User Guide
Page 3
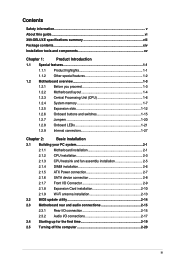
Contents Safety information...v About this guide...vi X99-DELUXE specifications summary viii Package contents...xiv Installation tools and components xv Chapter 1: Product Introduction 1.1 Special features ... 2-6 2.1.5 ATX Power connection 2-7 2.1.6 SATA device connection 2-8 2.1.7 Front I/O Connector 2-9 2.1.8 Expansion Card installation 2-10 2.1.9 Wi-Fi antenna installation 2-13 2.2 BIOS update utility 2-14 2.3 Motherboard rear and audio connections 2-15 2.3.1 Rear I/O connection 2-15 2.3.2 Audio I/O connections 2-17 2.4 Starting up for the first time 2-19...
Contents Safety information...v About this guide...vi X99-DELUXE specifications summary viii Package contents...xiv Installation tools and components xv Chapter 1: Product Introduction 1.1 Special features ... 2-6 2.1.5 ATX Power connection 2-7 2.1.6 SATA device connection 2-8 2.1.7 Front I/O Connector 2-9 2.1.8 Expansion Card installation 2-10 2.1.9 Wi-Fi antenna installation 2-13 2.2 BIOS update utility 2-14 2.3 Motherboard rear and audio connections 2-15 2.3.1 Rear I/O connection 2-15 2.3.2 Audio I/O connections 2-17 2.4 Starting up for the first time 2-19...
User Guide
Page 4
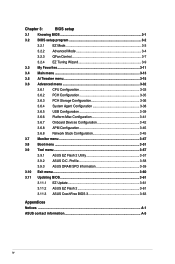
Chapter 3: BIOS setup 3.1 Knowing BIOS 3-1 3.2 BIOS setup program 3-2 3.2.1 EZ Mode 3-3 3.2.2 Advanced Mode 3-4 3.2.3 QFan Control 3-7 3.2.4 EZ Tuning Wizard 3-9 3.3 My Favorites 3-11 3.4 Main menu 3-13... 3-45 3.7 Monitor menu 3-47 3.8 Boot menu 3-51 3.9 Tool menu 3-57 3.9.1 ASUS EZ Flash 2 Utility 3-57 3.9.2 ASUS O.C. Profile 3-58 3.9.3 ASUS DRAM SPD Information 3-59 3.10 Exit menu 3-60 3.11 Updating BIOS 3-61 3.11.1 EZ Update 3-61 3.11.2 ASUS EZ Flash 2 3-61 3.11.3 ASUS CrashFree BIOS 3 3-63 Appendices Notices ...A-1 ASUS contact information A-5 iv
Chapter 3: BIOS setup 3.1 Knowing BIOS 3-1 3.2 BIOS setup program 3-2 3.2.1 EZ Mode 3-3 3.2.2 Advanced Mode 3-4 3.2.3 QFan Control 3-7 3.2.4 EZ Tuning Wizard 3-9 3.3 My Favorites 3-11 3.4 Main menu 3-13... 3-45 3.7 Monitor menu 3-47 3.8 Boot menu 3-51 3.9 Tool menu 3-57 3.9.1 ASUS EZ Flash 2 Utility 3-57 3.9.2 ASUS O.C. Profile 3-58 3.9.3 ASUS DRAM SPD Information 3-59 3.10 Exit menu 3-60 3.11 Updating BIOS 3-61 3.11.1 EZ Update 3-61 3.11.2 ASUS EZ Flash 2 3-61 3.11.3 ASUS CrashFree BIOS 3 3-63 Appendices Notices ...A-1 ASUS contact information A-5 iv
User Guide
Page 6
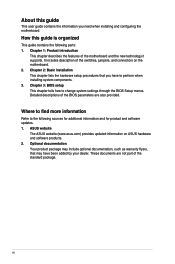
... guide is organized This guide contains the following sources for additional information and for product and software updates. 1. ASUS website The ASUS website (www.asus.com) provides updated information on the motherboard. 2. These documents are also provided. Chapter 3: BIOS setup This chapter tells how to the following parts: 1. Chapter 1: Product introduction This chapter describes the features...
... guide is organized This guide contains the following sources for additional information and for product and software updates. 1. ASUS website The ASUS website (www.asus.com) provides updated information on the motherboard. 2. These documents are also provided. Chapter 3: BIOS setup This chapter tells how to the following parts: 1. Chapter 1: Product introduction This chapter describes the features...
User Guide
Page 13
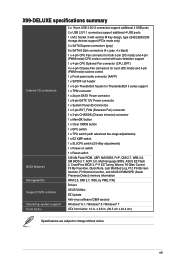
... information WfM 2.0, DMI 2.7, WOL by PME, PXE Drivers ASUS Utilities EZ Update Anti-virus software (OEM version) Windows® 8.1 / Windows® 8 / Windows® 7 ATX form factor: 12 in . (30.5 cm x 24.4 cm) Specifications are subject to change without notice. X99-DELUXE specifications summary Internal I/O connectors BIOS features Manageability Support DVD contents Operating system support Form...
... information WfM 2.0, DMI 2.7, WOL by PME, PXE Drivers ASUS Utilities EZ Update Anti-virus software (OEM version) Windows® 8.1 / Windows® 8 / Windows® 7 ATX form factor: 12 in . (30.5 cm x 24.4 cm) Specifications are subject to change without notice. X99-DELUXE specifications summary Internal I/O connectors BIOS features Manageability Support DVD contents Operating system support Form...
User Guide
Page 32
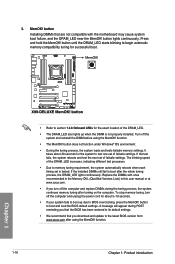
...DIMM is tested. function. 1-16 Chapter 1: Product introduction Chapter 1 It takes about 5-10 seconds. • If your system fails to BIOS overclocking, press the MemOK! Replace the DIMMs with the motherboard may cause system boot failure, and the DRAM_LED near the MemOK! If the ... 3. Turn off the computer and replace DIMMs during POST reminding you download and update to boot after turning on the computer. If the installed DIMMs still fail to the latest BIOS version from www.asus.com after using the MemOK! button does not function under Windows® OS environment...
...DIMM is tested. function. 1-16 Chapter 1: Product introduction Chapter 1 It takes about 5-10 seconds. • If your system fails to BIOS overclocking, press the MemOK! Replace the DIMMs with the motherboard may cause system boot failure, and the DRAM_LED near the MemOK! If the ... 3. Turn off the computer and replace DIMMs during POST reminding you download and update to boot after turning on the computer. If the installed DIMMs still fail to the latest BIOS version from www.asus.com after using the MemOK! button does not function under Windows® OS environment...

User Guide
Page 68
... again. • If the light flashes for three seconds to easily update the BIOS without entering the existing BIOS or operating system. Shut down your local ASUS Service Center. 2-14 Chapter 2: Basic installation For more BIOS update utilities in BIOS setup, refer to the section 3.11 Updating BIOS in green on the I /O connection for three seconds until the light...
... again. • If the light flashes for three seconds to easily update the BIOS without entering the existing BIOS or operating system. Shut down your local ASUS Service Center. 2-14 Chapter 2: Basic installation For more BIOS update utilities in BIOS setup, refer to the section 3.11 Updating BIOS in green on the I /O connection for three seconds until the light...

User Guide
Page 70
... run on xHCI mode or EHCI mode, depending on the operating system's setting. • USB 3.0 devices can disable the LAN controllers in BIOS. is under license. Other trademarks and trade names are those of their firmware for your USB 3.0 devices. • Due to the design of...owned by Bluetooth SIG, Inc. • The plugged USB 3.0 device may continue to blink even when disabled. Some legacy USB devices must update their respective owners. ** LAN ports LED indications Activity Link LED Speed LED Status Description Status Description Off No link Off 10 Mbps connection Orange...
... run on xHCI mode or EHCI mode, depending on the operating system's setting. • USB 3.0 devices can disable the LAN controllers in BIOS. is under license. Other trademarks and trade names are those of their firmware for your USB 3.0 devices. • Due to the design of...owned by Bluetooth SIG, Inc. • The plugged USB 3.0 device may continue to blink even when disabled. Some legacy USB devices must update their respective owners. ** LAN ports LED indications Activity Link LED Speed LED Status Description Status Description Off No link Off 10 Mbps connection Orange...
User Guide
Page 75
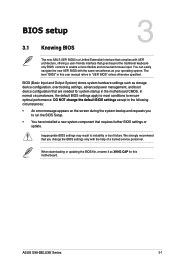
..., advanced power management, and boot device configuration that goes beyond the traditional keyboardonly BIOS controls to run the BIOS Setup. • You have installed a new system component that requires further BIOS settings or update. Chapter 3 ASUS X99-DELUXE Series 3-1 In normal circumstances, the default BIOS settings apply to most conditions to instability or boot failure. When downloading or...
..., advanced power management, and boot device configuration that goes beyond the traditional keyboardonly BIOS controls to run the BIOS Setup. • You have installed a new system component that requires further BIOS settings or update. Chapter 3 ASUS X99-DELUXE Series 3-1 In normal circumstances, the default BIOS settings apply to most conditions to instability or boot failure. When downloading or...

User Guide
Page 76
... menu or from the Exit/Advanced Mode screen. Chapter 3 3-2 Chapter 3: BIOS setup If you want to use the mouse to control the BIOS setup program. • If the system becomes unstable after changing any BIOS setting, load the default settings to update the BIOS or configure its routines. Select the Load Optimized Defaults item under...
... menu or from the Exit/Advanced Mode screen. Chapter 3 3-2 Chapter 3: BIOS setup If you want to use the mouse to control the BIOS setup program. • If the system becomes unstable after changing any BIOS setting, load the default settings to update the BIOS or configure its routines. Select the Load Optimized Defaults item under...

User Guide
Page 107
...allows the legacy OS to protect the CPU by decreasing its frequency as it reaches the thermal throttle point. Configuration options: [Disabled] [Enabled] ASUS X99-DELUXE Series 3-33 Configuration options: [Disabled] [Enabled] Execute Disable Bit [Enabled] Execute Disable prevents certain classes of malicious buffer overflow attacks when combined... [Enabled] This item allows you to enable/disable the Hyper-Threading for CPUs with a supporting OS (SuSE Linux 9.2, RedHat Enterprise 3 Update 3). 3.6.1 CPU Configuration The items in this menu show the CPU-related information that the...
...allows the legacy OS to protect the CPU by decreasing its frequency as it reaches the thermal throttle point. Configuration options: [Disabled] [Enabled] ASUS X99-DELUXE Series 3-33 Configuration options: [Disabled] [Enabled] Execute Disable Bit [Enabled] Execute Disable prevents certain classes of malicious buffer overflow attacks when combined... [Enabled] This item allows you to enable/disable the Hyper-Threading for CPUs with a supporting OS (SuSE Linux 9.2, RedHat Enterprise 3 Update 3). 3.6.1 CPU Configuration The items in this menu show the CPU-related information that the...

User Guide
Page 132
... you update the BIOS file only coming from Profile This item allows you to load the previous BIOS settings saved in the profile number that saved your USB drive, load and save the current BIOS settings ...to eight, press , and then select Yes. Load from the same memory/ CPU configuration and BIOS version. Key in the BIOS Flash. Load/Save Profile from... profile number from your BIOS settings, press , and then select Yes. • DO NOT shut down or reset the system while updating the BIOS to store or load multiple BIOS settings. Profile Name This ...
... you update the BIOS file only coming from Profile This item allows you to load the previous BIOS settings saved in the profile number that saved your USB drive, load and save the current BIOS settings ...to eight, press , and then select Yes. Load from the same memory/ CPU configuration and BIOS version. Key in the BIOS Flash. Load/Save Profile from... profile number from your BIOS settings, press , and then select Yes. • DO NOT shut down or reset the system while updating the BIOS to store or load multiple BIOS settings. Profile Name This ...

User Guide
Page 135
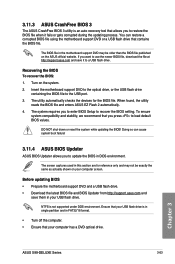
ASUS BIOS Updater: Updates the BIOS in DOS environment using the current version of the BIOS setup program. To update the BIOS using a USB flash drive. 3. Chapter 3 ASUS X99-DELUXE Series 3-61 Enter the Advanced Mode of BIOS, DO NOT manually update the BIOS. However, BIOS updating is no problem using the motherboard support DVD and a USB flash disk drive. 3.11.1 EZ Update The EZ Update is a utility that...
ASUS BIOS Updater: Updates the BIOS in DOS environment using the current version of the BIOS setup program. To update the BIOS using a USB flash drive. 3. Chapter 3 ASUS X99-DELUXE Series 3-61 Enter the Advanced Mode of BIOS, DO NOT manually update the BIOS. However, BIOS updating is no problem using the motherboard support DVD and a USB flash disk drive. 3.11.1 EZ Update The EZ Update is a utility that...

User Guide
Page 136
Press to switch to prevent system boot failure! Press the Up/Down arrow keys to perform the BIOS update process. Reboot the system when the update process is done. • This function can support devices such as a USB flash disk with FAT 32/16 format and single partition only. • DO ...NOT shut down or reset the system while updating the BIOS to the Drive field. 4. 3. Chapter 3 3-62 Chapter 3: BIOS setup Press the Up/Down arrow keys to find the BIOS file, and then press to find the USB flash disk that contains the latest...
Press to switch to prevent system boot failure! Press the Up/Down arrow keys to perform the BIOS update process. Reboot the system when the update process is done. • This function can support devices such as a USB flash disk with FAT 32/16 format and single partition only. • DO ...NOT shut down or reset the system while updating the BIOS to the Drive field. 4. 3. Chapter 3 3-62 Chapter 3: BIOS setup Press the Up/Down arrow keys to find the BIOS file, and then press to find the USB flash disk that contains the latest...
User Guide
Page 137
... press to the USB port. 3. The screen captures used in this section are for the BIOS file. You can cause system boot failure! 3.11.4 ASUS BIOS Updater ASUS BIOS Updater allows you to update the BIOS in FAT32/16 format. • Turn off the computer. • Ensure that your USB...to enter BIOS Setup to recover the BIOS setting. When found, the utility reads the BIOS file and enters ASUS EZ Flash 2 automatically. 4. The utility automatically checks the devices for reference only and may be exactly the same as actually shown on the system. 2. Chapter 3 ASUS X99-DELUXE Series 3-63...
... press to the USB port. 3. The screen captures used in this section are for the BIOS file. You can cause system boot failure! 3.11.4 ASUS BIOS Updater ASUS BIOS Updater allows you to update the BIOS in FAT32/16 format. • Turn off the computer. • Ensure that your USB...to enter BIOS Setup to recover the BIOS setting. When found, the utility reads the BIOS file and enters ASUS EZ Flash 2 automatically. 4. The utility automatically checks the devices for reference only and may be exactly the same as actually shown on the system. 2. Chapter 3 ASUS X99-DELUXE Series 3-63...
User Guide
Page 138
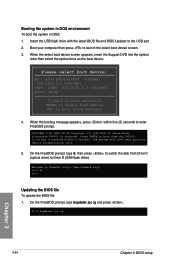
boot: 5. D:/> bupdater /pc /g Chapter 3 3-64 Chapter 3: BIOS setup On the FreeDOS prompt, type d: then press to switch the disk from the DVD/CD. Welcome to Drive D (USB flash drive). Please select boot device: E1: ASUS DVD-E818A6T (4069MB) USB DISK 2.0 (3824MB) UEFI: (FAT) USB... to launch the select boot device screen. 3. C:/> d: D:/> Updating the BIOS file To update the BIOS file: 1. ISOLINUX 3.20 2006-08-26 Copyright (C) 1994-2005 H. Insert the USB flash drive with the latest BIOS file and BIOS Updater to boot using defaults 4. On the FreeDOS prompt, type bupdater ...
boot: 5. D:/> bupdater /pc /g Chapter 3 3-64 Chapter 3: BIOS setup On the FreeDOS prompt, type d: then press to switch the disk from the DVD/CD. Welcome to Drive D (USB flash drive). Please select boot device: E1: ASUS DVD-E818A6T (4069MB) USB DISK 2.0 (3824MB) UEFI: (FAT) USB... to launch the select boot device screen. 3. C:/> d: D:/> Updating the BIOS file To update the BIOS file: 1. ISOLINUX 3.20 2006-08-26 Copyright (C) 1994-2005 H. Insert the USB flash drive with the latest BIOS file and BIOS Updater to boot using defaults 4. On the FreeDOS prompt, type bupdater ...

User Guide
Page 139
.... 5. When BIOS update is not supported due to exit BIOS Updater. 6. DO NOT shut down or reset the system while updating the BIOS to Drives panel then select D:. Chapter 3 ASUS X99-DELUXE Series 3-65 On the BIOS Updater screen, press to switch from Drives panel to Files panel then press keys to confirm the BIOS update. After the BIOS Updater checks the selected BIOS file, select...
.... 5. When BIOS update is not supported due to exit BIOS Updater. 6. DO NOT shut down or reset the system while updating the BIOS to Drives panel then select D:. Chapter 3 ASUS X99-DELUXE Series 3-65 On the BIOS Updater screen, press to switch from Drives panel to Files panel then press keys to confirm the BIOS update. After the BIOS Updater checks the selected BIOS file, select...


