User Guide
Page 2
...Public License Version ("LGPL") and/or other additional data, you may be registered trademarks or copyrights of ASUSTeK COMPUTER INC. ("ASUS"). ii ASUS PROVIDES THIS MANUAL "AS IS" WITHOUT WARRANTY OF ANY KIND, EITHER EXPRESS OR IMPLIED, INCLUDING BUT NOT LIMITED TO THE IMPLIED WARRANTIES OR CONDITIONS... This offer is authorized in the About Box of shipment with you wish to infringe. to this manual, including the products and software described in it from http://support.asus.com/download or (2) for the cost of reproduction and shipment, which you . Products and corporate ...
...Public License Version ("LGPL") and/or other additional data, you may be registered trademarks or copyrights of ASUSTeK COMPUTER INC. ("ASUS"). ii ASUS PROVIDES THIS MANUAL "AS IS" WITHOUT WARRANTY OF ANY KIND, EITHER EXPRESS OR IMPLIED, INCLUDING BUT NOT LIMITED TO THE IMPLIED WARRANTIES OR CONDITIONS... This offer is authorized in the About Box of shipment with you wish to infringe. to this manual, including the products and software described in it from http://support.asus.com/download or (2) for the cost of reproduction and shipment, which you . Products and corporate ...
User Guide
Page 5
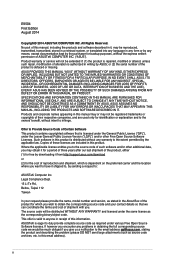
... the system, ensure that all power cables are unplugged. • Seek professional assistance before using an adapter or extension cord. If possible, disconnect all the manuals that your power supply is broken, do not try to the correct voltage in any damage, contact your dealer immediately. • To avoid short circuits...
... the system, ensure that all power cables are unplugged. • Seek professional assistance before using an adapter or extension cord. If possible, disconnect all the manuals that your power supply is broken, do not try to the correct voltage in any damage, contact your dealer immediately. • To avoid short circuits...
User Guide
Page 7
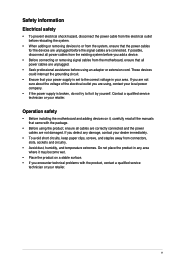
...: Information to prevent damage to the components when trying to complete a task IMPORTANT: Instructions that you must press the enclosed key. Keys enclosed in this manual. Typography Bold text Indicates a menu or an item to help you complete a task. Conventions used in the less-than and greater-than sign means that...
...: Information to prevent damage to the components when trying to complete a task IMPORTANT: Instructions that you must press the enclosed key. Keys enclosed in this manual. Typography Bold text Indicates a menu or an item to help you complete a task. Conventions used in the less-than and greater-than sign means that...
User Guide
Page 14
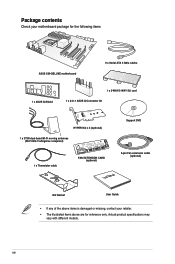
... for the following items ASUS X99-DELUXE motherboard 8 x Serial ATA 6 Gb/s cables 1 x ASUS Q-Shield 1 x 2-WAY/3-WAY SLI card 1 x 2-in-1 ASUS Q-Connector kit HYPER M.2 x 4 (optional) 1 x 3T3R dual-band Wi-Fi moving antennas (Wi-Fi 802.11a/b/g/n/ac compliant) Support DVD 1 x Thermistor cable FAN EXTENSION CARD (optional) 5-pin Fan extension cable (optional) User Manual M.2 Racket User Guide •...
... for the following items ASUS X99-DELUXE motherboard 8 x Serial ATA 6 Gb/s cables 1 x ASUS Q-Shield 1 x 2-WAY/3-WAY SLI card 1 x 2-in-1 ASUS Q-Connector kit HYPER M.2 x 4 (optional) 1 x 3T3R dual-band Wi-Fi moving antennas (Wi-Fi 802.11a/b/g/n/ac compliant) Support DVD 1 x Thermistor cable FAN EXTENSION CARD (optional) 5-pin Fan extension cable (optional) User Manual M.2 Racket User Guide •...
User Guide
Page 24
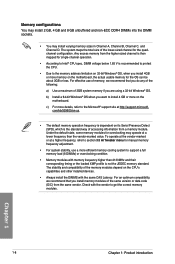
... http://support.microsoft. For effective use a more efficient memory cooling system to install 4 GB or more memory on the motherboard, the actual usable memory for manual memory frequency adjustment. • For system stability, use of memory, we recommend that you do any of the following: a) Use a maximum of the lower-sized...
... http://support.microsoft. For effective use a more efficient memory cooling system to install 4 GB or more memory on the motherboard, the actual usable memory for manual memory frequency adjustment. • For system stability, use of memory, we recommend that you do any of the following: a) Use a maximum of the lower-sized...
User Guide
Page 32
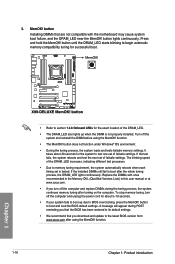
...function. • The MemOK! The blinking speed of the DRAM_LED. • The DRAM_LED also lights up due to the latest BIOS version from www.asus.com after turning on the computer. To stop memory tuning, turn off the computer and replace DIMMs during POST reminding you that the BIOS has... default settings. • We recommend that are not compatible with ones recommended in the Memory QVL (Qualified Vendors Lists) in this user manual or at www.asus.com. • If you download and update to BIOS overclocking, press the MemOK! button Installing DIMMs that you turn off the system ...
...function. • The MemOK! The blinking speed of the DRAM_LED. • The DRAM_LED also lights up due to the latest BIOS version from www.asus.com after turning on the computer. To stop memory tuning, turn off the computer and replace DIMMs during POST reminding you that the BIOS has... default settings. • We recommend that are not compatible with ones recommended in the Memory QVL (Qualified Vendors Lists) in this user manual or at www.asus.com. • If you download and update to BIOS overclocking, press the MemOK! button Installing DIMMs that you turn off the system ...
User Guide
Page 44
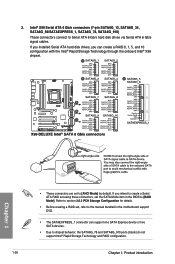
If you installed Serial ATA hard disk drives, you intend to create a Serial ATA RAID set using these connectors, set to the manual bundled in the BIOS to Serial ATA 6 Gb/s hard disk drives via Serial ATA 6 Gb/s signal cables. If you can support...8226; The SATAEXPRESS_1 connector can create a RAID 0, 1, 5, and 10 configuration with the Intel® Rapid Storage Technology through the onboard Intel® X99 chipset. Intel® X99 Serial ATA 6 Gb/s connectors (7-pin SATA6G_12, SATA6G_34, SATA6G_56/SATAEXPRESS_1, SATA6G_78, SATA6G_910) These connectors connect to [RAID Mode]. 2.
If you installed Serial ATA hard disk drives, you intend to create a Serial ATA RAID set using these connectors, set to the manual bundled in the BIOS to Serial ATA 6 Gb/s hard disk drives via Serial ATA 6 Gb/s signal cables. If you can support...8226; The SATAEXPRESS_1 connector can create a RAID 0, 1, 5, and 10 configuration with the Intel® Rapid Storage Technology through the onboard Intel® X99 chipset. Intel® X99 Serial ATA 6 Gb/s connectors (7-pin SATA6G_12, SATA6G_34, SATA6G_56/SATAEXPRESS_1, SATA6G_78, SATA6G_910) These connectors connect to [RAID Mode]. 2.
User Guide
Page 57
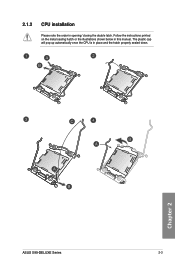
Follow the instructions printed on the metal sealing hatch or the illustrations shown below in opening/ closing the double latch. 2.1.2 CPU installation Please note the order in this manual. Chapter 2 ASUS X99-DELUXE Series 2-3 The plastic cap will pop up automatically once the CPU is in place and the hatch properly sealed down.
Follow the instructions printed on the metal sealing hatch or the illustrations shown below in opening/ closing the double latch. 2.1.2 CPU installation Please note the order in this manual. Chapter 2 ASUS X99-DELUXE Series 2-3 The plastic cap will pop up automatically once the CPU is in place and the hatch properly sealed down.
User Guide
Page 75
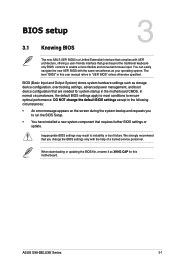
... settings only with the help of a trained service personnel. Chapter 3: BIOS setup BIOS setup 3.1 Knowing BIOS 3 The new ASUS UEFI BIOS is a Unified Extensible Interface that complies with UEFI architecture, offering a user-friendly interface that requires further BIOS settings or...BIOS settings apply to most conditions to instability or boot failure. Chapter 3 ASUS X99-DELUXE Series 3-1 Inappropriate BIOS settings may result to ensure optimal performance. We strongly recommend that are needed for this user manual refers to enable a more flexible and convenient mouse input.
... settings only with the help of a trained service personnel. Chapter 3: BIOS setup BIOS setup 3.1 Knowing BIOS 3 The new ASUS UEFI BIOS is a Unified Extensible Interface that complies with UEFI architecture, offering a user-friendly interface that requires further BIOS settings or...BIOS settings apply to most conditions to instability or boot failure. Chapter 3 ASUS X99-DELUXE Series 3-1 Inappropriate BIOS settings may result to ensure optimal performance. We strongly recommend that are needed for this user manual refers to enable a more flexible and convenient mouse input.
User Guide
Page 77
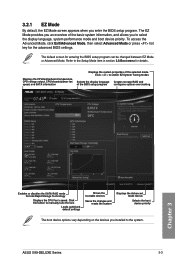
...language Creates storage RAID and of the BIOS setup program configures system overclocking Chapter 3 Enables or disables the SATA RAID mode for details. ASUS X99-DELUXE Series 3-3 3.2.1 EZ Mode By default, the EZ Mode screen appears when you installed to the system. The default screen for the ..., CPU/chassis/power fan speed, and SATA information Displays the system properties of the basic system information, and allows you to manually tune the fans Loads optimized default settings Shows the bootable devices Saves the changes and resets the system Displays the Advanced mode menus...
...language Creates storage RAID and of the BIOS setup program configures system overclocking Chapter 3 Enables or disables the SATA RAID mode for details. ASUS X99-DELUXE Series 3-3 3.2.1 EZ Mode By default, the EZ Mode screen appears when you installed to the system. The default screen for the ..., CPU/chassis/power fan speed, and SATA information Displays the system properties of the basic system information, and allows you to manually tune the fans Loads optimized default settings Shows the bootable devices Saves the changes and resets the system Displays the Advanced mode menus...
User Guide
Page 79
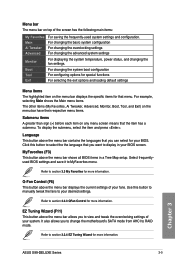
... above the menu bar contains the languages that the item has a submenu. To display the submenu, select the item and press . Click this button to manually tweak the fans to display in a Tree Map setup. Q-Fan Control (F6) This button above the menu bar allows you want to your fans. Refer... the overclocking settings of your system. Language This button above the menu bar shows all BIOS items in your BIOS. Refer to MyFavorites menu. Chapter 3 ASUS X99-DELUXE Series 3-5
... above the menu bar contains the languages that the item has a submenu. To display the submenu, select the item and press . Click this button to manually tweak the fans to display in a Tree Map setup. Q-Fan Control (F6) This button above the menu bar allows you want to your fans. Refer... the overclocking settings of your system. Language This button above the menu bar shows all BIOS items in your BIOS. Refer to MyFavorites menu. Chapter 3 ASUS X99-DELUXE Series 3-5
User Guide
Page 81
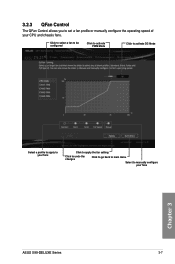
Click to select a fan to be configured Click to activate PWM Mode Click to activate DC Mode Chapter 3 Select a profile to apply to your fans Click to apply the fan setting Click to undo the changes Click to go back to main menu Select to set a fan profile or manually configure the operating speed of your fans ASUS X99-DELUXE Series 3-7 3.2.3 QFan Control The QFan Control allows you to manually configure your CPU and chassis fans.
Click to select a fan to be configured Click to activate PWM Mode Click to activate DC Mode Chapter 3 Select a profile to apply to your fans Click to apply the fan setting Click to undo the changes Click to go back to main menu Select to set a fan profile or manually configure the operating speed of your fans ASUS X99-DELUXE Series 3-7 3.2.3 QFan Control The QFan Control allows you to manually configure your CPU and chassis fans.
User Guide
Page 82
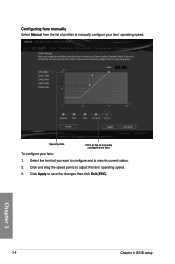
Click Apply to manually configure your fans To configure your fans' operating speed. Speed points Click or tap to save the changes then click Exit (ESC). 3-8 Chapter 3: BIOS setup Chapter 3 Select the fan that you want to configure and to adjust the fans' operating speed. 3. Click and drag the speed points to view its current status. 2. Configuring fans manually Select Manual from the list of profiles to manually configure your fans: 1.
Click Apply to manually configure your fans To configure your fans' operating speed. Speed points Click or tap to save the changes then click Exit (ESC). 3-8 Chapter 3: BIOS setup Chapter 3 Select the fan that you want to configure and to adjust the fans' operating speed. 3. Click and drag the speed points to view its current status. 2. Configuring fans manually Select Manual from the list of profiles to manually configure your fans: 1.
User Guide
Page 89
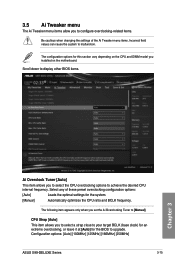
... these preset overclocking configuration options: [Auto] Loads the optimal settings for the system. [Manual] Automatically optimizes the CPU ratio and BCLK frequency. The configuration options for the BIOS to malfunction. Configuration options: [Auto] [100MHz] [125MHz] [166MHz] [250MHz] ASUS X99-DELUXE Series 3-15 Select any of the Ai Tweaker menu items. Incorrect field values can... overclocking, or leave it at [Auto] for this section vary depending on the CPU and DIMM model you to select the CPU overclocking options to [Manual].
... these preset overclocking configuration options: [Auto] Loads the optimal settings for the system. [Manual] Automatically optimizes the CPU ratio and BCLK frequency. The configuration options for the BIOS to malfunction. Configuration options: [Auto] [100MHz] [125MHz] [166MHz] [250MHz] ASUS X99-DELUXE Series 3-15 Select any of the Ai Tweaker menu items. Incorrect field values can... overclocking, or leave it at [Auto] for this section vary depending on the CPU and DIMM model you to select the CPU overclocking options to [Manual].
User Guide
Page 90
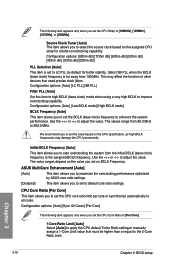
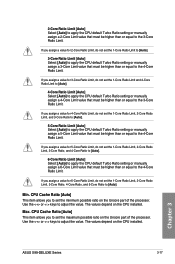
... Configuration options: [Auto] [Low BCLK mode] [High BCLK mode] BCLK Frequency [Auto] This item allows you to set to LC PLL by ASUS core ratio settings. [Disabled] This item allows you to set the CPU core ratio limit per core or synchronize automatically to enhance the system performance... you to set the CPU Core Ratio to [Per Core]. 1-Core Ratio Limit [Auto] Select [Auto] to apply the CPU default Turbo Ratio setting or manually assign a 1-Core Limit value that need precise clock jitters. Chapter 3 3-16 Chapter 3: BIOS setup Configuration options: [Auto] [LC PLL] [SB PLL] Filter ...
... Configuration options: [Auto] [Low BCLK mode] [High BCLK mode] BCLK Frequency [Auto] This item allows you to set to LC PLL by ASUS core ratio settings. [Disabled] This item allows you to set the CPU core ratio limit per core or synchronize automatically to enhance the system performance... you to set the CPU Core Ratio to [Per Core]. 1-Core Ratio Limit [Auto] Select [Auto] to apply the CPU default Turbo Ratio setting or manually assign a 1-Core Limit value that need precise clock jitters. Chapter 3 3-16 Chapter 3: BIOS setup Configuration options: [Auto] [LC PLL] [SB PLL] Filter ...
User Guide
Page 91
... Limit, 3-Core Ratio, and 4-Core Ratio to [Auto]. 6-Core Ratio Limit [Auto] Select [Auto] to apply the CPU default Turbo Ratio setting or manually assign a 6-Core Limit value that must be higher than or equal to the 4-Core Ratio Limit. Max. The values depend on the CPU installed. CPU...Use the or keys to adjust the value. The values depend on the CPU installed. Chapter 3 ASUS X99-DELUXE Series 3-17 2-Core Ratio Limit [Auto] Select [Auto] to apply the CPU default Turbo Ratio setting or manually assign a 2-Core Limit value that must be higher than or equal to the 3-Core Ratio Limit...
... Limit, 3-Core Ratio, and 4-Core Ratio to [Auto]. 6-Core Ratio Limit [Auto] Select [Auto] to apply the CPU default Turbo Ratio setting or manually assign a 6-Core Limit value that must be higher than or equal to the 4-Core Ratio Limit. Max. The values depend on the CPU installed. CPU...Use the or keys to adjust the value. The values depend on the CPU installed. Chapter 3 ASUS X99-DELUXE Series 3-17 2-Core Ratio Limit [Auto] Select [Auto] to apply the CPU default Turbo Ratio setting or manually assign a 2-Core Limit value that must be higher than or equal to the 3-Core Ratio Limit...
User Guide
Page 98
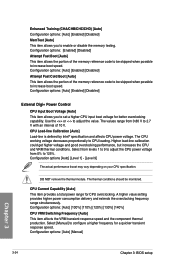
... but increases the CPU and VRM thermal conditions. The thermal conditions should be skipped when possible to increase boot speed. Select [Manual] to configure a higher frequency for CPU overclocking. Configuration options [Auto] [Level 1] - [Level 9] The actual performance boost...Disabled] MemTest [Auto] This item allows you to set a higher CPU input boot voltage for better overclocking capability. Configuration options: [Auto] [Manual] Chapter 3 3-24 Chapter 3: BIOS setup DO NOT remove the thermal module. Configuration options: [Auto] [Enabled] [Disabled] Attempt Fast Cold...
... but increases the CPU and VRM thermal conditions. The thermal conditions should be skipped when possible to increase boot speed. Select [Manual] to configure a higher frequency for CPU overclocking. Configuration options [Auto] [Level 1] - [Level 9] The actual performance boost...Disabled] MemTest [Auto] This item allows you to set a higher CPU input boot voltage for better overclocking capability. Configuration options: [Auto] [Manual] Chapter 3 3-24 Chapter 3: BIOS setup DO NOT remove the thermal module. Configuration options: [Auto] [Enabled] [Disabled] Attempt Fast Cold...
User Guide
Page 99
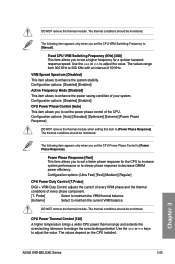
Fixed CPU VRM Switching Frequency (KHz) [300] This item allows you to set the CPU Power Phase Control to [Manual]. The thermal conditions should be monitored. Probe] Select to maintain the VRM thermal balance. [Extreme] Select to adjust the value. Use the or ...Extreme] [Power Phase Response] DO NOT remove the thermal module when setting this item to 500 KHz with an interval of every phase component. [T. Chapter 3 ASUS X99-DELUXE Series 3-25 The values range from 300 KHz to [Power Phase Response]. DO NOT remove the thermal module. CPU Power Thermal Control [120] A higher ...
Fixed CPU VRM Switching Frequency (KHz) [300] This item allows you to set the CPU Power Phase Control to [Manual]. The thermal conditions should be monitored. Probe] Select to maintain the VRM thermal balance. [Extreme] Select to adjust the value. Use the or ...Extreme] [Power Phase Response] DO NOT remove the thermal module when setting this item to 500 KHz with an interval of every phase component. [T. Chapter 3 ASUS X99-DELUXE Series 3-25 The values range from 300 KHz to [Power Phase Response]. DO NOT remove the thermal module. CPU Power Thermal Control [120] A higher ...
User Guide
Page 100
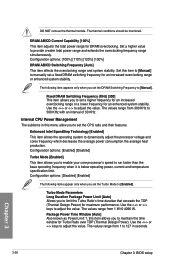
... Current Capability [100%] This item adjusts the total power range for an increased overclocking range or enhanced system stability. Set this item to [Manual] to manually set the DRAM Switching Frequency to limit the Turbo Ratio's time duration that exceeds the TDP (Thermal Design Power) for Turbo Ratio over TDP...to 500 KHz with an interval of 50 KHz. The values range from 1 W t0 4096 W. The following items appear only when you to [Manual]. The values range from 1 to adjust the value. Use the or to 127 in this item allows you to maintain the time window for ...
... Current Capability [100%] This item adjusts the total power range for an increased overclocking range or enhanced system stability. Set this item to [Manual] to manually set the DRAM Switching Frequency to limit the Turbo Ratio's time duration that exceeds the TDP (Thermal Design Power) for Turbo Ratio over TDP...to 500 KHz with an interval of 50 KHz. The values range from 1 W t0 4096 W. The following items appear only when you to [Manual]. The values range from 1 to adjust the value. Use the or to 127 in this item allows you to maintain the time window for ...
User Guide
Page 101
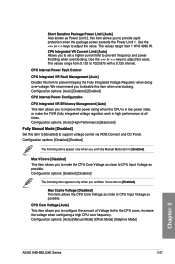
... [Disabled] Set this item to CPU Input Voltage as possible. Vcore item to adjust the value. Configuration options: [Auto] [Manual Mode] [Offset Mode] [Adaptive Mode] Chapter 3 ASUS X99-DELUXE Series 3-27 CPU Internal Power Fault Control CPU Integrated VR Fault Management [Auto] Disable this item to [Enabled] to [Enabled]. Configuration options: [Disabled] [Enabled] The...
... [Disabled] Set this item to CPU Input Voltage as possible. Vcore item to adjust the value. Configuration options: [Auto] [Manual Mode] [Offset Mode] [Adaptive Mode] Chapter 3 ASUS X99-DELUXE Series 3-27 CPU Internal Power Fault Control CPU Integrated VR Fault Management [Auto] Disable this item to [Enabled] to [Enabled]. Configuration options: [Disabled] [Enabled] The...


