X79-DELUXE User's Manual
Page 5
... Charger 4-20 4.4.5 Wi-Fi Engine 4-21 4.4.6 Wi-Fi GO 4-23 4.4.7 EZ Update 4-40 4.4.8 Network iControl 4-42 4.3.9 ASUS SSD Caching II 4-44 4.4.10 System Information 4-45 4.5 Audio configurations 4-46 Chapter 5: RAID support 5.1 RAID configurations 5-1 5.1.1 RAID definitions 5-1 5.1.2 Installing Serial ATA hard disks 5-2 5.1.3 Setting the RAID item in BIOS 5-2 5.1.4 Intel® Rapid Storage Technology Option ROM utility 5-3 5.1.5 Marvell...
... Charger 4-20 4.4.5 Wi-Fi Engine 4-21 4.4.6 Wi-Fi GO 4-23 4.4.7 EZ Update 4-40 4.4.8 Network iControl 4-42 4.3.9 ASUS SSD Caching II 4-44 4.4.10 System Information 4-45 4.5 Audio configurations 4-46 Chapter 5: RAID support 5.1 RAID configurations 5-1 5.1.1 RAID definitions 5-1 5.1.2 Installing Serial ATA hard disks 5-2 5.1.3 Setting the RAID item in BIOS 5-2 5.1.4 Intel® Rapid Storage Technology Option ROM utility 5-3 5.1.5 Marvell...

X79-DELUXE User's Manual
Page 7
...technology it supports. Optional documentation Your product package may have to the following parts: 1. These documents are also provided. 4. ASUS website The ASUS website (www.asus.com) provides updated information on the motherboard. 2. Chapter 1: Product introduction This chapter describes the features of the support DVD.... 1. Detailed descriptions of the BIOS parameters are not part of the switches, jumpers, and connectors on ASUS hardware and software products. 2. How this guide This user guide contains the information you have been added by your dealer. Chapter...
...technology it supports. Optional documentation Your product package may have to the following parts: 1. These documents are also provided. 4. ASUS website The ASUS website (www.asus.com) provides updated information on the motherboard. 2. Chapter 1: Product introduction This chapter describes the features of the support DVD.... 1. Detailed descriptions of the BIOS parameters are not part of the switches, jumpers, and connectors on ASUS hardware and software products. 2. How this guide This user guide contains the information you have been added by your dealer. Chapter...

X79-DELUXE User's Manual
Page 9
... QVL (Qualified Vendors List) for details. *** Refer to www.asus.com or this user manual for Intel® CPU support list. Functions are available when using PCIe 3.0-compliant devices. X79-DELUXE specifications summary CPU LGA2011 socket for the 2nd Generation Intel® ... NVIDIA® 3-Way SLI™ Technology Supports AMD® Quad-GPU CrossFireX™ Technology Intel® X79 Express Chipset - 2 x SATA 6Gb/s ports with RAID 0, 1, 5, and 10 support - 4 x SATA 3Gb/s ports with RAID 0, 1, 5, and 10 support Marvell® 9230 SATA controllers - 4 x SATA 6Gb/s ports ASMedia®...
... QVL (Qualified Vendors List) for details. *** Refer to www.asus.com or this user manual for Intel® CPU support list. Functions are available when using PCIe 3.0-compliant devices. X79-DELUXE specifications summary CPU LGA2011 socket for the 2nd Generation Intel® ... NVIDIA® 3-Way SLI™ Technology Supports AMD® Quad-GPU CrossFireX™ Technology Intel® X79 Express Chipset - 2 x SATA 6Gb/s ports with RAID 0, 1, 5, and 10 support - 4 x SATA 3Gb/s ports with RAID 0, 1, 5, and 10 support Marvell® 9230 SATA controllers - 4 x SATA 6Gb/s ports ASMedia®...

X79-DELUXE User's Manual
Page 50
...to [AHCI Mode] by default. If you can create a RAID 0, 1, 5, and 10 configuration with the Intel® Rapid Storage Technology through the onboard Intel® X79 chipset. Chapter 1 • These connectors are set , refer to section 5.1 RAID configurations or the manual bundled in the BIOS to create a... Serial ATA RAID set using these connectors, set the SATA Mode item in the...
...to [AHCI Mode] by default. If you can create a RAID 0, 1, 5, and 10 configuration with the Intel® Rapid Storage Technology through the onboard Intel® X79 chipset. Chapter 1 • These connectors are set , refer to section 5.1 RAID configurations or the manual bundled in the BIOS to create a... Serial ATA RAID set using these connectors, set the SATA Mode item in the...

X79-DELUXE User's Manual
Page 52
...connect to [AHCI Mode] by default. If you can create a RAID 0, 1, 5, and 10 configuration with the Intel® Rapid Storage Technology through the onboard Intel® X79 chipset. • These connectors are set , refer to section 5.1 RAID Configurations or the user manual bundled in the BIOS to create a... serial ATA RAID set using these connectors, set the SATA Mode item in the...
...connect to [AHCI Mode] by default. If you can create a RAID 0, 1, 5, and 10 configuration with the Intel® Rapid Storage Technology through the onboard Intel® X79 chipset. • These connectors are set , refer to section 5.1 RAID Configurations or the user manual bundled in the BIOS to create a... serial ATA RAID set using these connectors, set the SATA Mode item in the...

X79-DELUXE User's Manual
Page 104
... Mode] Set to [AHCI Mode] when you want the SATA hard disk drives to report warning messages during the POST. When read/write of commands. [RAID Mode] Set to [RAID Mode] when you want to the corresponding SATA port. S.M.A.R.T. Status Check [Enabled] S.M.A.R.T. (Self-Monitoring, Analysis and Reporting Technology) is installed to create...
... Mode] Set to [AHCI Mode] when you want the SATA hard disk drives to report warning messages during the POST. When read/write of commands. [RAID Mode] Set to [RAID Mode] when you want to the corresponding SATA port. S.M.A.R.T. Status Check [Enabled] S.M.A.R.T. (Self-Monitoring, Analysis and Reporting Technology) is installed to create...

X79-DELUXE User's Manual
Page 105
...] Enables the support for the BIOS setup program. SATA6G_6 [Black]) These items appear only when you set the SATA Mode Selection item to [AHCI] or [RAID], and allow you to change the USB-related features. Legacy USB Support [Enabled] [Enabled] Enables the support for USB devices on legacy operating systems (OS.... [Auto] Allows the system to enable or disable the support for USB 3.0 devices. If no USB device is detected, the legacy USB support is enabled. ASUS X79-DELUXE 3-27 Chapter 3
...] Enables the support for the BIOS setup program. SATA6G_6 [Black]) These items appear only when you set the SATA Mode Selection item to [AHCI] or [RAID], and allow you to change the USB-related features. Legacy USB Support [Enabled] [Enabled] Enables the support for USB devices on legacy operating systems (OS.... [Auto] Allows the system to enable or disable the support for USB 3.0 devices. If no USB device is detected, the legacy USB support is enabled. ASUS X79-DELUXE 3-27 Chapter 3
X79-DELUXE User's Manual
Page 130
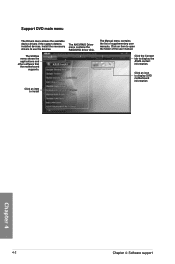
... manual. Click the Contact tab to install Chapter 4 4-2 Chapter 4: Software support Click an icon to display DVD/ motherboard information Click an item to display the ASUS contact information. Support DVD main menu The Drivers menu shows the available device drivers if the system detects installed devices. Install the necessary drivers to... supplementary user manuals. The Utilities menu shows the applications and other software that the motherboard supports. Click an item to use the devices. The AHCI/RAID Driver menu contains the RAID/AHCI driver disk.
... manual. Click the Contact tab to install Chapter 4 4-2 Chapter 4: Software support Click an icon to display DVD/ motherboard information Click an item to display the ASUS contact information. Support DVD main menu The Drivers menu shows the available device drivers if the system detects installed devices. Install the necessary drivers to... supplementary user manuals. The Utilities menu shows the applications and other software that the motherboard supports. Click an item to use the devices. The AHCI/RAID Driver menu contains the RAID/AHCI driver disk.

X79-DELUXE User's Manual
Page 177
... mirroring combined without parity (redundancy data) having to create a RAID driver disk and load the RAID driver during OS installation. With the RAID 10 configuration you have to be of a single disk alone, thus improving data access and storage. RAID 5 stripes both RAID 0 and RAID 1 configurations. Chapter 5 ASUS X79-DELUXE 5-1 If one drive to the entire system. If you...
... mirroring combined without parity (redundancy data) having to create a RAID driver disk and load the RAID driver during OS installation. With the RAID 10 configuration you have to be of a single disk alone, thus improving data access and storage. RAID 5 stripes both RAID 0 and RAID 1 configurations. Chapter 5 ASUS X79-DELUXE 5-1 If one drive to the entire system. If you...
X79-DELUXE User's Manual
Page 178
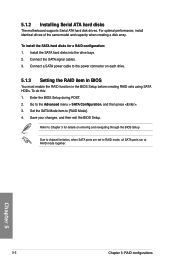
...hard disk drives. To install the SATA hard disks for details on each drive. 5.1.3 Setting the RAID item in BIOS You must enable the RAID function in the BIOS Setup before creating RAID sets using SATA HDDs. Set the SATA Mode item to the Advanced menu > SATA Configuration, and...to the power connector on entering and navigating through the BIOS Setup Due to chipset limitation, when SATA ports are set to Chapter 3 for a RAID configuration: 1. For optimal performance, install identical drives of the same model and capacity when creating a disk array. Enter the BIOS Setup during POST....
...hard disk drives. To install the SATA hard disks for details on each drive. 5.1.3 Setting the RAID item in BIOS You must enable the RAID function in the BIOS Setup before creating RAID sets using SATA HDDs. Set the SATA Mode item to the Advanced menu > SATA Configuration, and...to the power connector on entering and navigating through the BIOS Setup Due to chipset limitation, when SATA ports are set to Chapter 3 for a RAID configuration: 1. For optimal performance, install identical drives of the same model and capacity when creating a disk array. Enter the BIOS Setup during POST....

X79-DELUXE User's Manual
Page 179
All Rights Reserved. [ MAIN MENU ] 1. Recovery Volume Options 2. Chapter 5 ASUS X79-DELUXE 5-3 During POST, press + to Non-RAID 6. v10.5.1.1070 Copyright(C) 2003-10 Intel Corporation. Reset Disks to display the utility main menu. The utility supports maximum four hard disk...ST3160812AS 3 ST3160812AS Serial # 9LS0HJA4 9LS0F4HL 3LS0JYL8 9LS0BJ5H Size 149.0GB 149.0GB 149.0GB 149.0GB Type/Status(Vol ID) Non-RAID Disk Non-RAID Disk Non-RAID Disk Non-RAID Disk [↑↓]-Select [ESC]-Exit [ENTER]-Select Menu The navigation keys at the bottom of the screen allow you to ...
All Rights Reserved. [ MAIN MENU ] 1. Recovery Volume Options 2. Chapter 5 ASUS X79-DELUXE 5-3 During POST, press + to Non-RAID 6. v10.5.1.1070 Copyright(C) 2003-10 Intel Corporation. Reset Disks to display the utility main menu. The utility supports maximum four hard disk...ST3160812AS 3 ST3160812AS Serial # 9LS0HJA4 9LS0F4HL 3LS0JYL8 9LS0BJ5H Size 149.0GB 149.0GB 149.0GB 149.0GB Type/Status(Vol ID) Non-RAID Disk Non-RAID Disk Non-RAID Disk Non-RAID Disk [↑↓]-Select [ESC]-Exit [ENTER]-Select Menu The navigation keys at the bottom of the screen allow you to ...

X79-DELUXE User's Manual
Page 180
...press . The following screen appears: Intel(R) Rapid Storage Technology - Option ROM - v10.5.1.1070 Copyright(C) 2003-10 Intel Corporation. When the RAID Level item is 16 characters or less. [↑↓]-Select [ESC]-Exit [ENTER]-Select Menu 2. The SELECT DISKS screen appears: Port Drive... ] Serial # 9LS0HJA4 9LS0F4HL 3LS0JYL8 Size Status 149.0GB Non-RAID Disk 149.0GB Non-RAID Disk 149.0GB Non-RAID Disk 9LS0BJ5H 149.0GB Non-RAID Disk Select 2 to 6 disks to use in the RAID set and press . 3. Enter a name for the RAID set . All Rights Reserved. [ CREATE VOLUME MENU ] Name...
...press . The following screen appears: Intel(R) Rapid Storage Technology - Option ROM - v10.5.1.1070 Copyright(C) 2003-10 Intel Corporation. When the RAID Level item is 16 characters or less. [↑↓]-Select [ESC]-Exit [ENTER]-Select Menu 2. The SELECT DISKS screen appears: Port Drive... ] Serial # 9LS0HJA4 9LS0F4HL 3LS0JYL8 Size Status 149.0GB Non-RAID Disk 149.0GB Non-RAID Disk 149.0GB Non-RAID Disk 9LS0BJ5H 149.0GB Non-RAID Disk Select 2 to 6 disks to use in the RAID set and press . 3. Enter a name for the RAID set . All Rights Reserved. [ CREATE VOLUME MENU ] Name...

X79-DELUXE User's Manual
Page 181
...capacity. 8. Are you sure you want to 128KB. RAID 0: 128KB - When the Capacity item is selected, press . When the Create Volume item is selected, enter the RAID volume capacity that you want and press . Chapter 5 ASUS X79-DELUXE 5-5 Press after completing your selection. 6. 5. Use... the up /down arrow key to select a drive, and then press to the CREATE VOLUME menu. RAID 10: 64KB - The following are...
...capacity. 8. Are you sure you want to 128KB. RAID 0: 128KB - When the Capacity item is selected, press . When the Create Volume item is selected, enter the RAID volume capacity that you want and press . Chapter 5 ASUS X79-DELUXE 5-5 Press after completing your selection. 6. 5. Use... the up /down arrow key to select a drive, and then press to the CREATE VOLUME menu. RAID 10: 64KB - The following are...

X79-DELUXE User's Manual
Page 182
... ALL DATA IN THE VOLUME WILL BE LOST! (This does not apply to delete volume "Volume0"? (Y/N): 3. To delete a RAID set . Delete RAID Volume and press . Deleting a RAID set Be cautious when deleting a RAID set : 1. The following screen appears: Name Volume0 [ DELETE VOLUME MENU ] Level Drives RAID0(Stripe) 2 Capacity Status Bootable ... lose all data on the hard disk drives when you want to non-RAID. Use the up/down arrow key to select the RAID set you want to Recovery volumes) Are you sure you delete a RAID set and return to the utility main menu, or press to return to...
... ALL DATA IN THE VOLUME WILL BE LOST! (This does not apply to delete volume "Volume0"? (Y/N): 3. To delete a RAID set . Delete RAID Volume and press . Deleting a RAID set Be cautious when deleting a RAID set : 1. The following screen appears: Name Volume0 [ DELETE VOLUME MENU ] Level Drives RAID0(Stripe) 2 Capacity Status Bootable ... lose all data on the hard disk drives when you want to non-RAID. Use the up/down arrow key to select the RAID set you want to Recovery volumes) Are you sure you delete a RAID set and return to the utility main menu, or press to return to...
X79-DELUXE User's Manual
Page 183
...exact location of the Marvell SATA 6.0 Gb/s connector. Press to exit or press to return to the utility main menu. 5.1.5 Marvell RAID utility The onboard Marvell SATA 6.0 Gb/s controller allows you want to the drive status. To enter the Marvell utility, press + during...all your data in your hard disk drives before making any change to exit? (Y/N): 2. ENTER: Operation F10: Exit/Save ESC: Return Chapter 5 ASUS X79-DELUXE 5-7 From the utility main menu, select 5. Exiting the Intel® Rapid Storage Technology Option ROM utility To exit the utility: 1. Topology HBA 0:...
...exact location of the Marvell SATA 6.0 Gb/s connector. Press to exit or press to return to the utility main menu. 5.1.5 Marvell RAID utility The onboard Marvell SATA 6.0 Gb/s controller allows you want to the drive status. To enter the Marvell utility, press + during...all your data in your hard disk drives before making any change to exit? (Y/N): 2. ENTER: Operation F10: Exit/Save ESC: Return Chapter 5 ASUS X79-DELUXE 5-7 From the utility main menu, select 5. Exiting the Intel® Rapid Storage Technology Option ROM utility To exit the utility: 1. Topology HBA 0:...

X79-DELUXE User's Manual
Page 184
...Model : ST3160812AS Serial : 9LS0F4HL FW Version : 3.AAE ▶ ▶ Use space bar to select the free disks to be used in the RAID array. Select Configuration Wizard and press . Press to select the hard drives to be included in the array. An asterisk (*) appears in front of... selected hard drive. Marvell BIOS Setup (c) 2009 Marvell Technology Group Ltd. ENTER: Select F10: Exit/Save ESC: Return Chapter 5 5-8 Chapter 5: RAID configurations ENTER:Operation SPACE:Select F10:Exit/Save ESC:Return 3. Marvell BIOS Setup (c) 2009 Marvell Technology Group Ltd. Create...
...Model : ST3160812AS Serial : 9LS0F4HL FW Version : 3.AAE ▶ ▶ Use space bar to select the free disks to be used in the RAID array. Select Configuration Wizard and press . Press to select the hard drives to be included in the array. An asterisk (*) appears in front of... selected hard drive. Marvell BIOS Setup (c) 2009 Marvell Technology Group Ltd. ENTER: Select F10: Exit/Save ESC: Return Chapter 5 5-8 Chapter 5: RAID configurations ENTER:Operation SPACE:Select F10:Exit/Save ESC:Return 3. Marvell BIOS Setup (c) 2009 Marvell Technology Group Ltd. Create...

X79-DELUXE User's Manual
Page 185
... appears under Virtual Disks, as : 1B4B 9130 B1 1.0.0.1028 2.2.0.1105 5.0Gbps AHCI Mode ▶ ▶ Help Marvell RAID on the virtual disk. ENTER: Operation F10: Exit/Save ESC: Return Chapter 5 ASUS X79-DELUXE 5-9 Configuration options: [RAID 0] [RAID 1] Stripe Size: Specifies the size of drive capacity difference. The capacity of the rebuilt virtual disk equals to be...
... appears under Virtual Disks, as : 1B4B 9130 B1 1.0.0.1028 2.2.0.1105 5.0Gbps AHCI Mode ▶ ▶ Help Marvell RAID on the virtual disk. ENTER: Operation F10: Exit/Save ESC: Return Chapter 5 ASUS X79-DELUXE 5-9 Configuration options: [RAID 0] [RAID 1] Stripe Size: Specifies the size of drive capacity difference. The capacity of the rebuilt virtual disk equals to be...

X79-DELUXE User's Manual
Page 186
... message appears: Delete Virtual Disk Do you want to exit from this virtual disk ? Yes No Press to delete the selected RAID array. The following warning message appears: Exit Do you want to delete the Master Boot Record (MBR) from Marvell BIOS Setup...Marvell 0 ID ├ Virtual Disks Name │ └ VD 0: New_VD [Delete]Status │ ├ PD 0: ST3160812AS Stripte Size │ └ PD 8: ST3160812AS RAID Mode └ Free Physical Disks Size BGA Status Number of PDs Members :0 : New_VD : Functional : 64K : RAID0 : 304128MB : N/A :2 :0 8 ▶ ▶ Help...
... message appears: Delete Virtual Disk Do you want to exit from this virtual disk ? Yes No Press to delete the selected RAID array. The following warning message appears: Exit Do you want to delete the Master Boot Record (MBR) from Marvell BIOS Setup...Marvell 0 ID ├ Virtual Disks Name │ └ VD 0: New_VD [Delete]Status │ ├ PD 0: ST3160812AS Stripte Size │ └ PD 8: ST3160812AS RAID Mode └ Free Physical Disks Size BGA Status Number of PDs Members :0 : New_VD : Functional : 64K : RAID0 : 304128MB : N/A :2 :0 8 ▶ ▶ Help...
X79-DELUXE User's Manual
Page 187
.... 6. When the Make Disk menu appears, press to use a USB floppy disk drive when creating a SATA RAID driver disk. 5.2.1 Creating a RAID driver disk without entering the OS To create a RAID driver disk without entering the OS: 1. Chapter 5 ASUS X79-DELUXE 5-11 Boot your computer. 2. Insert a formatted floppy disk into the optical drive. 5. The motherboard does not...
.... 6. When the Make Disk menu appears, press to use a USB floppy disk drive when creating a SATA RAID driver disk. 5.2.1 Creating a RAID driver disk without entering the OS To create a RAID driver disk without entering the OS: 1. Chapter 5 ASUS X79-DELUXE 5-11 Boot your computer. 2. Insert a formatted floppy disk into the optical drive. 5. The motherboard does not...

X79-DELUXE User's Manual
Page 188
...3. Write-protect the floppy disk to load the UEFI driver for the corresponding OS version. Click OK. 4. Chapter 5 5-12 Chapter 5: RAID configurations Select 32bit or 64bit folder depending on your USB floppy disk drive. Start Windows®. 2. Place the motherboard support DVD into the ...optical drive, and then click Browse. 3. 5.2.2 Creating a RAID driver disk in Windows® To create a RAID driver disk in Windows®: 1. During the OS installation, click Load Driver to allow you to the USB flash ...
...3. Write-protect the floppy disk to load the UEFI driver for the corresponding OS version. Click OK. 4. Chapter 5 5-12 Chapter 5: RAID configurations Select 32bit or 64bit folder depending on your USB floppy disk drive. Start Windows®. 2. Place the motherboard support DVD into the ...optical drive, and then click Browse. 3. 5.2.2 Creating a RAID driver disk in Windows® To create a RAID driver disk in Windows®: 1. During the OS installation, click Load Driver to allow you to the USB flash ...


