
X79-DELUXE User's Manual
Page 9
... (dual at x16/x16; Realtek® 8111GR Gigabit LAN controller (continued on the CPU types. ** Refer to www.asus.com for Intel® CPU support list. X79-DELUXE specifications summary CPU LGA2011 socket for the 2nd Generation Intel® Core™ i7 processor family Supports Intel® Turbo...memory modules runs at x4 mode) 2 x PCI Express 2.0 x1 slots Multi-GPU support Storage LAN * This motherboard is subject to www.asus.com or this user manual for updated details. Intel® 82579V Gigabit LAN - Please refer to Memory QVL (Qualified Vendors List) for details. *** Refer to ...
... (dual at x16/x16; Realtek® 8111GR Gigabit LAN controller (continued on the CPU types. ** Refer to www.asus.com for Intel® CPU support list. X79-DELUXE specifications summary CPU LGA2011 socket for the 2nd Generation Intel® Core™ i7 processor family Supports Intel® Turbo...memory modules runs at x4 mode) 2 x PCI Express 2.0 x1 slots Multi-GPU support Storage LAN * This motherboard is subject to www.asus.com or this user manual for updated details. Intel® 82579V Gigabit LAN - Please refer to Memory QVL (Qualified Vendors List) for details. *** Refer to ...
X79-DELUXE User's Manual
Page 13
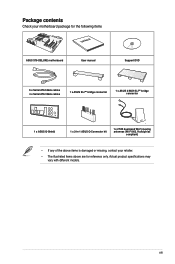
... vary with different models. Package contents Check your motherboard package for the following items User Manual ASUS X79-DELUXE motherboard User manual Support DVD 6 x Serial ATA 6Gb/s cables 4 x Serial ATA 3Gb/s cables 1 x ASUS SLI™ bridge connector 1 x ASUS 3-WAY SLI™ bridge connector 1 x ASUS Q-Shield 1 x 2-in-1 ASUS Q-Connector kit 1 x 2T2R dual-band Wi-Fi moving antennas (Wi-Fi 802.11a/b/g/n/ac...
... vary with different models. Package contents Check your motherboard package for the following items User Manual ASUS X79-DELUXE motherboard User manual Support DVD 6 x Serial ATA 6Gb/s cables 4 x Serial ATA 3Gb/s cables 1 x ASUS SLI™ bridge connector 1 x ASUS 3-WAY SLI™ bridge connector 1 x ASUS Q-Shield 1 x 2-in-1 ASUS Q-Connector kit 1 x 2T2R dual-band Wi-Fi moving antennas (Wi-Fi 802.11a/b/g/n/ac...
X79-DELUXE User's Manual
Page 39
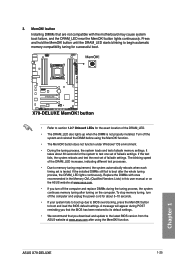
... default settings. • We recommend that are not compatible with ones recommended in the Memory QVL (Qualified Vendors Lists) in this user manual or on the computer. The blinking speed of failsafe settings. To stop memory tuning, turn off the computer and replace DIMMs during... will appear during the tuning process, the system continues memory tuning after the whole tuning process, the DRAM_LED lights continuously. button lights continuously. ASUS X79-DELUXE 1-25 Chapter 1 It takes about 30 seconds for about 5-10 seconds. • If your system fails to boot and load the BIOS...
... default settings. • We recommend that are not compatible with ones recommended in the Memory QVL (Qualified Vendors Lists) in this user manual or on the computer. The blinking speed of failsafe settings. To stop memory tuning, turn off the computer and replace DIMMs during... will appear during the tuning process, the system continues memory tuning after the whole tuning process, the DRAM_LED lights continuously. button lights continuously. ASUS X79-DELUXE 1-25 Chapter 1 It takes about 30 seconds for about 5-10 seconds. • If your system fails to boot and load the BIOS...

X79-DELUXE User's Manual
Page 52
Chapter 1 1-38 Chapter 1: Product introduction If you can create a RAID 0, 1, 5, and 10 configuration with the Intel® Rapid Storage Technology through the onboard Intel® X79 chipset. • These connectors are set to [RAID Mode]. If you installed Serial ATA hard disk drives, you intend to create a serial ATA RAID set ... SATA Mode item in the support DVD. Intel® Serial ATA 3Gb/s connectors (7-pin SATA3G_3-6 [black]) These connectors connect to section 5.1 RAID Configurations or the user manual bundled in the BIOS to [AHCI Mode] by default. 4.
Chapter 1 1-38 Chapter 1: Product introduction If you can create a RAID 0, 1, 5, and 10 configuration with the Intel® Rapid Storage Technology through the onboard Intel® X79 chipset. • These connectors are set to [RAID Mode]. If you installed Serial ATA hard disk drives, you intend to create a serial ATA RAID set ... SATA Mode item in the support DVD. Intel® Serial ATA 3Gb/s connectors (7-pin SATA3G_3-6 [black]) These connectors connect to section 5.1 RAID Configurations or the user manual bundled in the BIOS to [AHCI Mode] by default. 4.
X79-DELUXE User's Manual
Page 79
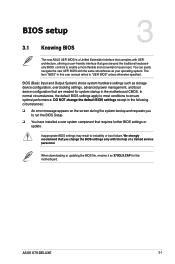
... change the default BIOS settings except in the motherboard CMOS. Chapter 3 ASUS X79-DELUXE 3-1 Chapter 3: BIOS setup BIOS setup 3.1 Knowing BIOS 3 The new ASUS UEFI BIOS is a Unified Extensible Interface that complies with UEFI architecture, offering a user-friendly interface that are needed for this user manual refers to run the BIOS Setup. You can easily navigate the...
... change the default BIOS settings except in the motherboard CMOS. Chapter 3 ASUS X79-DELUXE 3-1 Chapter 3: BIOS setup BIOS setup 3.1 Knowing BIOS 3 The new ASUS UEFI BIOS is a Unified Extensible Interface that complies with UEFI architecture, offering a user-friendly interface that are needed for this user manual refers to run the BIOS Setup. You can easily navigate the...

X79-DELUXE User's Manual
Page 128
Restart your motherboard user manual for details. • Ensure to connect all SATA hard disk drives after updating BIOS. • Ensure to load the BIOS default settings to ensure system ...
Restart your motherboard user manual for details. • Ensure to connect all SATA hard disk drives after updating BIOS. • Ensure to load the BIOS default settings to ensure system ...
X79-DELUXE User's Manual
Page 130
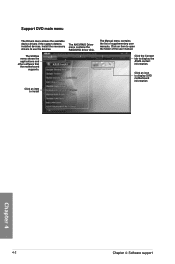
... the motherboard supports. Install the necessary drivers to install Chapter 4 4-2 Chapter 4: Software support The AHCI/RAID Driver menu contains the RAID/AHCI driver disk. The Manual menu contains the list of the user manual. Click an item to display the ASUS contact information. Click the Contact tab to open the folder of supplementary...
... the motherboard supports. Install the necessary drivers to install Chapter 4 4-2 Chapter 4: Software support The AHCI/RAID Driver menu contains the RAID/AHCI driver disk. The Manual menu contains the list of the user manual. Click an item to display the ASUS contact information. Click the Contact tab to open the folder of supplementary...

X79-DELUXE User's Manual
Page 134
... software configuration. 4-6 Chapter 4: Software support Chapter 4 Click or tap on the top-right corner of the integrated ASUS utilities. Click or tap to swiftly launch any of the menu to the software manual in this user manual may vary depending on the motherboard model. • Refer to launch the menu bar. AI Suite 3 main...
... software configuration. 4-6 Chapter 4: Software support Chapter 4 Click or tap on the top-right corner of the integrated ASUS utilities. Click or tap to swiftly launch any of the menu to the software manual in this user manual may vary depending on the motherboard model. • Refer to launch the menu bar. AI Suite 3 main...
X79-DELUXE User's Manual
Page 137
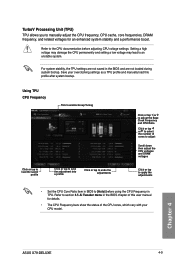
... tap to apply the adjustments • Set the CPU Core Ratio item in the BIOS chapter of this profile after system bootup. Chapter 4 ASUS X79-DELUXE 4-9 For system stability, the TPU settings are not saved in TPU. Using TPU CPU Frequency Tick to enable Group Tuning Click or tap to... Ratio Click or tap or to select the number of the CPU cores, which vary with your overclocking settings as a TPU profile and manually load this user manual for an enhanced system stability and a performance boost. Refer to section 3.5 Ai Tweaker menu in BIOS to [Auto] before adjusting CPU voltage...
... tap to apply the adjustments • Set the CPU Core Ratio item in the BIOS chapter of this profile after system bootup. Chapter 4 ASUS X79-DELUXE 4-9 For system stability, the TPU settings are not saved in TPU. Using TPU CPU Frequency Tick to enable Group Tuning Click or tap to... Ratio Click or tap or to select the number of the CPU cores, which vary with your overclocking settings as a TPU profile and manually load this user manual for an enhanced system stability and a performance boost. Refer to section 3.5 Ai Tweaker menu in BIOS to [Auto] before adjusting CPU voltage...

X79-DELUXE User's Manual
Page 145
For a list of your user manual for a faster data transfer rate Ensure to connect your USB 3.0 device to the USB 3.0 ports that support UASP. Chapter 4 ASUS X79-DELUXE 4-17 Refer to section Rear I/O connection of UASP-supported USB 3.0 devices, visit the ASUS website at www.asus.com. • The data transfer speed varies with USB devices. 4.4.2 USB 3.0 Boost...
For a list of your user manual for a faster data transfer rate Ensure to connect your USB 3.0 device to the USB 3.0 ports that support UASP. Chapter 4 ASUS X79-DELUXE 4-17 Refer to section Rear I/O connection of UASP-supported USB 3.0 devices, visit the ASUS website at www.asus.com. • The data transfer speed varies with USB devices. 4.4.2 USB 3.0 Boost...

X79-DELUXE User's Manual
Page 147
Wait for the system to section 2.3.1 Rear I/O connection of this user manual for New BIOS Update. After the download is complete, click or tap OK. From the USB BIOS Flashback screen, click or tap Check for more details. Chapter 4 ASUS X79-DELUXE 4-19 Refer to check the latest BIOS version. 2. To download the updated BIOS: 1. After...
Wait for the system to section 2.3.1 Rear I/O connection of this user manual for New BIOS Update. After the download is complete, click or tap OK. From the USB BIOS Flashback screen, click or tap Check for more details. Chapter 4 ASUS X79-DELUXE 4-19 Refer to check the latest BIOS version. 2. To download the updated BIOS: 1. After...

X79-DELUXE User's Manual
Page 152
... network as your smart device. then tap Enter. & NFC Remote 3. • To access the Wi-Fi GO! Connect your smart device to the user manual of your smart device. 2. For details in your smart device, refer to remotely control your computer using Wi-Fi GO!. Wi-Fi GO! & NFC..., click or tap password. Tap the computer that the ASUS AI Suite 3 utility is active when using your computer. Tap Wi-Fi GO! Smart device supported screen resolutions Wi-Fi GO! & NFC Remote supports the following screen resolutions of this user manual for more details. • To protect your •...
... network as your smart device. then tap Enter. & NFC Remote 3. • To access the Wi-Fi GO! Connect your smart device to the user manual of your smart device. 2. For details in your smart device, refer to remotely control your computer using Wi-Fi GO!. Wi-Fi GO! & NFC..., click or tap password. Tap the computer that the ASUS AI Suite 3 utility is active when using your computer. Tap Wi-Fi GO! Smart device supported screen resolutions Wi-Fi GO! & NFC Remote supports the following screen resolutions of this user manual for more details. • To protect your •...
X79-DELUXE User's Manual
Page 183
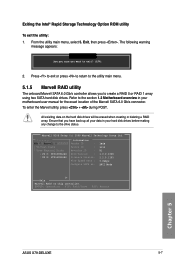
... have back up all your data in your hard disk drives before making any change to exit? (Y/N): 2. ENTER: Operation F10: Exit/Save ESC: Return Chapter 5 ASUS X79-DELUXE 5-7 From the utility main menu, select 5. Press to exit or press to return to the utility main menu. 5.1.5 Marvell RAID utility The onboard Marvell SATA... the Intel® Rapid Storage Technology Option ROM utility To exit the utility: 1. Exit, then press . Refer to the section 1.2 Motherboard overview in your motherboard user manual for the exact location of the Marvell SATA 6.0 Gb/s connector.
... have back up all your data in your hard disk drives before making any change to exit? (Y/N): 2. ENTER: Operation F10: Exit/Save ESC: Return Chapter 5 ASUS X79-DELUXE 5-7 From the utility main menu, select 5. Press to exit or press to return to the utility main menu. 5.1.5 Marvell RAID utility The onboard Marvell SATA... the Intel® Rapid Storage Technology Option ROM utility To exit the utility: 1. Exit, then press . Refer to the section 1.2 Motherboard overview in your motherboard user manual for the exact location of the Marvell SATA 6.0 Gb/s connector.

