X79-DELUXE User's Manual
Page 5
... Charger 4-20 4.4.5 Wi-Fi Engine 4-21 4.4.6 Wi-Fi GO 4-23 4.4.7 EZ Update 4-40 4.4.8 Network iControl 4-42 4.3.9 ASUS SSD Caching II 4-44 4.4.10 System Information 4-45 4.5 Audio configurations 4-46 Chapter 5: RAID support 5.1 RAID configurations 5-1 5.1.1 RAID definitions 5-1 5.1.2 Installing Serial ATA hard disks 5-2 5.1.3 Setting the RAID item in BIOS 5-2 5.1.4 Intel® Rapid Storage Technology Option ROM utility 5-3 5.1.5 Marvell...
... Charger 4-20 4.4.5 Wi-Fi Engine 4-21 4.4.6 Wi-Fi GO 4-23 4.4.7 EZ Update 4-40 4.4.8 Network iControl 4-42 4.3.9 ASUS SSD Caching II 4-44 4.4.10 System Information 4-45 4.5 Audio configurations 4-46 Chapter 5: RAID support 5.1 RAID configurations 5-1 5.1.1 RAID definitions 5-1 5.1.2 Installing Serial ATA hard disks 5-2 5.1.3 Setting the RAID item in BIOS 5-2 5.1.4 Intel® Rapid Storage Technology Option ROM utility 5-3 5.1.5 Marvell...

X79-DELUXE User's Manual
Page 7
... Product introduction This chapter describes the features of the standard package. Chapter 5: RAID support This chapter describes the RAID configurations. It includes description of the switches, jumpers, and connectors on ASUS hardware and software products. 2. Chapter 4: Software support This chapter describes the ... technology it supports. Where to find more information Refer to change system settings through the BIOS Setup menus. ASUS website The ASUS website (www.asus.com) provides updated information on the motherboard. 2. Chapter 3: BIOS setup This chapter tells how to the ...
... Product introduction This chapter describes the features of the standard package. Chapter 5: RAID support This chapter describes the RAID configurations. It includes description of the switches, jumpers, and connectors on ASUS hardware and software products. 2. Chapter 4: Software support This chapter describes the ... technology it supports. Where to find more information Refer to change system settings through the BIOS Setup menus. ASUS website The ASUS website (www.asus.com) provides updated information on the motherboard. 2. Chapter 3: BIOS setup This chapter tells how to the ...

X79-DELUXE User's Manual
Page 9
... PCI Express 2.0 x1 slots Multi-GPU support Storage LAN * This motherboard is ready to www.asus.com or this user manual for the Memory QVL (Qualified Vendors List). 3 x PCI Express... AMD® Quad-GPU CrossFireX™ Technology Intel® X79 Express Chipset - 2 x SATA 6Gb/s ports with RAID 0, 1, 5, and 10 support - 4 x SATA 3Gb/s ports with RAID 0, 1, 5, and 10 support Marvell® 9230 SATA controllers...modules runs at x16/x16; Refer to the physical characteristics of individual CPUs. X79-DELUXE specifications summary CPU LGA2011 socket for the 2nd Generation Intel® Core™...
... PCI Express 2.0 x1 slots Multi-GPU support Storage LAN * This motherboard is ready to www.asus.com or this user manual for the Memory QVL (Qualified Vendors List). 3 x PCI Express... AMD® Quad-GPU CrossFireX™ Technology Intel® X79 Express Chipset - 2 x SATA 6Gb/s ports with RAID 0, 1, 5, and 10 support - 4 x SATA 3Gb/s ports with RAID 0, 1, 5, and 10 support Marvell® 9230 SATA controllers...modules runs at x16/x16; Refer to the physical characteristics of individual CPUs. X79-DELUXE specifications summary CPU LGA2011 socket for the 2nd Generation Intel® Core™...

X79-DELUXE User's Manual
Page 50
Refer to section 3.6.4 SATA Configuration for details. • Before creating a RAID set, refer to section 5.1 RAID configurations or the manual bundled in the BIOS to [RAID Mode]. Intel® X79 Serial ATA 6Gb/s connectors (7-pin SATA6G_1/2 [black] These connectors connect to [AHCI Mode] by default..../s hard disk drives via Serial ATA 6Gb/s signal cables. If you can create a RAID 0, 1, 5, and 10 configuration with the Intel® Rapid Storage Technology through the onboard Intel® X79 chipset. 1.2.8 Internal connectors 1. Chapter 1 • These connectors are set the SATA Mode...
Refer to section 3.6.4 SATA Configuration for details. • Before creating a RAID set, refer to section 5.1 RAID configurations or the manual bundled in the BIOS to [RAID Mode]. Intel® X79 Serial ATA 6Gb/s connectors (7-pin SATA6G_1/2 [black] These connectors connect to [AHCI Mode] by default..../s hard disk drives via Serial ATA 6Gb/s signal cables. If you can create a RAID 0, 1, 5, and 10 configuration with the Intel® Rapid Storage Technology through the onboard Intel® X79 chipset. 1.2.8 Internal connectors 1. Chapter 1 • These connectors are set the SATA Mode...

X79-DELUXE User's Manual
Page 52
... 10 configuration with the Intel® Rapid Storage Technology through the onboard Intel® X79 chipset. • These connectors are set to section 3.6.4 SATA Configuration for details. • Before creating a RAID set the SATA Mode item in the support DVD. Chapter 1 1-38 Chapter 1: Product introduction Intel...Mode] by default. If you installed Serial ATA hard disk drives, you intend to create a serial ATA RAID set using these connectors, set , refer to section 5.1 RAID Configurations or the user manual bundled in the BIOS to Serial ATA 3Gb/s hard disk drives and optical ...
... 10 configuration with the Intel® Rapid Storage Technology through the onboard Intel® X79 chipset. • These connectors are set to section 3.6.4 SATA Configuration for details. • Before creating a RAID set the SATA Mode item in the support DVD. Chapter 1 1-38 Chapter 1: Product introduction Intel...Mode] by default. If you installed Serial ATA hard disk drives, you intend to create a serial ATA RAID set using these connectors, set , refer to section 5.1 RAID Configurations or the user manual bundled in the BIOS to Serial ATA 3Gb/s hard disk drives and optical ...

X79-DELUXE User's Manual
Page 104
... Serial ATA features that increases storage performance on random workloads by allowing the drive to internally optimize the order of commands. [RAID Mode] Set to [RAID Mode] when you want the SATA hard disk drives to use the Serial ATA hard disk drives as Parallel ATA physical storage... devices. [AHCI Mode] Set to [AHCI Mode] when you want to create a RAID configuration from the SATA hard disk drives. When read/write of SATA devices. Configuration options: [Enabled] [Disabled] 3-26 Chapter 3: BIOS setup 3.6.4 ...
... Serial ATA features that increases storage performance on random workloads by allowing the drive to internally optimize the order of commands. [RAID Mode] Set to [RAID Mode] when you want the SATA hard disk drives to use the Serial ATA hard disk drives as Parallel ATA physical storage... devices. [AHCI Mode] Set to [AHCI Mode] when you want to create a RAID configuration from the SATA hard disk drives. When read/write of SATA devices. Configuration options: [Enabled] [Disabled] 3-26 Chapter 3: BIOS setup 3.6.4 ...

X79-DELUXE User's Manual
Page 105
...the EHCI Hand-off support. SATA6G_6 [Black]) These items appear only when you set the SATA Mode Selection item to [AHCI] or [RAID], and allow you to detect the presence of USB devices at startup. If no USB device is disabled. Legacy USB3.0 Support [Enabled]... USB devices can be recognized in this menu allow you to enable or disable the support for USB 3.0 devices. Hot Plug [Disabled] (SATA6G_1 - ASUS X79-DELUXE 3-27 Chapter 3 If detected, the USB controller legacy mode is enabled. Configuration options: [Disabled] [Enabled] EHCI Hand-off [Disabled] [Enabled] ...
...the EHCI Hand-off support. SATA6G_6 [Black]) These items appear only when you set the SATA Mode Selection item to [AHCI] or [RAID], and allow you to detect the presence of USB devices at startup. If no USB device is disabled. Legacy USB3.0 Support [Enabled]... USB devices can be recognized in this menu allow you to enable or disable the support for USB 3.0 devices. Hot Plug [Disabled] (SATA6G_1 - ASUS X79-DELUXE 3-27 Chapter 3 If detected, the USB controller legacy mode is enabled. Configuration options: [Disabled] [Enabled] EHCI Hand-off [Disabled] [Enabled] ...
X79-DELUXE User's Manual
Page 130
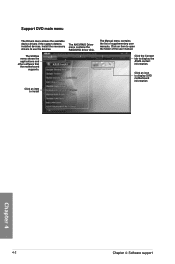
... the list of the user manual. Install the necessary drivers to install Chapter 4 4-2 Chapter 4: Software support The AHCI/RAID Driver menu contains the RAID/AHCI driver disk. Click an item to display the ASUS contact information. Click the Contact tab to open the folder of supplementary user manuals. The Utilities menu shows the...
... the list of the user manual. Install the necessary drivers to install Chapter 4 4-2 Chapter 4: Software support The AHCI/RAID Driver menu contains the RAID/AHCI driver disk. Click an item to display the ASUS contact information. Click the Contact tab to open the folder of supplementary user manuals. The Utilities menu shows the...

X79-DELUXE User's Manual
Page 177
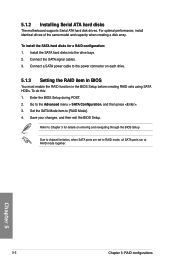
... capacity. If you want to install a Windows® operating system to a hard disk drive included in a RAID set, you get all applications to create a RAID driver disk and load the RAID driver during OS installation. Chapter 5 ASUS X79-DELUXE 5-1 Use two new drives or use an existing drive and three new drives for this setup. Among...
... capacity. If you want to install a Windows® operating system to a hard disk drive included in a RAID set, you get all applications to create a RAID driver disk and load the RAID driver during OS installation. Chapter 5 ASUS X79-DELUXE 5-1 Use two new drives or use an existing drive and three new drives for this setup. Among...
X79-DELUXE User's Manual
Page 178
... connector on entering and navigating through the BIOS Setup Due to chipset limitation, when SATA ports are set to Chapter 3 for a RAID configuration: 1. For optimal performance, install identical drives of the same model and capacity when creating a disk array. Enter the BIOS Setup... during POST. 2. Refer to RAID mode, all SATA ports run at RAID mode together. Chapter 5 5-2 Chapter 5: RAID configurations 5.1.2 Installing Serial ATA hard disks The motherboard supports Serial ATA hard disk drives. Install the...
... connector on entering and navigating through the BIOS Setup Due to chipset limitation, when SATA ports are set to Chapter 3 for a RAID configuration: 1. For optimal performance, install identical drives of the same model and capacity when creating a disk array. Enter the BIOS Setup... during POST. 2. Refer to RAID mode, all SATA ports run at RAID mode together. Chapter 5 5-2 Chapter 5: RAID configurations 5.1.2 Installing Serial ATA hard disks The motherboard supports Serial ATA hard disk drives. Install the...

X79-DELUXE User's Manual
Page 179
...® Rapid Storage Technology Option ROM utility: 1. All Rights Reserved. [ MAIN MENU ] 1. Create RAID Volume 4. Acceleration Options 3. Chapter 5 ASUS X79-DELUXE 5-3 v10.5.1.1070 Copyright(C) 2003-10 Intel Corporation. Reset Disks to move through the menus and select the menu... options. Exit RAID Volumes: None defined. [ DISK/VOLUME INFORMATION ] Physical Devices: Port Device Model 0 ...
...® Rapid Storage Technology Option ROM utility: 1. All Rights Reserved. [ MAIN MENU ] 1. Create RAID Volume 4. Acceleration Options 3. Chapter 5 ASUS X79-DELUXE 5-3 v10.5.1.1070 Copyright(C) 2003-10 Intel Corporation. Reset Disks to move through the menus and select the menu... options. Exit RAID Volumes: None defined. [ DISK/VOLUME INFORMATION ] Physical Devices: Port Device Model 0 ...

X79-DELUXE User's Manual
Page 180
... unique volume name that has no special characters and is 16 characters or less. [↑↓]-Select [ESC]-Exit [ENTER]-Select Menu 2. Create RAID Volume and press . The SELECT DISKS screen appears: Port Drive Model 0 ST3160812AS 1 ST3160812AS 2 ST3160812AS 3 ST3160812AS [ SELECT DISKS ] Serial #... 9LS0HJA4 9LS0F4HL 3LS0JYL8 Size Status 149.0GB Non-RAID Disk 149.0GB Non-RAID Disk 149.0GB Non-RAID Disk 9LS0BJ5H 149.0GB Non-RAID Disk Select 2 to 6 disks to include in creating the volume. [↑↓]-Prev/Next [SPACE...
... unique volume name that has no special characters and is 16 characters or less. [↑↓]-Select [ESC]-Exit [ENTER]-Select Menu 2. Create RAID Volume and press . The SELECT DISKS screen appears: Port Drive Model 0 ST3160812AS 1 ST3160812AS 2 ST3160812AS 3 ST3160812AS [ SELECT DISKS ] Serial #... 9LS0HJA4 9LS0F4HL 3LS0JYL8 Size Status 149.0GB Non-RAID Disk 149.0GB Non-RAID Disk 149.0GB Non-RAID Disk 9LS0BJ5H 149.0GB Non-RAID Disk Select 2 to 6 disks to include in creating the volume. [↑↓]-Prev/Next [SPACE...

X79-DELUXE User's Manual
Page 181
..., or to go back to select the stripe size for the RAID array (for audio and video editing. 7. 5. Use the up /down arrow key to the CREATE VOLUME menu. RAID 0: 128KB - When the Capacity item is selected, press . RAID 5: 64KB We recommend a lower stripe size for server systems, ...and a higher stripe size for multimedia computer systems used mainly for RAID 0, 10 and 5 only),and then press . When the Create Volume item is selected, enter the RAID volume capacity that you want and press . Chapter 5 ASUS X79-DELUXE 5-5 Are you sure you want to select. A small triangle marks ...
..., or to go back to select the stripe size for the RAID array (for audio and video editing. 7. 5. Use the up /down arrow key to the CREATE VOLUME menu. RAID 0: 128KB - When the Capacity item is selected, press . RAID 5: 64KB We recommend a lower stripe size for server systems, ...and a higher stripe size for multimedia computer systems used mainly for RAID 0, 10 and 5 only),and then press . When the Create Volume item is selected, enter the RAID volume capacity that you want and press . Chapter 5 ASUS X79-DELUXE 5-5 Are you sure you want to select. A small triangle marks ...

X79-DELUXE User's Manual
Page 182
... return to the utility main menu, or press to return to the DELETE VOLUME menu. Delete RAID Volume and press . Use the up/down arrow key to select the RAID set you want to delete the RAID set : 1. Press to delete volume "Volume0"? (Y/N): 3. From the utility main menu, select 2. The following...appears: [ DELETE VOLUME VERIFICATION ] ALL DATA IN THE VOLUME WILL BE LOST! (This does not apply to non-RAID. You will reset the disks to Recovery volumes) Are you sure you delete a RAID set . WARNING: ALL DISK DATA WILL BE DELETED. (This does not apply to delete, and then press ....
... return to the utility main menu, or press to return to the DELETE VOLUME menu. Delete RAID Volume and press . Use the up/down arrow key to select the RAID set you want to delete the RAID set : 1. Press to delete volume "Volume0"? (Y/N): 3. From the utility main menu, select 2. The following...appears: [ DELETE VOLUME VERIFICATION ] ALL DATA IN THE VOLUME WILL BE LOST! (This does not apply to non-RAID. You will reset the disks to Recovery volumes) Are you sure you delete a RAID set . WARNING: ALL DISK DATA WILL BE DELETED. (This does not apply to delete, and then press ....
X79-DELUXE User's Manual
Page 183
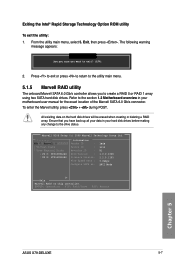
...Ltd. Press to exit or press to return to the utility main menu. 5.1.5 Marvell RAID utility The onboard Marvell SATA 6.0 Gb/s controller allows you want to create a RAID 0 or RAID 1 array using two SATA hard disk drives. Exiting the Intel® Rapid Storage ...disk drives before making any change to the drive status. All exisiting data on chip controller. ENTER: Operation F10: Exit/Save ESC: Return Chapter 5 ASUS X79-DELUXE 5-7 Topology HBA 0: Marvell 0 ├ Virtual Disks └ Free Physical Disks ├ PD 0: ST3160812AS └ PD 8: ST3160812AS Information Vendor ID...
...Ltd. Press to exit or press to return to the utility main menu. 5.1.5 Marvell RAID utility The onboard Marvell SATA 6.0 Gb/s controller allows you want to create a RAID 0 or RAID 1 array using two SATA hard disk drives. Exiting the Intel® Rapid Storage ...disk drives before making any change to the drive status. All exisiting data on chip controller. ENTER: Operation F10: Exit/Save ESC: Return Chapter 5 ASUS X79-DELUXE 5-7 Topology HBA 0: Marvell 0 ├ Virtual Disks └ Free Physical Disks ├ PD 0: ST3160812AS └ PD 8: ST3160812AS Information Vendor ID...

X79-DELUXE User's Manual
Page 184
...(c) 2009 Marvell Technology Group Ltd. ENTER:Operation SPACE:Select F10:Exit/Save ESC:Return 3. After selecting all the drives needed for the RAID array, press to HBA 0: Marvell 0 and press . 2. Marvell BIOS Setup (c) 2009 Marvell Technology Group Ltd. Configure->Select free disks...be included in front of the selected hard drive. Move the selection bar to continue. Configure->Select free disksCreate Virtual Disk HBA 0: Marvell 0 RAID Level : RAID 0 ├ Virtual Disks Max Size(MB) : 305253 └ Free Physical Disks Stripe Size : 64KB * ├ PD 0: ST3160812AS ...
...(c) 2009 Marvell Technology Group Ltd. ENTER:Operation SPACE:Select F10:Exit/Save ESC:Return 3. After selecting all the drives needed for the RAID array, press to HBA 0: Marvell 0 and press . 2. Marvell BIOS Setup (c) 2009 Marvell Technology Group Ltd. Configure->Select free disks...be included in front of the selected hard drive. Move the selection bar to continue. Configure->Select free disksCreate Virtual Disk HBA 0: Marvell 0 RAID Level : RAID 0 ├ Virtual Disks Max Size(MB) : 305253 └ Free Physical Disks Stripe Size : 64KB * ├ PD 0: ST3160812AS ...

X79-DELUXE User's Manual
Page 185
... appears under Virtual Disks, as : 1B4B 9130 B1 1.0.0.1028 2.2.0.1105 5.0Gbps AHCI Mode ▶ ▶ Help Marvell RAID on the virtual disk. ENTER: Operation F10: Exit/Save ESC: Return Chapter 5 ASUS X79-DELUXE 5-9 Topology HBA 0: Marvell 0 ├ Virtual Disks │ └ VD 0: New_VD │ ├ PD 0: ST3160812AS │ └ PD 8: ST3160812AS └ Free Physical...
... appears under Virtual Disks, as : 1B4B 9130 B1 1.0.0.1028 2.2.0.1105 5.0Gbps AHCI Mode ▶ ▶ Help Marvell RAID on the virtual disk. ENTER: Operation F10: Exit/Save ESC: Return Chapter 5 ASUS X79-DELUXE 5-9 Topology HBA 0: Marvell 0 ├ Virtual Disks │ └ VD 0: New_VD │ ├ PD 0: ST3160812AS │ └ PD 8: ST3160812AS └ Free Physical...

X79-DELUXE User's Manual
Page 186
... Marvell BIOS Setup (c) 2009 Marvell Technology Group Ltd. Yes No Press to exit from this virtual disk ? Delete an existing RAID Array 1. ENTER: Operation F10: Exit/Save ESC: Return 2. The following warning message appears: Exit Do you want to delete... ID ├ Virtual Disks Name │ └ VD 0: New_VD [Delete]Status │ ├ PD 0: ST3160812AS Stripte Size │ └ PD 8: ST3160812AS RAID Mode └ Free Physical Disks Size BGA Status Number of PDs Members :0 : New_VD : Functional : 64K : RAID0 : 304128MB : N/A :2 :0 8 ▶ &#...
... Marvell BIOS Setup (c) 2009 Marvell Technology Group Ltd. Yes No Press to exit from this virtual disk ? Delete an existing RAID Array 1. ENTER: Operation F10: Exit/Save ESC: Return 2. The following warning message appears: Exit Do you want to delete... ID ├ Virtual Disks Name │ └ VD 0: New_VD [Delete]Status │ ├ PD 0: ST3160812AS Stripte Size │ └ PD 8: ST3160812AS RAID Mode └ Free Physical Disks Size BGA Status Number of PDs Members :0 : New_VD : Functional : 64K : RAID0 : 304128MB : N/A :2 :0 8 ▶ &#...
X79-DELUXE User's Manual
Page 187
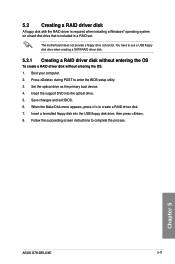
... the support DVD into the USB floppy disk drive, then press . 8. Save changes and exit BIOS. 6. Chapter 5 ASUS X79-DELUXE 5-11 Press during POST to create a RAID driver disk. 7. When the Make Disk menu appears, press to enter the BIOS setup utility. 3. Follow the succeeding screen... instructions to use a USB floppy disk drive when creating a SATA RAID driver disk. 5.2.1 Creating a RAID driver disk without entering the OS To create a RAID driver disk without entering the OS: 1. You have to complete the process. The motherboard does not...
... the support DVD into the USB floppy disk drive, then press . 8. Save changes and exit BIOS. 6. Chapter 5 ASUS X79-DELUXE 5-11 Press during POST to create a RAID driver disk. 7. When the Make Disk menu appears, press to enter the BIOS setup utility. 3. Follow the succeeding screen... instructions to use a USB floppy disk drive when creating a SATA RAID driver disk. 5.2.1 Creating a RAID driver disk without entering the OS To create a RAID driver disk without entering the OS: 1. You have to complete the process. The motherboard does not...

X79-DELUXE User's Manual
Page 188
... folder. 5. Click the name of the device you've inserted, go to the root path of the selected folder to Drivers > RAID, and then select the RAID driver for your operating system. Copy the files of your USB floppy disk drive. Follow the succeeding screen instructions to load the UEFI ...driver for the corresponding OS version. To set up a Windows® UEFI operating system under RAID mode, ensure to complete the installation. Plug the USB floppy disk drive and insert a floppy disk. 3. Insert the USB flash drive with...
... folder. 5. Click the name of the device you've inserted, go to the root path of the selected folder to Drivers > RAID, and then select the RAID driver for your operating system. Copy the files of your USB floppy disk drive. Follow the succeeding screen instructions to load the UEFI ...driver for the corresponding OS version. To set up a Windows® UEFI operating system under RAID mode, ensure to complete the installation. Plug the USB floppy disk drive and insert a floppy disk. 3. Insert the USB flash drive with...


