
X79-DELUXE User's Manual
Page 3
...guide...vii X79-DELUXE specifications summary ix Package contents...xiii Installation tools and components xiv Chapter 1: Product Introduction 1.1 Special features 1-1 1.1.1 Product highlights 1-1 1.1.2 Dual Intelligent Processors 4 with 4-Way Optimization 1-2 1.1.3 ASUS Exclusive Features 1-3 1.1.4 ASUS Quiet Thermal Solution 1-4 1.1.5 ASUS EZ DIY... 2.1.8 Expansion Card installation 2-10 2.1.9 Wi-Fi antenna installation 2-11 2.2 BIOS update utility 2-12 2.3 Motherboard rear and audio connections 2-13 2.3.1 Rear I/O connection 2-13 2.3.2 Audio I/O connections 2-15 iii
...guide...vii X79-DELUXE specifications summary ix Package contents...xiii Installation tools and components xiv Chapter 1: Product Introduction 1.1 Special features 1-1 1.1.1 Product highlights 1-1 1.1.2 Dual Intelligent Processors 4 with 4-Way Optimization 1-2 1.1.3 ASUS Exclusive Features 1-3 1.1.4 ASUS Quiet Thermal Solution 1-4 1.1.5 ASUS EZ DIY... 2.1.8 Expansion Card installation 2-10 2.1.9 Wi-Fi antenna installation 2-11 2.2 BIOS update utility 2-12 2.3 Motherboard rear and audio connections 2-13 2.3.1 Rear I/O connection 2-13 2.3.2 Audio I/O connections 2-15 iii

X79-DELUXE User's Manual
Page 4
... Devices Configuration 3-28 3.6.7 APM 3-31 3.6.8 Network Stack 3-32 3.7 Monitor menu 3-33 3.8 Boot menu 3-36 3.9 Tool menu 3-42 3.9.1 ASUS EZ Flash 2 Utility 3-42 3.9.2 ASUS DRAM SPD Information 3-42 3.9.3 ASUS O.C. Profile 3-43 3.10 Exit menu 3-44 3.11 Updating BIOS 3-45 Chapter 4: Software support 4.1 Installing an operating system 4-1 4.2 Support DVD information 4-1 4.2.1 Running the support DVD 4-1 4.2.2 Obtaining the...
... Devices Configuration 3-28 3.6.7 APM 3-31 3.6.8 Network Stack 3-32 3.7 Monitor menu 3-33 3.8 Boot menu 3-36 3.9 Tool menu 3-42 3.9.1 ASUS EZ Flash 2 Utility 3-42 3.9.2 ASUS DRAM SPD Information 3-42 3.9.3 ASUS O.C. Profile 3-43 3.10 Exit menu 3-44 3.11 Updating BIOS 3-45 Chapter 4: Software support 4.1 Installing an operating system 4-1 4.2 Support DVD information 4-1 4.2.1 Running the support DVD 4-1 4.2.2 Obtaining the...
X79-DELUXE User's Manual
Page 5
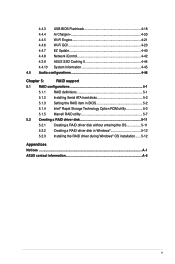
... 4-21 4.4.6 Wi-Fi GO 4-23 4.4.7 EZ Update 4-40 4.4.8 Network iControl 4-42 4.3.9 ASUS SSD Caching II 4-44 4.4.10 System Information 4-45 4.5 Audio configurations 4-46 Chapter 5: RAID support 5.1 RAID configurations 5-1 5.1.1 RAID definitions 5-1 5.1.2 Installing Serial ATA hard disks 5-2 5.1.3 Setting the RAID item in BIOS 5-2 5.1.4 Intel® Rapid Storage Technology Option ROM utility 5-3 5.1.5 Marvell RAID utility...
... 4-21 4.4.6 Wi-Fi GO 4-23 4.4.7 EZ Update 4-40 4.4.8 Network iControl 4-42 4.3.9 ASUS SSD Caching II 4-44 4.4.10 System Information 4-45 4.5 Audio configurations 4-46 Chapter 5: RAID support 5.1 RAID configurations 5-1 5.1.1 RAID definitions 5-1 5.1.2 Installing Serial ATA hard disks 5-2 5.1.3 Setting the RAID item in BIOS 5-2 5.1.4 Intel® Rapid Storage Technology Option ROM utility 5-3 5.1.5 Marvell RAID utility...

X79-DELUXE User's Manual
Page 7
...ASUS website The ASUS website (www.asus.com) provides updated information on the motherboard. 2. vii Chapter 2: Basic installation This chapter lists the hardware setup procedures that comes with the motherboard package and the software. 5. Chapter 1: Product introduction This chapter describes the features of the standard package. Chapter 3: BIOS..., such as warranty flyers, that may have to change system settings through the BIOS Setup menus. Detailed descriptions of the BIOS parameters are not part of the motherboard and the new technology it supports. Chapter...
...ASUS website The ASUS website (www.asus.com) provides updated information on the motherboard. 2. vii Chapter 2: Basic installation This chapter lists the hardware setup procedures that comes with the motherboard package and the software. 5. Chapter 1: Product introduction This chapter describes the features of the standard package. Chapter 3: BIOS..., such as warranty flyers, that may have to change system settings through the BIOS Setup menus. Detailed descriptions of the BIOS parameters are not part of the motherboard and the new technology it supports. Chapter...
X79-DELUXE User's Manual
Page 11
... voltage control SFS (Stepless Frequency Selection) - ASUS SSD Caching II - ASUS Q-Shield - ASUS Q-DIMM - ASUS CrashFree BIOS 3 - from 110MHz to 200MHz at 0.005V increment - Overclocking Protection - ASUS Q-Slot - ASUS Q-Connector ASUS EZ DIY - from 150MHz to 150MHz at 0.1MHz increment; ASUS Quiet Thermal Solution: - X79-DELUXE specifications summary ASUS Exclusive Features ASUS Exclusive Overclocking Features - ASUS UEFI BIOS EZ Mode - BCLK/PCIE frequency tuning: under...
... voltage control SFS (Stepless Frequency Selection) - ASUS SSD Caching II - ASUS Q-Shield - ASUS Q-DIMM - ASUS CrashFree BIOS 3 - from 110MHz to 200MHz at 0.005V increment - Overclocking Protection - ASUS Q-Slot - ASUS Q-Connector ASUS EZ DIY - from 150MHz to 150MHz at 0.1MHz increment; ASUS Quiet Thermal Solution: - X79-DELUXE specifications summary ASUS Exclusive Features ASUS Exclusive Overclocking Features - ASUS UEFI BIOS EZ Mode - BCLK/PCIE frequency tuning: under...

X79-DELUXE User's Manual
Page 12
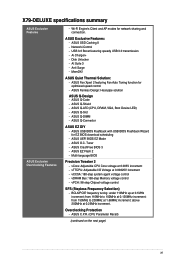
xii x 9.6 in . X79-DELUXE specifications summary Rear Panel I/O Ports Internal I /O ports 1 x 19-pin USB 3.0/2.0 connector supports additional 2 USB ports 4 x USB 2.0/1.1 connectors support additional 8 USB ports 8 x SATA 6Gb/s ...Power connector System Panel (Q-Connector) 64 Mb Flash ROM, UEFI AMI BIOS, PnP, DMI 2.7, WfM 2.0, SM BIOS 2.7, ACPI 5.0, Multi-language BIOS, ASUS EZ Flash 2, ASUS CrashFree BIOS 3, My Favorites, Quick Note, Last Modified Log, F12 PrintScreen function, F3 Shortcut function, and ASUS DRAM SPD (Serial Presence Detect) memory information WfM 2.0, DMI 2.7, WOL...
xii x 9.6 in . X79-DELUXE specifications summary Rear Panel I/O Ports Internal I /O ports 1 x 19-pin USB 3.0/2.0 connector supports additional 2 USB ports 4 x USB 2.0/1.1 connectors support additional 8 USB ports 8 x SATA 6Gb/s ...Power connector System Panel (Q-Connector) 64 Mb Flash ROM, UEFI AMI BIOS, PnP, DMI 2.7, WfM 2.0, SM BIOS 2.7, ACPI 5.0, Multi-language BIOS, ASUS EZ Flash 2, ASUS CrashFree BIOS 3, My Favorites, Quick Note, Last Modified Log, F12 PrintScreen function, F3 Shortcut function, and ASUS DRAM SPD (Serial Presence Detect) memory information WfM 2.0, DMI 2.7, WOL...

X79-DELUXE User's Manual
Page 17
...supervise overclocking, energy management, fan speed control, voltage and sensor readings, and even interact with no need for any user interaction. Chapter 1 ASUS X79-DELUXE 1-3 Conveniently use your smart device's touch panel as a remote keyboard and mouse for your smart device. • Remote Keyboard & Mouse...bandwidth and allows you to a smart device. Install a USB storage device containing the BIOS file, press the BIOS Flashback button for about three seconds, and the UEFI BIOS is an intuitive one-step network control center that makes it easier for your ultimate convenience...
...supervise overclocking, energy management, fan speed control, voltage and sensor readings, and even interact with no need for any user interaction. Chapter 1 ASUS X79-DELUXE 1-3 Conveniently use your smart device's touch panel as a remote keyboard and mouse for your smart device. • Remote Keyboard & Mouse...bandwidth and allows you to a smart device. Install a USB storage device containing the BIOS file, press the BIOS Flashback button for about three seconds, and the UEFI BIOS is an intuitive one-step network control center that makes it easier for your ultimate convenience...

X79-DELUXE User's Manual
Page 18
...simply press a button to the Marvell® SATA ports for an SSD-like transfer speed. 1.1.4 ASUS Quiet Thermal Solution ASUS Fanless Design - ASUS UEFI BIOS includes the following new features: • New My Favorite function allows you to quickly access the frequently...solution that goes beyond the traditional keyboard-only BIOS controls, providing you with its elegant appearance. 1.1.5 ASUS EZ DIY ASUS UEFI BIOS (EZ Mode) ASUS UEFI BIOS, a UEFI compliant architecture, offers the first mouse-controlled intuitive graphical BIOS interface that offers you with difficult POST ...
...simply press a button to the Marvell® SATA ports for an SSD-like transfer speed. 1.1.4 ASUS Quiet Thermal Solution ASUS Fanless Design - ASUS UEFI BIOS includes the following new features: • New My Favorite function allows you to quickly access the frequently...solution that goes beyond the traditional keyboard-only BIOS controls, providing you with its elegant appearance. 1.1.5 ASUS EZ DIY ASUS UEFI BIOS (EZ Mode) ASUS UEFI BIOS, a UEFI compliant architecture, offers the first mouse-controlled intuitive graphical BIOS interface that offers you with difficult POST ...
X79-DELUXE User's Manual
Page 35
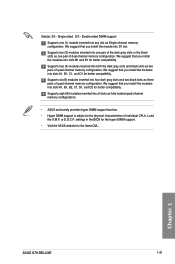
...DIMM support is subject to the physical characteristics of quad-channel memory configuration. Load the X.M.P. settings in the BIOS for the hyper DIMM support. • Visit the ASUS website for better compatibility. We suggest that you install the modules into slots A1, B1, B2, C1,... that you install the module into both the dark gray slots and black slots as three pairs of individual CPUs. Chapter 1 ASUS X79-DELUXE 1-21 Supports six (6) modules inserted into all slots as Single-channel memory configuration. Supports eight (8) modules inserted into four dark...
...DIMM support is subject to the physical characteristics of quad-channel memory configuration. Load the X.M.P. settings in the BIOS for the hyper DIMM support. • Visit the ASUS website for better compatibility. We suggest that you install the modules into slots A1, B1, B2, C1,... that you install the module into both the dark gray slots and black slots as three pairs of individual CPUs. Chapter 1 ASUS X79-DELUXE 1-21 Supports six (6) modules inserted into all slots as Single-channel memory configuration. Supports eight (8) modules inserted into four dark...
X79-DELUXE User's Manual
Page 39
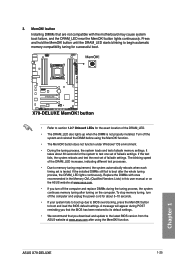
...fail to the latest BIOS version from the ASUS website at www.asus.com. • If you download and update to boot after using the MemOK! function. Replace the DIMMs with the motherboard may cause system boot failure, and the DRAM_LED near the MemOK! ASUS X79-DELUXE 1-25 Chapter 1 If... the test fails, the system reboots and test the next set of the DRAM_LED increases, indicating different test processes. • Due to boot and load the BIOS default settings. button lights continuously.
...fail to the latest BIOS version from the ASUS website at www.asus.com. • If you download and update to boot after using the MemOK! function. Replace the DIMMs with the motherboard may cause system boot failure, and the DRAM_LED near the MemOK! ASUS X79-DELUXE 1-25 Chapter 1 If... the test fails, the system reboots and test the next set of the DRAM_LED increases, indicating different test processes. • Due to boot and load the BIOS default settings. button lights continuously.

X79-DELUXE User's Manual
Page 40
... section 3.8 Boot Menu for details about setting the DirectKey default function. DirectKey button This feature allows your system and conveniently enter the BIOS during POST. 4. Chapter 1 1-26 Chapter 1: Product introduction Ensure to save your data before using the power-on button to reboot and enter ...the BIOS directly. • Turn off your system to go through POST (without having to the BIOS Setup program with the press of a button. Press the DirectKey button again or the Power-on...
... section 3.8 Boot Menu for details about setting the DirectKey default function. DirectKey button This feature allows your system and conveniently enter the BIOS during POST. 4. Chapter 1 1-26 Chapter 1: Product introduction Ensure to save your data before using the power-on button to reboot and enter ...the BIOS directly. • Turn off your system to go through POST (without having to the BIOS Setup program with the press of a button. Press the DirectKey button again or the Power-on...
X79-DELUXE User's Manual
Page 41
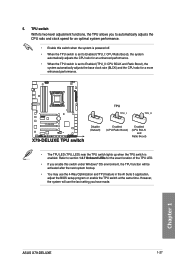
...Enabled (TPU_II: CPU BCLK and Ratio Boost), the system automatically adjusts the base clock rate (BLCK) and the CPU ratio for a more enhanced performance. ASUS X79-DELUXE 1-27 5. However, the system will be activated after the next system bootup. • You may use the last setting you to Enabled (TPU_I: ... under Windows® OS environment, the TPU function will use the 4-Way Optimization and TPU feature in the AI Suite 3 application, adjust the BIOS setup program or enable the TPU switch at the same time. Refer to section 1.2.7 Onboard LEDs for the exact location of the TPU LED. ...
...Enabled (TPU_II: CPU BCLK and Ratio Boost), the system automatically adjusts the base clock rate (BLCK) and the CPU ratio for a more enhanced performance. ASUS X79-DELUXE 1-27 5. However, the system will be activated after the next system bootup. • You may use the last setting you to Enabled (TPU_I: ... under Windows® OS environment, the TPU function will use the 4-Way Optimization and TPU feature in the AI Suite 3 application, adjust the BIOS setup program or enable the TPU switch at the same time. Refer to section 1.2.7 Onboard LEDs for the exact location of the TPU LED. ...

X79-DELUXE User's Manual
Page 42
However, the system will be activated after the next system bootup. • You may change the EPU settings in the software application or BIOS setup program and enable the EPU function at the same time. EPU switch Enable this switch to section 1.2.7 Onboard LEDs for the exact location of ...
However, the system will be activated after the next system bootup. • You may change the EPU settings in the software application or BIOS setup program and enable the EPU function at the same time. EPU switch Enable this switch to section 1.2.7 Onboard LEDs for the exact location of ...

X79-DELUXE User's Manual
Page 43
Chapter 1 ASUS X79-DELUXE 1-29 Clear CMOS button Press this button to clear the BIOS setup information only when the systems hangs due to overclocking. 7.
Chapter 1 ASUS X79-DELUXE 1-29 Clear CMOS button Press this button to clear the BIOS setup information only when the systems hangs due to overclocking. 7.

X79-DELUXE User's Manual
Page 50
Intel® X79 Serial ATA 6Gb/s connectors (7-pin SATA6G_1/2 [black] These connectors connect to [AHCI Mode] by default. Chapter 1 • These connectors are set to Serial ATA 6Gb/s ... 0, 1, 5, and 10 configuration with the Intel® Rapid Storage Technology through the onboard Intel® X79 chipset. Refer to section 3.6.4 SATA Configuration for details. • Before creating a RAID set the SATA Mode item in the BIOS to section 5.1 RAID configurations or the manual bundled in the motherboard support DVD. 1-36 Chapter 1: Product...
Intel® X79 Serial ATA 6Gb/s connectors (7-pin SATA6G_1/2 [black] These connectors connect to [AHCI Mode] by default. Chapter 1 • These connectors are set to Serial ATA 6Gb/s ... 0, 1, 5, and 10 configuration with the Intel® Rapid Storage Technology through the onboard Intel® X79 chipset. Refer to section 3.6.4 SATA Configuration for details. • Before creating a RAID set the SATA Mode item in the BIOS to section 5.1 RAID configurations or the manual bundled in the motherboard support DVD. 1-36 Chapter 1: Product...

X79-DELUXE User's Manual
Page 52
... to [AHCI Mode] by default. Refer to section 3.6.4 SATA Configuration for details. • Before creating a RAID set the SATA Mode item in the BIOS to section 5.1 RAID Configurations or the user manual bundled in the support DVD. Chapter 1 1-38 Chapter 1: Product introduction If you can create a RAID ...0, 1, 5, and 10 configuration with the Intel® Rapid Storage Technology through the onboard Intel® X79 chipset. • These connectors are set to Serial ATA 3Gb/s hard disk drives and optical drives via Serial ATA 3Gb/s signal cables.
... to [AHCI Mode] by default. Refer to section 3.6.4 SATA Configuration for details. • Before creating a RAID set the SATA Mode item in the BIOS to section 5.1 RAID Configurations or the user manual bundled in the support DVD. Chapter 1 1-38 Chapter 1: Product introduction If you can create a RAID ...0, 1, 5, and 10 configuration with the Intel® Rapid Storage Technology through the onboard Intel® X79 chipset. • These connectors are set to Serial ATA 3Gb/s hard disk drives and optical drives via Serial ATA 3Gb/s signal cables.
X79-DELUXE User's Manual
Page 57
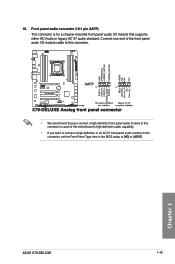
Chapter 1 ASUS X79-DELUXE 1-43 10. Front panel audio connector (10-1 pin AAFP) This connector is for a chassis-mounted front panel audio I /O module cable to this connector. • We ... you want to connect a high-definition or an AC'97 front panel audio module to this connector, set the Front Panel Type item in the BIOS setup to [HD] or [AC97].
Chapter 1 ASUS X79-DELUXE 1-43 10. Front panel audio connector (10-1 pin AAFP) This connector is for a chassis-mounted front panel audio I /O module cable to this connector. • We ... you want to connect a high-definition or an AC'97 front panel audio module to this connector, set the Front Panel Type item in the BIOS setup to [HD] or [AC97].

X79-DELUXE User's Manual
Page 71
IO Shield • Ensure that the ASUS 2T2R dual band Wi-Fi antenna is securely installed to the Wi-Fi ports. • Ensure to the Wi-Fi ports at the back of the chassis. software. Chapter 2 ASUS X79-DELUXE 2-11 KY IN LINE CTR BASS FRONT REAR SPK MIC IN POWER eSATA 6G USB3.0 S/PDIF USB BIOS Flashback USB3.0 2.1.9 Wi-Fi antenna installation Installing the ASUS 2T2R dual band W-Fi antenna Connect the bundled ASUS 2T2R dual band Wi-Fi antenna connector to install the Bluetooth driver before installing the Wi-Fi GO!
IO Shield • Ensure that the ASUS 2T2R dual band Wi-Fi antenna is securely installed to the Wi-Fi ports. • Ensure to the Wi-Fi ports at the back of the chassis. software. Chapter 2 ASUS X79-DELUXE 2-11 KY IN LINE CTR BASS FRONT REAR SPK MIC IN POWER eSATA 6G USB3.0 S/PDIF USB BIOS Flashback USB3.0 2.1.9 Wi-Fi antenna installation Installing the ASUS 2T2R dual band W-Fi antenna Connect the bundled ASUS 2T2R dual band Wi-Fi antenna connector to install the Bluetooth driver before installing the Wi-Fi GO!

X79-DELUXE User's Manual
Page 72
...or press the CLR_CMOS button while BIOS update is damaged during the process and results to the system's failure to boot up, please contact your local ASUS Service Center. 2-12 Chapter 2: Basic installation If this means that the BIOS Flashback function is updated automatically. ...To use a USB 2.0 storage device to save the latest BIOS version for three seconds, and the BIOS is enabled. 5. 2.2 BIOS update utility USB BIOS Flashback USB BIOS Flashback...
...or press the CLR_CMOS button while BIOS update is damaged during the process and results to the system's failure to boot up, please contact your local ASUS Service Center. 2-12 Chapter 2: Basic installation If this means that the BIOS Flashback function is updated automatically. ...To use a USB 2.0 storage device to save the latest BIOS version for three seconds, and the BIOS is enabled. 5. 2.2 BIOS update utility USB BIOS Flashback USB BIOS Flashback...

X79-DELUXE User's Manual
Page 73
2.3 Motherboard rear and audio connections 2.3.1 Rear I /O ports*** *, ** and ***: Refer to the tables on the next page for Bluetooth/Wi-Fi module LEDs, LAN port LEDs, and audio port definitions. Power external SATA 6Gb/s ports 1-2 8. Audio I /O connection Rear panel connectors 1. Optical S/PDIF Out port 11. USB BIOS Flashback button 7. Realtek® LAN (RJ-45) port** 4. Intel® LAN (RJ-45) port** 3. Wi-Fi 802.11 a/b/g/n/ac Bluetooth V4.0* 5. USB 3.0 ports 5-6 10. ASUS X79-DELUXE 2-13 Chapter 2 USB 2.0 ports 1-4 2. USB 3.0 ports 1-2 6. USB 3.0 ports 3-4 9.
2.3 Motherboard rear and audio connections 2.3.1 Rear I /O ports*** *, ** and ***: Refer to the tables on the next page for Bluetooth/Wi-Fi module LEDs, LAN port LEDs, and audio port definitions. Power external SATA 6Gb/s ports 1-2 8. Audio I /O connection Rear panel connectors 1. Optical S/PDIF Out port 11. USB BIOS Flashback button 7. Realtek® LAN (RJ-45) port** 4. Intel® LAN (RJ-45) port** 3. Wi-Fi 802.11 a/b/g/n/ac Bluetooth V4.0* 5. USB 3.0 ports 5-6 10. ASUS X79-DELUXE 2-13 Chapter 2 USB 2.0 ports 1-4 2. USB 3.0 ports 1-2 6. USB 3.0 ports 3-4 9.


