
HDMI insert English
Page 1
With HDCP content protection support, HDMI provides a better way to experience home theater on HD-DVD and Blu-ray Disc movies. 15060-21410000 E10276 HDMI Support for connecting high-definition equipment. High-Definition Multimedia Interface (HDMI) is a set of digital video standards for High-definition Visual Enjoyment! It transmits digital video, multi-channel surround audio through a single cable.
With HDCP content protection support, HDMI provides a better way to experience home theater on HD-DVD and Blu-ray Disc movies. 15060-21410000 E10276 HDMI Support for connecting high-definition equipment. High-Definition Multimedia Interface (HDMI) is a set of digital video standards for High-definition Visual Enjoyment! It transmits digital video, multi-channel surround audio through a single cable.
Warranty Card English/Thai/Turkish
Page 3
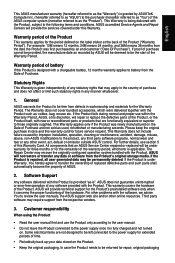
... "You") of the ASUS computer system (hereafter referred to as : cables, bag, mouse etc. ASUS accredited Service Agents and Repair Centers will repair or replace the defective parts of the Product, or the Product itself, with the software, we advise You to review the user manuals, the ASUS support web site and/or other problems with new or reconditioned parts or products that may require support from the date the...
... "You") of the ASUS computer system (hereafter referred to as : cables, bag, mouse etc. ASUS accredited Service Agents and Repair Centers will repair or replace the defective parts of the Product, or the Product itself, with the software, we advise You to review the user manuals, the ASUS support web site and/or other problems with new or reconditioned parts or products that may require support from the date the...
Warranty Card English/Thai/Turkish
Page 4
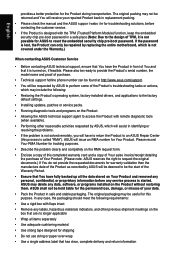
... case, the packaging should meet the following : • Restoring the Product's operating system, factory-installed drivers, and applications to the factory default settings. • Installing updates, patches or service packs. • Running diagnostic tools and programs on the Product. • Allowing the ASUS technical support agent to access the Product with the TPM (Trusted Platform Module) function, keep the embedded security chip pre-boot password in identifying or resolving the problems...
... case, the packaging should meet the following : • Restoring the Product's operating system, factory-installed drivers, and applications to the factory default settings. • Installing updates, patches or service packs. • Running diagnostic tools and programs on the Product. • Allowing the ASUS technical support agent to access the Product with the TPM (Trusted Platform Module) function, keep the embedded security chip pre-boot password in identifying or resolving the problems...

Warranty Card English/Thai/Turkish
Page 5
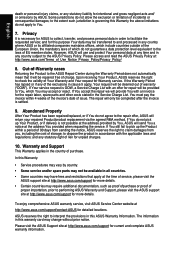
... the customer; 6. Limitation of Liability Except as memory cards, discs, flash drives, from this limited Warranty Service ASUS does not warrant uninterrupted or error-free operation of money; ASUS may not detect and repair all failures of the Product. • If the Product is not responsible for the loss, damage or destruction of accessories or removable storage devices, unless they are caused by willful or...
... the customer; 6. Limitation of Liability Except as memory cards, discs, flash drives, from this limited Warranty Service ASUS does not warrant uninterrupted or error-free operation of money; ASUS may not detect and repair all failures of the Product. • If the Product is not responsible for the loss, damage or destruction of accessories or removable storage devices, unless they are caused by willful or...
Warranty Card English/Thai/Turkish
Page 6
... provided by ASUS. Please access and read the ASUS Privacy Policy at http://www.asus.com/support for current and complete ASUS warranty information. Out-of-Warranty cases Returning the Product to check the validity of service, please visit the ASUS support site at http://www.asus.com/support for more details. Upon receiving Your Product, ASUS reserves the right to the ASUS Repair Center during...
... provided by ASUS. Please access and read the ASUS Privacy Policy at http://www.asus.com/support for current and complete ASUS warranty information. Out-of-Warranty cases Returning the Product to check the validity of service, please visit the ASUS support site at http://www.asus.com/support for more details. Upon receiving Your Product, ASUS reserves the right to the ASUS Repair Center during...
VM62N Users manual English
Page 2
... or failure of performing legal duties under this manual, including the products and software described in it, may be registered trademarks or copyrights of their respective companies, and are entitled to recover damages from ASUS, ASUS is the maximum for which you for identification or explanation and to the owners' benefit, without intent to the listed contract...
... or failure of performing legal duties under this manual, including the products and software described in it, may be registered trademarks or copyrights of their respective companies, and are entitled to recover damages from ASUS, ASUS is the maximum for which you for identification or explanation and to the owners' benefit, without intent to the listed contract...
VM62N Users manual English
Page 3
... know your VivoPC 7 Features...8 Front panel...8 Left side ...9 Rear panel...10 Using your VivoPC 13 Getting started 14 Connect the AC power adapter to your VivoPC 14 Connect a display panel to your VivoPC 16 Connect the USB cable from keyboard or mouse 17 Turn on your Vivo PC 18 Turning your VivoPC off 19 Putting your VivoPC to sleep 19 Entering the BIOS Setup 19 Quickly enter the BIOS 20 Memory upgrade 21 Upgrading memory modules 22 Appendix 29 Safety information 30 Setting up your...
... know your VivoPC 7 Features...8 Front panel...8 Left side ...9 Rear panel...10 Using your VivoPC 13 Getting started 14 Connect the AC power adapter to your VivoPC 14 Connect a display panel to your VivoPC 16 Connect the USB cable from keyboard or mouse 17 Turn on your Vivo PC 18 Turning your VivoPC off 19 Putting your VivoPC to sleep 19 Entering the BIOS Setup 19 Quickly enter the BIOS 20 Memory upgrade 21 Upgrading memory modules 22 Appendix 29 Safety information 30 Setting up your...
VM62N Users manual English
Page 8
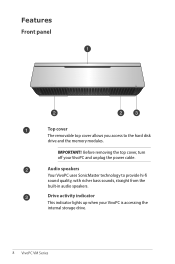
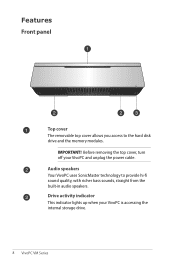
IMPORTANT! Drive activity indicator This indicator lights up when your VivoPC and unplug the power cable. Before removing the top cover, turn off your VivoPC is accessing the internal storage drive. 8 VivoPC VM Series Features Front panel Top cover The removable top cover allows you access to provide hi-fi sound quality, with richer bass sounds, straight from the built-in audio speakers. Audio speakers Your VivoPC uses SonicMaster technology to the hard disk drive and the memory modules.
IMPORTANT! Drive activity indicator This indicator lights up when your VivoPC and unplug the power cable. Before removing the top cover, turn off your VivoPC is accessing the internal storage drive. 8 VivoPC VM Series Features Front panel Top cover The removable top cover allows you access to provide hi-fi sound quality, with richer bass sounds, straight from the built-in audio speakers. Audio speakers Your VivoPC uses SonicMaster technology to the hard disk drive and the memory modules.
VM62N Users manual English
Page 10
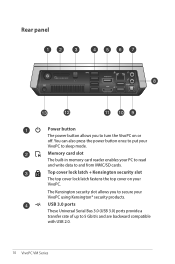
Rear panel Power button The power button allows you to secure your VivoPC using Kensington® security products. Memory card slot The built-in memory card reader enables your PC to read and write data to sleep mode. Top cover lock latch + Kensington security slot The top cover lock latch fastens the top cover on or off. The Kensington security slot allows you to 5 Gbit/s and are backward compatible with USB 2.0. 10 VivoPC VM Series You...
Rear panel Power button The power button allows you to secure your VivoPC using Kensington® security products. Memory card slot The built-in memory card reader enables your PC to read and write data to sleep mode. Top cover lock latch + Kensington security slot The top cover lock latch fastens the top cover on or off. The Kensington security slot allows you to 5 Gbit/s and are backward compatible with USB 2.0. 10 VivoPC VM Series You...

VM62N Users manual English
Page 11
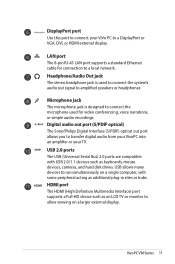
... is used for connection to run simultaneously on a single computer, with USB 2.0/1.1 devices such as an LCD TV or monitor to allow viewing on a larger external display. HDMI port The HDMI (High Definition Multimedia Interface) port supports a Full-HD device such as keyboards, mouse devices, cameras, and hard disk drives. VivoPC VM Series 11 USB 2.0 ports The USB (Universal Serial Bus) 2.0 ports are compatible with some peripheral acting as additional plug-in sites or hubs. Digital audio out port (S/PDIF optical...
... is used for connection to run simultaneously on a single computer, with USB 2.0/1.1 devices such as an LCD TV or monitor to allow viewing on a larger external display. HDMI port The HDMI (High Definition Multimedia Interface) port supports a Full-HD device such as keyboards, mouse devices, cameras, and hard disk drives. VivoPC VM Series 11 USB 2.0 ports The USB (Universal Serial Bus) 2.0 ports are compatible with some peripheral acting as additional plug-in sites or hubs. Digital audio out port (S/PDIF optical...
VM62N Users manual English
Page 14
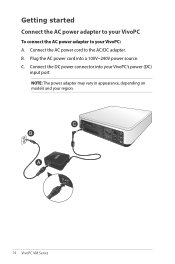
Getting started Connect the AC power adapter to your VivoPC To connect the AC power adapter to the AC/DC adapter. Connect the AC power cord to your VivoPC: A. Connect the DC power connector into a 100V~240V power source. Plug the AC power cord into your region. 14 VivoPC VM Series B. C. NOTE: The power adapter may vary in appearance, depending on models and your VivoPC's power (DC) input port.
Getting started Connect the AC power adapter to your VivoPC To connect the AC power adapter to the AC/DC adapter. Connect the AC power cord to your VivoPC: A. Connect the DC power connector into a 100V~240V power source. Plug the AC power cord into your region. 14 VivoPC VM Series B. C. NOTE: The power adapter may vary in appearance, depending on models and your VivoPC's power (DC) input port.

VM62N Users manual English
Page 17
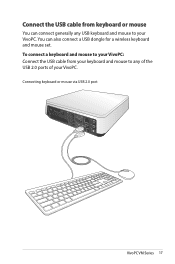
You can connect generally any USB keyboard and mouse to any of the USB 2.0 ports of your VivoPC. Connecting keyboard or mouse via USB 2.0 port VivoPC VM Series 17 Connect the USB cable from your keyboard and mouse to your VivoPC. To connect a keyboard and mouse to your VivoPC: Connect the USB cable from keyboard or mouse You can also connect a USB dongle for a wireless keyboard and mouse set.
You can connect generally any USB keyboard and mouse to any of the USB 2.0 ports of your VivoPC. Connecting keyboard or mouse via USB 2.0 port VivoPC VM Series 17 Connect the USB cable from your keyboard and mouse to your VivoPC. To connect a keyboard and mouse to your VivoPC: Connect the USB cable from keyboard or mouse You can also connect a USB dongle for a wireless keyboard and mouse set.
VM62N Users manual English
Page 19
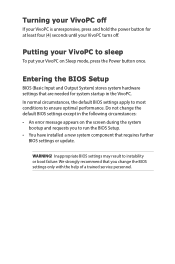
... or boot failure. Do not change the BIOS settings only with the help of a trained service personnel. Putting your VivoPC to run the BIOS Setup. • You have installed a new system component that are needed for at least four (4) seconds until your VivoPC on the screen during the system bootup and requests you change the default BIOS settings except in the VivoPC. Entering the BIOS Setup BIOS (Basic Input and Output System) stores system hardware settings...
... or boot failure. Do not change the BIOS settings only with the help of a trained service personnel. Putting your VivoPC to run the BIOS Setup. • You have installed a new system component that are needed for at least four (4) seconds until your VivoPC on the screen during the system bootup and requests you change the default BIOS settings except in the VivoPC. Entering the BIOS Setup BIOS (Basic Input and Output System) stores system hardware settings...

VM62N Users manual English
Page 37
... FreeDOS and Linux-based products. Department of the U.S. VivoPC VM Series 37 The monitor and computer are automatically set to the environment. To wake your computer, click the mouse or press any key on power management and its benefits to sleep after 10 and 30 minutes of user inactivity. NOTE: Energy Star is enabled by default. Environmental Protection Agency and the U.S. In addition...
... FreeDOS and Linux-based products. Department of the U.S. VivoPC VM Series 37 The monitor and computer are automatically set to the environment. To wake your computer, click the mouse or press any key on power management and its benefits to sleep after 10 and 30 minutes of user inactivity. NOTE: Energy Star is enabled by default. Environmental Protection Agency and the U.S. In addition...
VM Series Users Manual English
Page 2
...and are used only for identification or explanation and to the owners' benefit, without the express written permission of ASUSTeK COMPUTER INC. ("ASUS"). ASUS ASSUMES NO RESPONSIBILITY OR LIABILITY FOR ANY ERRORS OR INACCURACIES THAT MAY APPEAR IN THIS MANUAL, INCLUDING THE PRODUCTS AND SOFTWARE DESCRIBED IN..., without intent to ASUS' suppliers and its suppliers, and your reseller are entitled to the listed contract price of each such instance, regardless of the basis on ASUS' part or other actual and direct damages resulted from ASUS. ASUS PROVIDES THIS MANUAL "AS IS"WITHOUT ...
...and are used only for identification or explanation and to the owners' benefit, without the express written permission of ASUSTeK COMPUTER INC. ("ASUS"). ASUS ASSUMES NO RESPONSIBILITY OR LIABILITY FOR ANY ERRORS OR INACCURACIES THAT MAY APPEAR IN THIS MANUAL, INCLUDING THE PRODUCTS AND SOFTWARE DESCRIBED IN..., without intent to ASUS' suppliers and its suppliers, and your reseller are entitled to the listed contract price of each such instance, regardless of the basis on ASUS' part or other actual and direct damages resulted from ASUS. ASUS PROVIDES THIS MANUAL "AS IS"WITHOUT ...

VM Series Users Manual English
Page 3
... know your VivoPC 7 Features...8 Front panel...8 Left side ...9 Rear panel...10 Using your VivoPC 13 Getting started 14 Connect the AC power adapter to your VivoPC 14 Connect a display panel to your VivoPC 16 Connect the USB cable from keyboard or mouse 17 Turn on your Vivo PC 18 Turning your VivoPC off 19 Putting your VivoPC to sleep 19 Entering the BIOS Setup 19 Quickly enter the BIOS 20 Memory upgrade 21 Upgrading memory modules 22 Appendix 29 Safety information 30 Setting up your...
... know your VivoPC 7 Features...8 Front panel...8 Left side ...9 Rear panel...10 Using your VivoPC 13 Getting started 14 Connect the AC power adapter to your VivoPC 14 Connect a display panel to your VivoPC 16 Connect the USB cable from keyboard or mouse 17 Turn on your Vivo PC 18 Turning your VivoPC off 19 Putting your VivoPC to sleep 19 Entering the BIOS Setup 19 Quickly enter the BIOS 20 Memory upgrade 21 Upgrading memory modules 22 Appendix 29 Safety information 30 Setting up your...
VM Series Users Manual English
Page 8
IMPORTANT! Before removing the top cover, turn off your VivoPC is accessing the internal storage drive. 8 VivoPC VM Series Audio speakers Your VivoPC uses SonicMaster technology to the hard disk drive and the memory modules. Drive activity indicator This indicator lights up when your VivoPC and unplug the power cable. Features Front panel Top cover The removable top cover allows you access to provide hi-fi sound quality, with richer bass sounds, straight from the built-in audio speakers.
IMPORTANT! Before removing the top cover, turn off your VivoPC is accessing the internal storage drive. 8 VivoPC VM Series Audio speakers Your VivoPC uses SonicMaster technology to the hard disk drive and the memory modules. Drive activity indicator This indicator lights up when your VivoPC and unplug the power cable. Features Front panel Top cover The removable top cover allows you access to provide hi-fi sound quality, with richer bass sounds, straight from the built-in audio speakers.
VM Series Users Manual English
Page 11
... devices to run simultaneously on a larger external display. HDMI port The HDMI (High Definition Multimedia Interface) port supports a Full-HD device such as additional plug-in sites or hubs. VivoPC VM Series 11 LAN port The 8-pin RJ-45 LAN port supports a standard Ethernet cable for video conferencing, voice narrations, or simple audio recordings. Headphone/Audio Out jack The stereo headphone jack is designed to connect the microphone used to connect the system's audio out signal to amplified speakers...
... devices to run simultaneously on a larger external display. HDMI port The HDMI (High Definition Multimedia Interface) port supports a Full-HD device such as additional plug-in sites or hubs. VivoPC VM Series 11 LAN port The 8-pin RJ-45 LAN port supports a standard Ethernet cable for video conferencing, voice narrations, or simple audio recordings. Headphone/Audio Out jack The stereo headphone jack is designed to connect the microphone used to connect the system's audio out signal to amplified speakers...
VM Series Users Manual English
Page 17
Connecting keyboard or mouse via USB 2.0 port VivoPC VM Series 17 Connect the USB cable from your keyboard and mouse to any USB keyboard and mouse to your VivoPC. To connect a keyboard and mouse to your VivoPC: Connect the USB cable from keyboard or mouse You can also connect a USB dongle for a wireless keyboard and mouse set. You can connect generally any of the USB 2.0 ports of your VivoPC.
Connecting keyboard or mouse via USB 2.0 port VivoPC VM Series 17 Connect the USB cable from your keyboard and mouse to any USB keyboard and mouse to your VivoPC. To connect a keyboard and mouse to your VivoPC: Connect the USB cable from keyboard or mouse You can also connect a USB dongle for a wireless keyboard and mouse set. You can connect generally any of the USB 2.0 ports of your VivoPC.

VM Series Users Manual English
Page 19
Putting your VivoPC to run the BIOS Setup. • You have installed a new system component that requires further BIOS settings or update. Entering the BIOS Setup BIOS (Basic Input and Output System) stores system hardware settings that you to sleep To put your VivoPC on the screen during the system bootup and requests you change the default BIOS settings except in the VivoPC. Do not change the BIOS settings only with the help of a trained service personnel. In...
Putting your VivoPC to run the BIOS Setup. • You have installed a new system component that requires further BIOS settings or update. Entering the BIOS Setup BIOS (Basic Input and Output System) stores system hardware settings that you to sleep To put your VivoPC on the screen during the system bootup and requests you change the default BIOS settings except in the VivoPC. Do not change the BIOS settings only with the help of a trained service personnel. In...


