User Manual
Page 24
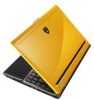
... Test (POST). Self Monitoring and Reporting Technology The S.M.A.R.T. (Self Monitoring and Reporting Technology) checks the hard disk drive during the splash screen, standard boot information such as the BIOS version can also select "Scan ... IMPORTANT! Continued use may get a message reporting "No operating... of the Notebook PC's architecture. 3 Getting Started Powering ON the Notebook PC The Notebook PC's power-ON message appears on the screen prompting you to correct the conflict by running a software disk checking utility, you should be seen. If you receive the Notebook PC...
... Test (POST). Self Monitoring and Reporting Technology The S.M.A.R.T. (Self Monitoring and Reporting Technology) checks the hard disk drive during the splash screen, standard boot information such as the BIOS version can also select "Scan ... IMPORTANT! Continued use may get a message reporting "No operating... of the Notebook PC's architecture. 3 Getting Started Powering ON the Notebook PC The Notebook PC's power-ON message appears on the screen prompting you to correct the conflict by running a software disk checking utility, you should be seen. If you receive the Notebook PC...
User Manual
Page 25
... suspend mode (Windows default uses STR). WARNING! A fully-charged battery pack provides the Notebook PC a few hours to charge as soon as power OFF. Note: Screen captures shown here are examples only and may not reflect what you will discharge over time. The battery pack begins to fully charge the battery...
... suspend mode (Windows default uses STR). WARNING! A fully-charged battery pack provides the Notebook PC a few hours to charge as soon as power OFF. Note: Screen captures shown here are examples only and may not reflect what you will discharge over time. The battery pack begins to fully charge the battery...
User Manual
Page 28
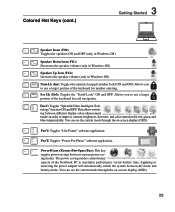
... light when the touchpad is UNLOCKED (enabled) and not light when the touchpad is best used with an on the Notebook PC's keyboard. stretches the screen area to use the wireless LAN or Bluetooth. Locking the touchpad will launch your Internet browser application while Windows is running . NOTE: The Hot Key... connect an external monitor "before" booting up. 3 Getting Started Special Keyboard Functions 1.3 MEGA PIXELS Colored Hot Keys The following defines the colored hot keys on -screen-display.
... light when the touchpad is UNLOCKED (enabled) and not light when the touchpad is best used with an on the Notebook PC's keyboard. stretches the screen area to use the wireless LAN or Bluetooth. Locking the touchpad will launch your Internet browser application while Windows is running . NOTE: The Hot Key... connect an external monitor "before" booting up. 3 Getting Started Special Keyboard Functions 1.3 MEGA PIXELS Colored Hot Keys The following defines the colored hot keys on -screen-display.
User Manual
Page 29
...Ins): Toggles the numeric keypad (number lock) ON and OFF. Fn+V: Toggles "Life Frame" software application. You can see the current mode through the on -screen display (OSD). Colored Hot Keys (cont.) 3 Getting Started 1.3 MEGA PIXELS Speaker Icons (F10): Toggles the speakers ON and OFF (only in Windows OS) Speaker... green, and blue independently. Scr Lk (Del): Toggles the "Scroll Lock" ON and OFF. You can see the current mode through the on -screen display (OSD). 29 The power saving modes control many aspects of the keyboard for number entering. This allows switch-
...Ins): Toggles the numeric keypad (number lock) ON and OFF. Fn+V: Toggles "Life Frame" software application. You can see the current mode through the on -screen display (OSD). Colored Hot Keys (cont.) 3 Getting Started 1.3 MEGA PIXELS Speaker Icons (F10): Toggles the speakers ON and OFF (only in Windows OS) Speaker... green, and blue independently. Scr Lk (Del): Toggles the "Scroll Lock" ON and OFF. You can see the current mode through the on -screen display (OSD). 29 The power saving modes control many aspects of the keyboard for number entering. This allows switch-
User Manual
Page 31
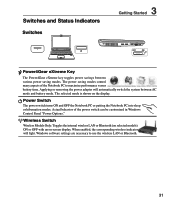
... PIXELS 3 Getting Started Power4Gear eXtreme Key The Power4Gear eXtreme key toggles power savings between AC mode and battery mode. The selected mode is shown on -screen display.
... PIXELS 3 Getting Started Power4Gear eXtreme Key The Power4Gear eXtreme key toggles power savings between AC mode and battery mode. The selected mode is shown on -screen display.
User Manual
Page 36
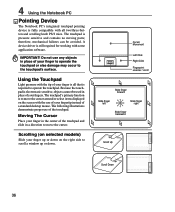
.... IMPORTANT! Moving The Cursor Place your finger up or down on the right side to move the cursor around or select items displayed on the screen with some application software. Cursor Movement Left Click Right Click Fingerprint scanner / scroll Slide finger forward Slide finger left Slide finger right Slide finger backward...
.... IMPORTANT! Moving The Cursor Place your finger up or down on the right side to move the cursor around or select items displayed on the screen with some application software. Cursor Movement Left Click Right Click Fingerprint scanner / scroll Slide finger forward Slide finger left Slide finger right Slide finger backward...
User Manual
Page 37
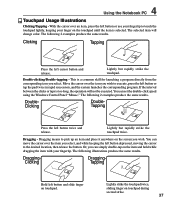
Double-clicking/Double-tapping - DoubleClicking DoubleTapping Press the left button and slide finger on the screen you select, and while keeping the left button or tap the pad twice in rapid succession, and the system launches the corresponding program. Dragging - DraggingClicking ...
Double-clicking/Double-tapping - DoubleClicking DoubleTapping Press the left button and slide finger on the screen you select, and while keeping the left button or tap the pad twice in rapid succession, and the system launches the corresponding program. Dragging - DraggingClicking ...
User Manual
Page 60
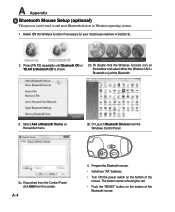
... model (see switches in Windows operating system. 1. A-4 4. Or double click the Wireless Console icon on the taskbar menu. 3b. Or Launch Bluetooth Devices from this screen.
... model (see switches in Windows operating system. 1. A-4 4. Or double click the Wireless Console icon on the taskbar menu. 3b. Or Launch Bluetooth Devices from this screen.
User Manual
Page 63
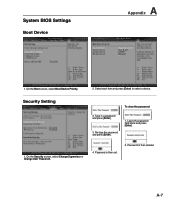
On the Security screen, select Change Supervisor or Change User Password. Leave the password field blank and press [Enter]. 4. Password is then set. 2. To clear the password: 2. Type in a password and press [Enter]. 3. Password is then cleared. Security Setting 1. Select each item and press [Enter] to select a device. A-7 Re-type the password and press [Enter]. 1. System BIOS Settings Boot Device A Appendix 1. On the Boot screen, select Boot Device Priority. 2.
On the Security screen, select Change Supervisor or Change User Password. Leave the password field blank and press [Enter]. 4. Password is then set. 2. To clear the password: 2. Type in a password and press [Enter]. 3. Password is then cleared. Security Setting 1. Select each item and press [Enter] to select a device. A-7 Re-type the password and press [Enter]. 1. System BIOS Settings Boot Device A Appendix 1. On the Boot screen, select Boot Device Priority. 2.
User Manual
Page 67
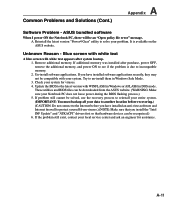
...un-install them in DOS mode. These utilities and BIOS files can be an "Open policy file error" message. Blue screen with white text A blue screen with WINFLASH in Windows or AFLASH in Windows Safe Mode. 3. Update the BIOS to the latest version with white text appears... will be recognized.) 6. Remove additional memory. Reinstall the latest version "Power4 Gear" utility to see if the problem is available on the ASUS website. Un-install software applications. If problem still cannot be solved, use the recovery process to reinstall your entire system. (IMPORTANT: You ...
...un-install them in DOS mode. These utilities and BIOS files can be an "Open policy file error" message. Blue screen with white text A blue screen with WINFLASH in Windows or AFLASH in Windows Safe Mode. 3. Update the BIOS to the latest version with white text appears... will be recognized.) 6. Remove additional memory. Reinstall the latest version "Power4 Gear" utility to see if the problem is available on the ASUS website. Un-install software applications. If problem still cannot be solved, use the recovery process to reinstall your entire system. (IMPORTANT: You ...
User Manual
Page 71
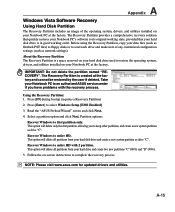
... (requires a Recovery Partition) 2. Recover Windows to a network drive and make note of the operating system, drivers, and utilities installed on -screen instructions to select Windows Setup [EMS Enabled] 3. This option will delete all partitions from your data files (such as Outlook PST files) to...The Recovery Partition is in good working state, provided that your Notebook PC to an authorized ASUS service center if you to its original working order. Read the "ASUS Preload Wizard" screen and click Next. 4. Select a partition option and click Next. This option will delete ...
... (requires a Recovery Partition) 2. Recover Windows to a network drive and make note of the operating system, drivers, and utilities installed on -screen instructions to select Windows Setup [EMS Enabled] 3. This option will delete all partitions from your data files (such as Outlook PST files) to...The Recovery Partition is in good working state, provided that your Notebook PC to an authorized ASUS service center if you to its original working order. Read the "ASUS Preload Wizard" screen and click Next. 4. Select a partition option and click Next. This option will delete ...
User Manual
Page 72
...remove the Recovery CD (unless instructed to its original working state, provided that your Notebook PC at the factory. NOTE: Please visit www.asus.com for updated drivers and utilities. Using the Recovery D�V��D��: 1. Select a partition option and click Next. Recover ...and create a new system partition as drive "C". This option will delete all partitions from the Recovery DVD. 3. A-16 Follow the on-screen instructions to entire HD. This option will delete all partitions from your data files (such as Outlook PST files) to floppy disks or ...
...remove the Recovery CD (unless instructed to its original working state, provided that your Notebook PC at the factory. NOTE: Please visit www.asus.com for updated drivers and utilities. Using the Recovery D�V��D��: 1. Select a partition option and click Next. Recover ...and create a new system partition as drive "C". This option will delete all partitions from the Recovery DVD. 3. A-16 Follow the on-screen instructions to entire HD. This option will delete all partitions from your data files (such as Outlook PST files) to floppy disks or ...


