User Guide
Page 2
... MANUAL, INCLUDING THE PRODUCTS AND SOFTWARE DESCRIBED IN IT. No part of this manual may or may be registered trademarks or copyrights of alteration is authorized in any form or by any language in writing by the purchaser for identification or explanation and to the owners' benefit, without the express written permission of the product is repaired...
... MANUAL, INCLUDING THE PRODUCTS AND SOFTWARE DESCRIBED IN IT. No part of this manual may or may be registered trademarks or copyrights of alteration is authorized in any form or by any language in writing by the purchaser for identification or explanation and to the owners' benefit, without the express written permission of the product is repaired...
User Guide
Page 3
...Package contents 1-1 1.3 Monitor introduction 1-2 1.3.1 Front view 1-2 1.3.2 Back view 1-3 Chapter 2: Setup 2.1 Assembling the monitor base 2-1 2.2 Adjusting the monitor angles 2-2 2.3 Detaching the arm/base (for VESA wall mount 2-2 2.4 Disassembling the monitor base (for product packing 2-4 2.5 Connecting the cables 2-4 2.6 Turning on the monitor 2-5 Chapter 3: General instruction 3.1 OSD (On-Screen Display) menu 3-1 3.1.1 How to reconfigure 3-1 3.1.2 OSD Function Introduction 3-1 3.2 Specifications summary 3-4 3.3 Troubleshooting (FAQ 3-7 3.4 Supported operating modes 3-8 iii
...Package contents 1-1 1.3 Monitor introduction 1-2 1.3.1 Front view 1-2 1.3.2 Back view 1-3 Chapter 2: Setup 2.1 Assembling the monitor base 2-1 2.2 Adjusting the monitor angles 2-2 2.3 Detaching the arm/base (for VESA wall mount 2-2 2.4 Disassembling the monitor base (for product packing 2-4 2.5 Connecting the cables 2-4 2.6 Turning on the monitor 2-5 Chapter 3: General instruction 3.1 OSD (On-Screen Display) menu 3-1 3.1.1 How to reconfigure 3-1 3.1.2 OSD Function Introduction 3-1 3.2 Specifications summary 3-4 3.3 Troubleshooting (FAQ 3-7 3.4 Supported operating modes 3-8 iii

User Guide
Page 4
... user is required to Part 15 of the FCC Rules. The use of shielded cables for a Class B digital device, pursuant to assure compliance with manufacturer's instructions, may cause undesired operation. This equipment has been tested and found to operate this product meets the Energy Star® guidelines for help. Canadian Department of the monitor to the graphics card is...
... user is required to Part 15 of the FCC Rules. The use of shielded cables for a Class B digital device, pursuant to assure compliance with manufacturer's instructions, may cause undesired operation. This equipment has been tested and found to operate this product meets the Energy Star® guidelines for help. Canadian Department of the monitor to the graphics card is...
User Guide
Page 6
.... • Slots and openings on the back or top of the crossed out wheeled bin indicates that came with the monitor, contact a qualified service technician or your retailer. • Before using the product, make sure all the documentation that the product (electrical and electronic equipment) should be used for a long period of power source indicated on a stable surface...
.... • Slots and openings on the back or top of the crossed out wheeled bin indicates that came with the monitor, contact a qualified service technician or your retailer. • Before using the product, make sure all the documentation that the product (electrical and electronic equipment) should be used for a long period of power source indicated on a stable surface...
User Guide
Page 7
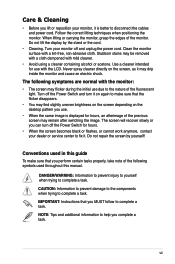
Turn off the Power Switch and turn off and unplug the power cord. IMPORTANT: Instructions that you complete a task. Do not lift the display by yourself! Clean the monitor surface with the monitor: • The screen may be removed with a cloth dampened with the LCD. The following symbols used throughout this guide To make sure that you perform certain tasks properly, take note of the following symptoms are...
Turn off the Power Switch and turn off and unplug the power cord. IMPORTANT: Instructions that you complete a task. Do not lift the display by yourself! Clean the monitor surface with the monitor: • The screen may be removed with a cloth dampened with the LCD. The following symbols used throughout this guide To make sure that you perform certain tasks properly, take note of the following symptoms are...
User Guide
Page 9
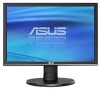
... delightful visual experience that the VW195xL/VW202xL/VW225xL Series brings you for the following items: • LCD monitor • Monitor base • Quick start guide • 1 x Power cord • 1 x VGA cable • 1 x DVI cable • 1 x Audio cable If any of features that enhance your retailer immediately. Thank you ! 1.2 Package contents Check your VW195xL/VW202xL/VW225xL Series LCD monitor package for purchasing the ASUS® VW195xL/VW202xL/VW225xL Series LCD monitor! ASUS VW195xL/VW202xL/VW225xL Series LCD Monitor 1-1 1.1 Welcome!
... delightful visual experience that the VW195xL/VW202xL/VW225xL Series brings you for the following items: • LCD monitor • Monitor base • Quick start guide • 1 x Power cord • 1 x VGA cable • 1 x DVI cable • 1 x Audio cable If any of features that enhance your retailer immediately. Thank you ! 1.2 Package contents Check your VW195xL/VW202xL/VW225xL Series LCD monitor package for purchasing the ASUS® VW195xL/VW202xL/VW225xL Series LCD monitor! ASUS VW195xL/VW202xL/VW225xL Series LCD Monitor 1-1 1.1 Welcome!

User Guide
Page 10
... for VGA mode only). 2. 1.3 Monitor introduction 1.3.1 Front view MENU Base 1 2 3 4 5 1. Button: • Press this button for 2-4 seconds (for model without speaker. 3. Button: • Press this button to enter/select the icon (function) highlighted while the OSD is also a hotkey for model with SPLENDID™ Video Enhancement Technology. • Exit the OSD menu or go back to the previous menu as the OSD menu is activated. • Automatically adjust the image to its optimized position...
... for VGA mode only). 2. 1.3 Monitor introduction 1.3.1 Front view MENU Base 1 2 3 4 5 1. Button: • Press this button for 2-4 seconds (for model without speaker. 3. Button: • Press this button to enter/select the icon (function) highlighted while the OSD is also a hotkey for model with SPLENDID™ Video Enhancement Technology. • Exit the OSD menu or go back to the previous menu as the OSD menu is activated. • Automatically adjust the image to its optimized position...
User Guide
Page 11
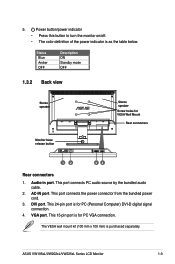
... audio cable. 2. ASUS VW195xL/VW202xL/VW225xL Series LCD Monitor 1-3 5. Status Blue Amber OFF Description ON Standby mode OFF 1.3.2 Back view Stereo speaker Monitor base release button Stereo speaker Screw holes for PC (Personal Computer) DVI-D digital signal connection. 4. Audio-in port. This 15-pin port is purchased separately. AC-IN port. VGA port. The VESA wall mount kit (100 mm x 100 mm) is for PC VGA connection. This port connects the power connector from the bundled power cord. 3. Power button/power indicator • Press this button to turn the monitor...
... audio cable. 2. ASUS VW195xL/VW202xL/VW225xL Series LCD Monitor 1-3 5. Status Blue Amber OFF Description ON Standby mode OFF 1.3.2 Back view Stereo speaker Monitor base release button Stereo speaker Screw holes for PC (Personal Computer) DVI-D digital signal connection. 4. Audio-in port. This 15-pin port is purchased separately. AC-IN port. VGA port. The VESA wall mount kit (100 mm x 100 mm) is for PC VGA connection. This port connects the power connector from the bundled power cord. 3. Power button/power indicator • Press this button to turn the monitor...

User Guide
Page 13
2.1 Assembling the monitor base To assemble the monitor base 1. ASUS VW195xL/VW202xL/VW225xL Series LCD Monitor 2-1 A click sound shows that the base has been connected successfully. 3. Connect the base with the arm according to the below drawing. Have the monitor base place on a flat surface. Remove the monitor height adjustment lock. 2 3 1 The monitor height adjustment lock should NEVER be removed BEFORE you place the monitor VERTICALLY on a flat table. 2.
2.1 Assembling the monitor base To assemble the monitor base 1. ASUS VW195xL/VW202xL/VW225xL Series LCD Monitor 2-1 A click sound shows that the base has been connected successfully. 3. Connect the base with the arm according to the below drawing. Have the monitor base place on a flat surface. Remove the monitor height adjustment lock. 2 3 1 The monitor height adjustment lock should NEVER be removed BEFORE you place the monitor VERTICALLY on a flat table. 2.
User Guide
Page 14
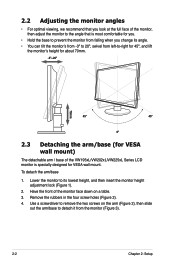
... you. • Hold the base to remove the two screws on a table. 3. Use a screwdriver to prevent the monitor from falling when you change its lowest height, and then insert the monitor height adjustment lock (Figure 1). 2. To detach the arm/base 1. 2.2 Adjusting the monitor angles • For optimal viewing, we recommend that you look at the full face of the VW195xL/VW202xL/VW225xL Series LCD monitor is most comfortable for VESA wall mount.
... you. • Hold the base to remove the two screws on a table. 3. Use a screwdriver to prevent the monitor from falling when you change its lowest height, and then insert the monitor height adjustment lock (Figure 1). 2. To detach the arm/base 1. 2.2 Adjusting the monitor angles • For optimal viewing, we recommend that you look at the full face of the VW195xL/VW202xL/VW225xL Series LCD monitor is most comfortable for VESA wall mount.
User Guide
Page 16
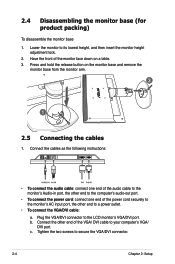
... the power cord securely to the monitor's AC input port, the other end of the monitor face down on the monitor base and remove the monitor base from the monitor arm. 3 1 2.5 Connecting the cables 1. Connect the other end to its lowest height, and then insert the monitor height adjustment lock. 2. Press and hold the release button on a table. 3. Plug the VGA/DVI connector to your computer's VGA/ DVI port. Tighten the two screws to secure the VGA/DVI connector. 2-4 Chapter 2: Setup 2.4 Disassembling the monitor base (for...
... the power cord securely to the monitor's AC input port, the other end of the monitor face down on the monitor base and remove the monitor base from the monitor arm. 3 1 2.5 Connecting the cables 1. Connect the other end to its lowest height, and then insert the monitor height adjustment lock. 2. Press and hold the release button on a table. 3. Plug the VGA/DVI connector to your computer's VGA/ DVI port. Tighten the two screws to secure the VGA/DVI connector. 2-4 Chapter 2: Setup 2.4 Disassembling the monitor base (for...
User Guide
Page 17
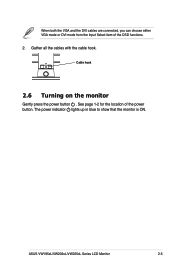
The power indicator lights up in blue to show that the monitor is ON. Gather all the cables with the cable hook. Cable hook 2.6 Turning on the monitor Gently press the power button . See page 1-2 for the location of the OSD functions. 2. ASUS VW195xL/VW202xL/VW225xL Series LCD Monitor 2-5 When both the VGA and the DVI cables are connected, you can choose either VGA mode or DVI mode from the Input Select item of the power button.
The power indicator lights up in blue to show that the monitor is ON. Gather all the cables with the cable hook. Cable hook 2.6 Turning on the monitor Gently press the power button . See page 1-2 for the location of the OSD functions. 2. ASUS VW195xL/VW202xL/VW225xL Series LCD Monitor 2-5 When both the VGA and the DVI cables are connected, you can choose either VGA mode or DVI mode from the Input Select item of the power button.
User Guide
Page 19
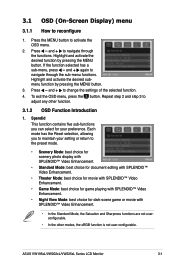
... preference. ASUS VW195xL/VW202xL/VW225xL Series LCD Monitor 3-1 Press and to navigate through the functions. Repeat step 2 and step 3 to change the settings of the selected function. 4. Highlight and activate the desired function by pressing the MENU button. 3. Press and to adjust any other modes, the sRGB function is not user-configurable. To exit the OSD menu, press the button. Each mode has the Reset selection...
... preference. ASUS VW195xL/VW202xL/VW225xL Series LCD Monitor 3-1 Press and to navigate through the functions. Repeat step 2 and step 3 to change the settings of the selected function. 4. Highlight and activate the desired function by pressing the MENU button. 3. Press and to adjust any other modes, the sRGB function is not user-configurable. To exit the OSD menu, press the button. Each mode has the Reset selection...

User Guide
Page 20
... screen shows horizontal disturbances. • Clock (pixel frequency) controls the number of the pixel clock signal. In the User mode, colors of the image by one horizontal sweep. If the frequency is not correct, the screen shows vertical stripes and the image is from 0-100. 3-2 Chapter 3: General Instruction The adjusting range is not proportional. 3. Image You can adjust brightness, contrast, sharpness, saturation, position (VGA only), ASCR, and focus (VGA only) from this function. • Color Temp.: contains five color modes...
... screen shows horizontal disturbances. • Clock (pixel frequency) controls the number of the pixel clock signal. In the User mode, colors of the image by one horizontal sweep. If the frequency is not correct, the screen shows vertical stripes and the image is from 0-100. 3-2 Chapter 3: General Instruction The adjusting range is not proportional. 3. Image You can adjust brightness, contrast, sharpness, saturation, position (VGA only), ASCR, and focus (VGA only) from this function. • Color Temp.: contains five color modes...
User Guide
Page 21
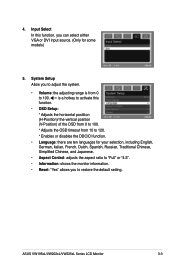
...; Information: shows the monitor information. • Reset: "Yes" allows you to adjust the system. • Volume: the adjusting range is a hotkey to activate this function. • OSD Setup: * Adjusts the horizontal postition (H-Position)/ the vertical position (V-Position) of the OSD from 0 to 100. * Adjusts the OSD timeout from 0 to 120. * Enables or disables the DDC/CI function. • Language: there are ten languages for some models) 5. ASUS VW195xL/VW202xL/VW225xL Series LCD Monitor 3-3 is from...
...; Information: shows the monitor information. • Reset: "Yes" allows you to adjust the system. • Volume: the adjusting range is a hotkey to activate this function. • OSD Setup: * Adjusts the horizontal postition (H-Position)/ the vertical position (V-Position) of the OSD from 0 to 100. * Adjusts the OSD timeout from 0 to 120. * Enables or disables the DDC/CI function. • Language: there are ten languages for some models) 5. ASUS VW195xL/VW202xL/VW225xL Series LCD Monitor 3-3 is from...

User Guide
Page 22
... summary (VW195xL Series) Panel Type TFT LCD Panel size Max. Resolution Pixel pitch Brightness (Typ.) Brightness (Max.) Contrast Ratio (Typ.) Contrast Ratio (Max.) Viewing angle(H/V) CR>10 Display colors Response time SPLENDID™ Video Enhancement SPLENDID™ selection Auto adjustment Color temperature selection Skin-Tone selection Digital input Analog input Audio-in port Colors Speaker (Built-in) Power LED VESA wall mount Tilt Swivel Height adjustment Kensington lock Voltage rating Power consumption 19" (16:10) wide screen WXGA+ 1440 x 900 0.285mm 250cd/m2 300cd/m2 800...
... summary (VW195xL Series) Panel Type TFT LCD Panel size Max. Resolution Pixel pitch Brightness (Typ.) Brightness (Max.) Contrast Ratio (Typ.) Contrast Ratio (Max.) Viewing angle(H/V) CR>10 Display colors Response time SPLENDID™ Video Enhancement SPLENDID™ selection Auto adjustment Color temperature selection Skin-Tone selection Digital input Analog input Audio-in port Colors Speaker (Built-in) Power LED VESA wall mount Tilt Swivel Height adjustment Kensington lock Voltage rating Power consumption 19" (16:10) wide screen WXGA+ 1440 x 900 0.285mm 250cd/m2 300cd/m2 800...
User Guide
Page 23
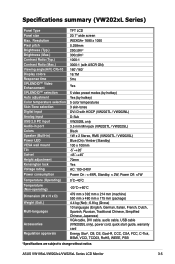
... summary (VW202xL Series) Panel Type Panel size Max. Resolution Pixel pitch Brightness (Typ.) Brightness (Max.) Contrast Ratio (Typ.) Contrast Ratio (Max.) Viewing angle(H/V) CR>10 Display colors Response time SPLENDID™ Video Enhancement SPLENDID™ selection Auto adjustment Color temperature selection Skin-Tone selection Digital input Analog input USB 2.0 PC input Audio-in port Colors Speaker (Built-in) Power LED VESA wall mount Tilt Swivel Height adjustment Kensington lock Voltage rating Power consumption TFT LCD 20.1" wide screen WSXGA+ 1680 x 1050 0.258mm 250cd/m2 300cd...
... summary (VW202xL Series) Panel Type Panel size Max. Resolution Pixel pitch Brightness (Typ.) Brightness (Max.) Contrast Ratio (Typ.) Contrast Ratio (Max.) Viewing angle(H/V) CR>10 Display colors Response time SPLENDID™ Video Enhancement SPLENDID™ selection Auto adjustment Color temperature selection Skin-Tone selection Digital input Analog input USB 2.0 PC input Audio-in port Colors Speaker (Built-in) Power LED VESA wall mount Tilt Swivel Height adjustment Kensington lock Voltage rating Power consumption TFT LCD 20.1" wide screen WSXGA+ 1680 x 1050 0.258mm 250cd/m2 300cd...

User Guide
Page 24
... (Typ.) Brightness (Max.) Contrast Ratio (Typ.) Contrast Ratio (Max.) Viewing angle(H/V) CR>10 Display colors Response time SPLENDID™ Video Enhancement SPLENDID™ selection Auto adjustment Color temperature selection Skin-Tone selection Digital input Analog input Audio-in port Colors Speaker (Built-in) Power LED VESA wall mount Tilt Swivel Height adjustment Kensington lock Voltage rating Power consumption Temperature (Operating) Temperature (Non-operating) Dimension (W x H x D) Weight (Esti.) Multi-languages Accessories Regulation approvals TFT LCD 22.0" (16:10) wide screen WSXGA...
... (Typ.) Brightness (Max.) Contrast Ratio (Typ.) Contrast Ratio (Max.) Viewing angle(H/V) CR>10 Display colors Response time SPLENDID™ Video Enhancement SPLENDID™ selection Auto adjustment Color temperature selection Skin-Tone selection Digital input Analog input Audio-in port Colors Speaker (Built-in) Power LED VESA wall mount Tilt Swivel Height adjustment Kensington lock Voltage rating Power consumption Temperature (Operating) Temperature (Non-operating) Dimension (W x H x D) Weight (Esti.) Multi-languages Accessories Regulation approvals TFT LCD 22.0" (16:10) wide screen WSXGA...
User Guide
Page 25
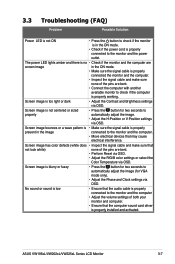
3.3 Troubleshooting (FAQ) Problem Possible Solution Power LED is not ON • Press the button to check if the monitor is in the ON mode. • Check if the power cord is properly connected to properly automatically adjust the image. • Adjust the H-Position or V-Position settings via OSD. Screen image bounces or a wave pattern is • Make sure the signal cable is properly present in the ON mode. • Make sure the signal cable is properly installed and activated. No...
3.3 Troubleshooting (FAQ) Problem Possible Solution Power LED is not ON • Press the button to check if the monitor is in the ON mode. • Check if the power cord is properly connected to properly automatically adjust the image. • Adjust the H-Position or V-Position settings via OSD. Screen image bounces or a wave pattern is • Make sure the signal cable is properly present in the ON mode. • Make sure the signal cable is properly installed and activated. No...

User Guide
Page 26
3.4 Supported operating modes Standard DOS VGA SVGA XGA SXGA VESA UXGA VESA Resolution Horizontal Frequency Frequency 720 x 400 31.47KHz 640 x 480 31.47KHz 640 x 480 37...1680 x 1050 (VW202xL / VW225xL 65.29KHz Primary) Vertical Frequency 70Hz 60Hz 72Hz 75Hz 56Hz 60Hz 72Hz 75Hz 60Hz 70Hz 75Hz 60Hz 60Hz 75Hz 75Hz 60Hz 60Hz 60Hz Pixel 28.32MHz 25.18MHz 31.50MHz 31.50MHz 36.... 106.5MHz 162.00MHz 146.25MHz * Modes not listed in the table above. 3-8 Chapter 3: General Instruction For optimal resolution, we recommend that you choose a mode listed in the table may not be supported.
3.4 Supported operating modes Standard DOS VGA SVGA XGA SXGA VESA UXGA VESA Resolution Horizontal Frequency Frequency 720 x 400 31.47KHz 640 x 480 31.47KHz 640 x 480 37...1680 x 1050 (VW202xL / VW225xL 65.29KHz Primary) Vertical Frequency 70Hz 60Hz 72Hz 75Hz 56Hz 60Hz 72Hz 75Hz 60Hz 70Hz 75Hz 60Hz 60Hz 75Hz 75Hz 60Hz 60Hz 60Hz Pixel 28.32MHz 25.18MHz 31.50MHz 31.50MHz 36.... 106.5MHz 162.00MHz 146.25MHz * Modes not listed in the table above. 3-8 Chapter 3: General Instruction For optimal resolution, we recommend that you choose a mode listed in the table may not be supported.


