
User Guide
Page 2
...service will not be extended if: (1) the product is repaired, modified or alered, unless such repair, modification of alteration is defaced or missing. SPECIFICATIONS AND INFORMATION CONTAINED IN THIS MANUAL ARE FURNISHED FOR INFORMATIONAL USE ONLY, AND ARE SUBJECT TO CHANGE AT ANY TIME WITHOUT NOTICE, AND SHOULD NOT BE CONSTRUED AS A COMMITMENT BY ASUS. or (2) the serial number... PURPOSE. No part of this manual, including the products and software described in it, may not be reproduced, transmitted, transcribed, stored in a retrieval system, or translated into any language in any form...
...service will not be extended if: (1) the product is repaired, modified or alered, unless such repair, modification of alteration is defaced or missing. SPECIFICATIONS AND INFORMATION CONTAINED IN THIS MANUAL ARE FURNISHED FOR INFORMATIONAL USE ONLY, AND ARE SUBJECT TO CHANGE AT ANY TIME WITHOUT NOTICE, AND SHOULD NOT BE CONSTRUED AS A COMMITMENT BY ASUS. or (2) the serial number... PURPOSE. No part of this manual, including the products and software described in it, may not be reproduced, transmitted, transcribed, stored in a retrieval system, or translated into any language in any form...
User Guide
Page 3
... v Care & Cleaning vi Chapter 1: Product introduction 1.1 Welcome 1 1.2 Package contents 1 1.3 Monitor introduction 2 1.3.1 Front view 2 1.3.2 Back view 3 Chapter 2: Setup 2.1 Assembling the monitor arm/base 1 2.2 Adjusting the monitor 1 2.3 Detaching the arm/base (for VESA wall mount 2-2 2.4 Connecting the cables 2-3 2.5 Turning on the monitor 2-3 Chapter 3: General instructions 3.1 OSD (On-Screen Display) menu 1 3.1.1 How to reconfigure 1 3.1.2 OSD function introduction 1 3.2 Specifications summary (VS248 4 3.3 Troubleshooting (FAQ 5 3.4 Supported operating modes 6 iii
... v Care & Cleaning vi Chapter 1: Product introduction 1.1 Welcome 1 1.2 Package contents 1 1.3 Monitor introduction 2 1.3.1 Front view 2 1.3.2 Back view 3 Chapter 2: Setup 2.1 Assembling the monitor arm/base 1 2.2 Adjusting the monitor 1 2.3 Detaching the arm/base (for VESA wall mount 2-2 2.4 Connecting the cables 2-3 2.5 Turning on the monitor 2-3 Chapter 3: General instructions 3.1 OSD (On-Screen Display) menu 1 3.1.1 How to reconfigure 1 3.1.2 OSD function introduction 1 3.2 Specifications summary (VS248 4 3.3 Troubleshooting (FAQ 5 3.4 Supported operating modes 6 iii
User Guide
Page 4
... with Part 15 of the monitor to the graphics card is required to assure compliance with FCC regulations. This equipment generates, uses and can be determined by turning the equipment off and on a circuit different from digital apparatus set out in accordance with manufacturer's instructions, may... receiving antenna. • Increase the separation between the equipment and receiver. • Connect the equipment to which can radiate radio frequency energy and, if not installed and used in the Radio Interference Regulations of the Canadian Department of the FCC Rules. Operation is...
... with Part 15 of the monitor to the graphics card is required to assure compliance with FCC regulations. This equipment generates, uses and can be determined by turning the equipment off and on a circuit different from digital apparatus set out in accordance with manufacturer's instructions, may... receiving antenna. • Increase the separation between the equipment and receiver. • Connect the equipment to which can radiate radio frequency energy and, if not installed and used in the Radio Interference Regulations of the Canadian Department of the FCC Rules. Operation is...

User Guide
Page 5
... a qualified service technician or your retailer. • Before using the product, make sure all the documentation that the product (electrical, electronic equipment, and mercury-containing button cell battery) should be operated only from damage due to open the monitor cabinet. If you detect any kind into the slots on the label. This symbol of power supply to fix it...
... a qualified service technician or your retailer. • Before using the product, make sure all the documentation that the product (electrical, electronic equipment, and mercury-containing button cell battery) should be operated only from damage due to open the monitor cabinet. If you detect any kind into the slots on the label. This symbol of power supply to fix it...
User Guide
Page 6
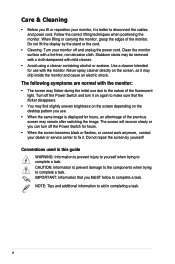
... edges of the fluorescent light. Do not repair the screen by the stand or the cord. • Cleaning. Turn off the Power Switch and turn off and unplug the power cord. IMPORTANT: Information that the flicker disappears. • You may find slightly uneven brightness on the screen depending on again to disconnect the cables and power cord. Follow the correct lifting techniques when positioning the monitor. CAUTION: Information to prevent...
... edges of the fluorescent light. Do not repair the screen by the stand or the cord. • Cleaning. Turn off the Power Switch and turn off and unplug the power cord. IMPORTANT: Information that the flicker disappears. • You may find slightly uneven brightness on the screen depending on again to disconnect the cables and power cord. Follow the correct lifting techniques when positioning the monitor. CAUTION: Information to prevent...
User Guide
Page 7
These documents are not part of the standard package. Optional documentation Your product package may include optional documentation that may have been added by your dealer. Refer to the following sources for additional information and for product and software updates. 1. vii Where to find more information Refer to http://www.asus.com 2. ASUS websites The ASUS websites worldwide provide updated information on ASUS hardware and software products.
These documents are not part of the standard package. Optional documentation Your product package may include optional documentation that may have been added by your dealer. Refer to the following sources for additional information and for product and software updates. 1. vii Where to find more information Refer to http://www.asus.com 2. ASUS websites The ASUS websites worldwide provide updated information on ASUS hardware and software products.
User Guide
Page 8
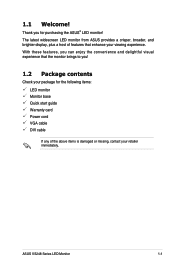
ASUS VS248 Series LED Monitor 1-1 With these features, you can enjoy the convenience and delightful visual experience that enhance your retailer immediately. 1.1 Welcome! The latest widescreen LED monitor from ASUS provides a crisper, broader, and brighter display, plus a host of features that the monitor brings to you for the following items: LED monitor Monitor base Quick start guide Warranty card Power cord VGA cable DVI cable If any of the above items is damaged or...
ASUS VS248 Series LED Monitor 1-1 With these features, you can enjoy the convenience and delightful visual experience that enhance your retailer immediately. 1.1 Welcome! The latest widescreen LED monitor from ASUS provides a crisper, broader, and brighter display, plus a host of features that the monitor brings to you for the following items: LED monitor Monitor base Quick start guide Warranty card Power cord VGA cable DVI cable If any of the above items is damaged or...
User Guide
Page 9
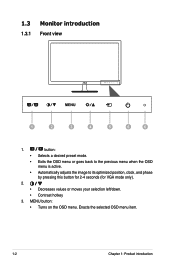
1.3 Monitor introduction 1.3.1 Front view 1 2 3 4 5 6 6 1. button: • Selects a desired preset mode. • Exits the OSD menu or goes back to the previous menu when the OSD menu is active. • Automatically adjusts the image to its optimized position, clock, and phase by pressing this button for 2-4 seconds (for VGA mode only). 2. • Decreases values or moves your selection left/down. • Contrast hotkey 3. Enacts the selected OSD menu item. 1-2 Chapter 1: Product introduction MENU button: • Turns on the OSD menu.
1.3 Monitor introduction 1.3.1 Front view 1 2 3 4 5 6 6 1. button: • Selects a desired preset mode. • Exits the OSD menu or goes back to the previous menu when the OSD menu is active. • Automatically adjusts the image to its optimized position, clock, and phase by pressing this button for 2-4 seconds (for VGA mode only). 2. • Decreases values or moves your selection left/down. • Contrast hotkey 3. Enacts the selected OSD menu item. 1-2 Chapter 1: Product introduction MENU button: • Turns on the OSD menu.

User Guide
Page 10
...-pin port is for connection with an HDMI compatible device. 3. This port is only available when an HDMI cable is as the below table. DVI port. 4. • Increases values or moves your selection right/up. • Brightness hotkey 5. button: • Selects an available input source. 6. HDMI port. Kensington lock slot. This port is for PC VGA connection. 5. This 15-pin port is for PC (Personal Computer) DVI-D digital signal connection. 4. AC-IN port. ASUS VS248 Series LED Monitor 1-3 VGA port. Earphone...
...-pin port is for connection with an HDMI compatible device. 3. This port is only available when an HDMI cable is as the below table. DVI port. 4. • Increases values or moves your selection right/up. • Brightness hotkey 5. button: • Selects an available input source. 6. HDMI port. Kensington lock slot. This port is for PC VGA connection. 5. This 15-pin port is for PC (Personal Computer) DVI-D digital signal connection. 4. AC-IN port. ASUS VS248 Series LED Monitor 1-3 VGA port. Earphone...
User Guide
Page 12
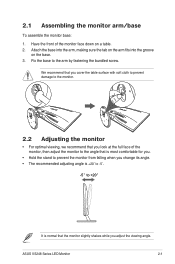
.... 2. ASUS VS248 Series LED Monitor 2-1 We recommend that you cover the table surface with soft cloth to prevent damage to the monitor. 2.2 Adjusting the monitor • For optimal viewing, we recommend that you look at the full face of the monitor face down on the base. 3. Fix the base to +20f It is normal that the monitor slightly shakes while you adjust the viewing angle. 2.1 Assembling the monitor arm/base...
.... 2. ASUS VS248 Series LED Monitor 2-1 We recommend that you cover the table surface with soft cloth to prevent damage to the monitor. 2.2 Adjusting the monitor • For optimal viewing, we recommend that you look at the full face of the monitor face down on the base. 3. Fix the base to +20f It is normal that the monitor slightly shakes while you adjust the viewing angle. 2.1 Assembling the monitor arm/base...
User Guide
Page 13
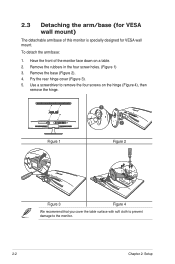
Use a screwdriver to the monitor. 2-2 Chapter 2: Setup Remove the base (Figure 2). 4. 2.3 Detaching the arm/base (for VESA wall mount) The detachable arm/base of the monitor face down on the hinge (Figure 4), then remove the hinge. 1 2 Figure 1 Figure 2 Figure 3 Figure 4 We recommend that you cover the table surface with soft cloth to prevent damage to remove the four screws on a table. 2. To detach the arm/base: 1. Pry...
Use a screwdriver to the monitor. 2-2 Chapter 2: Setup Remove the base (Figure 2). 4. 2.3 Detaching the arm/base (for VESA wall mount) The detachable arm/base of the monitor face down on the hinge (Figure 4), then remove the hinge. 1 2 Figure 1 Figure 2 Figure 3 Figure 4 We recommend that you cover the table surface with soft cloth to prevent damage to remove the four screws on a table. 2. To detach the arm/base: 1. Pry...
User Guide
Page 14
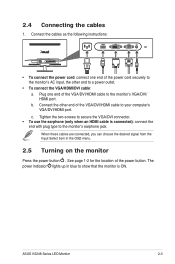
...'s VGA/DVI/HDMI port. c. 2.4 Connecting the cables 1. b. The power indicator lights up in the OSD menu. 2.5 Turning on the monitor Press the power button . ASUS VS248 Series LED Monitor 2-3 When these cables are connected, you can choose the desired signal from the Input Select item in blue to show that the monitor is connected): connect the end with plug type to the monitor's VGA/DVI/ HDMI port. Plug one end of the power button. See page 1-2 for the location of the power cord securely to the monitor's AC input...
...'s VGA/DVI/HDMI port. c. 2.4 Connecting the cables 1. b. The power indicator lights up in the OSD menu. 2.5 Turning on the monitor Press the power button . ASUS VS248 Series LED Monitor 2-3 When these cables are connected, you can choose the desired signal from the Input Select item in blue to show that the monitor is connected): connect the end with plug type to the monitor's VGA/DVI/ HDMI port. Plug one end of the power button. See page 1-2 for the location of the power cord securely to the monitor's AC input...
User Guide
Page 16
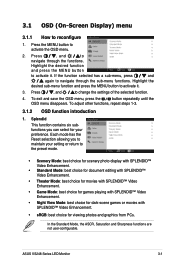
... functions, repeat steps 1-3. 3.1.2 OSD function introduction 1. Each mode has the Reset selection allowing you can select for viewing photos and graphics from PCs. 3.1 OSD (On-Screen Display) menu 3.1.1 How to reconfigure 111 Press the MENU button to activate the OSD menu. 222 P r e s s , and to change the settings of the selected function. 444 To exit and save the OSD menu, press the button repeatedly until the OSD menu disappears. Splendid This...
... functions, repeat steps 1-3. 3.1.2 OSD function introduction 1. Each mode has the Reset selection allowing you can select for viewing photos and graphics from PCs. 3.1 OSD (On-Screen Display) menu 3.1.1 How to reconfigure 111 Press the MENU button to activate the OSD menu. 222 P r e s s , and to change the settings of the selected function. 444 To exit and save the OSD menu, press the button repeatedly until the OSD menu disappears. Splendid This...
User Guide
Page 17
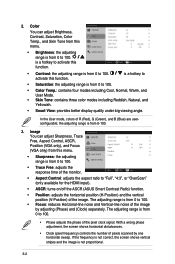
... frequency is not correct, the screen shows vertical stripes and the image is from this function. • Contrast: the adjusting range is from 0 to "Full", "4:3", or "OverScan" (only available for the HDMI input). • ASCR: turns on/off the ASCR (ASUS Smart Contrast Ratio) function. • Position: adjusts the horizontal position (H-Position) and the vertical position (V-Position) of pixels scanned by adjusting (Phase) and (Clock) separately. 2. Color You can adjust Sharpness, Trace Free, Aspect Control, ASCR, Position (VGA...
... frequency is not correct, the screen shows vertical stripes and the image is from this function. • Contrast: the adjusting range is from 0 to "Full", "4:3", or "OverScan" (only available for the HDMI input). • ASCR: turns on/off the ASCR (ASUS Smart Contrast Ratio) function. • Position: adjusts the horizontal position (H-Position) and the vertical position (V-Position) of pixels scanned by adjusting (Phase) and (Clock) separately. 2. Color You can adjust Sharpness, Trace Free, Aspect Control, ASCR, Position (VGA...
User Guide
Page 18
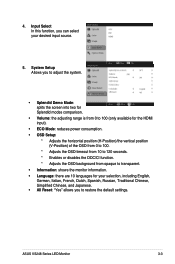
... input source. 5. Input Select In this function, you to transparent. • Information: shows the monitor information. • Language: there are 10 languages for the HDMI input). • ECO Mode: reduces power consumption. • OSD Setup: * Adjusts the horizontal position (H-Position)/the vertical position (V-Position) of the OSD from 0 to 100. * Adjusts the OSD timeout from 10 to 120 seconds. * Enables or disables the DDC/CI function. * Adjusts the OSD background from opaque to restore the default settings...
... input source. 5. Input Select In this function, you to transparent. • Information: shows the monitor information. • Language: there are 10 languages for the HDMI input). • ECO Mode: reduces power consumption. • OSD Setup: * Adjusts the horizontal position (H-Position)/the vertical position (V-Position) of the OSD from 0 to 100. * Adjusts the OSD timeout from 10 to 120 seconds. * Enables or disables the DDC/CI function. * Adjusts the OSD background from opaque to restore the default settings...

User Guide
Page 19
Resolution Pixel pitch Brightness (Max.) Contrast Ratio (Typ.) Contrast Ratio (Max.) Viewing angle(H/V) CR>10 Display colors Response time SPLENDID™ Video Enhancement SPLENDID™ selection Auto adjustment Color temperature selection Skin-Tone selection Digital input Analog input Earphone jack Colors Power LED Tilt Kensington lock Voltage rating Power consumption Temperature (Operating) Temperature (Non-operating) Dimensions (W x H x D) Weight (Esti.) Multi-languages Accessories Regulation approvals TFT LCD 24" (16:9, 61 cm) wide screen 1920 x 1080 0.2768 mm 250 cd/m2 1000...
Resolution Pixel pitch Brightness (Max.) Contrast Ratio (Typ.) Contrast Ratio (Max.) Viewing angle(H/V) CR>10 Display colors Response time SPLENDID™ Video Enhancement SPLENDID™ selection Auto adjustment Color temperature selection Skin-Tone selection Digital input Analog input Earphone jack Colors Power LED Tilt Kensington lock Voltage rating Power consumption Temperature (Operating) Temperature (Non-operating) Dimensions (W x H x D) Weight (Esti.) Multi-languages Accessories Regulation approvals TFT LCD 24" (16:9, 61 cm) wide screen 1920 x 1080 0.2768 mm 250 cd/m2 1000...
User Guide
Page 20
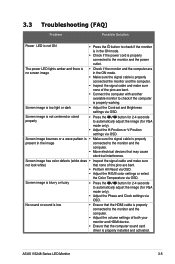
... button for VGA mode only). • Adjust the H-Position or V-Position settings via OSD. Screen image has color defects (white does • Inspect the signal cable and make sure none of the pins are bent. • Connect the computer with another available monitor to the monitor and the power outlet. 3.3 Troubleshooting (FAQ) Problem Possible Solution Power LED is not ON • Press the button to check if the monitor is in the ON mode. • Check if the power cord...
... button for VGA mode only). • Adjust the H-Position or V-Position settings via OSD. Screen image has color defects (white does • Inspect the signal cable and make sure none of the pins are bent. • Connect the computer with another available monitor to the monitor and the power outlet. 3.3 Troubleshooting (FAQ) Problem Possible Solution Power LED is not ON • Press the button to check if the monitor is in the ON mode. • Check if the power cord...
User Guide
Page 21
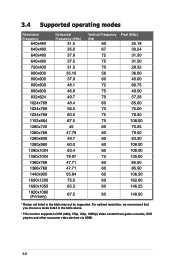
For optimal resolution, we recommend that you choose a mode listed in the table may not be supported. 3.4 Supported operating modes Resolution Frequency 640x480 640x480 640x480 640x480 720x400 800x600 800x600 800x600 800x600 832x624 1024x768 1024x768 1024x768 1152x864 1280x720 1280x768 1280x800 1280x960 1280x1024 1280x1024 1360x768 1366x768 1440x900 1600x1200 1680x1050 1920x1080 (Primary) Horizontal Frequency (KHz) 31.5 35.0 37...71 47.71 55.94 75.0 65.3 67.5 Vertical Frequency (Hz) 60 67 72 75 70 56 60 72 75 75 60 70 75 75 60 60 60 60 60 75 60 60 60 60 60 Pixel (MHz) 25.18 30.24 31.50 31.50...
For optimal resolution, we recommend that you choose a mode listed in the table may not be supported. 3.4 Supported operating modes Resolution Frequency 640x480 640x480 640x480 640x480 720x400 800x600 800x600 800x600 800x600 832x624 1024x768 1024x768 1024x768 1152x864 1280x720 1280x768 1280x800 1280x960 1280x1024 1280x1024 1360x768 1366x768 1440x900 1600x1200 1680x1050 1920x1080 (Primary) Horizontal Frequency (KHz) 31.5 35.0 37...71 47.71 55.94 75.0 65.3 67.5 Vertical Frequency (Hz) 60 67 72 75 70 56 60 72 75 75 60 70 75 75 60 60 60 60 60 75 60 60 60 60 60 Pixel (MHz) 25.18 30.24 31.50 31.50...


