
Vintage-PE1 User''s Manual for English Edition
Page 3
... 1-4 Voltage selector 1-6 1.4 Internal components 1-7 Chapter 2: Basic Installation 2.1 Preparation 2-2 2.2 Before you proceed 2-2 2.3 Removing the side plate and front cover 2-3 2.4 Central Processing Unit (CPU 2-5 2.4.1 Installling the CPU 2-5 2.4.2 Installling the CPU heatsink and fan 2-8 2.4.3 Uninstalling the CPU heatsink and fan 2-10 2.5 Installing a DIMM 2-12 2.5.1 Memory configurations 2-12 2.5.2 Installing a DIMM 2-14 2.5.3 Removing a DIMM 2-14 2.6 Expansion slots 2-15 2.6.1 Installing...
... 1-4 Voltage selector 1-6 1.4 Internal components 1-7 Chapter 2: Basic Installation 2.1 Preparation 2-2 2.2 Before you proceed 2-2 2.3 Removing the side plate and front cover 2-3 2.4 Central Processing Unit (CPU 2-5 2.4.1 Installling the CPU 2-5 2.4.2 Installling the CPU heatsink and fan 2-8 2.4.3 Uninstalling the CPU heatsink and fan 2-10 2.5 Installing a DIMM 2-12 2.5.1 Memory configurations 2-12 2.5.2 Installing a DIMM 2-14 2.5.3 Removing a DIMM 2-14 2.6 Expansion slots 2-15 2.6.1 Installing...

Vintage-PE1 User''s Manual for English Edition
Page 5
Table of contents 5.3.4 Primary and Secondary IDE Master/Slave 5-15 5.3.5 OnChip SATA Controller 5-16 5.3.6 System Information 5-16 5.4 Advanced menu 5-17 5.4.1 JumperFree Configuration 5-17 5.4.2 CPU Configuration 5-18 5.4.3 Chipset 5-19 5.4.4 Onboard Devices Configuration 5-20 5.4.5 PCI PnP 5-22 5.4.6 USB Configuration 5-23 5.4.7 Instant Music Configuration 5-24 5.5 Power menu 5-25 5.5.1 Suspend Mode 5-25 5.5.2 ACPI 2.0 ...
Table of contents 5.3.4 Primary and Secondary IDE Master/Slave 5-15 5.3.5 OnChip SATA Controller 5-16 5.3.6 System Information 5-16 5.4 Advanced menu 5-17 5.4.1 JumperFree Configuration 5-17 5.4.2 CPU Configuration 5-18 5.4.3 Chipset 5-19 5.4.4 Onboard Devices Configuration 5-20 5.4.5 PCI PnP 5-22 5.4.6 USB Configuration 5-23 5.4.7 Instant Music Configuration 5-24 5.5 Power menu 5-25 5.5.1 Suspend Mode 5-25 5.5.2 ACPI 2.0 ...

Vintage-PE1 User''s Manual for English Edition
Page 34
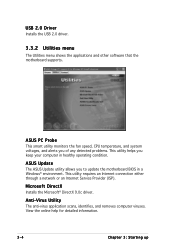
... DirectX Installs the Microsoft® DirectX 9.0c driver. View the online help for detailed information. 3-4 Chapter 3: Starting up ASUS Update The ASUS Update utility allows you keep your computer in a Windows® environment. Anti-Virus Utility The anti-virus application scans, identifies... supports. This utility requires an Internet connection either through a network or an Internet Service Provider (ISP). ASUS PC Probe This smart utility monitors the fan speed, CPU temperature, and system voltages, and alerts you of any detected problems. This utility helps you to update...
... DirectX Installs the Microsoft® DirectX 9.0c driver. View the online help for detailed information. 3-4 Chapter 3: Starting up ASUS Update The ASUS Update utility allows you keep your computer in a Windows® environment. Anti-Virus Utility The anti-virus application scans, identifies... supports. This utility requires an Internet connection either through a network or an Internet Service Provider (ISP). ASUS PC Probe This smart utility monitors the fan speed, CPU temperature, and system voltages, and alerts you of any detected problems. This utility helps you to update...

Vintage-PE1 User''s Manual for English Edition
Page 43
ASUS Vintage-PE1 4-7 CPU and Chassis Fan connectors (4-pin CPU_FAN1, 3-pin CHA_FAN1) The fan connectors support cooling fans of 350 mA~740 mA (8.88 W max.) or a total of the ... setting is correct. Insufficient air flow inside the system may damage the motherboard components. Connect the fan cables to the fan connectors. CPU_FAN1 CPU FAN PWM CPU FAN IN CPU FAN PWR GND ® GND +12V Rotation Fan connectors CHA_FAN1 Make sure that the black wire of each cable matches the ground pin...
ASUS Vintage-PE1 4-7 CPU and Chassis Fan connectors (4-pin CPU_FAN1, 3-pin CHA_FAN1) The fan connectors support cooling fans of 350 mA~740 mA (8.88 W max.) or a total of the ... setting is correct. Insufficient air flow inside the system may damage the motherboard components. Connect the fan cables to the fan connectors. CPU_FAN1 CPU FAN PWM CPU FAN IN CPU FAN PWR GND ® GND +12V Rotation Fan connectors CHA_FAN1 Make sure that the black wire of each cable matches the ground pin...

Vintage-PE1 User''s Manual for English Edition
Page 64
... [3] [4] DMA Mode [Auto] Selects the DMA mode. AMIBIOS Version : 08.00.10 Build Date : 10/07/04 Processor Type Speed Count : Genuine Intel(R) CPU 3.20GHz : 2800 MHz : 1 System Memory Size : 512MB AMI BIOS Displays the auto-detected BIOS information Processor Displays the auto-detected... CPU specification System Memory Displays the auto-detected system memory 5-16 Chapter 5: BIOS setup Configuration options: [Disabled] [Enabled] 5.3.5 OnChip SATA ...
... [3] [4] DMA Mode [Auto] Selects the DMA mode. AMIBIOS Version : 08.00.10 Build Date : 10/07/04 Processor Type Speed Count : Genuine Intel(R) CPU 3.20GHz : 2800 MHz : 1 System Memory Size : 512MB AMI BIOS Displays the auto-detected BIOS information Processor Displays the auto-detected... CPU specification System Memory Displays the auto-detected system memory 5-16 Chapter 5: BIOS setup Configuration options: [Disabled] [Enabled] 5.3.5 OnChip SATA ...

Vintage-PE1 User''s Manual for English Edition
Page 65
... Music Configuration SMBIOS SMI Support [Disabled] 5.4.1 JumperFree Configuration Configure System Frequency/Voltage AI Overclock Tuner Spread Spectrum DRAM Frequency CPU Lock Free [Standard] [Enabled] [Auto] [Auto] AI Overclock Tuner [Standard] Allows selection of the Advanced menu items... FSB. Configuration options: [Standard] [Overclock 5%] [Overclock 10%] [Overlock 20%] [Overclock 30%] CPU Lock Free [Auto] Allows you installed a CPU with the CPU Lock Free feature. Configuration options: [Auto] [Disabled] [Enabled] ASUS Vintage-PE1 5-17 Take caution when changing the settings of...
... Music Configuration SMBIOS SMI Support [Disabled] 5.4.1 JumperFree Configuration Configure System Frequency/Voltage AI Overclock Tuner Spread Spectrum DRAM Frequency CPU Lock Free [Standard] [Enabled] [Auto] [Auto] AI Overclock Tuner [Standard] Allows selection of the Advanced menu items... FSB. Configuration options: [Standard] [Overclock 5%] [Overclock 10%] [Overlock 20%] [Overclock 30%] CPU Lock Free [Auto] Allows you installed a CPU with the CPU Lock Free feature. Configuration options: [Auto] [Disabled] [Enabled] ASUS Vintage-PE1 5-17 Take caution when changing the settings of...

Vintage-PE1 User''s Manual for English Edition
Page 67
... the Microcode updation feature. Configuration options: [Enabled] [Disabled] CPU Lock Free [Auto] Allows you to adjust the CPU multiplier to Auto, the BIOS checks if the CPU supports the Intel® Enhanced Halt State mode. Configuration options: [Auto] [Disabled] ASUS Vintage-PE1 5-19 Setting this menu show the CPU-related information auto-detected by BIOS. Configuration options...
... the Microcode updation feature. Configuration options: [Enabled] [Disabled] CPU Lock Free [Auto] Allows you to adjust the CPU multiplier to Auto, the BIOS checks if the CPU supports the Intel® Enhanced Halt State mode. Configuration options: [Auto] [Disabled] ASUS Vintage-PE1 5-19 Setting this menu show the CPU-related information auto-detected by BIOS. Configuration options...

Vintage-PE1 User''s Manual for English Edition
Page 68
... Technology. Configuration options: [Auto] [Disabled] Hyper-Threading Function [Enabled] This item allows you to disable or set to auto the Intel® Thermal Monitoring 2 feature. CPU Internal Thermal Control [Auto] This item allows you to change the advanced chipset settings.
... Technology. Configuration options: [Auto] [Disabled] Hyper-Threading Function [Enabled] This item allows you to disable or set to auto the Intel® Thermal Monitoring 2 feature. CPU Internal Thermal Control [Auto] This item allows you to change the advanced chipset settings.

Vintage-PE1 User''s Manual for English Edition
Page 77
Thus, connection cannot be made on . Configuration options: [Disabled] [Enabled] 5.5.6 Hardware Monitor Hardware Monitor CPU Temperature MB Temperature CPU Fan Speed CPU Q-Fan Control CPU Q-Fan Mode CPU/Chassis Fan Ratio CPU Target Temperature Chassis Fan Speed Chassis Q-Fan Control VCORE Voltage 3.3V Voltage 5V Voltage 12V Voltage [51... to generate a wake event. Select Ignored if you to enable or disable RTC to the motherboard, the field shows N/A. ASUS Vintage-PE1 5-27 When this item is off and then back on while the computer is set values. Turning an external modem off ...
Thus, connection cannot be made on . Configuration options: [Disabled] [Enabled] 5.5.6 Hardware Monitor Hardware Monitor CPU Temperature MB Temperature CPU Fan Speed CPU Q-Fan Control CPU Q-Fan Mode CPU/Chassis Fan Ratio CPU Target Temperature Chassis Fan Speed Chassis Q-Fan Control VCORE Voltage 3.3V Voltage 5V Voltage 12V Voltage [51... to generate a wake event. Select Ignored if you to enable or disable RTC to the motherboard, the field shows N/A. ASUS Vintage-PE1 5-27 When this item is off and then back on while the computer is set values. Turning an external modem off ...

Vintage-PE1 User''s Manual for English Edition
Page 78
...The onboard hardware monitor automatically detects and displays the chassis fan speed in rotations per minute (RPM). Select Ignored if you enable the CPU Q-Fan Control feature. Configuration options: [Disabled] [Enabled] VCORE Voltage, 3.3V Voltage, 5V Voltage, 12V Voltage The onboard hardware monitor... temperature. Configuration options: [Auto] [60%] [50%] [40%] [35%] CPU Target Temperature [xxxºC] Allows you to select the type of CPU fan cable connected to select the appropriate CPU and chassis fan speed ratio for more efficient system operation. The configuration options vary...
...The onboard hardware monitor automatically detects and displays the chassis fan speed in rotations per minute (RPM). Select Ignored if you enable the CPU Q-Fan Control feature. Configuration options: [Disabled] [Enabled] VCORE Voltage, 3.3V Voltage, 5V Voltage, 12V Voltage The onboard hardware monitor... temperature. Configuration options: [Auto] [60%] [50%] [40%] [35%] CPU Target Temperature [xxxºC] Allows you to select the type of CPU fan cable connected to select the appropriate CPU and chassis fan speed ratio for more efficient system operation. The configuration options vary...

Vintage-PE1 User''s Manual for English E2012
Page 3
... 1-4 Voltage selector 1-6 1.4 Internal components 1-7 Chapter 2: Basic Installation 2.1 Preparation 2-2 2.2 Before you proceed 2-2 2.3 Removing the side plate and front cover 2-3 2.4 Central Processing Unit (CPU 2-5 2.4.1 Installling the CPU 2-5 2.4.2 Installling the CPU heatsink and fan 2-8 2.4.3 Uninstalling the CPU heatsink and fan 2-10 2.5 Installing a DIMM 2-12 2.5.1 Memory configurations 2-12 2.5.2 Installing a DIMM 2-14 2.5.3 Removing a DIMM 2-14 2.6 Expansion slots 2-15 2.6.1 Installing...
... 1-4 Voltage selector 1-6 1.4 Internal components 1-7 Chapter 2: Basic Installation 2.1 Preparation 2-2 2.2 Before you proceed 2-2 2.3 Removing the side plate and front cover 2-3 2.4 Central Processing Unit (CPU 2-5 2.4.1 Installling the CPU 2-5 2.4.2 Installling the CPU heatsink and fan 2-8 2.4.3 Uninstalling the CPU heatsink and fan 2-10 2.5 Installing a DIMM 2-12 2.5.1 Memory configurations 2-12 2.5.2 Installing a DIMM 2-14 2.5.3 Removing a DIMM 2-14 2.6 Expansion slots 2-15 2.6.1 Installing...

Vintage-PE1 User''s Manual for English E2012
Page 5
Table of contents 5.3.4 Primary and Secondary IDE Master/Slave 5-15 5.3.5 OnChip SATA Controller 5-16 5.3.6 System Information 5-16 5.4 Advanced menu 5-17 5.4.1 JumperFree Configuration 5-17 5.4.2 CPU Configuration 5-18 5.4.3 Chipset 5-19 5.4.4 Onboard Devices Configuration 5-20 5.4.5 PCI PnP 5-22 5.4.6 USB Configuration 5-23 5.4.7 Instant Music Configuration 5-24 5.5 Power menu 5-25 5.5.1 Suspend Mode 5-25 5.5.2 ACPI 2.0 ...
Table of contents 5.3.4 Primary and Secondary IDE Master/Slave 5-15 5.3.5 OnChip SATA Controller 5-16 5.3.6 System Information 5-16 5.4 Advanced menu 5-17 5.4.1 JumperFree Configuration 5-17 5.4.2 CPU Configuration 5-18 5.4.3 Chipset 5-19 5.4.4 Onboard Devices Configuration 5-20 5.4.5 PCI PnP 5-22 5.4.6 USB Configuration 5-23 5.4.7 Instant Music Configuration 5-24 5.5 Power menu 5-25 5.5.1 Suspend Mode 5-25 5.5.2 ACPI 2.0 ...
Vintage-PE1 User''s Manual for English E2012
Page 34
...or an Internet Service Provider (ISP). Anti-Virus Utility The anti-virus application scans, identifies, and removes computer viruses. ASUS Update The ASUS Update utility allows you keep your computer in a Windows® environment. Microsoft DirectX Installs the Microsoft® DirectX 9.0c driver.... ASUS PC Probe This smart utility monitors the fan speed, CPU temperature, and system voltages, and alerts you of any detected problems. This utility helps you to update the...
...or an Internet Service Provider (ISP). Anti-Virus Utility The anti-virus application scans, identifies, and removes computer viruses. ASUS Update The ASUS Update utility allows you keep your computer in a Windows® environment. Microsoft DirectX Installs the Microsoft® DirectX 9.0c driver.... ASUS PC Probe This smart utility monitors the fan speed, CPU temperature, and system voltages, and alerts you of any detected problems. This utility helps you to update the...

Vintage-PE1 User''s Manual for English E2012
Page 43
...jumpers! ASUS Vintage-PE1 4-7 Do not place jumper caps on the motherboard, making sure that your fan power setting is correct. Do not forget to connect the fan cables to the fan connectors on the fan connectors! Insufficient air flow inside the system may damage the motherboard components. CPU and ... cooling fans of 350 mA~740 mA (8.88 W max.) or a total of the connector. See page 2-8 for details. 5. CPU_FAN1 CPU FAN PWM CPU FAN IN CPU FAN PWR GND ® GND +12V Rotation Fan connectors CHA_FAN1 Make sure that the black wire of each cable matches the ground pin...
...jumpers! ASUS Vintage-PE1 4-7 Do not place jumper caps on the motherboard, making sure that your fan power setting is correct. Do not forget to connect the fan cables to the fan connectors on the fan connectors! Insufficient air flow inside the system may damage the motherboard components. CPU and ... cooling fans of 350 mA~740 mA (8.88 W max.) or a total of the connector. See page 2-8 for details. 5. CPU_FAN1 CPU FAN PWM CPU FAN IN CPU FAN PWR GND ® GND +12V Rotation Fan connectors CHA_FAN1 Make sure that the black wire of each cable matches the ground pin...

Vintage-PE1 User''s Manual for English E2012
Page 64
... [2] [3] [4] DMA Mode [Auto] Selects the DMA mode. AMIBIOS Version : 08.00.10 Build Date : 10/07/04 Processor Type Speed Count : Genuine Intel(R) CPU 3.20GHz : 2800 MHz : 1 System Memory Size : 512MB AMI BIOS Displays the auto-detected BIOS information Processor Displays the auto-detected... CPU specification System Memory Displays the auto-detected system memory 5-16 Chapter 5: BIOS setup Configuration options: [Auto] [Disabled] [Enabled] 32Bit Data ...
... [2] [3] [4] DMA Mode [Auto] Selects the DMA mode. AMIBIOS Version : 08.00.10 Build Date : 10/07/04 Processor Type Speed Count : Genuine Intel(R) CPU 3.20GHz : 2800 MHz : 1 System Memory Size : 512MB AMI BIOS Displays the auto-detected BIOS information Processor Displays the auto-detected... CPU specification System Memory Displays the auto-detected system memory 5-16 Chapter 5: BIOS setup Configuration options: [Auto] [Disabled] [Enabled] 32Bit Data ...

Vintage-PE1 User''s Manual for English E2012
Page 65
... ASUS Vintage-PE1 5-17 Take caution when changing the settings of CPU overclocking options to malfunction. This item appears only if you to adjust the CPU multiplier to 14x. Setting this item to [Auto] allows the motherboard to automatically reduce the CPU multiplier value for the CPU and... Music Configuration SMBIOS SMI Support [Disabled] 5.4.1 JumperFree Configuration Configure System Frequency/Voltage AI Overclock Tuner Spread Spectrum DRAM Frequency CPU Lock Free [Standard] [Enabled] [Auto] [Auto] AI Overclock Tuner [Standard] Allows selection of the Advanced menu items...
... ASUS Vintage-PE1 5-17 Take caution when changing the settings of CPU overclocking options to malfunction. This item appears only if you to adjust the CPU multiplier to 14x. Setting this item to [Auto] allows the motherboard to automatically reduce the CPU multiplier value for the CPU and... Music Configuration SMBIOS SMI Support [Disabled] 5.4.1 JumperFree Configuration Configure System Frequency/Voltage AI Overclock Tuner Spread Spectrum DRAM Frequency CPU Lock Free [Standard] [Enabled] [Auto] [Auto] AI Overclock Tuner [Standard] Allows selection of the Advanced menu items...

Vintage-PE1 User''s Manual for English E2012
Page 67
... Intel® Enhanced Halt State mode. Configuration options: [Disabled] [Enabled] Enhanced C1 Control [Auto] When set to automatically reduce the CPU multiplier value for more flexibility when increasing the external FSB. Configuration options: [Auto] [Disabled] ASUS Vintage-PE1 5-19 5.4.2 CPU Configuration The items in idle state. This item appears only if you to adjust the...
... Intel® Enhanced Halt State mode. Configuration options: [Disabled] [Enabled] Enhanced C1 Control [Auto] When set to automatically reduce the CPU multiplier value for more flexibility when increasing the external FSB. Configuration options: [Auto] [Disabled] ASUS Vintage-PE1 5-19 5.4.2 CPU Configuration The items in idle state. This item appears only if you to adjust the...

Vintage-PE1 User''s Manual for English E2012
Page 68
CPU Internal Thermal Control [Auto] This item allows you to enable or disable the processor Hyper-Threading Technology. Configuration options: [By SPD] [2T] [2.5T] [3T] 5-20 ...
CPU Internal Thermal Control [Auto] This item allows you to enable or disable the processor Hyper-Threading Technology. Configuration options: [By SPD] [2T] [2.5T] [3T] 5-20 ...

Vintage-PE1 User''s Manual for English E2012
Page 77
...ASUS Vintage-PE1 5-27 Turning an external modem off and then back on the first try. If the fan is set values. Configuration options: [Disabled] [Enabled] 5.5.6 Hardware Monitor Hardware Monitor CPU Temperature MB Temperature CPU Fan Speed CPU Q-Fan Control CPU Q-Fan Mode CPU/Chassis Fan Ratio CPU...Enabled] [ 1.320V] [ 3.345V] [ 5.094V] [11.880V] CPU Temperature [xxxC/xxxF] MB Temperature [xxxC/xxxF] The onboard hardware monitor automatically detects and displays the motherboard and CPU temperatures. Configuration options: [Disabled] [Enabled] The computer cannot receive or ...
...ASUS Vintage-PE1 5-27 Turning an external modem off and then back on the first try. If the fan is set values. Configuration options: [Disabled] [Enabled] 5.5.6 Hardware Monitor Hardware Monitor CPU Temperature MB Temperature CPU Fan Speed CPU Q-Fan Control CPU Q-Fan Mode CPU/Chassis Fan Ratio CPU...Enabled] [ 1.320V] [ 3.345V] [ 5.094V] [11.880V] CPU Temperature [xxxC/xxxF] MB Temperature [xxxC/xxxF] The onboard hardware monitor automatically detects and displays the motherboard and CPU temperatures. Configuration options: [Disabled] [Enabled] The computer cannot receive or ...

Vintage-PE1 User''s Manual for English E2012
Page 78
...for more efficient system operation. This item appears only when the CPU Q-Fan Control item is Enabled. Select Ignored if you to select the type of CPU fan cable connected to the CPU fan connector. Chassis Fan Speed [xxxxRPM] or [N/A] The onboard...Auto] automatically selects the fan speed ratio when operating a low chassis temperature. Configuration options: [Disabled] [Enabled] The CPU Q-Fan Mode, CPU/Chassis Fan Ratio, and CPU Target Temperature items appear when you installed additional devices and the system requires more ventilation. Configuration options: [Disabled] [Enabled...
...for more efficient system operation. This item appears only when the CPU Q-Fan Control item is Enabled. Select Ignored if you to select the type of CPU fan cable connected to the CPU fan connector. Chassis Fan Speed [xxxxRPM] or [N/A] The onboard...Auto] automatically selects the fan speed ratio when operating a low chassis temperature. Configuration options: [Disabled] [Enabled] The CPU Q-Fan Mode, CPU/Chassis Fan Ratio, and CPU Target Temperature items appear when you installed additional devices and the system requires more ventilation. Configuration options: [Disabled] [Enabled...

