User Manual
Page 2
....the.arm/stand.(for identification or explanation and to reconfigure 3-1 3.1.2 OSD Function Introduction 3-1 3.2. Product.introduction. 1.1. ASUS ASSUMES NO RESPONSIBILITY OR LIABILITY FOR ANY ERRORS OR INACCURACIES THAT MAY APPEAR IN THIS MANUAL, INCLUDING THE PRODUCTS AND SOFTWARE DESCRIBED IN IT. Adjusting the monitor 1-2 1.4. OSD.(On-Screen.Display).menu 3-1 3.1.1 How to the owners' benefit, without the express written permission of the LCD monitor 1-7 Chapter.2:. Specifications summary 3-4 3.3. Monitor.introduction...
....the.arm/stand.(for identification or explanation and to reconfigure 3-1 3.1.2 OSD Function Introduction 3-1 3.2. Product.introduction. 1.1. ASUS ASSUMES NO RESPONSIBILITY OR LIABILITY FOR ANY ERRORS OR INACCURACIES THAT MAY APPEAR IN THIS MANUAL, INCLUDING THE PRODUCTS AND SOFTWARE DESCRIBED IN IT. Adjusting the monitor 1-2 1.4. OSD.(On-Screen.Display).menu 3-1 3.1.1 How to the owners' benefit, without the express written permission of the LCD monitor 1-7 Chapter.2:. Specifications summary 3-4 3.3. Monitor.introduction...

User Manual
Page 3
... receiver. • Connect the equipment to an outlet on , the user is no guarantee that interference will not occur in a residential installation. iii This equipment has been tested and found to comply with manufacturer' s instructions, may cause undesired ...installation. Notices Federal.Communications.Commission.Statement This device complies with Canadian ICES-003. This class B digital apparatus complies with Part 15 of Communications. This equipment generates, uses and can be determined by turning the equipment off and on a circuit different from digital apparatus set...
... receiver. • Connect the equipment to an outlet on , the user is no guarantee that interference will not occur in a residential installation. iii This equipment has been tested and found to comply with manufacturer' s instructions, may cause undesired ...installation. Notices Federal.Communications.Commission.Statement This device complies with Canadian ICES-003. This class B digital apparatus complies with Part 15 of Communications. This equipment generates, uses and can be determined by turning the equipment off and on a circuit different from digital apparatus set...
User Manual
Page 4
.... Safety information • Before setting up the monitor, carefully read all cables are correctly connected and the power cables are not sure of the type of power supply to your home, consult your dealer or local power company. • Use the appropriate power plug which complies with your local power standard. • Do not overload power strips and extention cords. The dangerous high voltages inside...
.... Safety information • Before setting up the monitor, carefully read all cables are correctly connected and the power cables are not sure of the type of power supply to your home, consult your dealer or local power company. • Use the appropriate power plug which complies with your local power standard. • Do not overload power strips and extention cords. The dangerous high voltages inside...
User Manual
Page 5
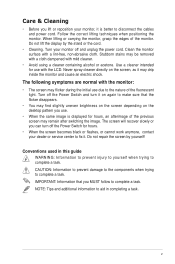
... nature of the monitor. v Turn your monitor off the Power Switch for hours. • When the screen becomes black or flashes, or cannot work anymore, contact your monitor, it is displayed for use due to complete a task. Conventions.used.in completing a task. Never spray cleaner directly on the desktop pattern you use. • When the same image is better to disconnect the cables and power cord. NOTE: Tips...
... nature of the monitor. v Turn your monitor off the Power Switch for hours. • When the screen becomes black or flashes, or cannot work anymore, contact your monitor, it is displayed for use due to complete a task. Conventions.used.in completing a task. Never spray cleaner directly on the desktop pattern you use. • When the same image is better to disconnect the cables and power cord. NOTE: Tips...
User Manual
Page 7
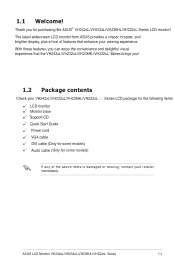
... ! 1.2 Package contents Check your VH242xL/VH232xL/VH236HL/VH222xL LCD monitor Monitor base Support CD Quick Start Guide Power cord VGA cable DVI cable (Only for some models) Audio cable (Only for some models) Series LCD package for purchasing the ASUS® VH242xL/VH232xL/VH236HL/VH222xL Series LCD monitor! ASUS LCD Monitor VH242xL/VH232xL/VH236HL/VH222xL Series 1-1 With these features, you can enjoy the convenience and delightful visual experience that enhance your retailer immediately. The latest widescreen LCD monitor from ASUS provides a crisper...
... ! 1.2 Package contents Check your VH242xL/VH232xL/VH236HL/VH222xL LCD monitor Monitor base Support CD Quick Start Guide Power cord VGA cable DVI cable (Only for some models) Audio cable (Only for some models) Series LCD package for purchasing the ASUS® VH242xL/VH232xL/VH236HL/VH222xL Series LCD monitor! ASUS LCD Monitor VH242xL/VH232xL/VH236HL/VH222xL Series 1-1 With these features, you can enjoy the convenience and delightful visual experience that enhance your retailer immediately. The latest widescreen LCD monitor from ASUS provides a crisper...

User Manual
Page 8
1.3 Adjusting the monitor • For optimal viewing, we recommend that you look at the full face of the monitor, then adjust the monitor to the angle that is most comfortable for you. • Hold the base to prevent the monitor from falling when you change its angle. • You can tilt the monitor's from -5º to 15º, swivel from left-to-right for 150º, and lift the monitor's height for about 100mm. -5º~15º 100mm 150º 150º 0º 1-2 Chapter 1: Product introduction
1.3 Adjusting the monitor • For optimal viewing, we recommend that you look at the full face of the monitor, then adjust the monitor to the angle that is most comfortable for you. • Hold the base to prevent the monitor from falling when you change its angle. • You can tilt the monitor's from -5º to 15º, swivel from left-to-right for 150º, and lift the monitor's height for about 100mm. -5º~15º 100mm 150º 150º 0º 1-2 Chapter 1: Product introduction
User Manual
Page 9
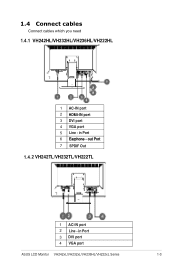
out Port 7 SPDIF Out 1.4.2 VH242TL/VH232TL/VH222TL 1 AC-IN.port 2 Line - 1.4 Connect cables Connect cables which you need 1.4.1 VH242HL/VH232HL/VH236HL/VH222HL 1 AC-IN.port 2 HDMI-IN.port 3 DVI.port 4 VGA.port 5 Line - in Port 6 Earphone - in Port 3 DVI.port 4 VGA.port ASUS LCD Monitor VH242xL/VH232xL/VH236HL/VH222xL Series 1-3
out Port 7 SPDIF Out 1.4.2 VH242TL/VH232TL/VH222TL 1 AC-IN.port 2 Line - 1.4 Connect cables Connect cables which you need 1.4.1 VH242HL/VH232HL/VH236HL/VH222HL 1 AC-IN.port 2 HDMI-IN.port 3 DVI.port 4 VGA.port 5 Line - in Port 6 Earphone - in Port 3 DVI.port 4 VGA.port ASUS LCD Monitor VH242xL/VH232xL/VH236HL/VH222xL Series 1-3
User Manual
Page 10
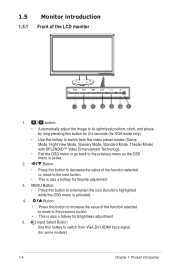
... switch from VGA,DVI,HDMI input signal. (for Volume adjustment. 3. MENU Button: • Press this button for 2-4 seconds (for Brightness adjustment. 5. 1.5 Monitor introduction 1.5.1. A button: • Automatically adjust the image to its optimized position, clock, and phase by long pressing this button to the previous menu as the OSD menu is also a hotkey for some models) 1-4 Chapter 1: Product introduction Front.of the function selected or move to switch from five video preset modes (Game Mode, Night View Mode, Scenery Mode, Standard Mode, Theater Mode...
... switch from VGA,DVI,HDMI input signal. (for Volume adjustment. 3. MENU Button: • Press this button for 2-4 seconds (for Brightness adjustment. 5. 1.5 Monitor introduction 1.5.1. A button: • Automatically adjust the image to its optimized position, clock, and phase by long pressing this button to the previous menu as the OSD menu is also a hotkey for some models) 1-4 Chapter 1: Product introduction Front.of the function selected or move to switch from five video preset modes (Game Mode, Night View Mode, Scenery Mode, Standard Mode, Theater Mode...
User Manual
Page 11
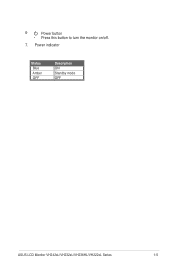
Power button • Press this button to turn the monitor on/off. 7. Power indicator Status Blue Amber OFF Description ON Standby mode OFF ASUS LCD Monitor VH242xL/VH232xL/VH236HL/VH222xL Series 1-5 6.
Power button • Press this button to turn the monitor on/off. 7. Power indicator Status Blue Amber OFF Description ON Standby mode OFF ASUS LCD Monitor VH242xL/VH232xL/VH236HL/VH222xL Series 1-5 6.
User Manual
Page 12
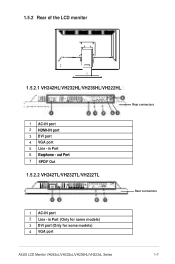
Rear.of.the.LCD.monitor. 1.5.2.1 VH242HL/VH232HL/VH236HL/VH222HL Rear.connectors 1 AC-IN.port 2 HDMI-IN.port 3 DVI.port 4 VGA.port 5 Line - 1.5.2. in Port 6 Earphone - in Port (Only for some models) 3 DVI.port (Only for some models) 4 VGA.port ASUS LCD Monitor VH242xL/VH232xL/VH236HL/VH222xL Series 1-7 out Port 7 SPDIF Out 1.5.2.2 VH242TL/VH232TL/VH222TL Rear connectors 1 AC-IN.port 2 Line -
Rear.of.the.LCD.monitor. 1.5.2.1 VH242HL/VH232HL/VH236HL/VH222HL Rear.connectors 1 AC-IN.port 2 HDMI-IN.port 3 DVI.port 4 VGA.port 5 Line - 1.5.2. in Port 6 Earphone - in Port (Only for some models) 3 DVI.port (Only for some models) 4 VGA.port ASUS LCD Monitor VH242xL/VH232xL/VH236HL/VH222xL Series 1-7 out Port 7 SPDIF Out 1.5.2.2 VH242TL/VH232TL/VH222TL Rear connectors 1 AC-IN.port 2 Line -
User Manual
Page 13
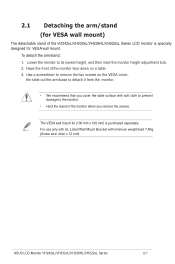
... monitor face down on the VESA cover, the slide out the arm/base to its lowest height, and then inset the monitor height adjustment lock. 2. Use a screwdriver to remove the two screws on a table. 3. Have the front of the monitor when you remove the screws. 2.1 Detaching the arm/stand (for VESA wall mount) The detachable stand of the VH242xL/VH232xL/VH236HL/VH222xL Series LCD monitor is purchased separately. To detach the arm/stand: 1. The VESA wall mount...
... monitor face down on the VESA cover, the slide out the arm/base to its lowest height, and then inset the monitor height adjustment lock. 2. Use a screwdriver to remove the two screws on a table. 3. Have the front of the monitor when you remove the screws. 2.1 Detaching the arm/stand (for VESA wall mount) The detachable stand of the VH242xL/VH232xL/VH236HL/VH222xL Series LCD monitor is purchased separately. To detach the arm/stand: 1. The VESA wall mount...

User Manual
Page 14
2.2 Assembling the monitor base To assemble the monitor base 1. Remove the monitor height adjustment lock. 1 2 3 The monitor height adjustment lock should NEVER be removed BEFORE you place the monitor VERTICALLY on a flat table. 2. Have the monitor base place on a flat surface. 2-2 Chapter 2: Setup Use the screw, lock the base to the arm according to the below drawing. 3.
2.2 Assembling the monitor base To assemble the monitor base 1. Remove the monitor height adjustment lock. 1 2 3 The monitor height adjustment lock should NEVER be removed BEFORE you place the monitor VERTICALLY on a flat table. 2. Have the monitor base place on a flat surface. 2-2 Chapter 2: Setup Use the screw, lock the base to the arm according to the below drawing. 3.
User Manual
Page 15
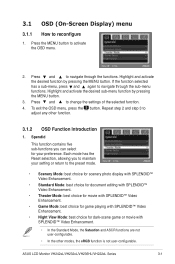
...-functions you to maintain your preference. If the function selected has a sub-menu, press and again to reconfigure 1. 3.1 OSD (On-Screen Display) menu 3.1.1 How to navigate through the functions. Press and to change the settings of the selected function. 4. To exit the OSD menu, press the button. Highlight and activate the desired function by pressing the MENU button. 3. ASUS LCD Monitor VH242xL/VH232xL/VH236HL/VH222xL...
...-functions you to maintain your preference. If the function selected has a sub-menu, press and again to reconfigure 1. 3.1 OSD (On-Screen Display) menu 3.1.1 How to navigate through the functions. Press and to change the settings of the selected function. 4. To exit the OSD menu, press the button. Highlight and activate the desired function by pressing the MENU button. 3. ASUS LCD Monitor VH242xL/VH232xL/VH236HL/VH222xL...

User Manual
Page 16
... pixel clock signal. If the frequency is not correct, the screen shows vertical stripes and the image is from 0 to 100. • Saturation: the adjusting range is not proportional. 3.. The adjusting range is from 0 to 100. Color.. The adjusting range is from 0 to 100. • Position: adjusts the horizontal postition (H-Position) and the vertical position (V-Position) of the image by one horizontal sweep. activate this function. 3-2 Chapter 3: General Instruction 2. Image You can adjust brightness, contrast, sharpness, saturation,position (VGA...
... pixel clock signal. If the frequency is not correct, the screen shows vertical stripes and the image is from 0 to 100. • Saturation: the adjusting range is not proportional. 3.. The adjusting range is from 0 to 100. Color.. The adjusting range is from 0 to 100. • Position: adjusts the horizontal postition (H-Position) and the vertical position (V-Position) of the image by one horizontal sweep. activate this function. 3-2 Chapter 3: General Instruction 2. Image You can adjust brightness, contrast, sharpness, saturation,position (VGA...
User Manual
Page 17
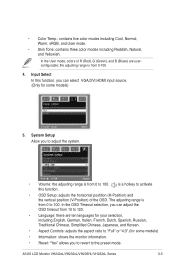
... monitor information. • Reset: "Yes" allows you can select VGA,DVI,HDMI input source. (Only for some models) A 5. In the OSD Timeout selection, you to revert to activate this function, you to adjust the system. • Volume: the adjusting range is from 0 to 100. In the User mode, colors of the OSD. is from 10 to 120. • Language: there are userconfigurable; the adjusting range is a hotkey to the preset mode...
... monitor information. • Reset: "Yes" allows you can select VGA,DVI,HDMI input source. (Only for some models) A 5. In the OSD Timeout selection, you to revert to activate this function, you to adjust the system. • Volume: the adjusting range is from 0 to 100. In the User mode, colors of the OSD. is from 10 to 120. • Language: there are userconfigurable; the adjusting range is a hotkey to the preset mode...

User Manual
Page 18
3.2 Specifications summary Model Panel Size True Resolution Brightness (Max.) Intrisinc Contrast Ratio Viewing Angle (CR=10) VH242HL 23.6"W 1920x1080 ≧300cd/㎡ ≧1000:1 ≧160°(V), ≧170°(H) Color Saturation (NTSC) 72% Display Colors 16.7 M Response Time 5ms (Tr+Tf) Satellite Speaker 2W x 2 stereo HDMI input HDMI DVI input DVI D‐Sub input Yes Audio Line‐in ) 3-4 Chapter 3: General Instruction Dimension 562.04x250x423.20 Box Dimension (WxHxD) Net Weight (Esti.) Gross...
3.2 Specifications summary Model Panel Size True Resolution Brightness (Max.) Intrisinc Contrast Ratio Viewing Angle (CR=10) VH242HL 23.6"W 1920x1080 ≧300cd/㎡ ≧1000:1 ≧160°(V), ≧170°(H) Color Saturation (NTSC) 72% Display Colors 16.7 M Response Time 5ms (Tr+Tf) Satellite Speaker 2W x 2 stereo HDMI input HDMI DVI input DVI D‐Sub input Yes Audio Line‐in ) 3-4 Chapter 3: General Instruction Dimension 562.04x250x423.20 Box Dimension (WxHxD) Net Weight (Esti.) Gross...
User Manual
Page 19
Model Panel Size True Resolution Brightness (Max.) Intrisinc Contrast Ratio Viewing Angle (CR=10) VH232HL 23"W 1920x1080 ≧300cd/㎡ ≧1000:1 ≧160°(V), ≧ 160°(H) Color Saturation (NTSC) 72% Display Colors Response Time 16.7 M 5ms (Tr+Tf) Satellite Speaker HDMI input DVI input 2W x 2 stereo HDMI DVI D-Sub input Yes Audio Line-in ) ASUS LCD Monitor VH242xL/VH232xL/VH236HL/VH222xL Series 3-5 Dimension 548.8x250x419 Box Dimension (WxHxD) 625x232x483 Net Weight (Esti.) 7.1 Gross...
Model Panel Size True Resolution Brightness (Max.) Intrisinc Contrast Ratio Viewing Angle (CR=10) VH232HL 23"W 1920x1080 ≧300cd/㎡ ≧1000:1 ≧160°(V), ≧ 160°(H) Color Saturation (NTSC) 72% Display Colors Response Time 16.7 M 5ms (Tr+Tf) Satellite Speaker HDMI input DVI input 2W x 2 stereo HDMI DVI D-Sub input Yes Audio Line-in ) ASUS LCD Monitor VH242xL/VH232xL/VH236HL/VH222xL Series 3-5 Dimension 548.8x250x419 Box Dimension (WxHxD) 625x232x483 Net Weight (Esti.) 7.1 Gross...
User Manual
Page 20
Model Panel Size True Resolution Brightness (Max.) Intrisinc Contrast Ratio Viewing Angle (CR=10) VH222HL 21.5"W 1920x1080 ≧300cd/㎡ ≧1000:1 ≧160°(V), ≧ 170°(H) Color Saturation (NTSC) 72% Display Colors Response Time 16.7 M 5ms (Tr+Tf) Satellite Speaker HDMI input DVI input 2W x 2 stereo HDMI DVI D-Sub input Yes Audio Line-in ) *Specifications are subject to change without notice. Dimension 515x250x409.5 Box Dimension (WxHxD) 590x220x457 Net Weight (Esti...
Model Panel Size True Resolution Brightness (Max.) Intrisinc Contrast Ratio Viewing Angle (CR=10) VH222HL 21.5"W 1920x1080 ≧300cd/㎡ ≧1000:1 ≧160°(V), ≧ 170°(H) Color Saturation (NTSC) 72% Display Colors Response Time 16.7 M 5ms (Tr+Tf) Satellite Speaker HDMI input DVI input 2W x 2 stereo HDMI DVI D-Sub input Yes Audio Line-in ) *Specifications are subject to change without notice. Dimension 515x250x409.5 Box Dimension (WxHxD) 590x220x457 Net Weight (Esti...
User Manual
Page 21
... the audio cable is properly connected to the monitor and the computer • Adjust the volume settings of the pins are bent. • Perform Reset via OSD. • Adjust the R/G/B color settings or select the Color Temperature via OSD. 3.3 Troubleshooting (FAQ) Problem Possible Solution Power LED is not ON • Press the button to check if the monitor is in the ON mode. • Check if the power cord is properly connected to automatically adjust the image (for VGA mode...
... the audio cable is properly connected to the monitor and the computer • Adjust the volume settings of the pins are bent. • Perform Reset via OSD. • Adjust the R/G/B color settings or select the Color Temperature via OSD. 3.3 Troubleshooting (FAQ) Problem Possible Solution Power LED is not ON • Press the button to check if the monitor is in the ON mode. • Check if the power cord is properly connected to automatically adjust the image (for VGA mode...

User Manual
Page 23
VESA Modes ,User Available Timings Mode Resolution H(...V H 2 4 2 H L/V H 2 3 2 H L/V H 2 3 6 H L/V H 2 2 2 H L H DM I Supported Primary Timings Mode Resolution H(KHz) 480P 640x480P 31.469/31.5 720x480P 31.469 / 31.5 720x480P 31.469 / 31.5 576P 720x576P 31.25 720x576P 31.25 720P 1280x720P ...Pixel(MHz) 25.175/25.2 27 /27.027 27 /27.027 27 27 74.25 74.176/74.25 74.25 74.176/74.25 148.5 148.352/148.5 * Modes not listed in the above tables may not be supported. For optimal resolution, we recommend that you choose a mode listed in the above tables 3-9 Chapter 3: General Instruction...
VESA Modes ,User Available Timings Mode Resolution H(...V H 2 4 2 H L/V H 2 3 2 H L/V H 2 3 6 H L/V H 2 2 2 H L H DM I Supported Primary Timings Mode Resolution H(KHz) 480P 640x480P 31.469/31.5 720x480P 31.469 / 31.5 720x480P 31.469 / 31.5 576P 720x576P 31.25 720x576P 31.25 720P 1280x720P ...Pixel(MHz) 25.175/25.2 27 /27.027 27 /27.027 27 27 74.25 74.176/74.25 74.25 74.176/74.25 148.5 148.352/148.5 * Modes not listed in the above tables may not be supported. For optimal resolution, we recommend that you choose a mode listed in the above tables 3-9 Chapter 3: General Instruction...


