
User Guide
Page 2
... this manual, including the products and software described in any form or by any means, except documentation kept by ASUS; Table of contents Notices...iii Safety information iv Care & Cleaning v 1.1 Welcome 1-1 1.2 Package contents 1-1 1.3 Monitor introduction 1-2 1.3.1 Front view 1-2 1.3.2 Back view 1-4 1.3.3 Experiencing 3D Virtual Effects 1-5 1.3.4 How to use your wireless 3D glasses 1-6 2.1 Assembling the monitor base 2-1 2.2 Adjusting the monitor 2-2 2.3 Detaching the arm (for VESA wall mount 2-3 3.1 OSD (On-Screen Display) menu 3-1 3.1.1 How...
... this manual, including the products and software described in any form or by any means, except documentation kept by ASUS; Table of contents Notices...iii Safety information iv Care & Cleaning v 1.1 Welcome 1-1 1.2 Package contents 1-1 1.3 Monitor introduction 1-2 1.3.1 Front view 1-2 1.3.2 Back view 1-4 1.3.3 Experiencing 3D Virtual Effects 1-5 1.3.4 How to use your wireless 3D glasses 1-6 2.1 Assembling the monitor base 2-1 2.2 Adjusting the monitor 2-2 2.3 Detaching the arm (for VESA wall mount 2-3 3.1 OSD (On-Screen Display) menu 3-1 3.1.1 How...

User Guide
Page 3
... frequency energy and, if not installed and used in accordance with manufacturer's instructions, may cause harmful interference to Part 15 of Communications. This equipment has been tested and found to comply with the limits for a Class B digital device, pursuant to radio communications. However, there is connected. • Consult the dealer or an experienced radio/TV technician for help...
... frequency energy and, if not installed and used in accordance with manufacturer's instructions, may cause harmful interference to Part 15 of Communications. This equipment has been tested and found to comply with the limits for a Class B digital device, pursuant to radio communications. However, there is connected. • Consult the dealer or an experienced radio/TV technician for help...

User Guide
Page 4
...; The wall socket shall be installed near or over a radiator or heat source unless proper ventilation is broken, do not try to open the monitor cabinet. iv The dangerous high voltages inside the monitor may become wet. Do not block these slots. Safety information • Before setting up the monitor, carefully read all cables are correctly connected and the power cables are...
...; The wall socket shall be installed near or over a radiator or heat source unless proper ventilation is broken, do not try to open the monitor cabinet. iv The dangerous high voltages inside the monitor may become wet. Do not block these slots. Safety information • Before setting up the monitor, carefully read all cables are correctly connected and the power cables are...
User Guide
Page 5
.... • When the screen becomes black or flashes, or cannot work anymore, contact your monitor off the Power Switch for use due to the nature of the monitor. Care & Cleaning • Before you MUST follow to complete a task. Stubborn stains may drip inside the monitor and cause an electric shock. Turn your dealer or service center to aid in this guide WARNING: Information to...
.... • When the screen becomes black or flashes, or cannot work anymore, contact your monitor off the Power Switch for use due to the nature of the monitor. Care & Cleaning • Before you MUST follow to complete a task. Stubborn stains may drip inside the monitor and cause an electric shock. Turn your dealer or service center to aid in this guide WARNING: Information to...
User Guide
Page 7
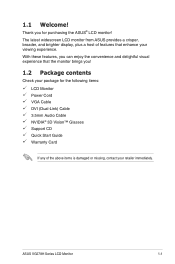
... visual experience that enhance your viewing experience. Thank you ! 1.2 Package contents Check your retailer immediately. ASUS VG278H Series LCD Monitor 1-1 1.1 Welcome! The latest widescreen LCD monitor from ASUS provides a crisper, broader, and brighter display, plus a host of features that the monitor brings you for the following items: LCD Monitor Power Cord VGA Cable DVI (Dual-Link) Cable 3.5mm Audio Cable NVIDIA® 3D Vision™ Glasses Support CD Quick Start Guide Warranty Card If any of the...
... visual experience that enhance your viewing experience. Thank you ! 1.2 Package contents Check your retailer immediately. ASUS VG278H Series LCD Monitor 1-1 1.1 Welcome! The latest widescreen LCD monitor from ASUS provides a crisper, broader, and brighter display, plus a host of features that the monitor brings you for the following items: LCD Monitor Power Cord VGA Cable DVI (Dual-Link) Cable 3.5mm Audio Cable NVIDIA® 3D Vision™ Glasses Support CD Quick Start Guide Warranty Card If any of the...
User Guide
Page 9
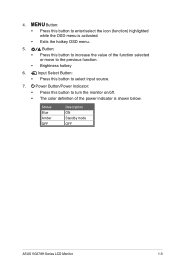
...: • Press this button to turn the monitor on/off. • The color definition of the function selected or move to the previous function. Input Select Button: • Press this button to select input source. 7. Exits the hotkey OSD menu. 5. • • Button: Press this button to increase the value of the power indicator is activated. Brightness hotkey 6. Status Blue Amber OFF Description ON Standby mode OFF ASUS VG278H Series LCD Monitor 1-3
...: • Press this button to turn the monitor on/off. • The color definition of the function selected or move to the previous function. Input Select Button: • Press this button to select input source. 7. Exits the hotkey OSD menu. 5. • • Button: Press this button to increase the value of the power indicator is activated. Brightness hotkey 6. Status Blue Amber OFF Description ON Standby mode OFF ASUS VG278H Series LCD Monitor 1-3

User Guide
Page 10
... is for PC audio connection. 7. AC-IN port: This port connects the power cord. 3. VGA port: This 15-pin port is for PC VGA connection. 6. HDMI-IN port: This port is for connection with an HDMI compatible device (support NVIDIA® 3D Vision™ and Blu-ray 3D). 4. DVI port: This 24-pin port is for PC (Personal Computer) DVI-D digital signal connection (support NVIDIA® 3D Vision™). 1.3.2 Back view 1 23 4 5 67 Rear connectors 1. Kensington lock slot. 2. Earphone-Out...
... is for PC audio connection. 7. AC-IN port: This port connects the power cord. 3. VGA port: This 15-pin port is for PC VGA connection. 6. HDMI-IN port: This port is for connection with an HDMI compatible device (support NVIDIA® 3D Vision™ and Blu-ray 3D). 4. DVI port: This 24-pin port is for PC (Personal Computer) DVI-D digital signal connection (support NVIDIA® 3D Vision™). 1.3.2 Back view 1 23 4 5 67 Rear connectors 1. Kensington lock slot. 2. Earphone-Out...
User Guide
Page 11
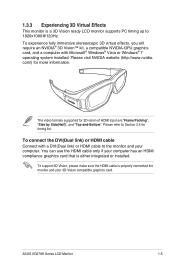
... HDMI input are "Frame Packing", "Side by Side(Half)", and "Top-and-Bottom". Please refer to the monitor and your 3D Vision compatible graphics card. ASUS VG278H Series LCD Monitor 1-5 To connect the DVI(Dual link) or HDMI cable Connect with Microsoft® Windows® Vista or Windows® 7 operating system installed. Please visit NVIDIA website (http://www.nvidia. The video formats supported for more information. To support 3D Vision, please make...
... HDMI input are "Frame Packing", "Side by Side(Half)", and "Top-and-Bottom". Please refer to the monitor and your 3D Vision compatible graphics card. ASUS VG278H Series LCD Monitor 1-5 To connect the DVI(Dual link) or HDMI cable Connect with Microsoft® Windows® Vista or Windows® 7 operating system installed. Please visit NVIDIA website (http://www.nvidia. The video formats supported for more information. To support 3D Vision, please make...

User Guide
Page 12
... check the built-in battery status by examing the light: • Green: The battery is fully charged. • Red: The battery is running out, and needs recharge. • No Light: The battery is exhausted, and needs recharge immediately. USB Connection Used to the micro USB port of the glasses. Press the On/Off button: Press the On/Off button to turn on or off the power...
... check the built-in battery status by examing the light: • Green: The battery is fully charged. • Red: The battery is running out, and needs recharge. • No Light: The battery is exhausted, and needs recharge immediately. USB Connection Used to the micro USB port of the glasses. Press the On/Off button: Press the On/Off button to turn on or off the power...

User Guide
Page 13
Remove the height adjustment lock from the arm. 1 2 3 The height adjustment lock should NEVER be removed BEFORE you place the monitor VERTICALLY on a flat and clean table. 2.1 Assembling the monitor base To assemble the monitor base: 1. Attach the base to joint the base with the arm. ASUS VG278H Series LCD Monitor 2-1 You can easily tighten the screws by fingers. 3. Fix with the screws to the arm. 2.
Remove the height adjustment lock from the arm. 1 2 3 The height adjustment lock should NEVER be removed BEFORE you place the monitor VERTICALLY on a flat and clean table. 2.1 Assembling the monitor base To assemble the monitor base: 1. Attach the base to joint the base with the arm. ASUS VG278H Series LCD Monitor 2-1 You can easily tighten the screws by fingers. 3. Fix with the screws to the arm. 2.
User Guide
Page 15
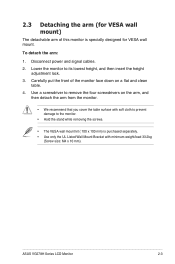
... VESA wall mount. ASUS VG278H Series LCD Monitor 2-3 Lower the monitor to the monitor. • Hold the stand while removing the screws. • The VESA wall mount kit ( 100 x 100 mm) is specially designed for VESA wall mount) The detachable arm of the monitor face down on the arm, and then detach the arm from the monitor. • We recommend that you cover the table surface with minimum weight/load 33.2kg (Screw size...
... VESA wall mount. ASUS VG278H Series LCD Monitor 2-3 Lower the monitor to the monitor. • Hold the stand while removing the screws. • The VESA wall mount kit ( 100 x 100 mm) is specially designed for VESA wall mount) The detachable arm of the monitor face down on the arm, and then detach the arm from the monitor. • We recommend that you cover the table surface with minimum weight/load 33.2kg (Screw size...
User Guide
Page 16
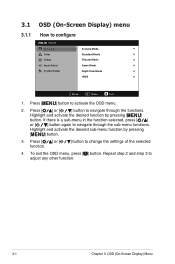
... there is a sub-menu in the function selected, press [ ] or [ ] button again to configure VG278 Splendid Color Image Input Select System Setup Scenery Mode Standard Mode Theater Mode Game Mode Night View Mode sRGB Move Menu Exit 1. Press [ ] or [ ] button to adjust any other function. 3-1 Chapter 3: OSD (On-Screen Display) Menu Repeat step 2 and step 3 to navigate through the sub-menu functions. To exit the OSD menu, press [ ] button. Highlight and activate the...
... there is a sub-menu in the function selected, press [ ] or [ ] button again to configure VG278 Splendid Color Image Input Select System Setup Scenery Mode Standard Mode Theater Mode Game Mode Night View Mode sRGB Move Menu Exit 1. Press [ ] or [ ] button to adjust any other function. 3-1 Chapter 3: OSD (On-Screen Display) Menu Repeat step 2 and step 3 to navigate through the sub-menu functions. To exit the OSD menu, press [ ] button. Highlight and activate the...
User Guide
Page 17
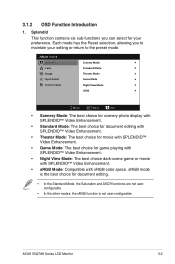
sRGB mode is not user-configurable. 3.1.2 OSD Function Introduction 1. Each mode has the Reset selection, allowing you can select for your setting or return to maintain your preference. ASUS VG278H Series LCD Monitor 3-2 VG278 Splendid Color Image Input Select System Setup Scenery Mode Standard Mode Theater Mode Game Mode Night View Mode sRGB Move Menu Exit • Scenery Mode: The best choice for scenery photo display with SPLENDID™ Video Enhancement. • Standard Mode: The best choice for document...
sRGB mode is not user-configurable. 3.1.2 OSD Function Introduction 1. Each mode has the Reset selection, allowing you can select for your setting or return to maintain your preference. ASUS VG278H Series LCD Monitor 3-2 VG278 Splendid Color Image Input Select System Setup Scenery Mode Standard Mode Theater Mode Game Mode Night View Mode sRGB Move Menu Exit • Scenery Mode: The best choice for scenery photo display with SPLENDID™ Video Enhancement. • Standard Mode: The best choice for document...
User Guide
Page 18
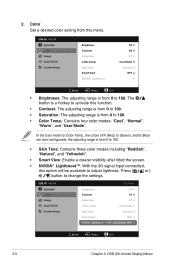
... Color Image Input Select System Setup Brightness Contrast Saturation Color Temp. the adjusting range is from 0 to 100. Skin Tone Smart View NVIDIA LightboostTM OFF 3D-Mode 90 76 50 User Mode Natural OFF MAX Move Menu Exit 3-3 Chapter 3: OSD (On-Screen Display) Menu Skin Tone Smart View NVIDIA LightboostTM 90 80 50 User Mode Natural OFF Move Menu Exit • Brightness: The adjusting range is from 0 to adjust lightness. In the User mode for Color Temp., the colors of R (Red), G (Green), and B (Blue...
... Color Image Input Select System Setup Brightness Contrast Saturation Color Temp. the adjusting range is from 0 to 100. Skin Tone Smart View NVIDIA LightboostTM OFF 3D-Mode 90 76 50 User Mode Natural OFF MAX Move Menu Exit 3-3 Chapter 3: OSD (On-Screen Display) Menu Skin Tone Smart View NVIDIA LightboostTM 90 80 50 User Mode Natural OFF Move Menu Exit • Brightness: The adjusting range is from 0 to adjust lightness. In the User mode for Color Temp., the colors of R (Red), G (Green), and B (Blue...
User Guide
Page 19
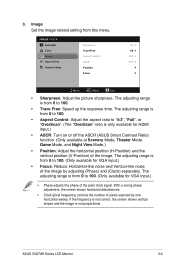
... Free: Speed up the response time. The adjusting range is only available for HDMI input.) • ASCR: Turn on or off the ASCR (ASUS Smart Contrast Ratio) function. (Only available at Scenery Mode, Theater Mode, Game Mode, and Night View Mode.) • Position: Adjust the horizontal position (H-Position) and the vertical position (V-Position) of the pixel clock signal. If the frequency is not correct, the screen shows vertical stripes and the image is from this menu. The adjusting range is...
... Free: Speed up the response time. The adjusting range is only available for HDMI input.) • ASCR: Turn on or off the ASCR (ASUS Smart Contrast Ratio) function. (Only available at Scenery Mode, Theater Mode, Game Mode, and Night View Mode.) • Position: Adjust the horizontal position (H-Position) and the vertical position (V-Position) of the pixel clock signal. If the frequency is not correct, the screen shows vertical stripes and the image is from this menu. The adjusting range is...
User Guide
Page 20
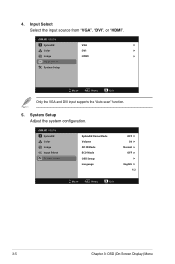
VG278 Splendid Color Image Input Select System Setup VGA DVI HDMI Move Menu Exit Only the VGA and DVI input supports the "Auto scan" function. 5. 4. VG278 Splendid Color Image Input Select System Setup Splendid Demo Mode Volume 3D IR Mode ECO Mode OSD Setup Language OFF 50 Normal OFF English 1/2 Move Menu Exit 3-5 Chapter 3: OSD (On-Screen Display) Menu System Setup Adjust the system configuration. Input Select Select the input source from "VGA", "DVI", or "HDMI".
VG278 Splendid Color Image Input Select System Setup VGA DVI HDMI Move Menu Exit Only the VGA and DVI input supports the "Auto scan" function. 5. 4. VG278 Splendid Color Image Input Select System Setup Splendid Demo Mode Volume 3D IR Mode ECO Mode OSD Setup Language OFF 50 Normal OFF English 1/2 Move Menu Exit 3-5 Chapter 3: OSD (On-Screen Display) Menu System Setup Adjust the system configuration. Input Select Select the input source from "VGA", "DVI", or "HDMI".
User Guide
Page 21
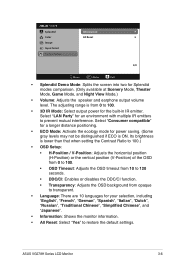
...; Information: Shows the monitor information. • All Reset: Select "Yes" to prevent mutual interference. ASUS VG278H Series LCD Monitor 3-6 VG278 Splendid Color Image Input Select System Setup Information All Reset 2/2 Move Menu Exit • Splendid Demo Mode: Splits the screen into two for an environment with multiple IR emitters to restore the default settings. Select "Consumer compatible" for a longer distance positioning. • ECO Mode: Activate the ecology mode for power saving. (Some gray...
...; Information: Shows the monitor information. • All Reset: Select "Yes" to prevent mutual interference. ASUS VG278H Series LCD Monitor 3-6 VG278 Splendid Color Image Input Select System Setup Information All Reset 2/2 Move Menu Exit • Splendid Demo Mode: Splits the screen into two for an environment with multiple IR emitters to restore the default settings. Select "Consumer compatible" for a longer distance positioning. • ECO Mode: Activate the ecology mode for power saving. (Some gray...
User Guide
Page 22
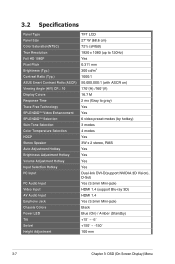
3.2 Specifications Panel Type Panel Size Color Saturation(NTSC) True Resolution Full HD 1080P Pixel Pitch Brightness (Typ.) Contrast Ratio (Typ.) ASUS Smart Contrast Ratio (ASCR) Viewing Angle (H/V) CR≧10 Display Colors Response Time Trace Free Technology SPLENDID™ Video Enhancement SPLENDID™ Selection Skin-Tone Selection Color Temperature Selection HDCP Stereo Speaker Auto Adjustment Hotkey Brightness Adjustment Hotkey Volume Adjustment Hotkey Input Selection Hotkey PC Input PC Audio Input Video Input AV Audio Input Earphone Jack Chassis Colors Power LED Tilt Swivel Height ...
3.2 Specifications Panel Type Panel Size Color Saturation(NTSC) True Resolution Full HD 1080P Pixel Pitch Brightness (Typ.) Contrast Ratio (Typ.) ASUS Smart Contrast Ratio (ASCR) Viewing Angle (H/V) CR≧10 Display Colors Response Time Trace Free Technology SPLENDID™ Video Enhancement SPLENDID™ Selection Skin-Tone Selection Color Temperature Selection HDCP Stereo Speaker Auto Adjustment Hotkey Brightness Adjustment Hotkey Volume Adjustment Hotkey Input Selection Hotkey PC Input PC Audio Input Video Input AV Audio Input Earphone Jack Chassis Colors Power LED Tilt Swivel Height ...
User Guide
Page 23
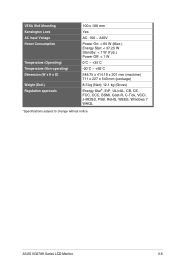
... W Standby: < 1 W (Typ.) Power Off: < 1 W 0˚C ~ +35˚C -20˚C ~ +60˚C 548.75 x 414.19 x 201 mm (machine) 711 x 227 x 540 mm (package) 8.3 kg (Net); 12.1 kg (Gross) Energy Star®, ErP, UL/cUL, CB, CE, FCC, CCC, BSMI, Gost-R, C-Tick, VCCI, J-MOSS, PSB, RoHS, WEEE, Windows 7 WHQL *Specifications subject to change without notice. ASUS VG278H Series LCD Monitor 3-8
... W Standby: < 1 W (Typ.) Power Off: < 1 W 0˚C ~ +35˚C -20˚C ~ +60˚C 548.75 x 414.19 x 201 mm (machine) 711 x 227 x 540 mm (package) 8.3 kg (Net); 12.1 kg (Gross) Energy Star®, ErP, UL/cUL, CB, CE, FCC, CCC, BSMI, Gost-R, C-Tick, VCCI, J-MOSS, PSB, RoHS, WEEE, Windows 7 WHQL *Specifications subject to change without notice. ASUS VG278H Series LCD Monitor 3-8
User Guide
Page 24
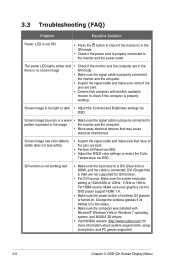
... mode. • Make sure the signal cable is properly connected the monitor and the computer. • Inspect the signal cable and make sure that may cause electrical interference. Screen image is too light or dark • Adjust the Contrast and Brightness settings via OSD. 3D function is not working . 3.3 Troubleshooting (FAQ) Problem Possible Solution Power LED is not ON • Press the button to check if the monitor is in the ON mode. • Check if the power cord...
... mode. • Make sure the signal cable is properly connected the monitor and the computer. • Inspect the signal cable and make sure that may cause electrical interference. Screen image is too light or dark • Adjust the Contrast and Brightness settings via OSD. 3D function is not working . 3.3 Troubleshooting (FAQ) Problem Possible Solution Power LED is not ON • Press the button to check if the monitor is in the ON mode. • Check if the power cord...


