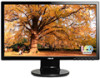

VE228D User's Manual
Page 4
... cabinet are provided for disposal of power source indicated on the monitor cabinet. • To ensure satisfactory operation, use the monitor only with UL listed computers which complies with your local power standard. • Do not overload power strips and extention cords. Never place this product near or over a radiator or...
... cabinet are provided for disposal of power source indicated on the monitor cabinet. • To ensure satisfactory operation, use the monitor only with UL listed computers which complies with your local power standard. • Do not overload power strips and extention cords. Never place this product near or over a radiator or...
VE228D User's Manual
Page 10
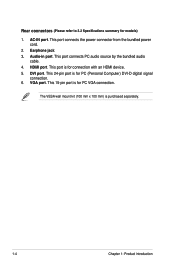
... an HDMI device. 5. This 24-pin port is for models) 1. HDMI port. The VESA wall mount kit (100 mm x 100 mm) is for PC (Personal Computer) DVI-D digital signal connection. 6. This 15-pin port is purchased separately. 1-4 Chapter 1: Product introduction VGA port. This port connects PC audio source by the bundled...
... an HDMI device. 5. This 24-pin port is for models) 1. HDMI port. The VESA wall mount kit (100 mm x 100 mm) is for PC (Personal Computer) DVI-D digital signal connection. 6. This 15-pin port is purchased separately. 1-4 Chapter 1: Product introduction VGA port. This port connects PC audio source by the bundled...

VE228D User's Manual
Page 13
... VGA/DVI connector. • To use earphones: connect the end with the cable management slot. c. Tighten the two screws to your computer's VGA/DVI/HDMI. Cable management slot ASUS VE228 Series LED Monitor 2-3 2.4 Connecting the cables 1. Connect the other end to the monitor's earphone jack. Gather all the cables with... • To connect the audio cable: connect one end of the audio cable to the monitor's Audio-in port, the other end to the computer's audio-out port. • To connect the power cord: connect one end of the power cord securely to the LED monitor's VGA/DVI/HDMI...
... VGA/DVI connector. • To use earphones: connect the end with the cable management slot. c. Tighten the two screws to your computer's VGA/DVI/HDMI. Cable management slot ASUS VE228 Series LED Monitor 2-3 2.4 Connecting the cables 1. Connect the other end to the monitor's earphone jack. Gather all the cables with... • To connect the audio cable: connect one end of the audio cable to the monitor's Audio-in port, the other end to the computer's audio-out port. • To connect the power cord: connect one end of the power cord securely to the LED monitor's VGA/DVI/HDMI...

VE228D User's Manual
Page 23
... electrical interference. Screen image is not centered or sized properly • Press the or button for two seconds to check if the computer is properly working. Screen image bounces or a wave pattern is • Make sure the signal cable is properly present in the ...; Move electrical devices that the computer sound card driver is properly installed and activated. Screen image is blurry or fuzzy • Press the or button for two seconds to the monitor and the power outlet. ASUS VE228 Series LED Monitor 3-9 3.3 Troubleshooting (FAQ) Problem Possible Solution Power LED...
... electrical interference. Screen image is not centered or sized properly • Press the or button for two seconds to check if the computer is properly working. Screen image bounces or a wave pattern is • Make sure the signal cable is properly present in the ...; Move electrical devices that the computer sound card driver is properly installed and activated. Screen image is blurry or fuzzy • Press the or button for two seconds to the monitor and the power outlet. ASUS VE228 Series LED Monitor 3-9 3.3 Troubleshooting (FAQ) Problem Possible Solution Power LED...

