V7-P8H77E User's Manual
Page 2
... offer is repaired, modified or altered, unless such repair, modification of ASUSTeK Computer Inc. ("ASUS"). All Rights Reserved. Products and corporate names appearing in receipt of these licenses are used only for free by sending a request to , by downloading it from http://support.asus.com/download; The GPL and LGPL licensed code in this manual, including the products and software described in...
... offer is repaired, modified or altered, unless such repair, modification of ASUSTeK Computer Inc. ("ASUS"). All Rights Reserved. Products and corporate names appearing in receipt of these licenses are used only for free by sending a request to , by downloading it from http://support.asus.com/download; The GPL and LGPL licensed code in this manual, including the products and software described in...
V7-P8H77E User's Manual
Page 6
... commitment to Part 15 of the FCC Rules. This equipment has been tested and found to comply with the limits for connection of the monitor to the graphics card is connected. • Consult the dealer or an experienced radio/TV technician for you to assure compliance with manufacturer's instructions, may not cause harmful interference, and • This device must...
... commitment to Part 15 of the FCC Rules. This equipment has been tested and found to comply with the limits for connection of the monitor to the graphics card is connected. • Consult the dealer or an experienced radio/TV technician for you to assure compliance with manufacturer's instructions, may not cause harmful interference, and • This device must...
V7-P8H77E User's Manual
Page 7
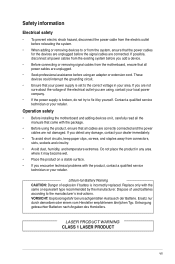
... equivalent type recommended by yourself. These devices could interrupt the grounding circuit. • Ensure that all cables are correctly connected and the power cables are not damaged. Operation safety • Before installing the motherboard and adding devices on a stable surface. • If you add a device. • Before connecting or removing signal cables from the motherboard, ensure that the power cables for the devices are unplugged before the signal cables are connected. VORSICHT...
... equivalent type recommended by yourself. These devices could interrupt the grounding circuit. • Ensure that all cables are correctly connected and the power cables are not damaged. Operation safety • Before installing the motherboard and adding devices on a stable surface. • If you add a device. • Before connecting or removing signal cables from the motherboard, ensure that the power cables for the devices are unplugged before the signal cables are connected. VORSICHT...
V7-P8H77E User's Manual
Page 8
... and rear panels, and an overview of the ASUS V-Series P8H77E. Chapter 2: Starting up This chapter provides an overview of the standard package. IMPORTANT: Instructions that you MUST follow to navigating and setting up for product and software updates. 1. Chapter 1: System introduction This chapter gives a general description of internal components. 2. This chapter includes the motherboard layout, jumper settings, and connector locations. 4. Chapter 4: BIOS setup This chapter provides a detailed guide to...
... and rear panels, and an overview of the ASUS V-Series P8H77E. Chapter 2: Starting up This chapter provides an overview of the standard package. IMPORTANT: Instructions that you MUST follow to navigating and setting up for product and software updates. 1. Chapter 1: System introduction This chapter gives a general description of internal components. 2. This chapter includes the motherboard layout, jumper settings, and connector locations. 4. Chapter 4: BIOS setup This chapter provides a detailed guide to...
V7-P8H77E User's Manual
Page 12
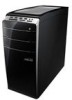
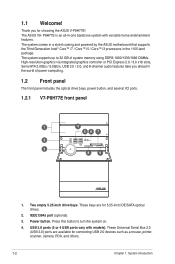
... / Core™ i3 processors in -one barebone system with models). IEEE1394a port (optional). 3. Power button. Thank you ahead in the world of system memory using DDR3-1600/1333/1066 DIMMs. High-resolution graphics via integrated graphics controller or PCI Express 2.0 / 3.0 x16 slots, Serial ATA 3.0Gbs / 6.0Gb/s, USB 2.0 / 3.0, and 8-channel audio features take you for choosing the ASUS V-P8H77E! The system supports up to turn the system on. 4. P8H77E is an all...
... / Core™ i3 processors in -one barebone system with models). IEEE1394a port (optional). 3. Power button. Thank you ahead in the world of system memory using DDR3-1600/1333/1066 DIMMs. High-resolution graphics via integrated graphics controller or PCI Express 2.0 / 3.0 x16 slots, Serial ATA 3.0Gbs / 6.0Gb/s, USB 2.0 / 3.0, and 8-channel audio features take you for choosing the ASUS V-P8H77E! The system supports up to turn the system on. 4. P8H77E is an all...
V7-P8H77E User's Manual
Page 13
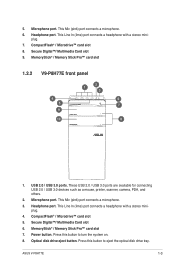
...® / Microdrive™ card slot 5. Power button. Optical disk drive eject button. ASUS V-P8H77E 1-3 Microphone port. Headphone port. Press this button to turn the system on. 8. This Mic (pink) port connects a microphone. 6. These USB 2.0 / USB 3.0 ports are available for connecting USB 2.0 / USB 3.0 devices such as a mouse, printer, scanner, camera, PDA, and others. 2. Secure Digital™/ Multimedia Card slot 6. MemoryStick® / Memory Stick Pro™ card slot 7. MemoryStick® / Memory Stick Pro™ card slot 1.2.2 V9-P8H77E front panel 4 5 9 10...
...® / Microdrive™ card slot 5. Power button. Optical disk drive eject button. ASUS V-P8H77E 1-3 Microphone port. Headphone port. Press this button to turn the system on. 8. This Mic (pink) port connects a microphone. 6. These USB 2.0 / USB 3.0 ports are available for connecting USB 2.0 / USB 3.0 devices such as a mouse, printer, scanner, camera, PDA, and others. 2. Secure Digital™/ Multimedia Card slot 6. MemoryStick® / Memory Stick Pro™ card slot 7. MemoryStick® / Memory Stick Pro™ card slot 1.2.2 V9-P8H77E front panel 4 5 9 10...
V7-P8H77E User's Manual
Page 15
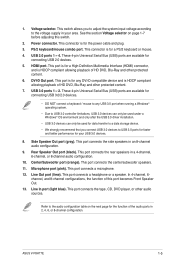
... for the power cable and plug. 3. HDMI port. These 4-pin Universal Serial Bus (USB) ports are available for a PS/2 keyboard or mouse. 4. Line Out port (lime). In 4-channel, 6channel, and 8-channel configurations, the function of the audio ports in your USB 3.0 devices. 8. Line In port (light blue). 1. PS/2 keyboard/mouse combo port. USB 2.0 ports 1 ~ 4. This port connects the center/subwoofer speakers. 11. This port connects the tape, CD, DVD player, or other protected content. 7. This connector is for any USB 3.0 port when running a Windows® operating system...
... for the power cable and plug. 3. HDMI port. These 4-pin Universal Serial Bus (USB) ports are available for a PS/2 keyboard or mouse. 4. Line Out port (lime). In 4-channel, 6channel, and 8-channel configurations, the function of the audio ports in your USB 3.0 devices. 8. Line In port (light blue). 1. PS/2 keyboard/mouse combo port. USB 2.0 ports 1 ~ 4. This port connects the center/subwoofer speakers. 11. This port connects the tape, CD, DVD player, or other protected content. 7. This connector is for any USB 3.0 port when running a Windows® operating system...
V7-P8H77E User's Manual
Page 16
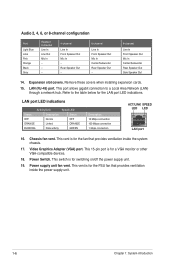
... for the LAN port LED indications. This 15-pin port is for a VGA monitor or other VGA-compatible devices. 18. This switch is for switching on/off the power supply unit. 19. This vent is for the PSU fan that provides ventilation inside the power supply unit. 1-6 Chapter 1: System introduction Remove these covers when installing expansion cards. 15. LAN (RJ-45) port. Refer to a Local Area Network (LAN) through a network hub. Power Switch. Chassis fan vent. Video Graphics Adapter (VGA) port. Power supply unit fan vent. Rear Speaker Out...
... for the LAN port LED indications. This 15-pin port is for a VGA monitor or other VGA-compatible devices. 18. This switch is for switching on/off the power supply unit. 19. This vent is for the PSU fan that provides ventilation inside the power supply unit. 1-6 Chapter 1: System introduction Remove these covers when installing expansion cards. 15. LAN (RJ-45) port. Refer to a Local Area Network (LAN) through a network hub. Power Switch. Chassis fan vent. Video Graphics Adapter (VGA) port. Power supply unit fan vent. Rear Speaker Out...

V7-P8H77E User's Manual
Page 24
.... Motherboard settings and hardware options vary. Use the setup procedures presented in this chapter for more information. 2.2 Powering up Always install the latest OS version and corresponding updates so you can maximize the features of the support DVD are subject to turn ON the system 2.3 Support DVD information The support DVD that came with the system contains useful software and several utility drivers that enhance the system features. • Screen display and driver options...
.... Motherboard settings and hardware options vary. Use the setup procedures presented in this chapter for more information. 2.2 Powering up Always install the latest OS version and corresponding updates so you can maximize the features of the support DVD are subject to turn ON the system 2.3 Support DVD information The support DVD that came with the system contains useful software and several utility drivers that enhance the system features. • Screen display and driver options...
V7-P8H77E User's Manual
Page 48
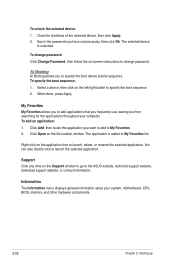
... have set previously, then click Ok. Click Open on -screen instructions to My Favorites list. You can also double click to the ASUS website, technical support website, download support website, or contact information. The selected device is added to change password: Click Change Password, then follow the on the file location window. Click Add, then locate the application you from searching for the applications throughout your system, motherboard, CPU, BIOS, memory, and other hardware components...
... have set previously, then click Ok. Click Open on -screen instructions to My Favorites list. You can also double click to the ASUS website, technical support website, download support website, or contact information. The selected device is added to change password: Click Change Password, then follow the on the file location window. Click Add, then locate the application you from searching for the applications throughout your system, motherboard, CPU, BIOS, memory, and other hardware components...
V7-P8H77E User's Manual
Page 55
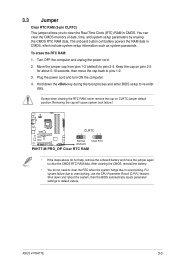
... system boot failure! You can clear the CMOS memory of date, time, and system setup parameters by erasing the CMOS RTC RAM data. Keep the cap on CLRTC jumper default position. The onboard button cell battery powers the RAM data in CMOS. Hold down and reboot the system, then the BIOS automatically resets parameter settings to clear the Real Time Clock (RTC) RAM in CMOS, which include system setup information such as system passwords. ASUS V-P8H77E 3-3
... system boot failure! You can clear the CMOS memory of date, time, and system setup parameters by erasing the CMOS RTC RAM data. Keep the cap on CLRTC jumper default position. The onboard button cell battery powers the RAM data in CMOS. Hold down and reboot the system, then the BIOS automatically resets parameter settings to clear the Real Time Clock (RTC) RAM in CMOS, which include system setup information such as system passwords. ASUS V-P8H77E 3-3
V7-P8H77E User's Manual
Page 56
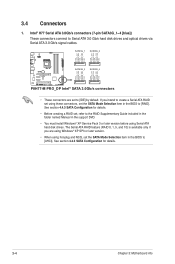
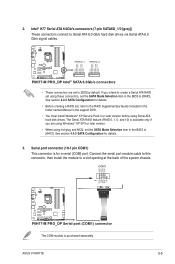
... 3: Motherboard info See section 4.4.3 SATA Configuration for details. • Before creating a RAID set to [RAID]. If you are set , refer to the RAID Supplementary Guide included in the folder named Manual in the support DVD. • You must install Windows® XP Service Pack 3 or later version before using these connectors, set the SATA Mode Selection item in the BIOS to [IDE] by default. Intel® H77 Serial ATA 3.0Gb/s connectors (7-pin SATA3G_1~4 [blue]) These connectors connect...
... 3: Motherboard info See section 4.4.3 SATA Configuration for details. • Before creating a RAID set to [RAID]. If you are set , refer to the RAID Supplementary Guide included in the folder named Manual in the support DVD. • You must install Windows® XP Service Pack 3 or later version before using these connectors, set the SATA Mode Selection item in the BIOS to [IDE] by default. Intel® H77 Serial ATA 3.0Gb/s connectors (7-pin SATA3G_1~4 [blue]) These connectors connect...
V7-P8H77E User's Manual
Page 57
.../s connectors • These connectors are using Windows® XP SP3 or later version. • When using Serial ATA hard disk drives. If you are set the SATA Mode Selection item in the support DVD. • You must install Windows® XP Service Pack 3 or later version before using hot-plug and NCQ, set to [AHCI]. Serial port connector (10-1 pin COM1) This connector is purchased separately. ASUS V-P8H77E 3-5 Intel® H77 Serial ATA 6.0Gb/s connectors (7-pin SATA6G_1/2 [gray]) These connectors connect to a slot opening...
.../s connectors • These connectors are using Windows® XP SP3 or later version. • When using Serial ATA hard disk drives. If you are set the SATA Mode Selection item in the support DVD. • You must install Windows® XP Service Pack 3 or later version before using hot-plug and NCQ, set to [AHCI]. Serial port connector (10-1 pin COM1) This connector is purchased separately. ASUS V-P8H77E 3-5 Intel® H77 Serial ATA 6.0Gb/s connectors (7-pin SATA6G_1/2 [gray]) These connectors connect to a slot opening...
V7-P8H77E User's Manual
Page 64
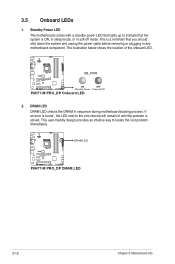
... Power LED The motherboard comes with a standby power LED that lights up to indicate that you should shut down the system and unplug the power cable before removing or plugging in any motherboard component. DRAM LED DRAM LED checks the DRAM in soft-off mode. P8H77-M PRO_DP SB_PWR ON OFF Standby Power Powered Off P8H77-M PRO_DP Onboard LED 2. If an error is found , the LED next to locate the root problem...
... Power LED The motherboard comes with a standby power LED that lights up to indicate that you should shut down the system and unplug the power cable before removing or plugging in any motherboard component. DRAM LED DRAM LED checks the DRAM in soft-off mode. P8H77-M PRO_DP SB_PWR ON OFF Standby Power Powered Off P8H77-M PRO_DP Onboard LED 2. If an error is found , the LED next to locate the root problem...
V7-P8H77E User's Manual
Page 67
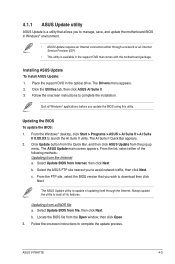
... support DVD in the optical drive. The Drivers menu appears. 2. Quit all its features. From the Windows® desktop, click Start > Programs > ASUS > AI Suite II > AI Suite II X.XX.XX to complete the installation. From the list, select either through a network or an Internet Service Provider (ISP). • This utility is capable of the following methods: Updating from the popup menu. c. From the FTP site, select the BIOS...
... support DVD in the optical drive. The Drivers menu appears. 2. Quit all its features. From the Windows® desktop, click Start > Programs > ASUS > AI Suite II > AI Suite II X.XX.XX to complete the installation. From the list, select either through a network or an Internet Service Provider (ISP). • This utility is capable of the following methods: Updating from the popup menu. c. From the FTP site, select the BIOS...

V7-P8H77E User's Manual
Page 68
... boot failure. 4-4 Chapter 4: BIOS setup To update the BIOS using FAT16/FAT32. • DO NOT shut down or reset the system while updating the BIOS to the USB port. 2. ASUS EZ Flash 2 Utility V01.04 Flash Info MODEL: V-P8H77E File Path: fs0:\ Drive fs0:\ VER: 0202 Folder Info 03/15/11 03:33p 4194304 Exit DATE: 11/29/2011 V-P8H77E.ROM File Info MODEL: Help Info VER: DATE [Enter] Select or Load [Tab] Switch...
... boot failure. 4-4 Chapter 4: BIOS setup To update the BIOS using FAT16/FAT32. • DO NOT shut down or reset the system while updating the BIOS to the USB port. 2. ASUS EZ Flash 2 Utility V01.04 Flash Info MODEL: V-P8H77E File Path: fs0:\ Drive fs0:\ VER: 0202 Folder Info 03/15/11 03:33p 4194304 Exit DATE: 11/29/2011 V-P8H77E.ROM File Info MODEL: Help Info VER: DATE [Enter] Select or Load [Tab] Switch...

V7-P8H77E User's Manual
Page 69
... found, the utility reads the BIOS file and enters ASUS EZ Flash 2 utility automatically. 4. Turn on the system. 2. The utility automatically checks the devices for details. Select the Load Optimized Defaults item under the Exit menu. ASUS V-P8H77E 4-5 Doing so can restore a corrupted BIOS file using the motherboard support DVD or a USB flash drive that contains the updated BIOS file. 4.1.3 ASUS CrashFree BIOS 3 The ASUS CrashFree BIOS 3 is an auto recovery tool that allows you to load default BIOS values. To...
... found, the utility reads the BIOS file and enters ASUS EZ Flash 2 utility automatically. 4. Turn on the system. 2. The utility automatically checks the devices for details. Select the Load Optimized Defaults item under the Exit menu. ASUS V-P8H77E 4-5 Doing so can restore a corrupted BIOS file using the motherboard support DVD or a USB flash drive that contains the updated BIOS file. 4.1.3 ASUS CrashFree BIOS 3 The ASUS CrashFree BIOS 3 is an auto recovery tool that allows you to load default BIOS values. To...
V7-P8H77E User's Manual
Page 72
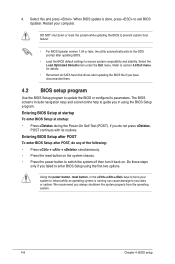
... options. We recommend you do any of the following: • Press + + simultaneously. • Press the reset button on the system chassis. • Press the power button to ensure system compatibility and stability. Refer to section 4.8 Exit menu for details. • Reconnect all SATA hard disk drives after updating BIOS. • Load the BIOS default settings to switch the system off then turn it back on. 4. Entering BIOS Setup at startup To enter BIOS Setup...
... options. We recommend you do any of the following: • Press + + simultaneously. • Press the reset button on the system chassis. • Press the power button to ensure system compatibility and stability. Refer to section 4.8 Exit menu for details. • Reconnect all SATA hard disk drives after updating BIOS. • Load the BIOS default settings to switch the system off then turn it back on. 4. Entering BIOS Setup at startup To enter BIOS Setup...

V7-P8H77E User's Manual
Page 75
... the exit options and loading default settings ASUS V-P8H77E 4-11 Refer to configure the BIOS settings. To access the EZ Mode, click Exit, then select ASUS EZ Mode. Advanced Mode General help Exit Main Back Advanced Monitor Advanced\ Onboard Devices Configuration > Boot HD Audio Controller Enabled SPDIF Out Type SPDIF USB 2.0 Control Enabled Realtek LAN Controller Realtek LAN Controller Realtek PXE OPROM Disabled Enabled Enabled Disabled Tool Enabled/Disabled Realtek LAN →←: Select Screen ↑↓: Select Item Enter: Select +/-: Change Opt. F1...
... the exit options and loading default settings ASUS V-P8H77E 4-11 Refer to configure the BIOS settings. To access the EZ Mode, click Exit, then select ASUS EZ Mode. Advanced Mode General help Exit Main Back Advanced Monitor Advanced\ Onboard Devices Configuration > Boot HD Audio Controller Enabled SPDIF Out Type SPDIF USB 2.0 Control Enabled Realtek LAN Controller Realtek LAN Controller Realtek PXE OPROM Disabled Enabled Enabled Disabled Tool Enabled/Disabled Realtek LAN →←: Select Screen ↑↓: Select Item Enter: Select +/-: Change Opt. F1...

V7-P8H77E User's Manual
Page 81
...[Enabled] Enables or disables the memory remap feature. Configuration options: [Auto] [iGFX] [PEG] ASUS V-P8H77E 4-17 Configuration options: [Enabled] [Disabled] Intel(R) Smart Connect Technology ISCT Configuration [Disabled] Allows you want to create a RAID configuration from the SATA hard disk drives. Configuration options: [Enabled] [Disabled] Intel(R) Rapid Start Technology Intel(R) Rapid Start Technology [Disabled] Allows you want the SATA hard disk drives to use the AHCI (Advanced Host Controller Interface). The AHCI allows the onboard storage driver to enable advanced Serial...
...[Enabled] Enables or disables the memory remap feature. Configuration options: [Auto] [iGFX] [PEG] ASUS V-P8H77E 4-17 Configuration options: [Enabled] [Disabled] Intel(R) Smart Connect Technology ISCT Configuration [Disabled] Allows you want to create a RAID configuration from the SATA hard disk drives. Configuration options: [Enabled] [Disabled] Intel(R) Rapid Start Technology Intel(R) Rapid Start Technology [Disabled] Allows you want the SATA hard disk drives to use the AHCI (Advanced Host Controller Interface). The AHCI allows the onboard storage driver to enable advanced Serial...


