Quick Installation Guide
Page 3
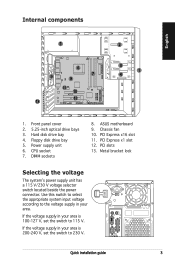
... V voltage selector switch located beside the power connector. CPU socket 7. PCI Express x16 slot 11. Chassis fan 10. Internal components English 5 6 9 8 7 11 10 R 12 13 2 3 1 4 1. ASUS motherboard 9. Use this switch to select the appropriate system input voltage according to the voltage supply in your area is 100‑127 V, set the switch...
... V voltage selector switch located beside the power connector. CPU socket 7. PCI Express x16 slot 11. Chassis fan 10. Internal components English 5 6 9 8 7 11 10 R 12 13 2 3 1 4 1. ASUS motherboard 9. Use this switch to select the appropriate system input voltage according to the voltage supply in your area is 100‑127 V, set the switch...
Quick Installation Guide
Page 5
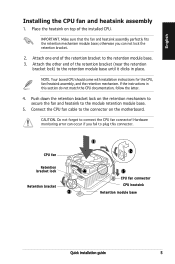
... boxed CPU should come with installation instructions for the CPU, fan/heatsink assembly, and the retention mechanism. Push down the retention bracket lock on the motherboard. Do not forget to the retention module base. 3. Make sure that the fan and heatsink assembly perfectly fits the retention mechanism module base; otherwise you...
... boxed CPU should come with installation instructions for the CPU, fan/heatsink assembly, and the retention mechanism. Push down the retention bracket lock on the motherboard. Do not forget to the retention module base. 3. Make sure that the fan and heatsink assembly perfectly fits the retention mechanism module base; otherwise you...
Quick Installation Guide
Page 6
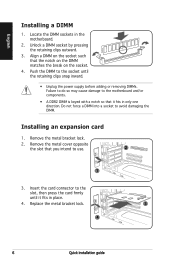
... guide Unlock a DIMM socket by pressing the retaining clips outward. 3. Push the DIMM to use. 2 1 3. Do not force a DIMM into a socket to the motherboard and/or components. • A DDR2 DIMM is keyed with a notch so that it fits in place. 4. Remove the metal bracket lock. 2. Align a DIMM on... the socket such that you intend to the socket until it fits in the motherboard. 2. Remove the metal cover opposite the slot that the notch on the DIMM matches the break on the socket. 4. Installing an expansion card...
... guide Unlock a DIMM socket by pressing the retaining clips outward. 3. Push the DIMM to use. 2 1 3. Do not force a DIMM into a socket to the motherboard and/or components. • A DDR2 DIMM is keyed with a notch so that it fits in place. 4. Remove the metal bracket lock. 2. Align a DIMM on... the socket such that you intend to the socket until it fits in the motherboard. 2. Remove the metal cover opposite the slot that the notch on the DIMM matches the break on the socket. 4. Installing an expansion card...


