
User Manual
Page 1
R TX97 Pentium Motherboard USER'S MANUAL
R TX97 Pentium Motherboard USER'S MANUAL
User Manual
Page 2
... are represented by the digit before and after the period of the manual revision number. Product Name: ASUS TX97 Manual Revision: 1.23 Release Date: August 1997 2 ASUS TX97 User's Manual Copyright © 1997 ASUSTeK COMPUTER INC. ASUS PROVIDES THIS MANUAL "AS IS" WITHOUT WARRANTY OF ANY KIND, EITHER EXPRESS OR IMPLIED, INCLUDING BUT NOT LIMITED TO THE IMPLIED WARRANTIES...
... are represented by the digit before and after the period of the manual revision number. Product Name: ASUS TX97 Manual Revision: 1.23 Release Date: August 1997 2 ASUS TX97 User's Manual Copyright © 1997 ASUSTeK COMPUTER INC. ASUS PROVIDES THIS MANUAL "AS IS" WITHOUT WARRANTY OF ANY KIND, EITHER EXPRESS OR IMPLIED, INCLUDING BUT NOT LIMITED TO THE IMPLIED WARRANTIES...

User Manual
Page 3
...tw Technical Support Fax: +886-2-895-9254 BBS: +886-2-896-4667 Email: tsd@asus.com.tw WWW: www.asus.com.tw Gopher: gopher.asus.com.tw FTP: ftp.asus.com.tw/pub/ASUS ASUS COMPUTER INTERNATIONAL Marketing Info Address: 721 Charcot Avenue, San Jose, CA 95131, USA ...asus.com.tw WWW: www.asus.com ASUS COMPUTER GmbH Marketing Info Address: Harkort Str. 25, 40880 Ratingen, BRD, Germany Telephone: 49-2102-445011 Fax: 49-2102-442066 Email: info-ger@asus.com.tw Technical Support BBS: 49-2102-448690 Email: tsd-ger@asus.com.tw Hotline: 49-2102-499712 ASUS TX97 User's Manual...
...tw Technical Support Fax: +886-2-895-9254 BBS: +886-2-896-4667 Email: tsd@asus.com.tw WWW: www.asus.com.tw Gopher: gopher.asus.com.tw FTP: ftp.asus.com.tw/pub/ASUS ASUS COMPUTER INTERNATIONAL Marketing Info Address: 721 Charcot Avenue, San Jose, CA 95131, USA ...asus.com.tw WWW: www.asus.com ASUS COMPUTER GmbH Marketing Info Address: Harkort Str. 25, 40880 Ratingen, BRD, Germany Telephone: 49-2102-445011 Fax: 49-2102-442066 Email: info-ger@asus.com.tw Technical Support BBS: 49-2102-448690 Email: tsd-ger@asus.com.tw Hotline: 49-2102-499712 ASUS TX97 User's Manual...

User Manual
Page 4
... Settings 15 Compatible Cyrix CPU Identification 17 2. INTRODUCTION 7 How this manual is organized 7 Item Checklist 7 II. INSTALLATION 12 Map of Power Management Setup 45 4 ASUS TX97 User's Manual Expansion Cards 22 Expansion Card Installation Procedure 22 Assigning IRQs for Expansion Cards... Setup 42 Power Management Setup 45 Details of the ASUS TX97 Motherboard 12 Installation Steps 14 1. FEATURES 8 Features of the ASUS TX97 Motherboard 8 Introduction to ASUS TX97 Series of motherboards 9 Parts of the ASUS TX97 Motherboard 11 III. System Memory (DIMM 19 DIMM ...
... Settings 15 Compatible Cyrix CPU Identification 17 2. INTRODUCTION 7 How this manual is organized 7 Item Checklist 7 II. INSTALLATION 12 Map of Power Management Setup 45 4 ASUS TX97 User's Manual Expansion Cards 22 Expansion Card Installation Procedure 22 Assigning IRQs for Expansion Cards... Setup 42 Power Management Setup 45 Details of the ASUS TX97 Motherboard 12 Installation Steps 14 1. FEATURES 8 Features of the ASUS TX97 Motherboard 8 Introduction to ASUS TX97 Series of motherboards 9 Parts of the ASUS TX97 Motherboard 11 III. System Memory (DIMM 19 DIMM ...

User Manual
Page 5
...-SC200 60 Terminator Requirements for SCSI Devices 60 Terminator Settings for the ASUS PCI-SC860 61 Terminator Settings for the ASUS PCI-SC200 61 SCSI ID Numbers for SCSI Devices 62 SCSI ID Priority 62 ASUS TX97 User's Manual 5 SUPPORT SOFTWARE 54 ASUS TX97 Motherboard Series Support CD 54 LANDesk Client Manager (LDCM 54 Desktop Management Interface...
...-SC200 60 Terminator Requirements for SCSI Devices 60 Terminator Settings for the ASUS PCI-SC860 61 Terminator Settings for the ASUS PCI-SC200 61 SCSI ID Numbers for SCSI Devices 62 SCSI ID Priority 62 ASUS TX97 User's Manual 5 SUPPORT SOFTWARE 54 ASUS TX97 Motherboard Series Support CD 54 LANDesk Client Manager (LDCM 54 Desktop Management Interface...

User Manual
Page 6
... radio noise emissions from that interference will not occur in a residential installation. This equipment has been tested and found to Part 15 of Communications. 6 ASUS TX97 User's Manual Changes or modifications to this unit not expressly approved by one or more of the following two conditions: • This device may not cause harmful...
... radio noise emissions from that interference will not occur in a residential installation. This equipment has been tested and found to Part 15 of Communications. 6 ASUS TX97 User's Manual Changes or modifications to this unit not expressly approved by one or more of the following two conditions: • This device may not cause harmful...

User Manual
Page 7
...Installation: Instructions on setting up the BIOS software V. Features: Information and specifications concerning this manual is organized This manual is complete. INTRODUCTION How this product III. The ASUS TX97 motherboard 2 serial port ribbon cables attached to a mounting bracket 1 parallel ribbon cable with ... (with mounting bracket set (optional) ATX to AT Power Connector Adapter (optional) ASUS PCI-SC200 Fast-SCSI or PCI-SC860 Ultra-Fast SCSI card (optional) ASUS TX97 User's Manual 7 If you discover damaged or missing items, please contact your package is divided ...
...Installation: Instructions on setting up the BIOS software V. Features: Information and specifications concerning this manual is organized This manual is complete. INTRODUCTION How this product III. The ASUS TX97 motherboard 2 serial port ribbon cables attached to a mounting bracket 1 parallel ribbon cable with ... (with mounting bracket set (optional) ATX to AT Power Connector Adapter (optional) ASUS PCI-SC200 Fast-SCSI or PCI-SC860 Ultra-Fast SCSI card (optional) ASUS TX97 User's Manual 7 If you discover damaged or missing items, please contact your package is divided ...

User Manual
Page 8
... PIO Modes 3 and 4 and Bus Master IDE DMA Mode 2. FEATURES Features of either a standard PCI card, an ASUS MediaBus card, or an ISA card. • ASUS MediaBus: Features an expansion slot extension shared with two connectors that supports four IDE devices in a small package. BIOS now... A second IrDA connector is carefully designed for an optional high-performance expansion card which allows hardware to support optional ASUS SCSI controller cards. 8 ASUS TX97 User's Manual Two floppy drives of the ASUS TX97 Motherboard The ASUS TX97 is available for wireless connections.
... PIO Modes 3 and 4 and Bus Master IDE DMA Mode 2. FEATURES Features of either a standard PCI card, an ASUS MediaBus card, or an ISA card. • ASUS MediaBus: Features an expansion slot extension shared with two connectors that supports four IDE devices in a small package. BIOS now... A second IrDA connector is carefully designed for an optional high-performance expansion card which allows hardware to support optional ASUS SCSI controller cards. 8 ASUS TX97 User's Manual Two floppy drives of the ASUS TX97 Motherboard The ASUS TX97 is available for wireless connections.

User Manual
Page 9
... implemented in the next release of Windows 95 must be used. • PC '97 Compliant - To fully utilize the benefits of motherboards. ASUS TX97 User's Manual 9 FEATURES Introduction to 528MB/s max. • Double the IDE Transfer Speed - Intelligence: • Fan Status Monitoring and Alarm - II... high-level goals: Support for Plug and Play compatibility and power management for configuring and managing all the energy saving standards. ASUS TX97 series of motherboards with existing ATA-2 IDE specs so there is operating at a safe heat level to upgrade current hard drives...
... implemented in the next release of Windows 95 must be used. • PC '97 Compliant - To fully utilize the benefits of motherboards. ASUS TX97 User's Manual 9 FEATURES Introduction to 528MB/s max. • Double the IDE Transfer Speed - Intelligence: • Fan Status Monitoring and Alarm - II... high-level goals: Support for Plug and Play compatibility and power management for configuring and managing all the energy saving standards. ASUS TX97 series of motherboards with existing ATA-2 IDE specs so there is operating at a safe heat level to upgrade current hard drives...
User Manual
Page 10
... power button is a important feature to prevent possible application crashes. A simple glimpse provides useful information to critical motherboard components. ASUS TX97 series of motherboards were designed to cooperate with BIOS, chipset, and flash EPROM to present enormous user interfaces and run large applications..., so monitoring is the Soft-Off mode. Voltage specifications are monitored to ensure stable current to the user. 10 ASUS TX97 User's Manual Normally, viruses can be turned on storage media such as hard drivers, floppy diskettes, and MO. The system can...
... power button is a important feature to prevent possible application crashes. A simple glimpse provides useful information to critical motherboard components. ASUS TX97 series of motherboards were designed to cooperate with BIOS, chipset, and flash EPROM to present enormous user interfaces and run large applications..., so monitoring is the Soft-Off mode. Voltage specifications are monitored to ensure stable current to the user. 10 ASUS TX97 User's Manual Normally, viruses can be turned on storage media such as hard drivers, floppy diskettes, and MO. The system can...

User Manual
Page 11
FEATURES Parts of Board) PCI 4 or ASUS MediaBus 3 DIMM Sockets Programmable Flash ROM Intel's 430TX PCIset Hardware Monitor CPU Thermal Sensor CPU ZIF Socket 7 512KB Pipelined Burst L2 Cache Switching Voltage Regulators ASUS TX97 User's Manual 11 FEATURES (Parts of the ASUS TX97 Motherboard Super Multi-I/O 4 ISA Slots 3 PCI Slots IDE / Floppy Connectors PS/2 Mouse, USB, IrDA Parallel & Serial Ports II. II.
FEATURES Parts of Board) PCI 4 or ASUS MediaBus 3 DIMM Sockets Programmable Flash ROM Intel's 430TX PCIset Hardware Monitor CPU Thermal Sensor CPU ZIF Socket 7 512KB Pipelined Burst L2 Cache Switching Voltage Regulators ASUS TX97 User's Manual 11 FEATURES (Parts of the ASUS TX97 Motherboard Super Multi-I/O 4 ISA Slots 3 PCI Slots IDE / Floppy Connectors PS/2 Mouse, USB, IrDA Parallel & Serial Ports II. II.
User Manual
Page 12
INSTALLATION (Map of the ASUS TX97 Motherboard Super Multi-I/O PS/2 Mouse, USB, IrDA Keyboard Serial Ports COM 1 COM 2 Parallel (Printer) Port P8 P9 Power Fan Board Power Input ATX Power Switch ... FS0 III. Ratio CPU Fan Vcore Voltage Infrared Switching Voltage Regulators CPU ZIF Socket 7 Heat Sensor Intel 430TX PCIset 512KB Pipelined Burst L2 Cache 12 ASUS TX97 User's Manual INSTALLATION Map of Board) MediaBus Extension Clock Freq Panel Connectors Keyboard BIOS Flash BIOS CR2032 3Volts Lithium Cell (BIOS Power) Intel PIIX4 PCIset Chasis...
INSTALLATION (Map of the ASUS TX97 Motherboard Super Multi-I/O PS/2 Mouse, USB, IrDA Keyboard Serial Ports COM 1 COM 2 Parallel (Printer) Port P8 P9 Power Fan Board Power Input ATX Power Switch ... FS0 III. Ratio CPU Fan Vcore Voltage Infrared Switching Voltage Regulators CPU ZIF Socket 7 Heat Sensor Intel 430TX PCIset 512KB Pipelined Burst L2 Cache 12 ASUS TX97 User's Manual INSTALLATION Map of Board) MediaBus Extension Clock Freq Panel Connectors Keyboard BIOS Flash BIOS CR2032 3Volts Lithium Cell (BIOS Power) Intel PIIX4 PCIset Chasis...

User Manual
Page 13
... Lead (5-pins) p. 29 Speaker Output Connector (4-pins) p. 30 PS/2 Mouse/USB/IR Combo-Connector (18-pin Block) p. 30 Second Infrared Port Module Connector (5-pin Block) ASUS TX97 User's Manual 13 III. INSTALLATION (Map of Board) III.
... Lead (5-pins) p. 29 Speaker Output Connector (4-pins) p. 30 PS/2 Mouse/USB/IR Combo-Connector (18-pin Block) p. 30 Second Infrared Port Module Connector (5-pin Block) ASUS TX97 User's Manual 13 III. INSTALLATION (Map of Board) III.
User Manual
Page 14
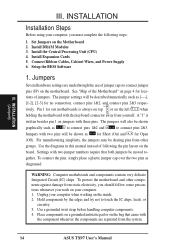
... INSTALLATION Installation Steps Before using your computer when working on the bag that both jumpers be sharing pins from the system. 14 ASUS TX97 User's Manual Settings with two pins will also be shown as diagramed. Jumpers Several hardware settings are separated from other components against damage from ... a plastic jumper cap over the two pins as for Short (On) and for loca- Install Expansion Cards 5. Use the diagrams in this manual instead of jumper caps to connect jumper pins (JP) on page 4 for Open (Off). III. To protect the motherboard and other groups....
... INSTALLATION Installation Steps Before using your computer when working on the bag that both jumpers be sharing pins from the system. 14 ASUS TX97 User's Manual Settings with two pins will also be shown as diagramed. Jumpers Several hardware settings are separated from other components against damage from ... a plastic jumper cap over the two pins as for Short (On) and for loca- Install Expansion Cards 5. Use the diagrams in this manual instead of jumper caps to connect jumper pins (JP) on page 4 for Open (Off). III. To protect the motherboard and other groups....
User Manual
Page 15
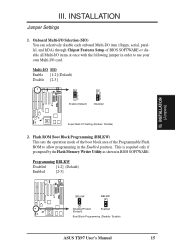
III. Programming BBLKW Disabled [1-2] (Default) Enabled [2-3] III. INSTALLATION (Jumpers) R R BBLKW BBLKW Disabled/Protect (Default) Enabled Boot Block Programming (Disable / Enable) ASUS TX97 User's Manual 15 Multi-I/O SIO Enable [1-2] (Default) Disable [2-3] SIO 1 2 3 Enable (Default) SIO 1 2 3 Disabled Super Multi I /O card. INSTALLATION Jumper Settings 1. This is required only if prompted by the ...
III. Programming BBLKW Disabled [1-2] (Default) Enabled [2-3] III. INSTALLATION (Jumpers) R R BBLKW BBLKW Disabled/Protect (Default) Enabled Boot Block Programming (Disable / Enable) ASUS TX97 User's Manual 15 Multi-I/O SIO Enable [1-2] (Default) Disable [2-3] SIO 1 2 3 Enable (Default) SIO 1 2 3 Disabled Super Multi I /O card. INSTALLATION Jumper Settings 1. This is required only if prompted by the ...

User Manual
Page 16
... RAM Operation Clear Data RTCLR [2-3] (Default) [1-2] (momentarily) RTCLR Battery Test Operation (Default) RTCLR Clear Data RTC RAM (Operation / Clear Data) R III. INSTALLATION (Jumpers) 16 ASUS TX97 User's Manual WARNING: You must unplug the power cord to your power supply to ensure that there is powered by removing this jumper to "Clear Data," (3) Move...
... RAM Operation Clear Data RTCLR [2-3] (Default) [1-2] (momentarily) RTCLR Battery Test Operation (Default) RTCLR Clear Data RTC RAM (Operation / Clear Data) R III. INSTALLATION (Jumpers) 16 ASUS TX97 User's Manual WARNING: You must unplug the power cord to your power supply to ensure that there is powered by removing this jumper to "Clear Data," (3) Move...

User Manual
Page 17
... as a simple quideline and is ignored and may work for both 3.4V(STD) and 2.8V(Dual). Look for 2.8V(Dual) may be [1-2] or [2-3] or [----] ASUS TX97 User's Manual 17 III. INSTALLATION Compatible Cyrix CPU Identification The only Cyrix CPU that is supported on the underside of the CPU for your CPU and follow...
... as a simple quideline and is ignored and may work for both 3.4V(STD) and 2.8V(Dual). Look for 2.8V(Dual) may be [1-2] or [2-3] or [----] ASUS TX97 User's Manual 17 III. INSTALLATION Compatible Cyrix CPU Identification The only Cyrix CPU that is supported on the underside of the CPU for your CPU and follow...

User Manual
Page 18
... clock generator what frequency to send to BUS Frequency Ratio (BF0, BF1) These jumpers set together with the Cyrix PR166+ installed on this motherboard. 18 ASUS TX97 User's Manual
... clock generator what frequency to send to BUS Frequency Ratio (BF0, BF1) These jumpers set together with the Cyrix PR166+ installed on this motherboard. 18 ASUS TX97 User's Manual

User Manual
Page 19
System Memory (DIMM) This motherboard has three sockets to support 3.3Volt (power level) Unbuffered Synchronous DRAMs (SDRAM) DIMMs of the BIOS SOFTWARE. INSTALLATION (System Memory) ASUS TX97 User's Manual 19 IMPORTANT: Memory speed setup is 256MB total for all sockets. • Socket 3 will not support 64MB or 128MB DIMMs with 64Mbit SDRAM cells. •...
System Memory (DIMM) This motherboard has three sockets to support 3.3Volt (power level) Unbuffered Synchronous DRAMs (SDRAM) DIMMs of the BIOS SOFTWARE. INSTALLATION (System Memory) ASUS TX97 User's Manual 19 IMPORTANT: Memory speed setup is 256MB total for all sockets. • Socket 3 will not support 64MB or 128MB DIMMs with 64Mbit SDRAM cells. •...

User Manual
Page 20
... to prevent the wrong type to be a 3.3Volt Unbuffered Synchronous DRAM (SDRAM). You must be inserted into the DIMM slot on this motherboard. 20 ASUS TX97 User's Manual SDRAM DIMM modules have different pint contact on each side and therefore have the same pin contact on the DIMM module will only fit in...
... to prevent the wrong type to be a 3.3Volt Unbuffered Synchronous DRAM (SDRAM). You must be inserted into the DIMM slot on this motherboard. 20 ASUS TX97 User's Manual SDRAM DIMM modules have different pint contact on each side and therefore have the same pin contact on the DIMM module will only fit in...


