
User Manual
Page 5
... Device Priority 4-27 4.6.2 Boot Settings Configuration 4-28 4.6.3 Security 4-29 4.7 Tools menu 4-31 4.7.1 ASUS EZ Flash 2 4-31 4.7.2 Ai Net 2 4-32 4.7.3 Express Gate 4-32 4.8 Exit menu 4-33 Chapter 5: RAID configuration 5.1... configurations 5-2 5.2 NVIDIA® RAID configurations 5-3 Chapter 6: Driver installation 6.1 RAID driver installation 6-2 6.1.1 Creating a RAID driver disk without entering the OS...... 6-2 6.1.2 Creating a RAID driver disk in Windows 6-2 6.1.3 Installing the RAID controller driver 6-3 6.1.4 Installing an operating system 6-4 6.2 Support DVD information...
... Device Priority 4-27 4.6.2 Boot Settings Configuration 4-28 4.6.3 Security 4-29 4.7 Tools menu 4-31 4.7.1 ASUS EZ Flash 2 4-31 4.7.2 Ai Net 2 4-32 4.7.3 Express Gate 4-32 4.8 Exit menu 4-33 Chapter 5: RAID configuration 5.1... configurations 5-2 5.2 NVIDIA® RAID configurations 5-3 Chapter 6: Driver installation 6.1 RAID driver installation 6-2 6.1.1 Creating a RAID driver disk without entering the OS...... 6-2 6.1.2 Creating a RAID driver disk in Windows 6-2 6.1.3 Installing the RAID controller driver 6-3 6.1.4 Installing an operating system 6-4 6.2 Support DVD information...
User Manual
Page 9
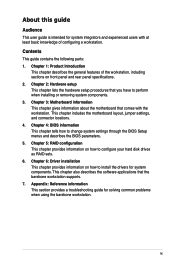
... as RAID sets. 6. Chapter 5: RAID configuration This chapter provides information on how to perform when installing or removing system components. 3. Chapter 6: Driver installation This chapter provides information on front panel and rear panel specifications. 2. This chapter includes the motherboard layout, jumper settings, and connector locations. ...Product Introduction This chapter describes the general features of configuring a workstation. Chapter 4: BIOS information This chapter tells how to install the drivers for solving common problems when using the barebone workstation.
... as RAID sets. 6. Chapter 5: RAID configuration This chapter provides information on how to perform when installing or removing system components. 3. Chapter 6: Driver installation This chapter provides information on front panel and rear panel specifications. 2. This chapter includes the motherboard layout, jumper settings, and connector locations. ...Product Introduction This chapter describes the general features of configuring a workstation. Chapter 4: BIOS information This chapter tells how to install the drivers for solving common problems when using the barebone workstation.

User Manual
Page 34
... cover. 2.6.2 Installing an additional 5.25-inch drive To install an additional 5.25-inch drive 1. Push the knock down metal cover. Use tools such as a screw driver to bend and remove the metal cover to completely detach the front panel cover from the chassis. Insert the drive into the 5.25-inch drive...
... cover. 2.6.2 Installing an additional 5.25-inch drive To install an additional 5.25-inch drive 1. Push the knock down metal cover. Use tools such as a screw driver to bend and remove the metal cover to completely detach the front panel cover from the chassis. Insert the drive into the 5.25-inch drive...
User Manual
Page 37
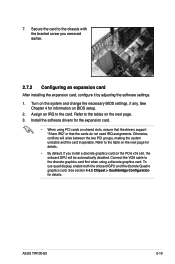
... Configuration for the expansion card. • When using a discrete graphics card. 7. Turn on the next page. 3. Install the software drivers for details. To use quad-display, enable both the onboard GPU and the discrete Quadro graphics card. Secure the card to the chassis ... removed earlier. 2.7.2 Configuring an expansion card After installing the expansion card, configure it by adjusting the software settings. 1. ASUS TW100-E5 2-19 Otherwise, conflicts will be automatically disabled. Refer to the tables on the system and change the necessary BIOS settings, if any.
... Configuration for the expansion card. • When using a discrete graphics card. 7. Turn on the next page. 3. Install the software drivers for details. To use quad-display, enable both the onboard GPU and the discrete Quadro graphics card. Secure the card to the chassis ... removed earlier. 2.7.2 Configuring an expansion card After installing the expansion card, configure it by adjusting the software settings. 1. ASUS TW100-E5 2-19 Otherwise, conflicts will be automatically disabled. Refer to the tables on the system and change the necessary BIOS settings, if any.
User Manual
Page 48
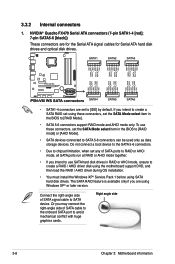
Connect the right-angle side of SATA cable to the onboard SATA port to create a RAID / AHCI driver disk using the motherboard support DVD, and then load the RAID / AHCI driver during OS installation. • You must install the Windows XP® Service Pack 1 before using SATA hard disk drives. NVIDIA® Quadro...
Connect the right-angle side of SATA cable to the onboard SATA port to create a RAID / AHCI driver disk using the motherboard support DVD, and then load the RAID / AHCI driver during OS installation. • You must install the Windows XP® Service Pack 1 before using SATA hard disk drives. NVIDIA® Quadro...
User Manual
Page 56
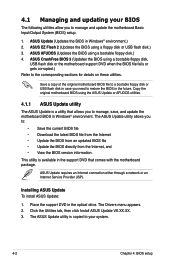
... Internet connection either through a network or an Internet Service Provider (ISP). The Drivers menu appears. 2. ASUS AFUDOS (Updates the BIOS using the ASUS Update or AFUDOS utilities. 4.1.1 ASUS Update utility The ASUS Update is a utility that comes with the motherboard package. The ASUS Update utility allows you need to restore the BIOS in Windows® environment...
... Internet connection either through a network or an Internet Service Provider (ISP). The Drivers menu appears. 2. ASUS AFUDOS (Updates the BIOS using the ASUS Update or AFUDOS utilities. 4.1.1 ASUS Update utility The ASUS Update is a utility that comes with the motherboard package. The ASUS Update utility allows you need to restore the BIOS in Windows® environment...

User Manual
Page 69
...ATA hard disk drives, set or change the configurations for the Serial ATA connectors supported by allowing the drive to configure the item. ASUS TW100-E5 4-15 IDE Configuration OnChip S-ATA Controller SATA Mode select [Enabled] [IDE Mode] Hard Disk Write Protect [Disabled] SATA Detect ...Enabled Disabled OnChip S-ATA Controller [Enabled] Allows you want to internally optimize the order of commands. The AHCI allows the onboard storage driver to [AHCI Mode]. Configuration options: [Enabled] [Disabled] SATA Mode select [IDE Mode] Sets the configuration for the SATA devices ...
...ATA hard disk drives, set or change the configurations for the Serial ATA connectors supported by allowing the drive to configure the item. ASUS TW100-E5 4-15 IDE Configuration OnChip S-ATA Controller SATA Mode select [Enabled] [IDE Mode] Hard Disk Write Protect [Disabled] SATA Detect ...Enabled Disabled OnChip S-ATA Controller [Enabled] Allows you want to internally optimize the order of commands. The AHCI allows the onboard storage driver to [AHCI Mode]. Configuration options: [Enabled] [Disabled] SATA Mode select [IDE Mode] Sets the configuration for the SATA devices ...
User Manual
Page 90
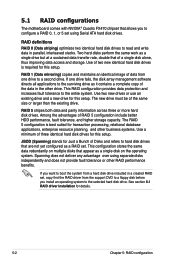
... write data in the other drive. RAID 5 stripes both data and parity information across three or more hard disk drives. See section 6.1 RAID driver installation for this setup. RAID definitions RAID 0 (Data striping) optimizes two identical hard disk drives to the entire system. If one drive to... 5: RAID configuration If you want to boot the system from a hard disk drive included in a created RAID set, copy first the RAID driver from one drive fails, the disk array management software directs all applications to hard disk drives that are not yet configured as it contains a complete...
... write data in the other drive. RAID 5 stripes both data and parity information across three or more hard disk drives. See section 6.1 RAID driver installation for this setup. RAID definitions RAID 0 (Data striping) optimizes two identical hard disk drives to the entire system. If one drive to... 5: RAID configuration If you want to boot the system from a hard disk drive included in a created RAID set, copy first the RAID driver from one drive fails, the disk array management software directs all applications to hard disk drives that are not yet configured as it contains a complete...
User Manual
Page 99
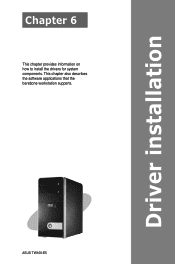
Driver installation Chapter 6 This chapter provides information on how to install the drivers for system components. ASUS TW100-E5 3- This chapter also describes the software applications that the barebone workstation supports.
Driver installation Chapter 6 This chapter provides information on how to install the drivers for system components. ASUS TW100-E5 3- This chapter also describes the software applications that the barebone workstation supports.

User Manual
Page 100
... a USB floppy drive when creating a SATA RAID driver disk. 6.1.1 Creating a RAID driver disk without entering the OS To create a RAID driver disk without entering the OS 1. You have to ASUS Motherboard Make Disk for DOS Menu + + Rev.1.0 + a) NVIDIA Windows XP RAID/AHCI Driver Disk b) NVIDIA Windows Vista RAID/AHCI Driver Disk c) FreeDOS command prompt Please choose...
... a USB floppy drive when creating a SATA RAID driver disk. 6.1.1 Creating a RAID driver disk without entering the OS To create a RAID driver disk without entering the OS 1. You have to ASUS Motherboard Make Disk for DOS Menu + + Rev.1.0 + a) NVIDIA Windows XP RAID/AHCI Driver Disk b) NVIDIA Windows Vista RAID/AHCI Driver Disk c) FreeDOS command prompt Please choose...
User Manual
Page 101
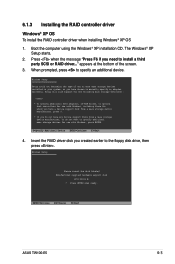
...Device ENTER=Continue F3=Exit 4. Insert the RAID driver disk you do not have any device support disks from a mass storage device manufacturer, press S. * If you created earlier to manually specify an adapter. ENTER=Continue ESC=Cancel F3=Exit ASUS TW100-E5 6-3 appears at the bottom of one or more... use with Windows, press ENTER. The Windows® XP Setup starts. 2. When prompted, press to install a third party SCSI or RAID driver..." Press when the message "Press F6 if you have a device support disk from a mass storage device manufacturer, or do not want to specify...
...Device ENTER=Continue F3=Exit 4. Insert the RAID driver disk you do not have any device support disks from a mass storage device manufacturer, press S. * If you created earlier to manually specify an adapter. ENTER=Continue ESC=Cancel F3=Exit ASUS TW100-E5 6-3 appears at the bottom of one or more... use with Windows, press ENTER. The Windows® XP Setup starts. 2. When prompted, press to install a third party SCSI or RAID driver..." Press when the message "Press F6 if you have a device support disk from a mass storage device manufacturer, or do not want to specify...
User Manual
Page 102
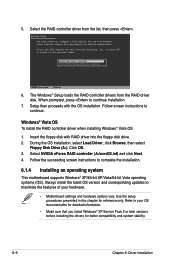
...version and corresponding updates to maximize the features of your OS documentation for better compatibility and system stability. 6-4 Chapter 6: Driver installation NVIDIA RAID Driver (required) NVIDIA nForce Storage Controller (required) ENTER=Continue F3=Exit 6. Insert the floppy disk with the OS installation.... Select NVIDIA nForce RAID controller (A:\nvrd32.inf) and click Next. 4. Windows® Vista OS To install the RAID controller driver when installing Windows® Vista OS 1. 5. When prompted, press to configure a SCSI Adapter for reference only. Follow the ...
...version and corresponding updates to maximize the features of your OS documentation for better compatibility and system stability. 6-4 Chapter 6: Driver installation NVIDIA RAID Driver (required) NVIDIA nForce Storage Controller (required) ENTER=Continue F3=Exit 6. Insert the floppy disk with the OS installation.... Select NVIDIA nForce RAID controller (A:\nvrd32.inf) and click Next. 4. Windows® Vista OS To install the RAID controller driver when installing Windows® Vista OS 1. 5. When prompted, press to configure a SCSI Adapter for reference only. Follow the ...

User Manual
Page 103
...file ASSETUP.EXE from the BIN folder. The DVD automatically displays the Drivers menu if Autorun is NOT enabled in your computer, browse the contents of the support DVD are subject to run the DVD. ASUS TW100-E5 6-5 Click an icon to display support DVD/motherboard information Click an... item to install If Autorun is enabled in your computer. Double-click the ASSETUP.EXE to change at any time without notice. Visit the ASUS website(www.asus.com) for updates. 6.2.1...
...file ASSETUP.EXE from the BIN folder. The DVD automatically displays the Drivers menu if Autorun is NOT enabled in your computer, browse the contents of the support DVD are subject to run the DVD. ASUS TW100-E5 6-5 Click an icon to display support DVD/motherboard information Click an... item to install If Autorun is enabled in your computer. Double-click the ASSETUP.EXE to change at any time without notice. Visit the ASUS website(www.asus.com) for updates. 6.2.1...
User Manual
Page 104
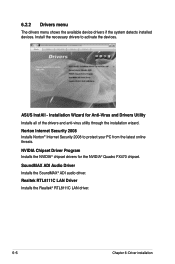
... Chipset Driver Program Installs the NVIDIA® chipset drivers for Anti-Virus and Drivers Utility Installs all of the drivers and anti-virus utility through the installation wizard. Norton Internet Security 2008 Installs Norton® Internet Security 2008 to activate the devices. Realtek RTL8111C LAN Driver Installs the Realtek® RTL8111C LAN driver. 6-6 Chapter 6: Driver installation ASUS InstAll...
... Chipset Driver Program Installs the NVIDIA® chipset drivers for Anti-Virus and Drivers Utility Installs all of the drivers and anti-virus utility through the installation wizard. Norton Internet Security 2008 Installs Norton® Internet Security 2008 to activate the devices. Realtek RTL8111C LAN Driver Installs the Realtek® RTL8111C LAN driver. 6-6 Chapter 6: Driver installation ASUS InstAll...
User Manual
Page 106
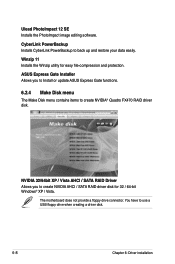
... USB floppy drive when creating a driver disk. 6-8 Chapter 6: Driver installation NVIDIA 32/64bit XP / Vista AHCI / SATA RAID Driver Allows you to Install or update ASUS Express Gate functions. 6.2.4 Make Disk menu The Make Disk menu contains items to create NVIDIA AHCI / SATA RAID driver disk for easy file-compression and protection...® XP / Vista. The motherboard does not provide a floppy drive connector. Ulead PhotoImpact 12 SE Installs the PhotoImpact image editing software. ASUS Express Gate Installer Allows you to create NVIDIA® Quadro FX470 RAID driver disk.
... USB floppy drive when creating a driver disk. 6-8 Chapter 6: Driver installation NVIDIA 32/64bit XP / Vista AHCI / SATA RAID Driver Allows you to Install or update ASUS Express Gate functions. 6.2.4 Make Disk menu The Make Disk menu contains items to create NVIDIA AHCI / SATA RAID driver disk for easy file-compression and protection...® XP / Vista. The motherboard does not provide a floppy drive connector. Ulead PhotoImpact 12 SE Installs the PhotoImpact image editing software. ASUS Express Gate Installer Allows you to create NVIDIA® Quadro FX470 RAID driver disk.
User Manual
Page 108
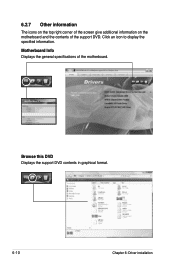
Motherboard Info Displays the general specifications of the support DVD. Browse this DVD Displays the support DVD contents in graphical format. 6-10 Chapter 6: Driver installation Click an icon to display the specified information. 6.2.7 Other information The icons on the top right corner of the screen give additional information on the motherboard and the contents of the motherboard.
Motherboard Info Displays the general specifications of the support DVD. Browse this DVD Displays the support DVD contents in graphical format. 6-10 Chapter 6: Driver installation Click an icon to display the specified information. 6.2.7 Other information The icons on the top right corner of the screen give additional information on the motherboard and the contents of the motherboard.

User Manual
Page 110
...the Support DVD have wizards that the BIOS item Full Screen Logo is set to [Enabled] if you install the ASUS Update utility from the drop down menu, then click Next. 3. The ASUS MyLogo window appears. 6. See section 4.1.4 AFUDOS utility. • Make sure that will conveniently guide you customize ... from the drop down menu, then click Next. 5. See section 4.6.2 Boot Settings Configuration. • You can create your boot logo. 6-12 Chapter 6: Driver installation To launch the ASUS MyLogo2™ 1. The ASUS MyLogo2™ is the image that contains the image you intend to use...
...the Support DVD have wizards that the BIOS item Full Screen Logo is set to [Enabled] if you install the ASUS Update utility from the drop down menu, then click Next. 3. The ASUS MyLogo window appears. 6. See section 4.1.4 AFUDOS utility. • Make sure that will conveniently guide you customize ... from the drop down menu, then click Next. 5. See section 4.6.2 Boot Settings Configuration. • You can create your boot logo. 6-12 Chapter 6: Driver installation To launch the ASUS MyLogo2™ 1. The ASUS MyLogo2™ is the image that contains the image you intend to use...

User Manual
Page 112
... the default audio output and input device in this tab. You can also set the default device 6-14 Chapter 6: Driver installation Follow the installation wizard to install the ADI AD1988B Audio Driver from the support DVD that comes with AudioESP™ software to deliver the ultimate audio experience on the taskbar. If...
... the default audio output and input device in this tab. You can also set the default device 6-14 Chapter 6: Driver installation Follow the installation wizard to install the ADI AD1988B Audio Driver from the support DVD that comes with AudioESP™ software to deliver the ultimate audio experience on the taskbar. If...

User Manual
Page 114
Recording Experience The Recording Experience tab allows you to calibrate microphone settings for high quality recording effects. Choose a desired enhancement Click to start microphone calibration Click to boost microphone volume Advanced The Advanced tab allows you to configure detailed utility settings. 6-16 Chapter 6: Driver installation
Recording Experience The Recording Experience tab allows you to calibrate microphone settings for high quality recording effects. Choose a desired enhancement Click to start microphone calibration Click to boost microphone volume Advanced The Advanced tab allows you to configure detailed utility settings. 6-16 Chapter 6: Driver installation

User Manual
Page 116
You will be asked to read pre-written text to allow the AudioWizard to hear the changes you have installed. Adjust microphone volume This screen helps you speak. 6-18 Chapter 6: Driver installation Adjust speaker volume This screen helps you have made. Jack configuration This screen helps you configure your computer's audio ports, depending on the audio devices you adjust speaker volume. Click the Test button to adjust the volume as you adjust microphone volume.
You will be asked to read pre-written text to allow the AudioWizard to hear the changes you have installed. Adjust microphone volume This screen helps you speak. 6-18 Chapter 6: Driver installation Adjust speaker volume This screen helps you have made. Jack configuration This screen helps you configure your computer's audio ports, depending on the audio devices you adjust speaker volume. Click the Test button to adjust the volume as you adjust microphone volume.


