User Manual
Page 45
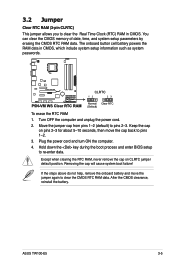
..., time, and system setup parameters by erasing the CMOS RTC RAM data. Removing the cap will cause system boot failure! Move the jumper cap from pins 1-2 (default) to re-enter data. Except when clearing the RTC RAM, never remove the cap on pins 2-3 for about 5-10 seconds...the RTC RAM 1. ASUS TW100-E5 3-5 3.2 Jumper Clear RTC RAM (3-pin CLRTC) This jumper allows you to clear the Real Time Clock (RTC) RAM in CMOS, which include system setup information such as system passwords. The onboard button cell battery powers the RAM data in CMOS. Keep the cap on CLRTC jumper default position. If...
..., time, and system setup parameters by erasing the CMOS RTC RAM data. Removing the cap will cause system boot failure! Move the jumper cap from pins 1-2 (default) to re-enter data. Except when clearing the RTC RAM, never remove the cap on pins 2-3 for about 5-10 seconds...the RTC RAM 1. ASUS TW100-E5 3-5 3.2 Jumper Clear RTC RAM (3-pin CLRTC) This jumper allows you to clear the Real Time Clock (RTC) RAM in CMOS, which include system setup information such as system passwords. The onboard button cell battery powers the RAM data in CMOS. Keep the cap on CLRTC jumper default position. If...
User Manual
Page 64
..., or prompted to enter the Setup utility; For example, you can enable the security password feature or change the configuration of the firmware chip. The firmware chip on . Press ...to enter Setup after changing any BIOS settings, load the default settings to reconfigure your screen. • Visit the ASUS website (www.asus.com) to ensure optimum performance. You can update using...screens shown in the CMOS RAM of your computer in section 4.1 Managing and updating your selections from the available options using the navigation keys. • The default BIOS settings for this ...
..., or prompted to enter the Setup utility; For example, you can enable the security password feature or change the configuration of the firmware chip. The firmware chip on . Press ...to enter Setup after changing any BIOS settings, load the default settings to reconfigure your screen. • Visit the ASUS website (www.asus.com) to ensure optimum performance. You can update using...screens shown in the CMOS RAM of your computer in section 4.1 Managing and updating your selections from the available options using the navigation keys. • The default BIOS settings for this ...
User Manual
Page 83
... the configuration options. After you set a password, this item to set your password. Select the Change Supervisor Password item and press . 2. ASUS TW100-E5 4-29 The message "Password Installed" appears after you can clear it by erasing the CMOS Real Time Clock (RTC) RAM. To change password. If you forget your BIOS password, you successfully set or change the supervisor...
... the configuration options. After you set a password, this item to set your password. Select the Change Supervisor Password item and press . 2. ASUS TW100-E5 4-29 The message "Password Installed" appears after you can clear it by erasing the CMOS Real Time Clock (RTC) RAM. To change password. If you forget your BIOS password, you successfully set or change the supervisor...

User Manual
Page 84
... and/or numbers, then press . 3. On the password box that appears, type a password composed of the screen shows the default Not Installed. The message "Password Installed" appears after you set to [Setup], BIOS checks for user password both when accessing Setup and booting the system. Clear User Password Select this item shows Installed. Configuration options: [Setup...
... and/or numbers, then press . 3. On the password box that appears, type a password composed of the screen shows the default Not Installed. The message "Password Installed" appears after you set to [Setup], BIOS checks for user password both when accessing Setup and booting the system. Clear User Password Select this item shows Installed. Configuration options: [Setup...

User Manual
Page 87
Select YES to save the changes while exiting. If you made to the CMOS RAM. Select Exit & Save Changes or make other than System Date, System Time, and Password, the BIOS asks for the BIOS items, and save your selections, choose this option from the Exit menu to save the.... Discard Changes This option allows you to discard the selections you to load the default values for this option, a confirmation appears. Load Setup Defaults This option allows you made changes to save changes and exit. ASUS TW100-E5 4-33 Select one of the parameters on even when the PC is turned off....
Select YES to save the changes while exiting. If you made to the CMOS RAM. Select Exit & Save Changes or make other than System Date, System Time, and Password, the BIOS asks for the BIOS items, and save your selections, choose this option from the Exit menu to save the.... Discard Changes This option allows you to discard the selections you to load the default values for this option, a confirmation appears. Load Setup Defaults This option allows you made changes to save changes and exit. ASUS TW100-E5 4-33 Select one of the parameters on even when the PC is turned off....

User Manual
Page 128
... input, etc. 6-30 Chapter 6: Driver installation The following tools are available: • Date and Time: set the login credentials (user name, password, SSID, etc.) as time zone. • Input Language: choose your preferred input language and method. • Language and Keyboard: choose your ...browser (Bookmarks, Cookies, History, etc.). The first-time Wizard will immediately restart and then re-enter Express Gate to the original default configuration. This is also useful in the confirmation dialog box, your computer connects to clear the Express Gate settings, as well ...
... input, etc. 6-30 Chapter 6: Driver installation The following tools are available: • Date and Time: set the login credentials (user name, password, SSID, etc.) as time zone. • Input Language: choose your preferred input language and method. • Language and Keyboard: choose your ...browser (Bookmarks, Cookies, History, etc.). The first-time Wizard will immediately restart and then re-enter Express Gate to the original default configuration. This is also useful in the confirmation dialog box, your computer connects to clear the Express Gate settings, as well ...
