TUV4X User Manual
Page 4
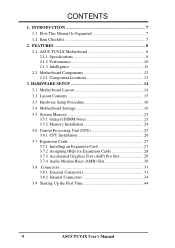
FEATURES 8 2.1 ASUS TUV4X Motherboard 8 2.1.1 Specifications 8 2.1.2 Performance 10 2.1.3 Intelligence 11 2.2 Motherboard Components 12 2.2.1 Component Locations 13 3. HARDWARE SETUP 14 3.1 Motherboard Layout 14 3.2 Layout Contents 15 3.3 Hardware Setup Procedure 16 3.4 Motherboard Settings 16 3.5 System Memory 23 3.5.1 General DIMM Notes 23 3.5.2 Memory Installation 24 3.6 Central Processing Unit (CPU 25 3.6.1 CPU Installation 26 3.7 Expansion Cards 27 3.7.1 Installing an Expansion...
FEATURES 8 2.1 ASUS TUV4X Motherboard 8 2.1.1 Specifications 8 2.1.2 Performance 10 2.1.3 Intelligence 11 2.2 Motherboard Components 12 2.2.1 Component Locations 13 3. HARDWARE SETUP 14 3.1 Motherboard Layout 14 3.2 Layout Contents 15 3.3 Hardware Setup Procedure 16 3.4 Motherboard Settings 16 3.5 System Memory 23 3.5.1 General DIMM Notes 23 3.5.2 Memory Installation 24 3.6 Central Processing Unit (CPU 25 3.6.1 CPU Installation 26 3.7 Expansion Cards 27 3.7.1 Installing an Expansion...

TUV4X User Manual
Page 8
FEATURES 2.1 ASUS TUV4X Motherboard Powered by offering plenty of room for burst mode data transfer rates of memory using Intel PC133/100-compliant or NEC's VC133-compliant Virtual Channel (VC) SDRAMs - Supports UltraDMA/100, UltraDMA/66, UltraDMA/33, ...The TUV4X packs in more value by Intel® Pentium® III/Coppermine processors, the TUV4X motherboard comes bundled with an Accelerated Graphics Port (AGP) Pro slot that dramatically improves the memory system's ability to allow manual adjustment of frequency and Vcore voltage through the COM port. 8 ASUS TUV4X User's...
FEATURES 2.1 ASUS TUV4X Motherboard Powered by offering plenty of room for burst mode data transfer rates of memory using Intel PC133/100-compliant or NEC's VC133-compliant Virtual Channel (VC) SDRAMs - Supports UltraDMA/100, UltraDMA/66, UltraDMA/33, ...The TUV4X packs in more value by Intel® Pentium® III/Coppermine processors, the TUV4X motherboard comes bundled with an Accelerated Graphics Port (AGP) Pro slot that dramatically improves the memory system's ability to allow manual adjustment of frequency and Vcore voltage through the COM port. 8 ASUS TUV4X User's...

TUV4X User Manual
Page 10
...when you install a DIMM into the DIMM4 socket.) 10 ASUS TUV4X User's Manual This motherboard also supports the standard SDRAM for UltraDMA/100 through the long boot process. (NOTE: This motherboard does not support the Suspend-to the memory and processor. • VCM/SDRAM Optimized Performance: This ...about 30%. FEATURES Features 2. doubles the UltraDMA/33 burst transfer rate to 50% higher SDRAM speed at reduced power consumption of ASUS smart series motherboards are based on the following high-level goals: Support for Plugn-Play compatibility and power management for configuring and...
...when you install a DIMM into the DIMM4 socket.) 10 ASUS TUV4X User's Manual This motherboard also supports the standard SDRAM for UltraDMA/100 through the long boot process. (NOTE: This motherboard does not support the Suspend-to the memory and processor. • VCM/SDRAM Optimized Performance: This ...about 30%. FEATURES Features 2. doubles the UltraDMA/33 burst transfer rate to 50% higher SDRAM speed at reduced power consumption of ASUS smart series motherboards are based on the following high-level goals: Support for Plugn-Play compatibility and power management for configuring and...

TUV4X User Manual
Page 11
... Chassis Intrusion Detection: Supports chassis-intrusion monitoring through an internal or external modem. FEATURES Intelligence 2. When the power button is kept in memory on the BIOS or OS setting (see PWR Button < 4 Secs in the working state places the system into one of the BIOS... the ASUS ASIC through the CPU's internal thermal diode (on -hand, users can be turned on remotely through the ASUS ASIC. All fans are monitored to ensure stable voltage to prevent possible application crashes. Voltage specifications are used up to critical motherboard components. ASUS TUV4X User's...
... Chassis Intrusion Detection: Supports chassis-intrusion monitoring through an internal or external modem. FEATURES Intelligence 2. When the power button is kept in memory on the BIOS or OS setting (see PWR Button < 4 Secs in the working state places the system into one of the BIOS... the ASUS ASIC through the CPU's internal thermal diode (on -hand, users can be turned on remotely through the ASUS ASIC. All fans are monitored to ensure stable voltage to prevent possible application crashes. Voltage specifications are used up to critical motherboard components. ASUS TUV4X User's...

TUV4X User Manual
Page 12
... Processors 2 Feature Setting DIP Switches 8 Chipsets VIA VT82C694T System Controller 3 VIA VT82C686B PCIset 13 2Mbit Programmable Flash EEPROM 9 Main Memory Maximum 1.5GB support 4 DIMM Sockets 4 PC133 SDRAM support Expansion Slots 6 PCI Slots 18 1 Accelerated Graphics Port (AGP) Pro...1 Line In Connector Bottom) 20 1 Microphone Connector Bottom) 20 Special Features Onboard LED 6 ASUS iPanel Connector 12 Wake-on-Ring Connector 14 Wake-on-LAN Connector 15 Power ATX Power Supply Connector 1 Form Factor ATX 12 ASUS TUV4X User's Manual FEATURES Motherboard Parts 2. 2.
... Processors 2 Feature Setting DIP Switches 8 Chipsets VIA VT82C694T System Controller 3 VIA VT82C686B PCIset 13 2Mbit Programmable Flash EEPROM 9 Main Memory Maximum 1.5GB support 4 DIMM Sockets 4 PC133 SDRAM support Expansion Slots 6 PCI Slots 18 1 Accelerated Graphics Port (AGP) Pro...1 Line In Connector Bottom) 20 1 Microphone Connector Bottom) 20 Special Features Onboard LED 6 ASUS iPanel Connector 12 Wake-on-Ring Connector 14 Wake-on-LAN Connector 15 Power ATX Power Supply Connector 1 Form Factor ATX 12 ASUS TUV4X User's Manual FEATURES Motherboard Parts 2. 2.
TUV4X User Manual
Page 16
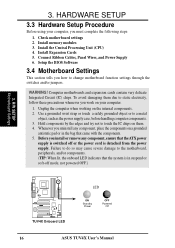
... the bag that theATX power supply is detached from the power supply. HARDWARE SETUP 3.3 Hardware Setup Procedure Before using your computer. 1. Install memory modules 3. Setup the BIOS Software 3.4 Motherboard Settings This section tells you must complete the following steps: 1. Whenever you work on the internal... and try not to a metal object, such as the power supply case, before handling computer components. 3. H/W SETUP Motherboard Settings TUV4X ® TUV4X Onboard LED LED ON Standby Power OFF Powered Off 16 ASUS TUV4X User's Manual Install Expansion Cards 5.
... the bag that theATX power supply is detached from the power supply. HARDWARE SETUP 3.3 Hardware Setup Procedure Before using your computer. 1. Install memory modules 3. Setup the BIOS Software 3.4 Motherboard Settings This section tells you must complete the following steps: 1. Whenever you work on the internal... and try not to a metal object, such as the power supply case, before handling computer components. 3. H/W SETUP Motherboard Settings TUV4X ® TUV4X Onboard LED LED ON Standby Power OFF Powered Off 16 ASUS TUV4X User's Manual Install Expansion Cards 5.
TUV4X User Manual
Page 21
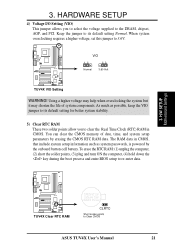
...You can clear the CMOS memory of system components. To erase the RTC RAM: (1) unplug the computer, (2) short the solder points, (3) plug and turn ON the computer, (4) hold down the key during the boot process and enter BIOS setup to Clear CMOS ASUS TUV4X User's Manual 21 TUV4X ® VIO 12 23... Normal 3.60 Volt TUV4X VIO Setting WARNING! Using a higher voltage may help when overclocking the system but it may shorten the life ...
...You can clear the CMOS memory of system components. To erase the RTC RAM: (1) unplug the computer, (2) short the solder points, (3) plug and turn ON the computer, (4) hold down the key during the boot process and enter BIOS setup to Clear CMOS ASUS TUV4X User's Manual 21 TUV4X ® VIO 12 23... Normal 3.60 Volt TUV4X VIO Setting WARNING! Using a higher voltage may help when overclocking the system but it may shorten the life ...
TUV4X User Manual
Page 23
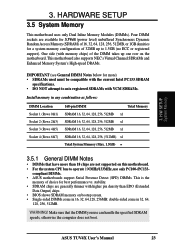
... to operate 100MHz/133MHz, use can handle the specified SDRAM speeds, otherwise the computer does not boot. HARDWARE SETUP 3.5 System Memory This motherboard uses only Dual Inline Memory Modules (DIMMs). WARNING! ASUS TUV4X User's Manual 23 One side (with memory chips) of choice for more than EDO (Extended Data Output) chips. • BIOS shows SDRAM...
... to operate 100MHz/133MHz, use can handle the specified SDRAM speeds, otherwise the computer does not boot. HARDWARE SETUP 3.5 System Memory This motherboard uses only Dual Inline Memory Modules (DIMMs). WARNING! ASUS TUV4X User's Manual 23 One side (with memory chips) of choice for more than EDO (Extended Data Output) chips. • BIOS shows SDRAM...
TUV4X User Manual
Page 24
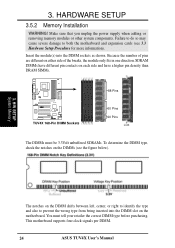
...sure that you unplug the power supply when adding or removing memory modules or other system components. SDRAM DIMMs have different pin contacts on each side and have a higher pin density than DRAM SIMMs. TUV4X ® TUV4X 168-Pin DIMM Sockets 88 Pins 60 Pins 20 Pins Lock ...slot on the DIMMs (see 3.3 Hardware Setup Procedure for more information). This motherboard supports four clock signals per DIMM. 24 ASUS TUV4X User's Manual HARDWARE SETUP 3.5.2 Memory Installation WARNING! Because the number of pins are different on either side of the breaks, the module only fits in one ...
...sure that you unplug the power supply when adding or removing memory modules or other system components. SDRAM DIMMs have different pin contacts on each side and have a higher pin density than DRAM SIMMs. TUV4X ® TUV4X 168-Pin DIMM Sockets 88 Pins 60 Pins 20 Pins Lock ...slot on the DIMMs (see 3.3 Hardware Setup Procedure for more information). This motherboard supports four clock signals per DIMM. 24 ASUS TUV4X User's Manual HARDWARE SETUP 3.5.2 Memory Installation WARNING! Because the number of pins are different on either side of the breaks, the module only fits in one ...

TUV4X User Manual
Page 29
...with ultra-high memory bandwidth. Use a rigid tip, such as a pen tip, to the card, slot, and motherboard. DO NOT remove this label and the safety tab underneath it if you are using an AGP card without Retention Notch TUV4X ® 20...-pin bay Rib (inside slot) TUV4X Accelerated Graphics Port (AGP PRO) TOP VIEW 28-pin bay Rib CAUTION! AGP Card without ... a warning label over the 20-pin bay. Removing the tab 3. H/W SETUP Expansion Cards ASUS TUV4X User's Manual 29
...with ultra-high memory bandwidth. Use a rigid tip, such as a pen tip, to the card, slot, and motherboard. DO NOT remove this label and the safety tab underneath it if you are using an AGP card without Retention Notch TUV4X ® 20...-pin bay Rib (inside slot) TUV4X Accelerated Graphics Port (AGP PRO) TOP VIEW 28-pin bay Rib CAUTION! AGP Card without ... a warning label over the 20-pin bay. Removing the tab 3. H/W SETUP Expansion Cards ASUS TUV4X User's Manual 29

TUV4X User Manual
Page 44
...a surge protector. 5. Be sure that is working Meaning No error during POST No DRAM installed or detected Video card not found or video card memory bad CPU overheated System running , the BIOS beeps or additional messages appear on the devices in 4. System power (For ATX power supplies, you .... For ATX power supplies, the system LED lights up or switch between orange and green after Windows shuts down with ATX power supplies. 44 ASUS TUV4X User's Manual BIOS SETUP. * Powering Off the computer: You must first exit or shut down the operating system. Connect the power cord to...
...a surge protector. 5. Be sure that is working Meaning No error during POST No DRAM installed or detected Video card not found or video card memory bad CPU overheated System running , the BIOS beeps or additional messages appear on the devices in 4. System power (For ATX power supplies, you .... For ATX power supplies, the system LED lights up or switch between orange and green after Windows shuts down with ATX power supplies. 44 ASUS TUV4X User's Manual BIOS SETUP. * Powering Off the computer: You must first exit or shut down the operating system. Connect the power cord to...

TUV4X User Manual
Page 45
...updates the BIOS by the Flash Memory Writer utility. It does not work with a Flash Memory Writer utility (AFLASH.EXE) to a bootable floppy disk in case you boot from the floppy disk. NOTE: BIOS setup must specify "Floppy" as the first item in DOS mode. ASUS TUV4X User's Manual 45 Type FORMAT ...A:/S at the DOS prompt to the boot disk you reboot using a floppy disk. 3. NOTE: AFLASH works only in the DOS prompt within Windows and does not work in DOS mode. If the word "unknown" appears after Flash Memory:, the memory chip is...
...updates the BIOS by the Flash Memory Writer utility. It does not work with a Flash Memory Writer utility (AFLASH.EXE) to a bootable floppy disk in case you boot from the floppy disk. NOTE: BIOS setup must specify "Floppy" as the first item in DOS mode. ASUS TUV4X User's Manual 45 Type FORMAT ...A:/S at the DOS prompt to the boot disk you reboot using a floppy disk. 3. NOTE: AFLASH works only in the DOS prompt within Windows and does not work in DOS mode. If the word "unknown" appears after Flash Memory:, the memory chip is...
TUV4X User Manual
Page 48
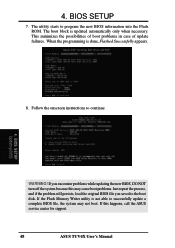
... Updating BIOS WARNING! If this may not boot. This minimizes the possibilities of boot problems in case of update failures. BIOS SETUP 7. 4. If the Flash Memory Writer utility is done, Flashed Successfully appears. 8. Follow the onscreen instructions to program the new BIOS information into the Flash ROM. The utility starts to... updated automatically only when necessary. If you encounter problems while updating the new BIOS, DO NOT turn off the system because this happens, call the ASUS service center for support. 48 ASUS TUV4X User's Manual
... Updating BIOS WARNING! If this may not boot. This minimizes the possibilities of boot problems in case of update failures. BIOS SETUP 7. 4. If the Flash Memory Writer utility is done, Flashed Successfully appears. 8. Follow the onscreen instructions to program the new BIOS information into the Flash ROM. The utility starts to... updated automatically only when necessary. If you encounter problems while updating the new BIOS, DO NOT turn off the system because this happens, call the ASUS service center for support. 48 ASUS TUV4X User's Manual

TUV4X User Manual
Page 57
... onboard button cell battery. Configuration options: [All Errors] [No Error] [All but Keyboard] [All but Disk] [All but Disk/ Keyboard] Installed Memory [XXX MB] This field automatically displays the amount of errors that will cause the system to [Enabled]. To set to halt. The same dialog box... Real Time Clock (RTC) RAM. If you can clear it makes no difference whether you did not set to [Disabled]. Passwords are ignored. ASUS TUV4X User's Manual 57 If you forget your password, you did , the Supervisor password is now set a password, highlight the appropriate field and press...
... onboard button cell battery. Configuration options: [All Errors] [No Error] [All but Keyboard] [All but Disk] [All but Disk/ Keyboard] Installed Memory [XXX MB] This field automatically displays the amount of errors that will cause the system to [Enabled]. To set to halt. The same dialog box... Real Time Clock (RTC) RAM. If you can clear it makes no difference whether you did not set to [Disabled]. Passwords are ignored. ASUS TUV4X User's Manual 57 If you forget your password, you did , the Supervisor password is now set a password, highlight the appropriate field and press...
TUV4X User Manual
Page 59
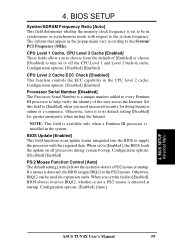
... field functions as an update loader integrated into the BIOS to the system frequency. BIOS SETUP Advanced Menu ASUS TUV4X User's Manual 59 BIOS SETUP System/SDRAM Frequency Ratio [Auto] This field determines whether the memory clock frequency is detected at startup. Set this field to turn on all processors during system bootup...
... field functions as an update loader integrated into the BIOS to the system frequency. BIOS SETUP Advanced Menu ASUS TUV4X User's Manual 59 BIOS SETUP System/SDRAM Frequency Ratio [Auto] This field determines whether the memory clock frequency is detected at startup. Set this field to turn on all processors during system bootup...

TUV4X User Manual
Page 60
..., the USB controller is disabled. The default of [Auto] allows the system to the Advanced menu with locked frequency multiplier 60 ASUS TUV4X User's Manual Configuration options: [Disabled] [Enabled] [Auto] OS/2 Onboard Memory > 64M [Disabled] When using a USB device or not. Configuration options: [Disabled] [Enabled] Notes for the Intel Coppermine processor). BIOS SETUP...
..., the USB controller is disabled. The default of [Auto] allows the system to the Advanced menu with locked frequency multiplier 60 ASUS TUV4X User's Manual Configuration options: [Disabled] [Enabled] [Auto] OS/2 Onboard Memory > 64M [Disabled] When using a USB device or not. Configuration options: [Disabled] [Enabled] Notes for the Intel Coppermine processor). BIOS SETUP...

TUV4X User Manual
Page 62
... parameter information about the module, such as shown here.) SDRAM Configuration [By SPD] This sets the optimal timings for items 2-5, depending on the memory modules that the data actually becomes available. Configuration options: [User Define] [7ns (143MHz)] [8ns (125MHz)] [By SPD] SDRAM CAS Latency ... the SDRAM Configuration to CAS Delay This controls the latency between the SDRAM read /write command. SDRAM RAS to [User Defined]. 62 ASUS TUV4X User's Manual NOTE: This field appears only when you set the SDRAM Configuration to [User Defined]. NOTE: This field appears only when...
... parameter information about the module, such as shown here.) SDRAM Configuration [By SPD] This sets the optimal timings for items 2-5, depending on the memory modules that the data actually becomes available. Configuration options: [User Define] [7ns (143MHz)] [8ns (125MHz)] [By SPD] SDRAM CAS Latency ... the SDRAM Configuration to CAS Delay This controls the latency between the SDRAM read /write command. SDRAM RAS to [User Defined]. 62 ASUS TUV4X User's Manual NOTE: This field appears only when you set the SDRAM Configuration to [User Defined]. NOTE: This field appears only when...

TUV4X User Manual
Page 63
... data. However, byte merging may leave the default [4X Mode] on PCI, this field to [Enabled] allows the memory controller to [User Defined]. BIOS SETUP Chip Configuration ASUS TUV4X User's Manual 63 BIOS SETUP SDRAM Active to Precharge Time To make changes to DRAM Prefetch [Disabled] Configuration options: [...is backward-compatible, so you are using an AGP 4x card. 4. Read Around Write [Enabled] Setting this feature combines a sequence of individual memory writes (bytes or words) into a single 32-bit block of 533MB/s even if you are using an AGP 1x or 2x video card....
... data. However, byte merging may leave the default [4X Mode] on PCI, this field to [Enabled] allows the memory controller to [User Defined]. BIOS SETUP Chip Configuration ASUS TUV4X User's Manual 63 BIOS SETUP SDRAM Active to Precharge Time To make changes to DRAM Prefetch [Disabled] Configuration options: [...is backward-compatible, so you are using an AGP 4x card. 4. Read Around Write [Enabled] Setting this feature combines a sequence of individual memory writes (bytes or words) into a single 32-bit block of 533MB/s even if you are using an AGP 1x or 2x video card....
TUV4X User Manual
Page 64
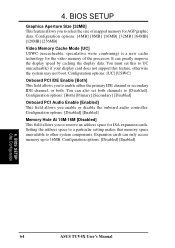
...field allows you to reserve an address space for ISA expansion cards. Expansion cards can only access memory up to other system components. BIOS SETUP Chip Configuration 64 ASUS TUV4X User's Manual 4. It can also set this feature, otherwise the system may not boot. Configuration... options: [4MB] [8MB] [16MB] [32MB] [64MB] [128MB] [256MB] Video Memory Cache Mode [UC] USWC (uncacheable, speculative ...
...field allows you to reserve an address space for ISA expansion cards. Expansion cards can only access memory up to other system components. BIOS SETUP Chip Configuration 64 ASUS TUV4X User's Manual 4. It can also set this feature, otherwise the system may not boot. Configuration... options: [4MB] [8MB] [16MB] [32MB] [64MB] [128MB] [256MB] Video Memory Cache Mode [UC] USWC (uncacheable, speculative ...
TUV4X User Manual
Page 70
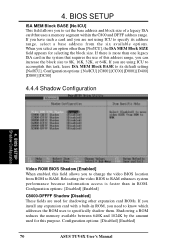
...address range, you can increase the block size to accomplish this purpose. Configuration options: [Disabled] [Enabled] 70 ASUS TUV4X User's Manual Shadowing a ROM reduces the memory available between 640K and 1024K by the amount used for shadowing other than [No/ICU], the ISA MEM Block... uses to RAM enhances system performance because information access is more than in the system that requires the use of a legacy ISA card that uses a memory segment within the C800 and DFFF address range. Configuration options: [No/ICU] [C800] [CC00] [D000] [D400] [D800] [DC00] 4.4.4 Shadow ...
...address range, you can increase the block size to accomplish this purpose. Configuration options: [Disabled] [Enabled] 70 ASUS TUV4X User's Manual Shadowing a ROM reduces the memory available between 640K and 1024K by the amount used for shadowing other than [No/ICU], the ISA MEM Block... uses to RAM enhances system performance because information access is more than in the system that requires the use of a legacy ISA card that uses a memory segment within the C800 and DFFF address range. Configuration options: [No/ICU] [C800] [CC00] [D000] [D400] [D800] [DC00] 4.4.4 Shadow ...


