User Guide
Page 3
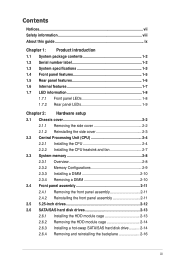
... 2-10 2.4 Front panel assembly 2-11 2.4.1 Removing the front panel assembly 2-11 2.4.2 Reinstalling the front panel assembly 2-11 2.5 5.25-inch drives 2-12 2.6 SATA/SAS hard disk drives 2-13 2.6.1 Installing the HDD module cage 2-13 2.6.2 Removing the HDD module cage 2-14 2.6.3 Installing a hot-swap SATA/SAS hard disk drive........... 2-14 2.6.4 Removing and reinstalling the backplane 2-16 iii
... 2-10 2.4 Front panel assembly 2-11 2.4.1 Removing the front panel assembly 2-11 2.4.2 Reinstalling the front panel assembly 2-11 2.5 5.25-inch drives 2-12 2.6 SATA/SAS hard disk drives 2-13 2.6.1 Installing the HDD module cage 2-13 2.6.2 Removing the HDD module cage 2-14 2.6.3 Installing a hot-swap SATA/SAS hard disk drive........... 2-14 2.6.4 Removing and reinstalling the backplane 2-16 iii
User Guide
Page 15
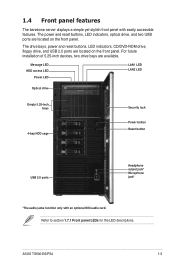
... For future installation of 5.25-inch devices, two drive bays are located on the front panel. Message LED HDD access LED Power LED LAN1 LED LAN2 LED Optical drive Empty 5.25-inch bays 4-bay HDD cage Security lock Power button Reset button USB 2.0 ports Headphone... output jack* Microphone jack* *The audio jacks function only with easily accessible features. The drive bays, power and reset buttons, LED indicators, CD/DVD-ROM drive, floppy drive, and USB 2.0 ports are located on the front panel. ASUS TS500-E6/PS4...
... For future installation of 5.25-inch devices, two drive bays are located on the front panel. Message LED HDD access LED Power LED LAN1 LED LAN2 LED Optical drive Empty 5.25-inch bays 4-bay HDD cage Security lock Power button Reset button USB 2.0 ports Headphone... output jack* Microphone jack* *The audio jacks function only with easily accessible features. The drive bays, power and reset buttons, LED indicators, CD/DVD-ROM drive, floppy drive, and USB 2.0 ports are located on the front panel. ASUS TS500-E6/PS4...

User Guide
Page 33
... appropriate cables to access the drive trays by simply opening the front bezel. Ensure of the type of wires and other obstructions. 2. When the HDD module cage is free of HDD module cage you to the SATA/SAS backplane on the HDD module cage. ASUS TS500-E6/PS4 5 2-13 Insert the HDD module cage into the bay. 2 4. An HDD...
... appropriate cables to access the drive trays by simply opening the front bezel. Ensure of the type of wires and other obstructions. 2. When the HDD module cage is free of HDD module cage you to the SATA/SAS backplane on the HDD module cage. ASUS TS500-E6/PS4 5 2-13 Insert the HDD module cage into the bay. 2 4. An HDD...
User Guide
Page 34
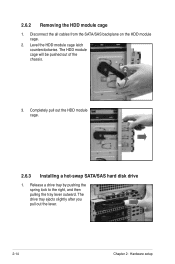
2.6.2 Removing the HDD module cage 1. Release a drive tray by pushing the spring lock to the right, and then pulling the tray lever outward. Level the HDD module cage latch counterclockwise. The drive tray ejects slightly after you pull out the lever. 2-14 Chapter 2: Hardware setup The HDD module cage will be pushed out of the chassis. 2 3. Completely pull out the HDD module cage. 2.6.3 Installing a hot-swap SATA/SAS hard disk drive 1. Disconnect the all cables from the SATA/SAS backplane on the HDD module cage. 2.
2.6.2 Removing the HDD module cage 1. Release a drive tray by pushing the spring lock to the right, and then pulling the tray lever outward. Level the HDD module cage latch counterclockwise. The drive tray ejects slightly after you pull out the lever. 2-14 Chapter 2: Hardware setup The HDD module cage will be pushed out of the chassis. 2 3. Completely pull out the HDD module cage. 2.6.3 Installing a hot-swap SATA/SAS hard disk drive 1. Disconnect the all cables from the SATA/SAS backplane on the HDD module cage. 2.


