
User Manual
Page 4
...Chapter 5: BIOS setup 5.1 Managing and updating your BIOS 5-2 5.1.1 Creating a bootable floppy disk 5-2 5.1.2 ASUS EZ Flash 2 utility 5-3 5.1.3 AFUDOS utility 5-4 5.1.4 ASUS CrashFree BIOS 3 utility 5-6 5.1.5 ASUS Update utility 5-8 5.2 BIOS setup program 5-11 5.2.1 BIOS menu screen 5-12 5.2.2 Menu bar 5-12 ...5.2.3 Navigation keys 5-12 5.2.4 Menu items 5-13 5.2.5 Sub-menu items 5-13 5.2.6 Configuration fields 5-13 5.2.7 Pop-up window 5-...
...Chapter 5: BIOS setup 5.1 Managing and updating your BIOS 5-2 5.1.1 Creating a bootable floppy disk 5-2 5.1.2 ASUS EZ Flash 2 utility 5-3 5.1.3 AFUDOS utility 5-4 5.1.4 ASUS CrashFree BIOS 3 utility 5-6 5.1.5 ASUS Update utility 5-8 5.2 BIOS setup program 5-11 5.2.1 BIOS menu screen 5-12 5.2.2 Menu bar 5-12 ...5.2.3 Navigation keys 5-12 5.2.4 Menu items 5-13 5.2.5 Sub-menu items 5-13 5.2.6 Configuration fields 5-13 5.2.7 Pop-up window 5-...

User Manual
Page 5
... APIC Support 5-25 5.5.5 APM Configuration 5-25 5.5.6 Hardware Monitor 5-27 5.6 Boot menu 5-28 5.6.1 Boot Device Priority 5-28 5.6.2 Boot Settings Configuration 5-29 5.6.3 Security 5-30 5.7 Tools menu 5-32 5.7.1 ASUS EZ Flash 2 5-32 5.7.2 Express Gate 5-33 5.7.3 LED Poster Configuration 5-34 5.8 Exit menu 5-35 Appendix A.1 Power supply specifications A-2 A.2 Dubug code table A-2 A.3 Using the Remote Control (optional...
... APIC Support 5-25 5.5.5 APM Configuration 5-25 5.5.6 Hardware Monitor 5-27 5.6 Boot menu 5-28 5.6.1 Boot Device Priority 5-28 5.6.2 Boot Settings Configuration 5-29 5.6.3 Security 5-30 5.7 Tools menu 5-32 5.7.1 ASUS EZ Flash 2 5-32 5.7.2 Express Gate 5-33 5.7.3 LED Poster Configuration 5-34 5.8 Exit menu 5-35 Appendix A.1 Power supply specifications A-2 A.2 Dubug code table A-2 A.3 Using the Remote Control (optional...
User Manual
Page 8
...Windows® XP installation. This chapter includes the motherboard layout, jumper settings, and connector locations. 5. viii The chapter lists the system features, including introduction on how to change system settings through the BIOS Setup menus and describes the BIOS parameters. 6. Chapter 4: Motherboard info This chapter gives information about ASUS T-P5G43...general information and installation instructions about the motherboard that comes with hardware knowledge of ASUS T-P5G43. Chapter 1: System introduction This chapter gives a general description of personal computers. ...
...Windows® XP installation. This chapter includes the motherboard layout, jumper settings, and connector locations. 5. viii The chapter lists the system features, including introduction on how to change system settings through the BIOS Setup menus and describes the BIOS parameters. 6. Chapter 4: Motherboard info This chapter gives information about ASUS T-P5G43...general information and installation instructions about the motherboard that comes with hardware knowledge of ASUS T-P5G43. Chapter 1: System introduction This chapter gives a general description of personal computers. ...

User Manual
Page 13
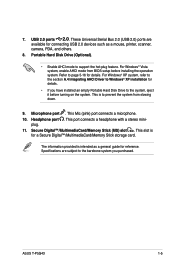
... Hard Disk Drive to eject the optical drive. 9. This is reading from slowing down. 8. Headphone port . Specifications depend on the system. ASUS T-P5G43 1-3 Front panel I/O cover. Portable Hard Disk Drive (Optional). • Enable AHCI mode to page 5-16 for Silver Bezel) 5. Eject ...this door to the hard disk drive. (for details. • If you purchased. Secure Digital™/MultimediaCard/Memory Stick (MS) slot . For Windows® Vista system, enable AHCI mode from or writing to access the optical drive. 2. Microphone port . This Mic (pink) port connects a ...
... Hard Disk Drive to eject the optical drive. 9. This is reading from slowing down. 8. Headphone port . Specifications depend on the system. ASUS T-P5G43 1-3 Front panel I/O cover. Portable Hard Disk Drive (Optional). • Enable AHCI mode to page 5-16 for Silver Bezel) 5. Eject ...this door to the hard disk drive. (for details. • If you purchased. Secure Digital™/MultimediaCard/Memory Stick (MS) slot . For Windows® Vista system, enable AHCI mode from or writing to access the optical drive. 2. Microphone port . This Mic (pink) port connects a ...
User Manual
Page 15
... with a stereo mini- plug. 11. The information provided is intended as a mouse, printer, scanner, camera, PDA, and others. 8. ASUS T-P5G43 1-5 These Universal Serial Bus 2.0 (USB 2.0) ports are subject to the barebone system you have installed an empty Portable Hard Disk Drive to support...for a Secure Digital™/MultimediaCard/Memory Stick storage card. This Mic (pink) port connects a microphone. 10. Headphone port . For Windows® XP system, refer to the section A.4 Integrating AHCI Driver to prevent the system from BIOS setup before turning on the system....
... with a stereo mini- plug. 11. The information provided is intended as a mouse, printer, scanner, camera, PDA, and others. 8. ASUS T-P5G43 1-5 These Universal Serial Bus 2.0 (USB 2.0) ports are subject to the barebone system you have installed an empty Portable Hard Disk Drive to support...for a Secure Digital™/MultimediaCard/Memory Stick storage card. This Mic (pink) port connects a microphone. 10. Headphone port . For Windows® XP system, refer to the section A.4 Integrating AHCI Driver to prevent the system from BIOS setup before turning on the system....

User Manual
Page 26
Lift the load plate with your thumb and forefinger to a 100º angle (4A), then push the PnP cap from the 4B load plate window to a 135º angle. 4. Close the load plate (A), then push the load lever (B) until it snaps into the CPU notch. Lift the load lever in ...
Lift the load plate with your thumb and forefinger to a 100º angle (4A), then push the PnP cap from the 4B load plate window to a 135º angle. 4. Close the load plate (A), then push the load lever (B) until it snaps into the CPU notch. Lift the load lever in ...

User Manual
Page 28
... using 512 MB, 1 GB, 2GB, and 4GB DDR2 DIMMs. • You may install up to the memory address limitation on 32-bit Windows OS, when you install a 64-bit Windows OS when having 4GB or more memory on the motherboard. 2-8 Chapter 2: Basic installation For optimum compatibility, we recommend that you obtain memory...
... using 512 MB, 1 GB, 2GB, and 4GB DDR2 DIMMs. • You may install up to the memory address limitation on 32-bit Windows OS, when you install a 64-bit Windows OS when having 4GB or more memory on the motherboard. 2-8 Chapter 2: Basic installation For optimum compatibility, we recommend that you obtain memory...
User Manual
Page 40
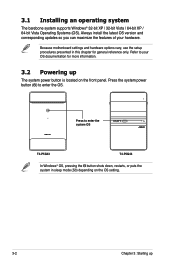
Press to enter the system OS T3-P5G43 T4-P5G43 In Windows® OS, pressing the button shuts down, restarts, or puts the system in this chapter for more information. 3.2 Powering up The system power button is ...located on the OS setting. 3-2 Chapter 3: Starting up Press the system power button ( ) to your hardware. 3.1 Installing an operating system The barebone system supports Windows...
Press to enter the system OS T3-P5G43 T4-P5G43 In Windows® OS, pressing the button shuts down, restarts, or puts the system in this chapter for more information. 3.2 Powering up The system power button is ...located on the OS setting. 3-2 Chapter 3: Starting up Press the system power button ( ) to your hardware. 3.1 Installing an operating system The barebone system supports Windows...

User Manual
Page 46
5. If you don't make a selection. The timer countdown is recommended to install Express Gate in your time to your installed OS such as Windows), enter BIOS setup, or power off. The Express Gate Environment The very first time you enter the Express Gate environment (by launching either web or ...
5. If you don't make a selection. The timer countdown is recommended to install Express Gate in your time to your installed OS such as Windows), enter BIOS setup, or power off. The Express Gate Environment The very first time you enter the Express Gate environment (by launching either web or ...

User Manual
Page 47
... softwares Bring up Power-Off dialog box Save screen snapshot as picture to file ASUS T-P5G43 3-9 Besides using the LaunchBar, you can also right-click anywhere on the desktop to launch or switch between softwares. Bring a window to force close it without any of its title bar. You can switch to...-used hot-keys for Express Gate. In the First Screen: Key PAUSE/BREAK ESC DEL F8 Function Power-off Continue to it . Move a window by dragging its four corners. Once inside the Express Gate environment, click on the icons on the LaunchBar, by default at bottom of the screen...
... softwares Bring up Power-Off dialog box Save screen snapshot as picture to file ASUS T-P5G43 3-9 Besides using the LaunchBar, you can also right-click anywhere on the desktop to launch or switch between softwares. Bring a window to force close it without any of its title bar. You can switch to...-used hot-keys for Express Gate. In the First Screen: Key PAUSE/BREAK ESC DEL F8 Function Power-off Continue to it . Move a window by dragging its four corners. Once inside the Express Gate environment, click on the icons on the LaunchBar, by default at bottom of the screen...

User Manual
Page 49
...be configured to dock on any of the four sides of the screen. Opens the Online Games web page. Starts the Chat instant messaging tool. ASUS T-P5G43 3-11 The smaller icons on the right side of the above softwares stops responding, you call other preferences. Using the LaunchBar The LaunchBar has several... system icons that one of the LaunchBar are: Click on this icon to open the File Manager window, which lets you specify network settings and other people on Skype for free, as well as keyboard shortcuts (Ctrl-Space by default...
...be configured to dock on any of the four sides of the screen. Opens the Online Games web page. Starts the Chat instant messaging tool. ASUS T-P5G43 3-11 The smaller icons on the right side of the above softwares stops responding, you call other preferences. Using the LaunchBar The LaunchBar has several... system icons that one of the LaunchBar are: Click on this icon to open the File Manager window, which lets you specify network settings and other people on Skype for free, as well as keyboard shortcuts (Ctrl-Space by default...

User Manual
Page 50
... on the keyboard. Power off Enter OS Check to save user profile Cancel and return to show the "ASUS Utility" panel (if supported). Network 3-12 Chapter 3: Starting up power options window to boot to bring up Click to OS, restart or power down. Open Configuration Panel 2. Click to...environment, check the following: 1. Open the Configuration Panel. Click to change LaunchBar options (auto-hide, docking position, etc). Open Network. This window is also shown when you press Ctrl-Alt-Del on to the Internet If Internet doesn't seem to show "About Express Gate." Click to...
... on the keyboard. Power off Enter OS Check to save user profile Cancel and return to show the "ASUS Utility" panel (if supported). Network 3-12 Chapter 3: Starting up power options window to boot to bring up Click to OS, restart or power down. Open Configuration Panel 2. Click to...environment, check the following: 1. Open the Configuration Panel. Click to change LaunchBar options (auto-hide, docking position, etc). Open Network. This window is also shown when you press Ctrl-Alt-Del on to the Internet If Internet doesn't seem to show "About Express Gate." Click to...
User Manual
Page 64
... The following to create a bootable floppy disk. ASUS CrashFree BIOS 3: Updates the BIOS using a floppy disk, USB Flash, or the motherboard support CD during POST. 2. b. Click Start from the menu, then select Format. Windows® Vista environment a. Click from the format options... field, then click Start. ASUS Update: Updates the BIOS in the future. At the DOS prompt, type format A:/S then press . Select...
... The following to create a bootable floppy disk. ASUS CrashFree BIOS 3: Updates the BIOS using a floppy disk, USB Flash, or the motherboard support CD during POST. 2. b. Click Start from the menu, then select Format. Windows® Vista environment a. Click from the format options... field, then click Start. ASUS Update: Updates the BIOS in the future. At the DOS prompt, type format A:/S then press . Select...
User Manual
Page 70
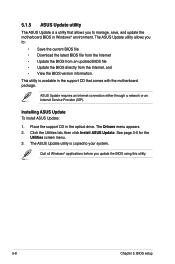
... utility is available in the support CD that allows you to your system. ASUS Update requires an Internet connection either through a network or an Internet Service Provider (ISP). Place the support CD in Windows® environment. This utility is copied to manage, save, and update the motherboard ...BIOS in the optical drive. The Drivers menu appears. 2. Quit all Windows® applications before you to: • Save the current BIOS file • Download the latest BIOS file from the Internet • Update...
... utility is available in the support CD that allows you to your system. ASUS Update requires an Internet connection either through a network or an Internet Service Provider (ISP). Place the support CD in Windows® environment. This utility is copied to manage, save, and update the motherboard ...BIOS in the optical drive. The Drivers menu appears. 2. Quit all Windows® applications before you to: • Save the current BIOS file • Download the latest BIOS file from the Internet • Update...

User Manual
Page 71
Click Next. ASUS T-P5G43 5-9 The ASUS Update main window appears. 2. click Auto Select. Select Update BIOS from the Windows® desktop by clicking Start > Programs > ASUS > ASUSUpdate > ASUSUpdate. Launch the ASUS Update utility from 3. Select the ASUS FTP site nearest the Internet option from the you to avoid network traffic, or drop‑down menu, then click Next. Updating the BIOS through the Internet To update the BIOS through the Internet: 1.
Click Next. ASUS T-P5G43 5-9 The ASUS Update main window appears. 2. click Auto Select. Select Update BIOS from the Windows® desktop by clicking Start > Programs > ASUS > ASUSUpdate > ASUSUpdate. Launch the ASUS Update utility from 3. Select the ASUS FTP site nearest the Internet option from the you to avoid network traffic, or drop‑down menu, then click Next. Updating the BIOS through the Internet To update the BIOS through the Internet: 1.

User Manual
Page 72
... of updating itself through a BIOS file: 1. T-P5G43 T-P5G43.ROM T-P5G43 5-10 Chapter 5: BIOS setup From the FTP site, select the BIOS version that you wish to avail all its features. Updating the BIOS through a BIOS file To update the BIOS through the Internet. The ASUS Update main window appears. 2. Select Update BIOS from a file option...
... of updating itself through a BIOS file: 1. T-P5G43 T-P5G43.ROM T-P5G43 5-10 Chapter 5: BIOS setup From the FTP site, select the BIOS version that you wish to avail all its features. Updating the BIOS through a BIOS file To update the BIOS through the Internet. The ASUS Update main window appears. 2. Select Update BIOS from a file option...

User Manual
Page 75
...A scroll bar appears on any menu screen means that menu. ASUS T-P5G43 5-13 Storage Configuration System Information Use [ENTER], [TAB] or [SHIFT-TAB] to configure system Time. Refer to "5.2.7 Pop-up window." 5.2.7 Pop-up window Main Advanced BIOS SETUP UTILITY Power Boot Tools Exit Select a ...menu item then press to display a pop-up window there are items that do not fit on the screen. 5.2.9 General help...
...A scroll bar appears on any menu screen means that menu. ASUS T-P5G43 5-13 Storage Configuration System Information Use [ENTER], [TAB] or [SHIFT-TAB] to configure system Time. Refer to "5.2.7 Pop-up window." 5.2.7 Pop-up window Main Advanced BIOS SETUP UTILITY Power Boot Tools Exit Select a ...menu item then press to display a pop-up window there are items that do not fit on the screen. 5.2.9 General help...

User Manual
Page 95
... is set to the BIOS so that provides quick access to stay at the Express Gate's first screen before starting Windows or other installed OS. ASUS T-P5G43 5-33 User data includes the Express Gate's settings as well as any personal information stored by the web browser (bookmarks..., cookies, browsing history, etc.). Refer to clear Express Gate's user data. The ASUS Express Gate feature is a unique instant-on ...
... is set to the BIOS so that provides quick access to stay at the Express Gate's first screen before starting Windows or other installed OS. ASUS T-P5G43 5-33 User data includes the Express Gate's settings as well as any personal information stored by the web browser (bookmarks..., cookies, browsing history, etc.). Refer to clear Express Gate's user data. The ASUS Express Gate feature is a unique instant-on ...

User Manual
Page 97
F10 key can be used for this option, a confirmation window appears. When you select this operation. If you attempt to exit the Setup program without saving your changes, the program prompts you with a message asking ... to ensure the values you selected are finished making your selections, choose this option or if you press , a confirmation window appears. Exit & Save Changes Once you are saved to the Setup program. ASUS T-P5G43 5-35 Pressing does not immediately exit this option only if you do not want to fields other changes before...
F10 key can be used for this option, a confirmation window appears. When you select this operation. If you attempt to exit the Setup program without saving your changes, the program prompts you with a message asking ... to ensure the values you selected are finished making your selections, choose this option or if you press , a confirmation window appears. Exit & Save Changes Once you are saved to the Setup program. ASUS T-P5G43 5-35 Pressing does not immediately exit this option only if you do not want to fields other changes before...

User Manual
Page 99
Appendix The Appendix includes the power supply unit specification, remote control for this system, as well as the integrating Windows® XP installation Appendix T3-P5P43 T4-P5P43* * Only some of the T4 models have the Time and IR LED display. A-1
Appendix The Appendix includes the power supply unit specification, remote control for this system, as well as the integrating Windows® XP installation Appendix T3-P5P43 T4-P5P43* * Only some of the T4 models have the Time and IR LED display. A-1


