T2-R User Manual
Page 3
... a CPU 25 2.5.1 Removing the CPU fan and heatsink assembly .... 25 2.5.2 CPU installation 26 2.5.3 Re-installing the CPU fan and heatsink assembly 27 2.6 Installing a DIMM 28 2.6.1 Memory configurations 28 2.6.2 DIMM installation 29 2.7 Installing an expansion card 30 2.7.1 Expansion slots 30 2.7.2 Expansion card installation 31 2.7.3 Configuring an expansion card 32 2.8 Installing a second optical...
... a CPU 25 2.5.1 Removing the CPU fan and heatsink assembly .... 25 2.5.2 CPU installation 26 2.5.3 Re-installing the CPU fan and heatsink assembly 27 2.6 Installing a DIMM 28 2.6.1 Memory configurations 28 2.6.2 DIMM installation 29 2.7 Installing an expansion card 30 2.7.1 Expansion slots 30 2.7.2 Expansion card installation 31 2.7.3 Configuring an expansion card 32 2.8 Installing a second optical...
T2-R User Manual
Page 12
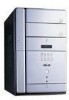
... features of the many more, the Terminator 2 definitely delivers the cutting edge technology for choosing the ASUS Terminator 2! Delivered in a stylish mini-tower casing and powered by the ASUS P4R8T motherboard that supports Intel® Pentium® 4 processor with an 800MHz FSB, and up to 2GB system memory, the Terminator 2 system is an all-in-one...
... features of the many more, the Terminator 2 definitely delivers the cutting edge technology for choosing the ASUS Terminator 2! Delivered in a stylish mini-tower casing and powered by the ASUS P4R8T motherboard that supports Intel® Pentium® 4 processor with an 800MHz FSB, and up to 2GB system memory, the Terminator 2 system is an all-in-one...

T2-R User Manual
Page 15
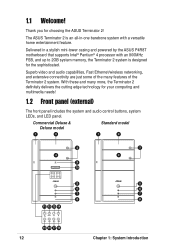
... ). Secure Digital™/MultimediaCard slot ( ). Floppy disk drive. This drive is for a Memory Stick®/Memory Stick Pro™ storage card. 23. This slot is for a Secure Digital™/MultimediaCard ... close the storage card reader door if a storage card is an IDE optical drive. 21. ASUS Terminator 2 barebone system 15 1.3 Front panel (internal) The optical drive(s), storage card reader slots, and... several I/O ports are located inside the front panel doors. Commercial Deluxe and Deluxe model 19 20 Standard model 19 20 21 22 23 24 MODE 25 26 27...
... ). Secure Digital™/MultimediaCard slot ( ). Floppy disk drive. This drive is for a Memory Stick®/Memory Stick Pro™ storage card. 23. This slot is for a Secure Digital™/MultimediaCard ... close the storage card reader door if a storage card is an IDE optical drive. 21. ASUS Terminator 2 barebone system 15 1.3 Front panel (internal) The optical drive(s), storage card reader slots, and... several I/O ports are located inside the front panel doors. Commercial Deluxe and Deluxe model 19 20 Standard model 19 20 21 22 23 24 MODE 25 26 27...
T2-R User Manual
Page 22
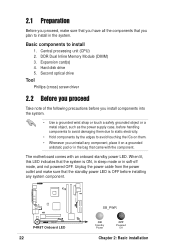
... proceed, make sure that the standby power LED is ON, in sleep mode or in soft-off mode, and not powered OFF. DDR Dual Inline Memory Module (DIMM) 3. Basic components to install 1. Expansion card(s) 4. Unplug the power cable from the power outlet and make sure that you have all the components...
... proceed, make sure that the standby power LED is ON, in sleep mode or in soft-off mode, and not powered OFF. DDR Dual Inline Memory Module (DIMM) 3. Basic components to install 1. Expansion card(s) 4. Unplug the power cable from the power outlet and make sure that you have all the components...

T2-R User Manual
Page 28
For optimum compatibility, obtain memory modules from ASUS qualified vendors. Qualified DDR400 vendors This table lists the memory modules that have been tested and qualified for the latest Qualified Vendors List. HYB25D256800BT-5 • Install only identical (the same type and size) ... 64MB, 128MB, 256MB, 512MB, and 1GB DDR DIMMs into the DIMM sockets. These sockets support up to the table below. Refer to 2GB system memory using unbuffered non-ECC PC3200/2700/2100 DIMMs. • This motherboard supports one single-sided PC3200 (DDR400) DIMM per module DDR DIMMs. 28 Chapter ...
For optimum compatibility, obtain memory modules from ASUS qualified vendors. Qualified DDR400 vendors This table lists the memory modules that have been tested and qualified for the latest Qualified Vendors List. HYB25D256800BT-5 • Install only identical (the same type and size) ... 64MB, 128MB, 256MB, 512MB, and 1GB DDR DIMMs into the DIMM sockets. These sockets support up to the table below. Refer to 2GB system memory using unbuffered non-ECC PC3200/2700/2100 DIMMs. • This motherboard supports one single-sided PC3200 (DDR400) DIMM per module DDR DIMMs. 28 Chapter ...
T2-R User Manual
Page 73
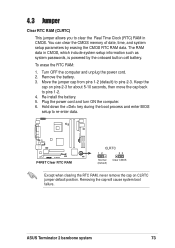
Move the jumper cap from pins 1-2 (default) to pins 2-3. Re-install the battery. 5. ASUS Terminator 2 barebone system 73 You can clear the CMOS memory of date, time, and system setup parameters by the onboard button cell battery. Plug the power cord and turn ON the computer. 6. Hold down the ...
Move the jumper cap from pins 1-2 (default) to pins 2-3. Re-install the battery. 5. ASUS Terminator 2 barebone system 73 You can clear the CMOS memory of date, time, and system setup parameters by the onboard button cell battery. Plug the power cord and turn ON the computer. 6. Hold down the ...
T2-R User Manual
Page 96
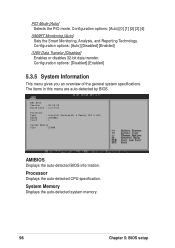
... 08.00.09 Build Date : 11/17/03 Processor Type : Intel(R) Pentium(R) 4 Family CPU 2.40G Speed : 2400MHz Count : 1 System Memory Size : 256MB AMIBIOS Displays the auto-detected BIOS information. Configuration options: [Auto] [0] [1] [2] [3] [4] SMART Monitoring [Auto] Sets the Smart ...Monitoring, Analysis, and Reporting Technology. Processor Displays the auto-detected CPU specification. System Memory Displays the auto-detected system memory. 96 Chapter 5: BIOS setup The items in this menu are auto-detected by BIOS. PIO Mode [Auto] Selects ...
... 08.00.09 Build Date : 11/17/03 Processor Type : Intel(R) Pentium(R) 4 Family CPU 2.40G Speed : 2400MHz Count : 1 System Memory Size : 256MB AMIBIOS Displays the auto-detected BIOS information. Configuration options: [Auto] [0] [1] [2] [3] [4] SMART Monitoring [Auto] Sets the Smart ...Monitoring, Analysis, and Reporting Technology. Processor Displays the auto-detected CPU specification. System Memory Displays the auto-detected system memory. 96 Chapter 5: BIOS setup The items in this menu are auto-detected by BIOS. PIO Mode [Auto] Selects ...
T2-R User Manual
Page 100
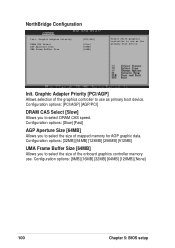
...512MB] UMA Frame Buffer Size [64MB] Allows you to use as the primary boot device. Graphic Adapter Priority [PCI/AGP] Allows selection of mapped memory for AGP graphic data. Configuration options: [PCI/AGP] [AGP/PCI] DRAM CAS Select [Slow] Allows you to select the size of the ...graphics controller to select the size of the onboard graphics controller memory use as primary boot device. Configuration options: [Slow] [Fast] AGP Aperture Size [64MB] Allows you to use . Configuration options: [8MB] [16MB] [32MB]...
...512MB] UMA Frame Buffer Size [64MB] Allows you to use as the primary boot device. Graphic Adapter Priority [PCI/AGP] Allows selection of mapped memory for AGP graphic data. Configuration options: [PCI/AGP] [AGP/PCI] DRAM CAS Select [Slow] Allows you to select the size of the ...graphics controller to select the size of the onboard graphics controller memory use as primary boot device. Configuration options: [Slow] [Fast] AGP Aperture Size [64MB] Allows you to use . Configuration options: [8MB] [16MB] [32MB]...
T2-R User Manual
Page 103
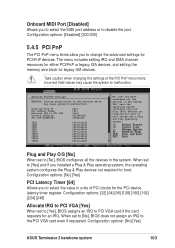
... the devices in the system. The menu includes setting IRQ and DMA channel resources for either PCI/PnP or legacy ISA devices, and setting the memory size block for boot if your system has a Plug and Play operating system. Plug and Play O/S [No] When set to [Yes] and if you to... PCI VGA [Yes] When set to [No], BIOS does not assign an IRQ to the PCI VGA card even if requested. Configuration options: [No] [Yes] ASUS Terminator 2 barebone system 103 Advanced PCI/PnP settings WARNING: Setting wrong values in units of the PCI PnP menu items. Incorrect field values may cause system...
... the devices in the system. The menu includes setting IRQ and DMA channel resources for either PCI/PnP or legacy ISA devices, and setting the memory size block for boot if your system has a Plug and Play operating system. Plug and Play O/S [No] When set to [Yes] and if you to... PCI VGA [Yes] When set to [No], BIOS does not assign an IRQ to the PCI VGA card even if requested. Configuration options: [No] [Yes] ASUS Terminator 2 barebone system 103 Advanced PCI/PnP settings WARNING: Setting wrong values in units of the PCI PnP menu items. Incorrect field values may cause system...

