
User Manual
Page 1
Motherboard
Motherboard

User Manual
Page 1
Motherboard Striker II Extreme / Striker II NSE
Motherboard Striker II Extreme / Striker II NSE
User Manual
Page 3
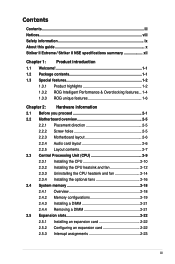
......iii Notices...viii Safety information ix About this guide x Striker II Extreme / Striker II NSE specifications summary xii Chapter 1: Product introduction 1.1 Welcome 1-1 1.2 Package contents 1-1 1.3 Special features 1-2 1.3.1 Product highlights 1-2 1.3.2 ROG Intelligent Performance & Overclocking features... 1-4 1.3.3 ROG unique features 1-6 Chapter 2: Hardware information 2.1 Before you proceed 2-1 2.2 Motherboard overview 2-5 2.2.1 Placement direction 2-5 2.2.2 Screw holes 2-5 2.2.3 Motherboard layout 2-6 2.2.4 Audio card layout 2-6 2.2.5 Layout contents 2-7 2.3 Central...
......iii Notices...viii Safety information ix About this guide x Striker II Extreme / Striker II NSE specifications summary xii Chapter 1: Product introduction 1.1 Welcome 1-1 1.2 Package contents 1-1 1.3 Special features 1-2 1.3.1 Product highlights 1-2 1.3.2 ROG Intelligent Performance & Overclocking features... 1-4 1.3.3 ROG unique features 1-6 Chapter 2: Hardware information 2.1 Before you proceed 2-1 2.2 Motherboard overview 2-5 2.2.1 Placement direction 2-5 2.2.2 Screw holes 2-5 2.2.3 Motherboard layout 2-6 2.2.4 Audio card layout 2-6 2.2.5 Layout contents 2-7 2.3 Central...
User Manual
Page 9
...in any damage, contact your dealer immediately. • To avoid short circuits, keep paper clips, screws, and staples away from the motherboard, ensure that all power cables are connected. If you add a device. • Before connecting or removing signal cables from connectors, slots, ...signal cables are unplugged. • Seek professional assistance before using an adpater or extension cord. Operation safety • Before installing the motherboard and adding devices on a stable surface. • If you are not damaged. This symbol of the electrical outlet you encounter ...
...in any damage, contact your dealer immediately. • To avoid short circuits, keep paper clips, screws, and staples away from the motherboard, ensure that all power cables are connected. If you add a device. • Before connecting or removing signal cables from connectors, slots, ...signal cables are unplugged. • Seek professional assistance before using an adpater or extension cord. Operation safety • Before installing the motherboard and adding devices on a stable surface. • If you are not damaged. This symbol of the electrical outlet you encounter ...

User Manual
Page 10
...additional information and for the LCD Poster. ASUS websites The ASUS website provides updated information on the motherboard. • Chapter 3: Powering up This chapter describes the power up sequence and ways of the support DVD that comes with the motherboard package. • Chapter 6: NVIDIA®... This chapter shows how to perform when installing system components. Detailed descriptions of the BIOS parameters are not part of the motherboard and the new technology it supports. • Chapter 2: Hardware information This chapter lists the hardware setup procedures that may ...
...additional information and for the LCD Poster. ASUS websites The ASUS website provides updated information on the motherboard. • Chapter 3: Powering up This chapter describes the power up sequence and ways of the support DVD that comes with the motherboard package. • Chapter 6: NVIDIA®... This chapter shows how to perform when installing system components. Detailed descriptions of the BIOS parameters are not part of the motherboard and the new technology it supports. • Chapter 2: Hardware information This chapter lists the hardware setup procedures that may ...

User Manual
Page 15
Chapter 1: 1Product introduction This chapter describes the motherboard features and the new technologies it supports.
Chapter 1: 1Product introduction This chapter describes the motherboard features and the new technologies it supports.

User Manual
Page 17
... DVD The hottest game: Company of Heroes-Opposing Fronts Documentation User guide If any of ASUS quality motherboards! ROG Striker II Extreme / Striker II NSE 1-1 1.1 Welcome! Before you for the following items. Motherboard ROG Striker II Extreme / Striker II NSE I/O module USB 2.0 + IEEE 1394a module Cables Ultra DMA 133/100/66 cable Floppy disk drive cable Serial ATA cables Serial ATA power cables...
... DVD The hottest game: Company of Heroes-Opposing Fronts Documentation User guide If any of ASUS quality motherboards! ROG Striker II Extreme / Striker II NSE 1-1 1.1 Welcome! Before you for the following items. Motherboard ROG Striker II Extreme / Striker II NSE I/O module USB 2.0 + IEEE 1394a module Cables Ultra DMA 133/100/66 cable Floppy disk drive cable Serial ATA cables Serial ATA power cables...
User Manual
Page 18
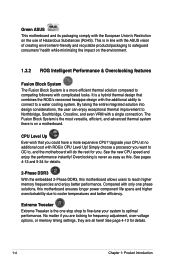
...of the increased bandwidth of Gamers. For some applications nearly triple performance! See Chapter 6 for details. Intel® Core™2 Quad / Core™2 Duo / Core™2 Extreme CPU support This motherboard supports the latest Intel® Quad-core/Core™2 processor in the Republic of the PCI Express ..., x16 mode, and up to deliver earthshattering, scalable performance. It's definitely one of the best. 1.3 Special features 1.3.1 Product highlights Republic of Gamers The Republic of Gamers consists only the best of the most innovating ideas, and we excel in .
...of the increased bandwidth of Gamers. For some applications nearly triple performance! See Chapter 6 for details. Intel® Core™2 Quad / Core™2 Duo / Core™2 Extreme CPU support This motherboard supports the latest Intel® Quad-core/Core™2 processor in the Republic of the PCI Express ..., x16 mode, and up to deliver earthshattering, scalable performance. It's definitely one of the best. 1.3 Special features 1.3.1 Product highlights Republic of Gamers The Republic of Gamers consists only the best of the most innovating ideas, and we excel in .
User Manual
Page 19
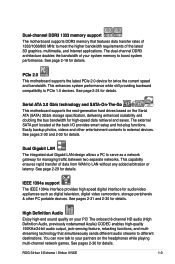
...and other PC portable devices. This capability ensures rapid transfer of the latest 3D graphics, multimedia, and Internet applications. ROG Striker II Extreme / Striker II NSE 1-3 See pages 2-30 and 2-33 for details. See pages 2-30 for details. This enhances system performance while still .... See pages 2-31 and 2-35 for managing traffic between two separate networks. Dual-channel DDR3 1333 memory support The motherboard supports DDR3 memory that simultaneously sends different audio streams to boost system performance. The onboard 8-channel HD audio (High Definition...
...and other PC portable devices. This capability ensures rapid transfer of the latest 3D graphics, multimedia, and Internet applications. ROG Striker II Extreme / Striker II NSE 1-3 See pages 2-30 and 2-33 for details. See pages 2-30 for details. This enhances system performance while still .... See pages 2-31 and 2-35 for managing traffic between two separate networks. Dual-channel DDR3 1333 memory support The motherboard supports DDR3 memory that simultaneously sends different audio streams to boost system performance. The onboard 8-channel HD audio (High Definition...
User Manual
Page 20
...CPU speed and enjoy the performance instantly! Extreme Tweaker Extreme Tweaker is the one phase solutions, this motherboard ensures longer power component life spans and higher overclockability due to , and the motherboard will do the rest for details. 2-Phase DDR3 With the embedded 2-Phase DDR3, this . .... Compared with only one stop shop to fine-tune your CPU at no additional cost with ROG's CPU Level Up! Green ASUS This motherboard and its packaging comply with the European Union's Restriction on the use of creating environment-friendly and recyclable products/packaging to safeguard ...
...CPU speed and enjoy the performance instantly! Extreme Tweaker Extreme Tweaker is the one phase solutions, this motherboard ensures longer power component life spans and higher overclockability due to , and the motherboard will do the rest for details. 2-Phase DDR3 With the embedded 2-Phase DDR3, this . .... Compared with only one stop shop to fine-tune your CPU at no additional cost with ROG's CPU Level Up! Green ASUS This motherboard and its packaging comply with the European Union's Restriction on the use of creating environment-friendly and recyclable products/packaging to safeguard ...

User Manual
Page 21
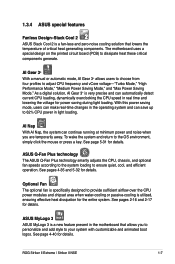
... before using C.P.R. AI Booster The ASUS AI Booster allows you have overclocked your O.C. Profile that no need to open the system chassis to the max? ROG Striker II Extreme / Striker II NSE 1-5 Voltiminder LED In the persuit of... booting the BIOS. S��e�e��p�a��g�e��2�-�3��f�o�r�d��e�ta��il�s�. Profile The motherboard features the ASUS...
... before using C.P.R. AI Booster The ASUS AI Booster allows you have overclocked your O.C. Profile that no need to open the system chassis to the max? ROG Striker II Extreme / Striker II NSE 1-5 Voltiminder LED In the persuit of... booting the BIOS. S��e�e��p�a��g�e��2�-�3��f�o�r�d��e�ta��il�s�. Profile The motherboard features the ASUS...
User Manual
Page 23
...motherboard uses a special design on the printed circuit board (PCB) to the OS environment, simply click the mouse or press a key. To wake the system and return to dissipate heat these critical components generate. See pages 2-16 and 2-17 for details. ROG Striker II Extreme / Striker II NSE 1-7 1.3.4 ASUS... special features Fanless Design-Stack Cool 2 ASUS Stack Cool 2 is a fan-less and zero-noise cooling solution that allows you are ...
...motherboard uses a special design on the printed circuit board (PCB) to the OS environment, simply click the mouse or press a key. To wake the system and return to dissipate heat these critical components generate. See pages 2-16 and 2-17 for details. ROG Striker II Extreme / Striker II NSE 1-7 1.3.4 ASUS... special features Fanless Design-Stack Cool 2 ASUS Stack Cool 2 is a fan-less and zero-noise cooling solution that allows you are ...

User Manual
Page 25
It includes description of the jumpers and connectors on the motherboard. Chapter 2: 2 Hardware information This chapter lists the hardware setup procedures that you have to perform when installing system components.
It includes description of the jumpers and connectors on the motherboard. Chapter 2: 2 Hardware information This chapter lists the hardware setup procedures that you have to perform when installing system components.
User Manual
Page 26
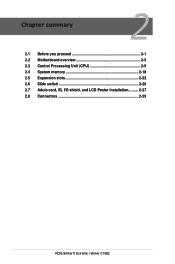
Chapter summary 2 2.1 Before you proceed 2-1 2.2 Motherboard overview 2-5 2.3 Central Processing Unit (CPU 2-9 2.4 System memory 2-18 2.5 Expansion slots 2-22 2.6 Slide switch 2-26 2.7 Aduio card, EL I/O shield, and LCD Poster Installation.......... 2-27 2.8 Connectors 2-29 ROG Striker II Extreme / Striker II NSE
Chapter summary 2 2.1 Before you proceed 2-1 2.2 Motherboard overview 2-5 2.3 Central Processing Unit (CPU 2-9 2.4 System memory 2-18 2.5 Expansion slots 2-22 2.6 Slide switch 2-26 2.7 Aduio card, EL I/O shield, and LCD Poster Installation.......... 2-27 2.8 Connectors 2-29 ROG Striker II Extreme / Striker II NSE

User Manual
Page 27
... frequency. CPU_CRAZY CPU_HIGH CPU_NORMAL STRIKER II EXTREME STRIKER II EXTREME/ STRIKER II NSE CPU LED CPU Voltage CPU PLL Voltage Normal (green) 1.10000~1.50000 1.50000~1.60000 High (yellow) 1.50625~1.69375 1.62000~1.80000 Crazy (red) 1.70000~ 1.82000~ ROG Striker II Extreme / Striker II NSE 2-1 2.1 Before you proceed Take note of the following precautions before you install motherboard components or change any motherboard settings. • Unplug...
... frequency. CPU_CRAZY CPU_HIGH CPU_NORMAL STRIKER II EXTREME STRIKER II EXTREME/ STRIKER II NSE CPU LED CPU Voltage CPU PLL Voltage Normal (green) 1.10000~1.50000 1.50000~1.60000 High (yellow) 1.50625~1.69375 1.62000~1.80000 Crazy (red) 1.70000~ 1.82000~ ROG Striker II Extreme / Striker II NSE 2-1 2.1 Before you proceed Take note of the following precautions before you install motherboard components or change any motherboard settings. • Unplug...
User Manual
Page 30
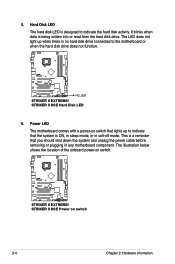
...function. The illustration below shows the location of the onboard power-on switch 2-4 Chapter 2: Hardware information Power LED The motherboard comes with a power-on switch that you should shut down the system and unplug the power cable before removing or ...disk drive connected to indicate that the system is ON, in sleep mode, or in any motherboard component. STRIKER II EXTREME STRIKER II EXTREME/ STRIKER II NSE Power on switch. STRIKER II EXTREME HD_LED STRIKER II EXTREME/ STRIKER II NSE Hard Disk LED 6. 5. It blinks when data is designed to indicate the hard disk activity....
...function. The illustration below shows the location of the onboard power-on switch 2-4 Chapter 2: Hardware information Power LED The motherboard comes with a power-on switch that you should shut down the system and unplug the power cable before removing or ...disk drive connected to indicate that the system is ON, in sleep mode, or in any motherboard component. STRIKER II EXTREME STRIKER II EXTREME/ STRIKER II NSE Power on switch. STRIKER II EXTREME HD_LED STRIKER II EXTREME/ STRIKER II NSE Hard Disk LED 6. 5. It blinks when data is designed to indicate the hard disk activity....
User Manual
Page 31
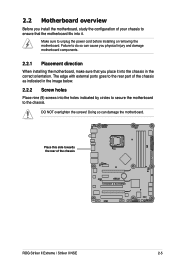
... the chassis STRIKER II EXTREME ROG Striker II Extreme / Striker II NSE 2-5 The edge with external ports goes to the rear part of the chassis as indicated in the image below. 2.2.2 Screw holes Place nine (9) screws into the chassis in the correct orientation. Failure to do so can damage the motherboard. DO NOT overtighten the screws! 2.2 Motherboard overview Before...
... the chassis STRIKER II EXTREME ROG Striker II Extreme / Striker II NSE 2-5 The edge with external ports goes to the rear part of the chassis as indicated in the image below. 2.2.2 Screw holes Place nine (9) screws into the chassis in the correct orientation. Failure to do so can damage the motherboard. DO NOT overtighten the screws! 2.2 Motherboard overview Before...
User Manual
Page 32
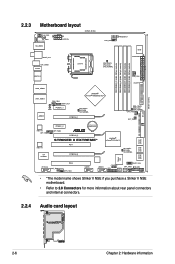
2.2.3 Motherboard layout CHA_FAN1 EL_CON LCD_CON KB_USB56 EATX12V 24.5cm (9.6in) SPDIF_O12 CLR_CMOS E1394 LGA775 CPU_FAN FREQUENCY CPU_CRAZY CPU_HIGH CPU_NORMAL BIOS EATXPWR DDR3 DIMM_A1 (64bit, 240-... SB_NORMAL SATA3 SATA4 SATA5 SATA6 Super I/O IE1394_2 OPT_TEMP3 PCI2 OPT_FAN3 USB78 USB910 CHASSIS ADH CLRTC_SW CHA_FAN3 RESET HD_LED PANEL • *The model name shows Striker II NSE if you purchase a Striker II NSE motherboard. • Refer to 2.8 Connectors for more information about rear panel connectors and internal connectors. 2.2.4 Audio card layout SUPREMEFX...
2.2.3 Motherboard layout CHA_FAN1 EL_CON LCD_CON KB_USB56 EATX12V 24.5cm (9.6in) SPDIF_O12 CLR_CMOS E1394 LGA775 CPU_FAN FREQUENCY CPU_CRAZY CPU_HIGH CPU_NORMAL BIOS EATXPWR DDR3 DIMM_A1 (64bit, 240-... SB_NORMAL SATA3 SATA4 SATA5 SATA6 Super I/O IE1394_2 OPT_TEMP3 PCI2 OPT_FAN3 USB78 USB910 CHASSIS ADH CLRTC_SW CHA_FAN3 RESET HD_LED PANEL • *The model name shows Striker II NSE if you purchase a Striker II NSE motherboard. • Refer to 2.8 Connectors for more information about rear panel connectors and internal connectors. 2.2.4 Audio card layout SUPREMEFX...
User Manual
Page 35
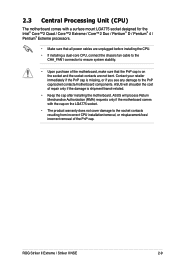
...damage is missing, or if you see any damage to the PnP cap/socket contacts/motherboard components. ASUS will shoulder the cost of the PnP cap. 2.3 Central Processing Unit (CPU) The motherboard comes with the cap on the socket and the socket contacts are unplugged before installing... chassis fan cable to the CHA_FAN1 connector to ensure system stability. • Upon purchase of the motherboard, make sure that all power cables are not bent. ROG Striker II Extreme / Striker II NSE 2-9 Contact your retailer immediately if the PnP cap is shipment/transit-related. • Keep the cap...
...damage is missing, or if you see any damage to the PnP cap/socket contacts/motherboard components. ASUS will shoulder the cost of the PnP cap. 2.3 Central Processing Unit (CPU) The motherboard comes with the cap on the socket and the socket contacts are unplugged before installing... chassis fan cable to the CHA_FAN1 connector to ensure system stability. • Upon purchase of the motherboard, make sure that all power cables are not bent. ROG Striker II Extreme / Striker II NSE 2-9 Contact your retailer immediately if the PnP cap is shipment/transit-related. • Keep the cap...

User Manual
Page 36
... . Press the load lever with your left (B) until it is on the motherboard. 2.3.1 Installing the CPU To install a CPU: 1. Lift the load lever in the direction of the socket box should face you are installing a CPU. 3. STRIKER II EXTREME STRIKER II EXTREME/ STRIKER II NSE CPU socket 775 Before installing the CPU, make sure that the cam box...
... . Press the load lever with your left (B) until it is on the motherboard. 2.3.1 Installing the CPU To install a CPU: 1. Lift the load lever in the direction of the socket box should face you are installing a CPU. 3. STRIKER II EXTREME STRIKER II EXTREME/ STRIKER II NSE CPU socket 775 Before installing the CPU, make sure that the cam box...


