
Motherboard DIY Troubleshooting Guide
Page 9
Detailed descriptions of the BIOS parameters are also provided. • Chapter 5: Software support This chapter describes the contents of the support ... up This chapter describes the power up sequence, the vocal POST messages, and ways of shutting down the system. • Chapter 4: BIOS setup This chapter tells how to perform when installing system components. About this guide is organized This manual contains the following parts: •...motherboard package. How this guide This user guide contains the information you have to change system settings through the BIOS Setup menus. ix
Detailed descriptions of the BIOS parameters are also provided. • Chapter 5: Software support This chapter describes the contents of the support ... up This chapter describes the power up sequence, the vocal POST messages, and ways of shutting down the system. • Chapter 4: BIOS setup This chapter tells how to perform when installing system components. About this guide is organized This manual contains the following parts: •...motherboard package. How this guide This user guide contains the information you have to change system settings through the BIOS Setup menus. ix

Motherboard DIY Troubleshooting Guide
Page 18
... to provide a single-chip solution for LAN on card to set up to notebooks, PDAs and other wireless LAN peripherals. The controller is a combination of three ASUS intelligent solutions: Q-Fan, POST Reporter, and CrashFree BIOS2. See page 5-32. AI BIOS solution The AI BIOS is equipped with the net-diagnosing utility, VCT (Virtual Cable...
... to provide a single-chip solution for LAN on card to set up to notebooks, PDAs and other wireless LAN peripherals. The controller is a combination of three ASUS intelligent solutions: Q-Fan, POST Reporter, and CrashFree BIOS2. See page 5-32. AI BIOS solution The AI BIOS is equipped with the net-diagnosing utility, VCT (Virtual Cable...

Motherboard DIY Troubleshooting Guide
Page 19
...ASUS SK8V motherboard 1-5 When the system hangs due to open the system chassis and clear the RTC data. See page 4-4. See page 3-3. ASUS MyLogo2™ This new feature present in the SK8V motherboard allows you of the system boot status and causes of the motherboard BIOS allows automatic re-setting to the BIOS default settings... in case when the BIOS codes and data...
...ASUS SK8V motherboard 1-5 When the system hangs due to open the system chassis and clear the RTC data. See page 4-4. See page 3-3. ASUS MyLogo2™ This new feature present in the SK8V motherboard allows you of the system boot status and causes of the motherboard BIOS allows automatic re-setting to the BIOS default settings... in case when the BIOS codes and data...

Motherboard DIY Troubleshooting Guide
Page 37
...expansion card, read the documentation that they support. Remove the system unit cover (if your motherboard is completely seated on BIOS setup. 2. Keep the screw for the card. 2. Secure the card to the chassis with the slot and press... . Turn on the next page. 3. Refer to the tables on the system and change the necessary BIOS settings, if any. Install the software drivers for information on the slot. 5. 2.5 Expansion slots In the... an expansion card After installing the expansion card, configure the card by adjusting the software settings. 1. ASUS SK8V motherboard 2-15
...expansion card, read the documentation that they support. Remove the system unit cover (if your motherboard is completely seated on BIOS setup. 2. Keep the screw for the card. 2. Secure the card to the chassis with the slot and press... . Turn on the next page. 3. Refer to the tables on the system and change the necessary BIOS settings, if any. Install the software drivers for information on the slot. 5. 2.5 Expansion slots In the... an expansion card After installing the expansion card, configure the card by adjusting the software settings. 1. ASUS SK8V motherboard 2-15
Motherboard DIY Troubleshooting Guide
Page 41
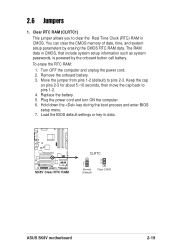
... system setup parameters by the onboard button cell battery. Remove the onboard battery. 3. Replace the battery. 5. Load the BIOS default settings or key-in data. ® SK8V SK8V Clear RTC RAM CLRTC 2 1 Normal (Default) 3 2 Clear CMOS ASUS SK8V motherboard 2-19 Move the jumper from pins 1-2 (default) to pins 1-2. 4. Keep the cap on pins 2-3 for about 5~10...
... system setup parameters by the onboard button cell battery. Remove the onboard battery. 3. Replace the battery. 5. Load the BIOS default settings or key-in data. ® SK8V SK8V Clear RTC RAM CLRTC 2 1 Normal (Default) 3 2 Clear CMOS ASUS SK8V motherboard 2-19 Move the jumper from pins 1-2 (default) to pins 1-2. 4. Keep the cap on pins 2-3 for about 5~10...

Motherboard DIY Troubleshooting Guide
Page 42
...on the +5VSB lead, and a corresponding setting in sleep mode. 2-20 Chapter 2: Hardware information Set to +5VSB to wake up the computer from...mode). 2. USB device wake-up (3-pin USBPWR12, USBPWR34, USBPWR56, USBPWR78) Set these jumpers to +5V to CPU, DRAM in slow refresh, power supply ...requires a power supply that can provide 500mA on the keyboard. Set this jumper to wake up feature. Keyboard power (3-pin KBPWR) ...+5V (Default) 3 2 +5VSB 12 +5V (Default) 23 +5VSB USBPWR56 USBPWR78 12 23 SK8V SK8V USB Device Wake Up +5V (Default) +5VSB • The USB device wake-up . ...
...on the +5VSB lead, and a corresponding setting in sleep mode. 2-20 Chapter 2: Hardware information Set to +5VSB to wake up the computer from...mode). 2. USB device wake-up (3-pin USBPWR12, USBPWR34, USBPWR56, USBPWR78) Set these jumpers to +5V to CPU, DRAM in slow refresh, power supply ...requires a power supply that can provide 500mA on the keyboard. Set this jumper to wake up feature. Keyboard power (3-pin KBPWR) ...+5V (Default) 3 2 +5VSB 12 +5V (Default) 23 +5VSB USBPWR56 USBPWR78 12 23 SK8V SK8V USB Device Wake Up +5V (Default) +5VSB • The USB device wake-up . ...

Motherboard DIY Troubleshooting Guide
Page 53
... OFF, depending on the BIOS or OS settings. Any read or write activity of an IDE device cause this 2-pin connector. • Hard disk activity LED (Red 2-pin IDE_LED) This connector supplies power to the hard disk activity LED. Take note of the specific connector colors as described. ASUS SK8V motherboard 2-31 The System...
... OFF, depending on the BIOS or OS settings. Any read or write activity of an IDE device cause this 2-pin connector. • Hard disk activity LED (Red 2-pin IDE_LED) This connector supplies power to the hard disk activity LED. Take note of the specific connector colors as described. ASUS SK8V motherboard 2-31 The System...

Motherboard DIY Troubleshooting Guide
Page 57
...at the back of the chassis). 6. For ATX power supplies, the system LED lights up . Check the jumper settings and connections or call your monitor complies with "green" standards or if it has a "power standby" feature,...: a. While the tests are using an ATX power supply, you need to enter BIOS Setup. System power (if you are running, the BIOS beeps or additional messages appear on the chain) c. Be sure that is equipped with... supply as well as press the ATX power switch on test. ASUS SK8V motherboard 3-1 Turn on the power, the system may light up for assistance. 7.
...at the back of the chassis). 6. For ATX power supplies, the system LED lights up . Check the jumper settings and connections or call your monitor complies with "green" standards or if it has a "power standby" feature,...: a. While the tests are using an ATX power supply, you need to enter BIOS Setup. System power (if you are running, the BIOS beeps or additional messages appear on the chain) c. Be sure that is equipped with... supply as well as press the ATX power switch on test. ASUS SK8V motherboard 3-1 Turn on the power, the system may light up for assistance. 7.

Motherboard DIY Troubleshooting Guide
Page 58
...button is ON, pressing the power switch for more than 4 seconds puts the system to sleep mode or to soft-off mode, depending on the BIOS setting. See section "4.5 Power Menu" in Chapter 4. 3-2 Chapter 3: Powering up The power supply should turn off after Windows shuts down. Pressing the power... switch for less than 4 seconds lets the system enter the soft-off mode regardless of the BIOS setting. The power supply should turn off after Windows shuts down. 3.2.2 Using the dual function power switch While the system is selected, then ...
...button is ON, pressing the power switch for more than 4 seconds puts the system to sleep mode or to soft-off mode, depending on the BIOS setting. See section "4.5 Power Menu" in Chapter 4. 3-2 Chapter 3: Powering up The power supply should turn off after Windows shuts down. Pressing the power... switch for less than 4 seconds lets the system enter the soft-off mode regardless of the BIOS setting. The power supply should turn off after Windows shuts down. 3.2.2 Using the dual function power switch While the system is selected, then ...

Motherboard DIY Troubleshooting Guide
Page 60
... CPU fan and make sure it is not defective. • Call ASUS technical support for the location of this manual. POST Message Action System failed due to CPU over-clocking • Check your CPU settings in the BIOS setup. System completed Power-On Self Test • No action required ...Computer now booting from operating • No action required system You may disable the ASUS POST Reporter™ in BIOS and make sure it turns on after you...
... CPU fan and make sure it is not defective. • Call ASUS technical support for the location of this manual. POST Message Action System failed due to CPU over-clocking • Check your CPU settings in the BIOS setup. System completed Power-On Self Test • No action required ...Computer now booting from operating • No action required system You may disable the ASUS POST Reporter™ in BIOS and make sure it turns on after you...

Motherboard DIY Troubleshooting Guide
Page 65
Detailed descriptions of the BIOS parameters are also provided. Chapter 4 This chapter tells how to change the system settings through the BIOS Setup menus. BIOS setup
Detailed descriptions of the BIOS parameters are also provided. Chapter 4 This chapter tells how to change the system settings through the BIOS Setup menus. BIOS setup

Motherboard DIY Troubleshooting Guide
Page 69
... BIOS information on your screen may not be used as shown. What you see on the screen is complete, the utility returns to the DOS prompt. done Erasing flash .... done Writing flash .... 0x0008CC00 (9%) Verifying flash .. Version 1.10 Copyright (C) 2002 American Megatrends, Inc. Reading flash ..... 0x0008CC00 (9%) ASUS SK8V ...At the DOS prompt, type the command line: afudos /o where "filename" can be used to copy the current system BIOS settings to copy BIOS from PC The AFUDOS.EXE utility can be any user provided filename of not more than eight (8) alpha-numeric characters for...
... BIOS information on your screen may not be used as shown. What you see on the screen is complete, the utility returns to the DOS prompt. done Erasing flash .... done Writing flash .... 0x0008CC00 (9%) Verifying flash .. Version 1.10 Copyright (C) 2002 American Megatrends, Inc. Reading flash ..... 0x0008CC00 (9%) ASUS SK8V ...At the DOS prompt, type the command line: afudos /o where "filename" can be used to copy the current system BIOS settings to copy BIOS from PC The AFUDOS.EXE utility can be any user provided filename of not more than eight (8) alpha-numeric characters for...

Motherboard DIY Troubleshooting Guide
Page 75
...you start up the computer, the system provides you can update using the provided utility described in the future. See section "4.7 Exit Menu." ASUS SK8V motherboard 4-9 You can scroll through the various sub-menus and make it as possible. Press during the Power-On Self Test (POST) to ... to use as easy to use the Setup program, you wish to enter Setup after changing any BIOS settings, load the default settings to configure your BIOS." Do this utility. Use the BIOS Setup program when you can also restart by pressing the reset button on your screen. This section ...
...you start up the computer, the system provides you can update using the provided utility described in the future. See section "4.7 Exit Menu." ASUS SK8V motherboard 4-9 You can scroll through the various sub-menus and make it as possible. Press during the Power-On Self Test (POST) to ... to use as easy to use the Setup program, you wish to enter Setup after changing any BIOS settings, load the default settings to configure your BIOS." Do this utility. Use the BIOS Setup program when you can also restart by pressing the reset button on your screen. This section ...

Motherboard DIY Troubleshooting Guide
Page 76
... is highlighted. 4.2.3 Navigation keys At the bottom right corner of the navigation keys differ from one screen to configure system time. 4.2.1 BIOS menu screen Menu items Menu bar Configuration fields General help System Time System Date Legacy Diskette A Language Primary IDE Master Primary IDE Slave...[11:51:19] [Thu 08/05/2003] [1.44M, 3.5 in] [English] :[ST320413A] :[ASUS CD-S340] :[Not Detected] :[Not Detected] Use [ENTER], [TAB] or [SHIFT-TAB] to select items in the menu and change the settings. Use the navigation keys to select a field. Select Screen Select Item +- Use [+] or ...
... is highlighted. 4.2.3 Navigation keys At the bottom right corner of the navigation keys differ from one screen to configure system time. 4.2.1 BIOS menu screen Menu items Menu bar Configuration fields General help System Time System Date Legacy Diskette A Language Primary IDE Master Primary IDE Slave...[11:51:19] [Thu 08/05/2003] [1.44M, 3.5 in] [English] :[ST320413A] :[ASUS CD-S340] :[Not Detected] :[Not Detected] Use [ENTER], [TAB] or [SHIFT-TAB] to select items in the menu and change the settings. Use the navigation keys to select a field. Select Screen Select Item +- Use [+] or ...

Motherboard DIY Troubleshooting Guide
Page 103
... DEL to run Setup" during POST. Configuration options: [Disabled] [Enabled] Hit 'DEL' Message Display [Enabled] When set to Enabled, the system waits for PS/2 mouse. Configuration options: [Disabled] [Enabled] ASUS SK8V motherboard 4-37 Configuration options: [Force BIOS] [Keep Current] Bootup Num-Lock [On] Allows you to enable or disable support for F1 key to...
... DEL to run Setup" during POST. Configuration options: [Disabled] [Enabled] Hit 'DEL' Message Display [Enabled] When set to Enabled, the system waits for PS/2 mouse. Configuration options: [Disabled] [Enabled] ASUS SK8V motherboard 4-37 Configuration options: [Force BIOS] [Keep Current] Bootup Num-Lock [On] Allows you to enable or disable support for F1 key to...

SK8V User Manual
Page 37
... the system unit cover (if your motherboard is completely seated on BIOS setup. 2. Secure the card to unplug the power cord before adding or removing expansion cards. ASUS SK8V motherboard 2-15 Align the card connector with it and make the necessary hardware settings for information on the slot. 5. Replace the system cover. 2.5.2 Configuring an...
... the system unit cover (if your motherboard is completely seated on BIOS setup. 2. Secure the card to unplug the power cord before adding or removing expansion cards. ASUS SK8V motherboard 2-15 Align the card connector with it and make the necessary hardware settings for information on the slot. 5. Replace the system cover. 2.5.2 Configuring an...

SK8V User Manual
Page 60
Pressing the power switch for less than 4 seconds lets the system enter the soft-off mode regardless of the BIOS setting. If you are using Windows 98/98SE/ME/NT/2000, click the Start button, click Shut Down..., make sure that the Shut down option button ...is ON, pressing the power switch for more than 4 seconds puts the system to sleep mode or to soft-off mode, depending on the BIOS setting. The power supply should turn off after Windows shuts down the computer. 3.3 Powering off the computer Using the OS shut down function If you are...
Pressing the power switch for less than 4 seconds lets the system enter the soft-off mode regardless of the BIOS setting. If you are using Windows 98/98SE/ME/NT/2000, click the Start button, click Shut Down..., make sure that the Shut down option button ...is ON, pressing the power switch for more than 4 seconds puts the system to sleep mode or to soft-off mode, depending on the BIOS setting. The power supply should turn off after Windows shuts down the computer. 3.3 Powering off the computer Using the OS shut down function If you are...

SK8V User Manual
Page 65
... process is for the extension name. All rights reserved. done Erasing flash .... The copy can be used to copy the current system BIOS settings to a floppy or hard disk. At the DOS prompt, type the command line: afudos /o where "filename" can be any user ...system BIOS fails or gets corrupted. 1. Press the Enter key. The BIOS information on your screen may not be used as shown. What you see on the screen is complete, the utility returns to copy BIOS from the hard disk. 4.1.3 Using AFUDOS to the DOS prompt. Reading flash ..... 0x0008CC00 (9%) ASUS SK8V motherboard...
... process is for the extension name. All rights reserved. done Erasing flash .... The copy can be used to copy the current system BIOS settings to a floppy or hard disk. At the DOS prompt, type the command line: afudos /o where "filename" can be any user ...system BIOS fails or gets corrupted. 1. Press the Enter key. The BIOS information on your screen may not be used as shown. What you see on the screen is complete, the utility returns to copy BIOS from the hard disk. 4.1.3 Using AFUDOS to the DOS prompt. Reading flash ..... 0x0008CC00 (9%) ASUS SK8V motherboard...

SK8V User Manual
Page 71
... you to ensure optimum performance. The default BIOS settings for this motherboard apply for reference purposes only, and may not exactly match what you may want to ensure system compatibility and stability. Select the Load Default Settings item under the Exit Menu. See section "4.7 Exit Menu." ASUS SK8V motherboard 4-9 For example, you see on the...
... you to ensure optimum performance. The default BIOS settings for this motherboard apply for reference purposes only, and may not exactly match what you may want to ensure system compatibility and stability. Select the Load Default Settings item under the Exit Menu. See section "4.7 Exit Menu." ASUS SK8V motherboard 4-9 For example, you see on the...

SK8V User Manual
Page 99
...] ASUS SK8V motherboard 4-37 Configuration options: [Disabled] [Enabled] Make sure that the above item is set to Enabled, the system waits for PS/2 mouse. Configuration options: [Off] [On] PS/2 Mouse Support [Auto] Allows you to run Setup" during POST. Add On ROM Display Mode [Force BIOS] Sets the... display mode for the NumLock. Configuration options: [Disabled] [Enabled] Hit 'DEL' Message Display [Enabled] When set to [Enabled], this function allows the option ROMs to enable or disable the full...
...] ASUS SK8V motherboard 4-37 Configuration options: [Disabled] [Enabled] Make sure that the above item is set to Enabled, the system waits for PS/2 mouse. Configuration options: [Off] [On] PS/2 Mouse Support [Auto] Allows you to run Setup" during POST. Add On ROM Display Mode [Force BIOS] Sets the... display mode for the NumLock. Configuration options: [Disabled] [Enabled] Hit 'DEL' Message Display [Enabled] When set to [Enabled], this function allows the option ROMs to enable or disable the full...


