
Motherboard DIY Troubleshooting Guide
Page 5
... Drives 4-36 4.6.3 Boot Settings Configuration 4-36 4.6.4 Security 4-38 4.7 Exit menu 4-41 Chapter 5: Software support 5.1 Install an operating system 5-1 5.2 Support CD information 5-1 5.2.1 Running the support CD 5-1 5.2.2 Drivers menu 5-2 5.2.3 Utilities menu 5-3 5.2.4 ASUS Contact Information 5-4 5.2.5 Other information 5-5 v
... Drives 4-36 4.6.3 Boot Settings Configuration 4-36 4.6.4 Security 4-38 4.7 Exit menu 4-41 Chapter 5: Software support 5.1 Install an operating system 5-1 5.2 Support CD information 5-1 5.2.1 Running the support CD 5-1 5.2.2 Drivers menu 5-2 5.2.3 Utilities menu 5-3 5.2.4 ASUS Contact Information 5-4 5.2.5 Other information 5-5 v

Motherboard DIY Troubleshooting Guide
Page 6
5.3 Software Information 5-7 5.3.1 ASUS MyLogo2 5-7 5.3.2 ASUS Instant Music 5-9 5.4 AI Audio feature 5-12 5.5 VIA RAID configurations 5-16 5.5.1 Install the Serial ATA (SATA) hard disks 5-17 5.5.2 Entering VIA® Tech RAID BIOS Utility 5-... 5.6.2 Enter the MBFastBuild™ utility 5-25 5.6.3 Creating a RAID 0 array (Performance 5-26 5.6.4 Creating a RAID 1 array (Security 5-27 5.6.5 Other FastBuild Utility Commands 5-29 5.7 Creating a floppy with RAID driver 5-31 5.8 AI Net feature 5-32 vi
5.3 Software Information 5-7 5.3.1 ASUS MyLogo2 5-7 5.3.2 ASUS Instant Music 5-9 5.4 AI Audio feature 5-12 5.5 VIA RAID configurations 5-16 5.5.1 Install the Serial ATA (SATA) hard disks 5-17 5.5.2 Entering VIA® Tech RAID BIOS Utility 5-... 5.6.2 Enter the MBFastBuild™ utility 5-25 5.6.3 Creating a RAID 0 array (Performance 5-26 5.6.4 Creating a RAID 1 array (Security 5-27 5.6.5 Other FastBuild Utility Commands 5-29 5.7 Creating a floppy with RAID driver 5-31 5.8 AI Net feature 5-32 vi

Motherboard DIY Troubleshooting Guide
Page 12
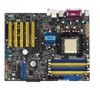
SK8V specifications summary Rear panel I/O 1 x Parallel port 1 x Serial port 1 x PS/2 keyboard port 1 x PS/2 mouse port 4 x USB 2.0...1394 connector Serial port 2 connector BIOS features 4Mb Flash EEPROM AMI BIOS with enhanced ACPI, PnP, DMI2.0, Green ASUS EZ Flash, ASUS MyLogo2, Q-Fan, SM BIOS 2.3, Multi-Language BIOS, CrashFree BIOS2 Industry standard PCI 2.2, USB 2.0/1.1 Manageability DMI... in x 9.6 in (30.5 cm x 24.4 cm) Support CD contents Device drivers ASUS PC Probe Trend Micro™ PC-cillin 2002 anti-virus software * Specifications are subject to change without notice. xii
SK8V specifications summary Rear panel I/O 1 x Parallel port 1 x Serial port 1 x PS/2 keyboard port 1 x PS/2 mouse port 4 x USB 2.0...1394 connector Serial port 2 connector BIOS features 4Mb Flash EEPROM AMI BIOS with enhanced ACPI, PnP, DMI2.0, Green ASUS EZ Flash, ASUS MyLogo2, Q-Fan, SM BIOS 2.3, Multi-Language BIOS, CrashFree BIOS2 Industry standard PCI 2.2, USB 2.0/1.1 Manageability DMI... in x 9.6 in (30.5 cm x 24.4 cm) Support CD contents Device drivers ASUS PC Probe Trend Micro™ PC-cillin 2002 anti-virus software * Specifications are subject to change without notice. xii

Motherboard DIY Troubleshooting Guide
Page 37
... to install expansion cards. Secure the card to unplug the power cord before adding or removing expansion cards. See Chapter 4 for the card. 2. ASUS SK8V motherboard 2-15 Failure to do so may need to use . 4. Keep the screw for the expansion card. Turn on the next page. 3. ...IRQ to install an expansion card. 1. Remove the system unit cover (if your motherboard is completely seated on BIOS setup. 2. Install the software drivers for later use . Refer to the tables on the system and change the necessary BIOS settings, if any. The motherboard has available PCI slots...
... to install expansion cards. Secure the card to unplug the power cord before adding or removing expansion cards. See Chapter 4 for the card. 2. ASUS SK8V motherboard 2-15 Failure to do so may need to use . 4. Keep the screw for the expansion card. Turn on the next page. 3. ...IRQ to install an expansion card. 1. Remove the system unit cover (if your motherboard is completely seated on BIOS setup. 2. Install the software drivers for later use . Refer to the tables on the system and change the necessary BIOS settings, if any. The motherboard has available PCI slots...

Motherboard DIY Troubleshooting Guide
Page 38
... slot 5 AGP slot Onboard RAID Onboard 1394 Onboard LAN WiFi slot PCI INT A shared - - - shared - When using PCI cards on shared slots, ensure that the drivers support "Share IRQ" or that the cards do not need IRQ assignments. shared - - - IRQ assignments for ISA or PCI devices.
... slot 5 AGP slot Onboard RAID Onboard 1394 Onboard LAN WiFi slot PCI INT A shared - - - shared - When using PCI cards on shared slots, ensure that the drivers support "Share IRQ" or that the cards do not need IRQ assignments. shared - - - IRQ assignments for ISA or PCI devices.
Motherboard DIY Troubleshooting Guide
Page 49
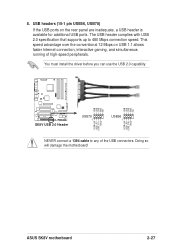
8. You must install the driver before you can use the USB 2.0 capability. ® USB+5V USB_P6USB_P6+ GND NC USB+5V USB_P8USB_P8+ GND NC SK8V SK8V USB 2.0 Header USB78 1 USB56 1 USB+5V USB_P5USB_P5+ GND USB+5V USB_P7USB_P7+ GND NEVER connect a 1394 cable to 480 Mbps ...connection speed. The USB header complies with USB 2.0 specification that supports up to any of high-speed peripherals. ASUS SK8V motherboard 2-27 This speed advantage over the conventional 12 Mbps on the rear panel are inadequate, a USB header is available for additional USB...
8. You must install the driver before you can use the USB 2.0 capability. ® USB+5V USB_P6USB_P6+ GND NC USB+5V USB_P8USB_P8+ GND NC SK8V SK8V USB 2.0 Header USB78 1 USB56 1 USB+5V USB_P5USB_P5+ GND USB+5V USB_P7USB_P7+ GND NEVER connect a 1394 cable to 480 Mbps ...connection speed. The USB header complies with USB 2.0 specification that supports up to any of high-speed peripherals. ASUS SK8V motherboard 2-27 This speed advantage over the conventional 12 Mbps on the rear panel are inadequate, a USB header is available for additional USB...
Motherboard DIY Troubleshooting Guide
Page 73
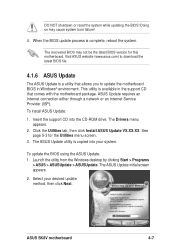
...is copied into the CD-ROM drive. The ASUS Update initial screen appears. 2. Select your system. To update the BIOS using the ASUS Update: 1. ASUS SK8V motherboard 4-7 This utility is available in Windows® environment. To install ASUS Update: 1. The recovered BIOS may cause ... the system while updating the BIOS! ASUS Update requires an Internet connection either through a network or an Internet Service Provider (ISP). Launch the utility from the Windows desktop by clicking Start > Programs > ASUS > ASUSUpdate > ASUSUpdate. The Drivers menu appears. 2. See page 5-3...
...is copied into the CD-ROM drive. The ASUS Update initial screen appears. 2. Select your system. To update the BIOS using the ASUS Update: 1. ASUS SK8V motherboard 4-7 This utility is available in Windows® environment. To install ASUS Update: 1. The recovered BIOS may cause ... the system while updating the BIOS! ASUS Update requires an Internet connection either through a network or an Internet Service Provider (ISP). Launch the utility from the Windows desktop by clicking Start > Programs > ASUS > ASUSUpdate > ASUSUpdate. The Drivers menu appears. 2. See page 5-3...

Motherboard DIY Troubleshooting Guide
Page 110
Chapter summary 5.1 Install an operating system 5-1 5.2 Support CD information 5-1 5.3 Software information 5-7 5.4 AI Audio feature 5-12 5.5 VIA® RAID configurations 5-16 5.6 Promise® RAID configurations 5-23 5.7 Creating a floppy with RAID driver 5-26 5.8 AI Net feature 5-32 ASUS SK8V motherboard
Chapter summary 5.1 Install an operating system 5-1 5.2 Support CD information 5-1 5.3 Software information 5-7 5.4 AI Audio feature 5-12 5.5 VIA® RAID configurations 5-16 5.6 Promise® RAID configurations 5-23 5.7 Creating a floppy with RAID driver 5-26 5.8 AI Net feature 5-32 ASUS SK8V motherboard
Motherboard DIY Troubleshooting Guide
Page 111
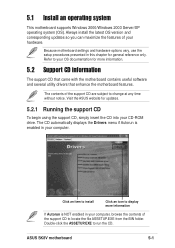
... Autorun is enabled in your computer, browse the contents of the support CD to change at any time without notice. The CD automatically displays the Drivers menu if Autorun is NOT enabled in this chapter for updates. 5.2.1 Running the support CD To begin using the support CD, simply insert the... of the support CD are subject to locate the file ASSETUP.EXE from the BIN folder. The contents of your CD-ROM drive. ASUS SK8V motherboard 5-1 Visit the ASUS website for general reference only. Click an item to install Click an icon to run the CD. Double-click the ASSETUP.EXE to...
... Autorun is enabled in your computer, browse the contents of the support CD to change at any time without notice. The CD automatically displays the Drivers menu if Autorun is NOT enabled in this chapter for updates. 5.2.1 Running the support CD To begin using the support CD, simply insert the... of the support CD are subject to locate the file ASSETUP.EXE from the BIN folder. The contents of your CD-ROM drive. ASUS SK8V motherboard 5-1 Visit the ASUS website for general reference only. Click an item to install Click an icon to run the CD. Double-click the ASSETUP.EXE to...

Motherboard DIY Troubleshooting Guide
Page 112
... to activate the devices. VIA ATAPI vendor support driver - Install the necessary drivers to USB 2.0. 5-2 Chapter 5: Software support VIA PCI IRQ Miniport driver. VIA 6420 RAID Controller driver This item installs the VIA® 6420 RAID controller driver and application. 5.2.2 Drivers menu The drivers menu shows the available device drivers if the system detects installed devices. Promise FastTrak...
... to activate the devices. VIA ATAPI vendor support driver - Install the necessary drivers to USB 2.0. 5-2 Chapter 5: Software support VIA PCI IRQ Miniport driver. VIA 6420 RAID Controller driver This item installs the VIA® 6420 RAID controller driver and application. 5.2.2 Drivers menu The drivers menu shows the available device drivers if the system detects installed devices. Promise FastTrak...
Motherboard DIY Troubleshooting Guide
Page 122
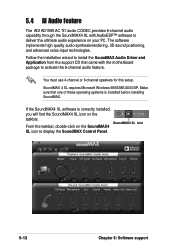
.../XP. Make sure that came with AudioESP™ software to deliver the ultimate audio experience on the SoundMAX4 XL icon to install the SoundMAX Audio Driver and Application from the support CD that one of these operating systems is correctly installed, you will find the SoundMAX4 XL icon on the taskbar...
.../XP. Make sure that came with AudioESP™ software to deliver the ultimate audio experience on the SoundMAX4 XL icon to install the SoundMAX Audio Driver and Application from the support CD that one of these operating systems is correctly installed, you will find the SoundMAX4 XL icon on the taskbar...

Motherboard DIY Troubleshooting Guide
Page 133
... detailed information on the PRI_RAID interface, you use either Windows XP or Windows 2000 operating system (OS), copy first the Promise FastTrak 378 Driver from one drive fails, the disk array management software directs all applications to a second drive. If you may set of drives (like...Using two Serial ATA hard disks on the PRI_SATA / SEC_SATA interfaces, and two ATA133 hard disks on RAID configurations under different operating systems. ASUS SK8V motherboard 5-23 Use the MBFastTrak378™ BIOS and the FastBuild™ utility to read and write data in the other drive. RAID 0...
... detailed information on the PRI_RAID interface, you use either Windows XP or Windows 2000 operating system (OS), copy first the Promise FastTrak 378 Driver from one drive fails, the disk array management software directs all applications to a second drive. If you may set of drives (like...Using two Serial ATA hard disks on the PRI_SATA / SEC_SATA interfaces, and two ATA133 hard disks on RAID configurations under different operating systems. ASUS SK8V motherboard 5-23 Use the MBFastTrak378™ BIOS and the FastBuild™ utility to read and write data in the other drive. RAID 0...
Motherboard DIY Troubleshooting Guide
Page 136
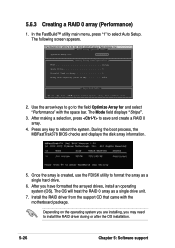
... 6. 5.6.3 Creating a RAID 0 array (Performance) 1. Once the array is created, use the FDISK utility to reboot the system. Install the RAID driver from the support CD that came with the space bar. The Mode field displays "Stripe". 3. After you may need to save and create a RAID... 0 array. 4. After making a selection, press to install the RAID driver during or after the OS installation. 5-26 Chapter 5: Software support During the boot process, the MBFastTrak378 BIOS checks and displays the disk array information...
... 6. 5.6.3 Creating a RAID 0 array (Performance) 1. Once the array is created, use the FDISK utility to reboot the system. Install the RAID driver from the support CD that came with the space bar. The Mode field displays "Stripe". 3. After you may need to save and create a RAID... 0 array. 4. After making a selection, press to install the RAID driver during or after the OS installation. 5-26 Chapter 5: Software support During the boot process, the MBFastTrak378 BIOS checks and displays the disk array information...

Motherboard DIY Troubleshooting Guide
Page 138
... do so may need to use. 6. The FastBuild utility will use an existing drive that came with the space bar. Continue N - Install the RAID driver from the source drive to save your system, make sure that the new hard drive you want the disk image to be duplicated to select... The next window prompts you want to duplicate the image... The following message appears: Do you to select the source drive to install the RAID driver during or after the OS installation. Do you will copy all important data before creating an array. In the FastBuild™ utility main menu, ...
... do so may need to use. 6. The FastBuild utility will use an existing drive that came with the space bar. Continue N - Install the RAID driver from the source drive to save your system, make sure that the new hard drive you want the disk image to be duplicated to select... The next window prompts you want to duplicate the image... The following message appears: Do you to select the source drive to install the RAID driver during or after the OS installation. Do you will copy all important data before creating an array. In the FastBuild™ utility main menu, ...
Motherboard DIY Troubleshooting Guide
Page 139
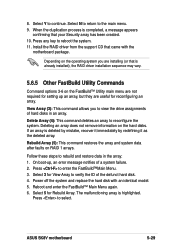
...by mistake, recover it immediately by redefining it as the deleted array. ASUS SK8V motherboard 5-29 Select Y to reconfigure the system. Reboot and enter the FastBuild™ Main Menu again. 6. Install the RAID driver from the support CD that your Security array has been created. 10.... Follow these steps to verify the ID of hard disks in the array: 1. When the duplication process is already installed), the RAID driver installation sequence may vary. 5.6.5 Other FastBuild Utility Commands Command options 3-6 on the FastBuild™ Utility main menu are useful for setting ...
...by mistake, recover it immediately by redefining it as the deleted array. ASUS SK8V motherboard 5-29 Select Y to reconfigure the system. Reboot and enter the FastBuild™ Main Menu again. 6. Install the RAID driver from the support CD that your Security array has been created. 10.... Follow these steps to verify the ID of hard disks in the array: 1. When the duplication process is already installed), the RAID driver installation sequence may vary. 5.6.5 Other FastBuild Utility Commands Command options 3-6 on the FastBuild™ Utility main menu are useful for setting ...
Motherboard DIY Troubleshooting Guide
Page 141
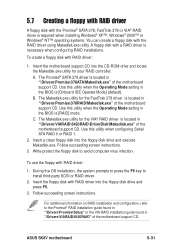
...\DriverDisk\Makedisk.exe" of the motherboard support CD. Insert the floppy disk with RAID driver into the CD-ROM drive and locate the Makedisk.exe utility for the VIA® RAID driver is [Onboard IDE Operate Mode] (default). ASUS SK8V motherboard 5-31 Follow succeeding screen instructions. 3. For additional information on RAID installation and configuration...
...\DriverDisk\Makedisk.exe" of the motherboard support CD. Insert the floppy disk with RAID driver into the CD-ROM drive and locate the Makedisk.exe utility for the VIA® RAID driver is [Onboard IDE Operate Mode] (default). ASUS SK8V motherboard 5-31 Follow succeeding screen instructions. 3. For additional information on RAID installation and configuration...

SK8V User Manual
Page 5
... 4.6.3 Boot Settings Configuration 4-36 4.6.4 Security 4-38 4.7 Exit menu 4-41 Chapter 5: Software support 5.1 Install an operating system 5-1 5.2 Support CD information 5-1 5.2.1 Running the support CD 5-1 5.2.2 Drivers menu 5-2 5.2.3 Utilities menu 5-3 5.2.4 ASUS Contact Information 5-4 5.2.5 Other information 5-5 5.3 SoundMAX® 4 XL software 5-7 5.4 VIA RAID configurations 5-11 5.4.1 Install the Serial ATA (SATA) hard disks 5-12 5.4.2 Entering VIA® Tech...
... 4.6.3 Boot Settings Configuration 4-36 4.6.4 Security 4-38 4.7 Exit menu 4-41 Chapter 5: Software support 5.1 Install an operating system 5-1 5.2 Support CD information 5-1 5.2.1 Running the support CD 5-1 5.2.2 Drivers menu 5-2 5.2.3 Utilities menu 5-3 5.2.4 ASUS Contact Information 5-4 5.2.5 Other information 5-5 5.3 SoundMAX® 4 XL software 5-7 5.4 VIA RAID configurations 5-11 5.4.1 Install the Serial ATA (SATA) hard disks 5-12 5.4.2 Entering VIA® Tech...

SK8V User Manual
Page 12
xii SK8V specifications summary Rear panel I/O 1 x Parallel port 1 x Serial port 1 x PS/2 keyboard port 1 x PS/2 mouse port 4 x USB 2.0...1394 connector Serial port 2 connector BIOS features 4Mb Flash EEPROM AMI BIOS with enhanced ACPI, PnP, DMI2.0, Green ASUS EZ Flash, ASUS MyLogo2, Q-Fan, SM BIOS 2.3, Multi-Language BIOS, CrashFree BIOS2 Industry standard PCI 2.2, USB 2.0/1.1 Manageability DMI... in x 9.6 in (30.5 cm x 24.4 cm) Support CD contents Device drivers ASUS PC Probe Trend Micro™ PC-cillin 2002 anti-virus software * Specifications are subject to change without notice.
xii SK8V specifications summary Rear panel I/O 1 x Parallel port 1 x Serial port 1 x PS/2 keyboard port 1 x PS/2 mouse port 4 x USB 2.0...1394 connector Serial port 2 connector BIOS features 4Mb Flash EEPROM AMI BIOS with enhanced ACPI, PnP, DMI2.0, Green ASUS EZ Flash, ASUS MyLogo2, Q-Fan, SM BIOS 2.3, Multi-Language BIOS, CrashFree BIOS2 Industry standard PCI 2.2, USB 2.0/1.1 Manageability DMI... in x 9.6 in (30.5 cm x 24.4 cm) Support CD contents Device drivers ASUS PC Probe Trend Micro™ PC-cillin 2002 anti-virus software * Specifications are subject to change without notice.

SK8V User Manual
Page 37
... Chapter 4 for later use . Refer to install expansion cards. ASUS SK8V motherboard 2-15 2.5 Expansion slots In the future, you may cause you physical injury and damage motherboard components. 2.5.1 Installing an expansion card Follow these steps to install an expansion card. 1. Install the software drivers for the card. 2. Replace the system cover. 2.5.2 Configuring an...
... Chapter 4 for later use . Refer to install expansion cards. ASUS SK8V motherboard 2-15 2.5 Expansion slots In the future, you may cause you physical injury and damage motherboard components. 2.5.1 Installing an expansion card Follow these steps to install an expansion card. 1. Install the software drivers for the card. 2. Replace the system cover. 2.5.2 Configuring an...
SK8V User Manual
Page 38
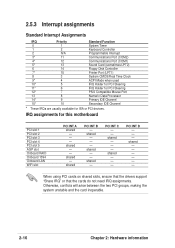
... the card inoperable. 2-16 Chapter 2: Hardware information shared - IRQ assignments for ISA or PCI devices. When using PCI cards on shared slots, ensure that the drivers support "Share IRQ" or that the cards do not need IRQ assignments. 2.5.3 Interrupt assignments Standard Interrupt Assignments IRQ Priority Standard Function 0 1 System Timer 1 2 Keyboard Controller...
... the card inoperable. 2-16 Chapter 2: Hardware information shared - IRQ assignments for ISA or PCI devices. When using PCI cards on shared slots, ensure that the drivers support "Share IRQ" or that the cards do not need IRQ assignments. 2.5.3 Interrupt assignments Standard Interrupt Assignments IRQ Priority Standard Function 0 1 System Timer 1 2 Keyboard Controller...


