
Spresso Hardware User Manual
Page 12
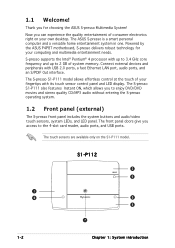
... needs. S1-P112 3 4 1 2 5 6 7 1-2 Chapter 1: System introduction S-presso supports the Intel® Pentium® 4 processor with its touch sensor control panel and LED display. The S-presso S1-P111 also features Instant ON, which allows you access to the 4-slot card reader, audio ports, and USB ports. Now you for your own desktop. The front panel doors give you to 2 GB of consumer electronics right on the S1-P111 model. 1.1 Welcome! The S-presso...
... needs. S1-P112 3 4 1 2 5 6 7 1-2 Chapter 1: System introduction S-presso supports the Intel® Pentium® 4 processor with its touch sensor control panel and LED display. The S-presso S1-P111 also features Instant ON, which allows you access to the 4-slot card reader, audio ports, and USB ports. Now you for your own desktop. The front panel doors give you to 2 GB of consumer electronics right on the S1-P111 model. 1.1 Welcome! The S-presso...
Spresso Hardware User Manual
Page 16
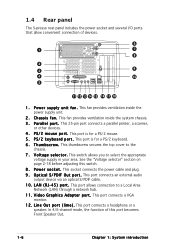
... y b o a r d p o r t . This port connects a VGA monitor. 1 2 . This port connects a headphone or a speaker. This port is for a PS/2 mouse. 5 . V i d e o G r a p h i c s A d a p t e r p o r t . In 4/6-channel mode, the function of devices. 6 1 7 8 2 3 9 4 10 5 11 12 13 14 15 16 17 18 1 . 1.4 Rear panel The S-presso rear panel includes the power socket and several I F O u t p o r t . V o l t a g e s e l e c t o r . This port allows connection to the chassis. 7 . L i n e O u t p o r t ( l i m e ) . This fan provides ventilation inside the power supply unit...
... y b o a r d p o r t . This port connects a VGA monitor. 1 2 . This port connects a headphone or a speaker. This port is for a PS/2 mouse. 5 . V i d e o G r a p h i c s A d a p t e r p o r t . In 4/6-channel mode, the function of devices. 6 1 7 8 2 3 9 4 10 5 11 12 13 14 15 16 17 18 1 . 1.4 Rear panel The S-presso rear panel includes the power socket and several I F O u t p o r t . V o l t a g e s e l e c t o r . This port allows connection to the chassis. 7 . L i n e O u t p o r t ( l i m e ) . This fan provides ventilation inside the power supply unit...
Spresso Hardware User Manual
Page 17
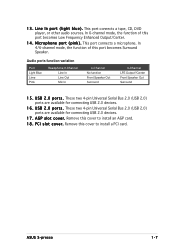
... this cover to install a PCI card. These two 4-pin Universal Serial Bus 2.0 (USB 2.0) ports are available for connecting USB 2.0 devices. 1 7 . P C I n p o r t ( l i g h t b l u e ) . In 6-channel mode, the function of this cover to install an AGP card. 1 8 . These two 4-pin Universal Serial Bus 2.0 (USB 2.0) ports are available for connecting USB 2.0 devices. 1 6 . This port connects a microphone. U S B 2 . 0 p o r t s . A G P s l o t c o v e r . Remove this port becomes Low Frequency Enhanced Output/Center. 1 4 . ASUS S-presso 1-7 This port connects a tape, CD, DVD player...
... this cover to install a PCI card. These two 4-pin Universal Serial Bus 2.0 (USB 2.0) ports are available for connecting USB 2.0 devices. 1 7 . P C I n p o r t ( l i g h t b l u e ) . In 6-channel mode, the function of this cover to install an AGP card. 1 8 . These two 4-pin Universal Serial Bus 2.0 (USB 2.0) ports are available for connecting USB 2.0 devices. 1 6 . This port connects a microphone. U S B 2 . 0 p o r t s . A G P s l o t c o v e r . Remove this port becomes Low Frequency Enhanced Output/Center. 1 4 . ASUS S-presso 1-7 This port connects a tape, CD, DVD player...
Spresso Hardware User Manual
Page 22
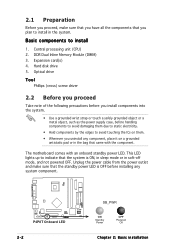
Central processing unit (CPU) 2. DDR Dual Inline Memory Module (DIMM) 3. Expansion card(s) 4. This LED lights up to indicate that the standby power LED is ON, in sleep mode or in the system. The motherboard comes with the component. Basic components to install in soft-off mode, and not powered OFF. Hard disk drive 5. Unplug the power cable from the power outlet and make sure that you have all the components that came...
Central processing unit (CPU) 2. DDR Dual Inline Memory Module (DIMM) 3. Expansion card(s) 4. This LED lights up to indicate that the standby power LED is ON, in sleep mode or in the system. The motherboard comes with the component. Basic components to install in soft-off mode, and not powered OFF. Hard disk drive 5. Unplug the power cable from the power outlet and make sure that you have all the components that came...
Spresso Hardware User Manual
Page 33
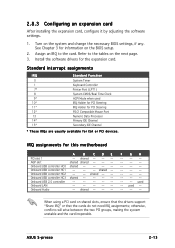
...or PCI devices. shared -- Onboard Audio -- used -- -- -- -- ASUS S-presso 2-13 AGP slot shared shared -- -- -- Onboard USB controller HC3 shared -- -- -- -- Onboard USB controller HC2 -- -- F G H -- -- -- -- -- -- -- -- -- -- -- -- -- -- -- -- -- -- -- -- 2.8.3 Configuring an expansion card After installing the expansion card, configure it by adjusting the software settings. 1. shared -- -- used -- Onboard USB 2.0 controller -- -- -- -- -- Turn on shared slots, ensure that the drivers support "Share IRQ" or that the cards do not need IRQ...
...or PCI devices. shared -- Onboard Audio -- used -- -- -- -- ASUS S-presso 2-13 AGP slot shared shared -- -- -- Onboard USB controller HC3 shared -- -- -- -- Onboard USB controller HC2 -- -- F G H -- -- -- -- -- -- -- -- -- -- -- -- -- -- -- -- -- -- -- -- 2.8.3 Configuring an expansion card After installing the expansion card, configure it by adjusting the software settings. 1. shared -- -- used -- Onboard USB 2.0 controller -- -- -- -- -- Turn on shared slots, ensure that the drivers support "Share IRQ" or that the cards do not need IRQ...

Spresso Hardware User Manual
Page 36
... IDE connector on the drive. 6. To install a hard disk drive: 1. Drive two screws in the direction of the drive bay, then slide it inside. 4. Push in each side of the IDE ribbon cable to the primary 6 IDE connector (blue connector labeled PRI_IDE) on the motherboard. Connect a 4-pin power plug from 5 the power supply unit to Master before connecting the IDE cable and power plug. See page 3-8 for instructions. 3. Set the hard disk drive jumper to the HDD power connector. 7. Clamp HDD reverse side 4 3 5. Connect...
... IDE connector on the drive. 6. To install a hard disk drive: 1. Drive two screws in the direction of the drive bay, then slide it inside. 4. Push in each side of the IDE ribbon cable to the primary 6 IDE connector (blue connector labeled PRI_IDE) on the motherboard. Connect a 4-pin power plug from 5 the power supply unit to Master before connecting the IDE cable and power plug. See page 3-8 for instructions. 3. Set the hard disk drive jumper to the HDD power connector. 7. Clamp HDD reverse side 4 3 5. Connect...

Spresso Hardware User Manual
Page 45
... the power cord. 2. ASUS S-presso 3-3 3.3 Jumper Clear RTC RAM (CLRTC) This jumper allows you clear the CMOS after first reboot. To erase the RTC RAM: 1. Removing the cap will cause system boot failure! Move the jumper cap from pins 1-2 (default) to re-enter data. Plug the power cord and turn ON the computer. 6. Remove the battery. 3. Keep the cap on when you to pins 1-2. 4. The onboard button cell battery powers the RAM data in CMOS. P4P8T ® P4P8T Clear RTC RAM...
... the power cord. 2. ASUS S-presso 3-3 3.3 Jumper Clear RTC RAM (CLRTC) This jumper allows you clear the CMOS after first reboot. To erase the RTC RAM: 1. Removing the cap will cause system boot failure! Move the jumper cap from pins 1-2 (default) to re-enter data. Plug the power cord and turn ON the computer. 6. Remove the battery. 3. Keep the cap on when you to pins 1-2. 4. The onboard button cell battery powers the RAM data in CMOS. P4P8T ® P4P8T Clear RTC RAM...

Spresso Hardware User Manual
Page 50
... signal cable has three connectors: a blue connector for the primary IDE connector on the IDE connector is removed to PIN 1. IDE connectors (40-1 pin PRI_IDE, SEC_IDE) These connectors are for the jumper settings. • Pin 20 on the motherboard, a black connector for an Ultra DMA 100/66 IDE slave device (optical drive/hard disk drive), and a gray connector for Ultra DMA 100/66 IDE devices. If you install two hard disk drives, you to receive stereo audio input from sound...
... signal cable has three connectors: a blue connector for the primary IDE connector on the IDE connector is removed to PIN 1. IDE connectors (40-1 pin PRI_IDE, SEC_IDE) These connectors are for the jumper settings. • Pin 20 on the motherboard, a black connector for an Ultra DMA 100/66 IDE slave device (optical drive/hard disk drive), and a gray connector for Ultra DMA 100/66 IDE devices. If you install two hard disk drives, you to receive stereo audio input from sound...
Spresso Hardware User Manual
Page 63
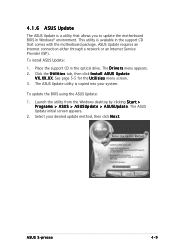
... page 5-5 for the U t i l i t i e s menu screen. 3. The ASUS Update initial screen appears. 2. ASUS S-presso 4-9 To update the BIOS using the ASUS Update: 1. ASUS Update requires an Internet connection either through a network or an Internet Service Provider (ISP). The D r i v e r s menu appears. 2. Place the support CD in Windows® environment. Click the U t i l i t i e s tab, then click I n s t a l l A S U S U p d a t e V X . X X. The ASUS Update utility is copied into your desired update method, then click N e x t. Launch the utility from the Windows desktop by clicking...
... page 5-5 for the U t i l i t i e s menu screen. 3. The ASUS Update initial screen appears. 2. ASUS S-presso 4-9 To update the BIOS using the ASUS Update: 1. ASUS Update requires an Internet connection either through a network or an Internet Service Provider (ISP). The D r i v e r s menu appears. 2. Place the support CD in Windows® environment. Click the U t i l i t i e s tab, then click I n s t a l l A S U S U p d a t e V X . X X. The ASUS Update utility is copied into your desired update method, then click N e x t. Launch the utility from the Windows desktop by clicking...
Spresso Hardware User Manual
Page 69
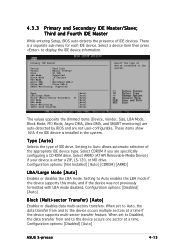
... Fourth IDE Master While entering Setup, BIOS auto-detects the presence of the appropriate IDE device type. Configuration options: [Not Installed] [Auto] [CDROM] [ARMD] LBA/Large Mode [Auto] Enables or disables the LBA mode. Configuration options: [Disabled] [Auto] ASUS S-presso 4-15 There is installed in the system. Setting to display the IDE device information. Primary IDE Master Device : Hard Disk Vendor : Maxtor 6Y080L0 Size : 81.9GB LBA Mode : Supported Block Mode : 16 Sectors PIO Mode : 4 Async DMA : MultiWord...
... Fourth IDE Master While entering Setup, BIOS auto-detects the presence of the appropriate IDE device type. Configuration options: [Not Installed] [Auto] [CDROM] [ARMD] LBA/Large Mode [Auto] Enables or disables the LBA mode. Configuration options: [Disabled] [Auto] ASUS S-presso 4-15 There is installed in the system. Setting to display the IDE device information. Primary IDE Master Device : Hard Disk Vendor : Maxtor 6Y080L0 Size : 81.9GB LBA Mode : Supported Block Mode : 16 Sectors PIO Mode : 4 Async DMA : MultiWord...
Spresso Hardware User Manual
Page 94
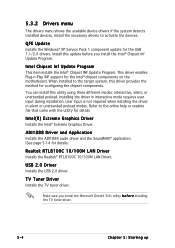
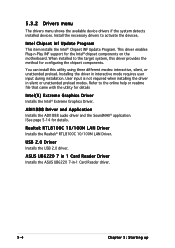
... Graphics Driver. This driver enables Plug-n-Play INF support for the USB 1.1/2.0 drivers. User input is not required when installing the driver in interactive mode requires user input during installation. When installed to the target system, this utility using three different modes: interactive, silent, or unattended preload. Installing the driver in silent or unattended preload modes. Refer to activate the devices. Realtek RTL8100C 10/100M LAN Driver Installs the Realtek® RTL8100C 10/100M LAN Driver. QFE Update Installs...
... Graphics Driver. This driver enables Plug-n-Play INF support for the USB 1.1/2.0 drivers. User input is not required when installing the driver in interactive mode requires user input during installation. When installed to the target system, this utility using three different modes: interactive, silent, or unattended preload. Installing the driver in silent or unattended preload modes. Refer to activate the devices. Realtek RTL8100C 10/100M LAN Driver Installs the Realtek® RTL8100C 10/100M LAN Driver. QFE Update Installs...
Spresso Hardware User Manual
Page 104
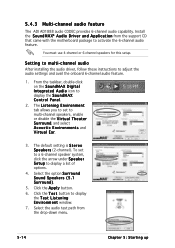
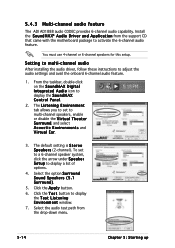
... and Virtual Ear. 3. You must use 4-channel or 6-channel speakers for this setup. To set to display a list of options. 4. Select the option S u r r o u n d Sound Speakers (5.1 S u r r o u n d ). 5. Select the audio test path from the support CD that came with the motherboard package to display the S o u n d M A X Control Panel. 2. Setting to multi-channel audio After installing the audio driver, follow these instructions to display the T e s t L i s t e n i n g E n v i r o n m e n t window. 7. Click the T e s t button to adjust the audio settings and avail the onboard...
... and Virtual Ear. 3. You must use 4-channel or 6-channel speakers for this setup. To set to display a list of options. 4. Select the option S u r r o u n d Sound Speakers (5.1 S u r r o u n d ). 5. Select the audio test path from the support CD that came with the motherboard package to display the S o u n d M A X Control Panel. 2. Setting to multi-channel audio After installing the audio driver, follow these instructions to display the T e s t L i s t e n i n g E n v i r o n m e n t window. 7. Click the T e s t button to adjust the audio settings and avail the onboard...

Spresso Software User Manual
Page 10
... the BIOS setup, set the hard disk drive as P r i m a r y I D E M a s t e r in the BIOS setup. • set the hard disk drive as P r i m a r y I D E M a s t e r before installing an operating system in this chapter for general reference only. Empty and unpartitioned hard disk Before installing Instant ON: • set the HDD jumper to M a s t e r . 1.1.2 Requirements for more information. Because motherboard settings and hardware options vary, use the setup procedures presented in your OS documentation for installing to your hard disk. • Instant On does not support add-on...
... the BIOS setup, set the hard disk drive as P r i m a r y I D E M a s t e r in the BIOS setup. • set the hard disk drive as P r i m a r y I D E M a s t e r before installing an operating system in this chapter for general reference only. Empty and unpartitioned hard disk Before installing Instant ON: • set the HDD jumper to M a s t e r . 1.1.2 Requirements for more information. Because motherboard settings and hardware options vary, use the setup procedures presented in your OS documentation for installing to your hard disk. • Instant On does not support add-on...
Spresso Software User Manual
Page 30
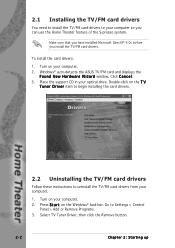
... card drivers to Settings > Control Panel > Add or Remove Programs. 3. To install the card drivers: 1. Turn on your computer so you install the TV/FM card drivers. Click C a n c e l. 3. Place the support CD in your computer. 1. Select TV Tuner Driver, then click the Remove button. 2-2 Chapter 2: Starting up Make sure that you have installed Microsoft DirectX® 9.0c before you can use the Home Theater feature of the S-presso system. Double-click on the Windows...
... card drivers to Settings > Control Panel > Add or Remove Programs. 3. To install the card drivers: 1. Turn on your computer so you install the TV/FM card drivers. Click C a n c e l. 3. Place the support CD in your computer. 1. Select TV Tuner Driver, then click the Remove button. 2-2 Chapter 2: Starting up Make sure that you have installed Microsoft DirectX® 9.0c before you can use the Home Theater feature of the S-presso system. Double-click on the Windows...

S-presso Software User's Manual
Page 10
... electronics on or VGA cards. Because motherboard settings and hardware options vary, use the setup procedures presented in the BIOS setup. • set the hard disk drive as P r i m a r y I D E M a s t e r in this chapter for installing to an occupied HDD 1. 1.1 Installing Instant On IMPORTANT! • Install Instant On before installing Instant On. 1-2 Chapter 1: Instant On Without entering the Windows® operating system, you to enjoy the features of the hard disk. • In the BIOS setup, set the HDD jumper to M a s t e r . 1.1.2 Requirements...
... electronics on or VGA cards. Because motherboard settings and hardware options vary, use the setup procedures presented in the BIOS setup. • set the hard disk drive as P r i m a r y I D E M a s t e r in this chapter for installing to an occupied HDD 1. 1.1 Installing Instant On IMPORTANT! • Install Instant On before installing Instant On. 1-2 Chapter 1: Instant On Without entering the Windows® operating system, you to enjoy the features of the hard disk. • In the BIOS setup, set the HDD jumper to M a s t e r . 1.1.2 Requirements...
Spresso User Manual
Page 33
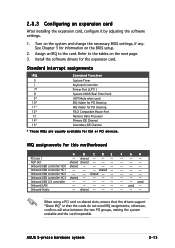
... Controller 7* Printer Port (LPT1) 8 System CMOS/Real Time Clock 9* ACPI Mode when used -- -- -- -- otherwise, conflicts will arise between the two PCI groups, making the system unstable and the card inoperable. Refer to the card. shared -- -- When using a PCI card on the BIOS setup. 2. 2.8.3 Configuring an expansion card After installing the expansion card, configure it by adjusting the software settings. 1. See Chapter 3 for ISA or PCI devices. Onboard LAN -- -- -- -- -- Install the software drivers for this motherboard A B CDE PCI slot 1 -- Turn...
... Controller 7* Printer Port (LPT1) 8 System CMOS/Real Time Clock 9* ACPI Mode when used -- -- -- -- otherwise, conflicts will arise between the two PCI groups, making the system unstable and the card inoperable. Refer to the card. shared -- -- When using a PCI card on the BIOS setup. 2. 2.8.3 Configuring an expansion card After installing the expansion card, configure it by adjusting the software settings. 1. See Chapter 3 for ISA or PCI devices. Onboard LAN -- -- -- -- -- Install the software drivers for this motherboard A B CDE PCI slot 1 -- Turn...
Spresso User Manual
Page 36
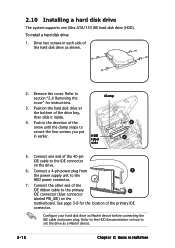
2.10 Installing a hard disk drive The system supports one end of the IDE ribbon cable to the primary 6 IDE connector (blue connector labeled PRI_IDE) on the motherboard. Push in the direction of the primary IDE connector. Clamp HDD label side 4 3 5. See page 3-8 for instructions. 3. To install a hard disk drive: 1. Drive two screws in earlier. Connect a 4-pin power plug from 5 the power supply unit to set the drive as a Master device. 2-16 Chapter 2: Basic installation Position the hard disk drive at the...
2.10 Installing a hard disk drive The system supports one end of the IDE ribbon cable to the primary 6 IDE connector (blue connector labeled PRI_IDE) on the motherboard. Push in the direction of the primary IDE connector. Clamp HDD label side 4 3 5. See page 3-8 for instructions. 3. To install a hard disk drive: 1. Drive two screws in earlier. Connect a 4-pin power plug from 5 the power supply unit to set the drive as a Master device. 2-16 Chapter 2: Basic installation Position the hard disk drive at the...

Spresso User Manual
Page 69
... mode if the device supports this mode, and if the device was not previously formatted with LBA mode disabled. Configuration options: [Disabled] [Auto] ASUS S-presso barebone system 4-15 Type [Auto] Selects the type of IDE devices. Setting to the device occurs multiple sectors at a time. Configuration options: [Not Installed] [Auto] [CDROM] [ARMD] LBA/Large Mode [Auto] Enables or disables the LBA mode. Third and Fourth IDE Master While entering Setup, BIOS auto-detects the presence of IDE drive...
... mode if the device supports this mode, and if the device was not previously formatted with LBA mode disabled. Configuration options: [Disabled] [Auto] ASUS S-presso barebone system 4-15 Type [Auto] Selects the type of IDE devices. Setting to the device occurs multiple sectors at a time. Configuration options: [Not Installed] [Auto] [CDROM] [ARMD] LBA/Large Mode [Auto] Enables or disables the LBA mode. Third and Fourth IDE Master While entering Setup, BIOS auto-detects the presence of IDE drive...
Spresso User Manual
Page 94
... Graphics Driver. Install the necessary drivers to the online help or readme file that came with the utility for details. Refer to activate the devices. ASUS UB6220 7 in 1 Card Reader Driver Installs the ASUS UB6220 7-in-1 Card Reader driver. 5-4 Chapter 5: Starting up You can install this driver provides the method for the Intel® chipset components on the motherboard. Realtek RTL8100C 10/100M LAN Driver Installs the Realtek® RTL8100C 10/100M LAN Driver. 5.3.2 Drivers menu...
... Graphics Driver. Install the necessary drivers to the online help or readme file that came with the utility for details. Refer to activate the devices. ASUS UB6220 7 in 1 Card Reader Driver Installs the ASUS UB6220 7-in-1 Card Reader driver. 5-4 Chapter 5: Starting up You can install this driver provides the method for the Intel® chipset components on the motherboard. Realtek RTL8100C 10/100M LAN Driver Installs the Realtek® RTL8100C 10/100M LAN Driver. 5.3.2 Drivers menu...
Spresso User Manual
Page 104
... e n i n g E n v i r o n m e n t window. 7. 5.4.3 Multi-channel audio feature The ADI AD1888 audio CODEC provides 6-channel audio capability. Select the option S u r r o u n d Sound Speakers (5.1 S u r r o u n d ). 5. To set to adjust the audio settings and avail the onboard 6-channel audio feature. 1. Setting to multi-channel audio After installing the audio driver, follow these instructions to multi-channel speakers, enable or disable the V i r t u a l T h e a t e r S u r r o u n d, and select A c o u s t i c E n v i r o n m e n t s and Virtual Ear. 3. The default setting is...
... e n i n g E n v i r o n m e n t window. 7. 5.4.3 Multi-channel audio feature The ADI AD1888 audio CODEC provides 6-channel audio capability. Select the option S u r r o u n d Sound Speakers (5.1 S u r r o u n d ). 5. To set to adjust the audio settings and avail the onboard 6-channel audio feature. 1. Setting to multi-channel audio After installing the audio driver, follow these instructions to multi-channel speakers, enable or disable the V i r t u a l T h e a t e r S u r r o u n d, and select A c o u s t i c E n v i r o n m e n t s and Virtual Ear. 3. The default setting is...


