
User Guide
Page 12
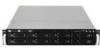
... xxxxxxxxxxxx 1-2 Chapter 1: Product introduction 1.1 System package contents Check your system package for the following items. Model Name Chassis RS520-E6/RS8 ASUS R20A 2U Rackmount Chassis Motherboard ASUS Z8NR-D12-SYS Server Board Component 1 x 770W Redundant Power Supply 1 x SATAII/SAS HDD Backplane (BP8LX-R20A) 8 x hot-swap HDD trays (varies by territories) 1 x Front I/O Board (...
... xxxxxxxxxxxx 1-2 Chapter 1: Product introduction 1.1 System package contents Check your system package for the following items. Model Name Chassis RS520-E6/RS8 ASUS R20A 2U Rackmount Chassis Motherboard ASUS Z8NR-D12-SYS Server Board Component 1 x 770W Redundant Power Supply 1 x SATAII/SAS HDD Backplane (BP8LX-R20A) 8 x hot-swap HDD trays (varies by territories) 1 x Front I/O Board (...

User Guide
Page 43
...the rack to ensure that the front end of the rail with two rack screws. 8. ASUS RS520-E6/RS8 3-3 Select two units of space (2U) on the rack. Secure the rear end of the chassis with one screw. 5. Repeat ...of the server rail to install the barebone server. 2. Install the nuts on the holes of the 2U space on the rack front. 3. Position the rack rail to the other side of the rack space.... the rack rails To attach the rack rails: 1. Install the nuts on the holes of the 2U space on the corresponding rack rear. 4. Ensure that it locks in place. 4. Repeat steps 5 to ...
...the rack to ensure that the front end of the rail with two rack screws. 8. ASUS RS520-E6/RS8 3-3 Select two units of space (2U) on the rack. Secure the rear end of the chassis with one screw. 5. Repeat ...of the server rail to install the barebone server. 2. Install the nuts on the holes of the 2U space on the rack front. 3. Position the rack rail to the other side of the rack space.... the rack rails To attach the rack rails: 1. Install the nuts on the holes of the 2U space on the corresponding rack rear. 4. Ensure that it locks in place. 4. Repeat steps 5 to ...