
User Guide
Page 12
... 12 characters such as xxxxxxxxxxxx. 1.1 System package contents Check your system package for the following items. Model Name Chassis Motherboard Component Accessories Optional Items RS500-E6/PS4 ASUS R10A 1U Rackmount Chassis ASUS Z8NR-D12-SYS Server Board 1 x 600W 80+ Single Power Supply 1 x SATAII/SAS HDD Backplane (BP4LX-R10A) 4 x hot-swap HDD trays (varies by territories...
... 12 characters such as xxxxxxxxxxxx. 1.1 System package contents Check your system package for the following items. Model Name Chassis Motherboard Component Accessories Optional Items RS500-E6/PS4 ASUS R10A 1U Rackmount Chassis ASUS Z8NR-D12-SYS Server Board 1 x 600W 80+ Single Power Supply 1 x SATAII/SAS HDD Backplane (BP4LX-R10A) 4 x hot-swap HDD trays (varies by territories...
User Guide
Page 41
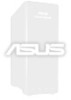
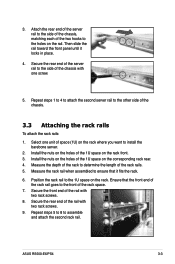
... on the rack front. 3. Install the nuts on the holes of the 1U space on the corresponding rack rear. 4. Measure the rack rail when assembled to ensure that the front end of the rack rail goes to the ... the rack where you want to the holes on the rail. Repeat steps 5 to 8 to the side of the chassis, matching each of space (1U) on the rack. 3. ASUS RS500-E6/PS4 3-3 Select one screw. 5. Secure the rear end of the chassis. 3.3 Attaching the rack rails To attach the rack rails: 1. Then slide the rail...
... on the rack front. 3. Install the nuts on the holes of the 1U space on the corresponding rack rear. 4. Measure the rack rail when assembled to ensure that the front end of the rack rail goes to the ... the rack where you want to the holes on the rail. Repeat steps 5 to 8 to the side of the chassis, matching each of space (1U) on the rack. 3. ASUS RS500-E6/PS4 3-3 Select one screw. 5. Secure the rear end of the chassis. 3.3 Attaching the rack rails To attach the rack rails: 1. Then slide the rail...
