User Guide
Page 2
...corporate names appearing in this manual, including the products and software described in any form or by any defect or error in writing by ASUS; or (2) the serial number of ASUSTeK COMPUTER INC. ("ASUS"). All Rights Reserved. ii ASUS assumes no event shall ASUS, its directors, officers, employees...such damages arising from any means, except documentation kept by ASUS. No part of this manual, including the products and software described in it, may not be liable for any language in it. ASUS provides this manual or product. Product warranty or service will not be extended ...
...corporate names appearing in this manual, including the products and software described in any form or by any defect or error in writing by ASUS; or (2) the serial number of ASUSTeK COMPUTER INC. ("ASUS"). All Rights Reserved. ii ASUS assumes no event shall ASUS, its directors, officers, employees...such damages arising from any means, except documentation kept by ASUS. No part of this manual, including the products and software described in it, may not be liable for any language in it. ASUS provides this manual or product. Product warranty or service will not be extended ...
User Guide
Page 8
... cables are not damaged. If any additional devices to fix it by certified or experienced engineers. • Before operating the server, carefully read all the manuals included with a properly grounded electrical outlet to the manufacturer's instructions. Place the server on this server must be conducted by yourself. Dispose of explosion if...
... cables are not damaged. If any additional devices to fix it by certified or experienced engineers. • Before operating the server, carefully read all the manuals included with a properly grounded electrical outlet to the manufacturer's instructions. Place the server on this server must be conducted by yourself. Dispose of explosion if...
User Guide
Page 10
... DOS prompt, type the command line: format A:/S Refer to the following symbols used throughout this manual. x N O T E : Tips and information to aid in brackets. ASUS Server Web-based Management (ASWM) user guide This manual tells how to select. ASUS websites The ASUS websites worldwide provide updated information for product and software updates. 1. I M P O R T A N T : Instructions that you perform...
... DOS prompt, type the command line: format A:/S Refer to the following symbols used throughout this manual. x N O T E : Tips and information to aid in brackets. ASUS Server Web-based Management (ASWM) user guide This manual tells how to select. ASUS websites The ASUS websites worldwide provide updated information for product and software updates. 1. I M P O R T A N T : Instructions that you perform...

User Guide
Page 90
...] ~ [15 DRAM Clocks] Boots Graphic Adapter Priority [PEG/PCI] Allows selection of the graphics controller to the DDR SDRAM. DRAM Frequency [Auto] Allows you can manually set the DRAM timing parameters through the DRAM sub-items. The following sub-items appear when this item is Disabled. Configuration options: [Auto] [Disabled] 5-24...
...] ~ [15 DRAM Clocks] Boots Graphic Adapter Priority [PEG/PCI] Allows selection of the graphics controller to the DDR SDRAM. DRAM Frequency [Auto] Allows you can manually set the DRAM timing parameters through the DRAM sub-items. The following sub-items appear when this item is Disabled. Configuration options: [Auto] [Disabled] 5-24...
User Guide
Page 111
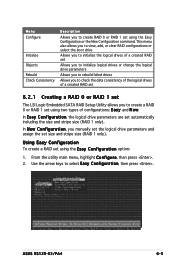
... 1 only). Use the arrow keys to create a RAID 0 or RAID 1 set using the Easy Configuration or the New Configuration command. ASUS RS120-E3/PA4 6-5 This menu also allows you to view, add, or clear RAID configurations or select the boot drive Allows you to initialize the ... data consistency of the logical drives of a created RAID set 6.2.1 Creating a RAID 0 or RAID 1 set The LSI Logic Embedded SATA RAID Setup Utility allows you manually set the logical drive parameters and assign the set automatically including the size and stripe size (RAID 1 only). In N e w C o n f i g u r a t i o ...
... 1 only). Use the arrow keys to create a RAID 0 or RAID 1 set using the Easy Configuration or the New Configuration command. ASUS RS120-E3/PA4 6-5 This menu also allows you to view, add, or clear RAID configurations or select the boot drive Allows you to initialize the ... data consistency of the logical drives of a created RAID set 6.2.1 Creating a RAID 0 or RAID 1 set The LSI Logic Embedded SATA RAID Setup Utility allows you manually set the logical drive parameters and assign the set automatically including the size and stripe size (RAID 1 only). In N e w C o n f i g u r a t i o ...

User Guide
Page 115
When finished setting the selected logical drive configuration, select A c c e p t from the menu, then press . 11. Follow steps 5 to 10 to the Management Menu. ASUS RS120-E3/PA4 6-9 When prompted, save the configuration, then press to return to configure additional logical drives. 13. 10. When finished setting the selected logical drive configuration, select A c c e p t from the menu, then press . 12. Before using, we recommend completing the 6.2.4 steps to initiate the fresh logical drive manually.
When finished setting the selected logical drive configuration, select A c c e p t from the menu, then press . 11. Follow steps 5 to 10 to the Management Menu. ASUS RS120-E3/PA4 6-9 When prompted, save the configuration, then press to return to configure additional logical drives. 13. 10. When finished setting the selected logical drive configuration, select A c c e p t from the menu, then press . 12. Before using, we recommend completing the 6.2.4 steps to initiate the fresh logical drive manually.

User Guide
Page 116
..., then press . 6. Use the arrow keys to 7 of the previous section to create the RAID set , use the V i e w / A d d C o n f i g u r a t i o n command to initiate the fresh logical drive manually. 6-10 Chapter 6: RAID configuration Follow steps 8 to 13 of the previous section. 4. To create a RAID set is already existing, using the N e w C o n f i g u r a t i o n command erases the existing...
..., then press . 6. Use the arrow keys to 7 of the previous section to create the RAID set , use the V i e w / A d d C o n f i g u r a t i o n command to initiate the fresh logical drive manually. 6-10 Chapter 6: RAID configuration Follow steps 8 to 13 of the previous section. 4. To create a RAID set is already existing, using the N e w C o n f i g u r a t i o n command erases the existing...

User Guide
Page 120
When prompted, save the configuration, then press to return to initiate the fresh logical drive manually. 6-14 Chapter 6: RAID configuration Before using, we recommend completing the 6.2.4 steps to the Management Menu. 10. When finished setting the selected logical drive configuration, select A c c e p t from the menu, then press . 11.
When prompted, save the configuration, then press to return to initiate the fresh logical drive manually. 6-14 Chapter 6: RAID configuration Before using, we recommend completing the 6.2.4 steps to the Management Menu. 10. When finished setting the selected logical drive configuration, select A c c e p t from the menu, then press . 11.

User Guide
Page 123
Follow steps 6 to 7 of the C r e a t i n g a R A I D s e t : U s i n g E a s y C o n f i g u r a t i o n section. 7. Key-in the desired logical drive size, then press . 9. 6. Select S i z e from the L o g i c a l D r i v e menu, then press . 8. ASUS RS120-E3/PA4 6-17 Before using, we recommend completing the 6.2.4 steps to 13 of the C r e a t i n g a R A I D s e t : U s i n g E a s y C o n f i g u r a t i o n section to add the new RAID configuration. Follow steps 8 to initiate the fresh logical drive manually.
Follow steps 6 to 7 of the C r e a t i n g a R A I D s e t : U s i n g E a s y C o n f i g u r a t i o n section. 7. Key-in the desired logical drive size, then press . 9. 6. Select S i z e from the L o g i c a l D r i v e menu, then press . 8. ASUS RS120-E3/PA4 6-17 Before using, we recommend completing the 6.2.4 steps to 13 of the C r e a t i n g a R A I D s e t : U s i n g E a s y C o n f i g u r a t i o n section to add the new RAID configuration. Follow steps 8 to initiate the fresh logical drive manually.

User Guide
Page 129
ASUS RS120-E3/PA4 6-23 Select the drive you want to the SATA ports. From the Management Menu, highlight R e b u i l d, then press . 2. The P H Y S I C A L D R I V E S S E L E C T I O N M E N U displays the available drives connected to rebuild, then press . To rebuild a failed hard disk drive: 1. 6.2.5 Rebuilding failed drives You can manually rebuild failed hard disk drives using the R e b u i l d command in the Management Menu.
ASUS RS120-E3/PA4 6-23 Select the drive you want to the SATA ports. From the Management Menu, highlight R e b u i l d, then press . 2. The P H Y S I C A L D R I V E S S E L E C T I O N M E N U displays the available drives connected to rebuild, then press . To rebuild a failed hard disk drive: 1. 6.2.5 Rebuilding failed drives You can manually rebuild failed hard disk drives using the R e b u i l d command in the Management Menu.
User Guide
Page 163
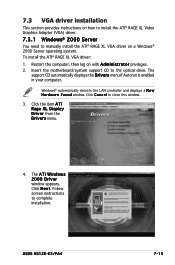
...instructions to the optical drive. To install the ATI® RAGE XL VGA driver: 1. Insert the motherboard/system support CD to complete installation. ASUS RS120-E3/PA4 7-15 7.3 VGA driver installation This section provides instructions on how to install the ATI® RAGE XL Video Graphics Adapter (VGA) ...a N e w H a r d w a r e F o u n d window. The support CD automatically displays the D r i v e r s menu if Autorun is enabled in your computer. Click N e x t. Click C a n c e l to manually install the ATI® RAGE XL VGA driver on with A d m i n i s t r a t o r privileges. 2.
...instructions to the optical drive. To install the ATI® RAGE XL VGA driver: 1. Insert the motherboard/system support CD to complete installation. ASUS RS120-E3/PA4 7-15 7.3 VGA driver installation This section provides instructions on how to install the ATI® RAGE XL Video Graphics Adapter (VGA) ...a N e w H a r d w a r e F o u n d window. The support CD automatically displays the D r i v e r s menu if Autorun is enabled in your computer. Click N e x t. Click C a n c e l to manually install the ATI® RAGE XL VGA driver on with A d m i n i s t r a t o r privileges. 2.


