User Guide
Page 3
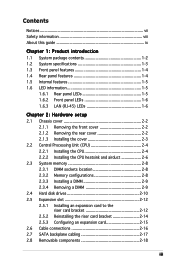
... 1-6 1.6.3 LAN (RJ-45) LEDs 1-6 Chapter 2: Hardware setup 2.1 Chassis cover 2-2 2.1.1 Removing the front cover 2-2 2.1.2 Removing the rear cover 2-2 2.1.3 Installing the cover 2-3 2.2 Central Processing Unit (CPU 2-4 2.2.1 Installing the CPU 2-4 2.2.2 Installing the CPU heatsink and airduct 2-6 2.3 System memory 2-8 2.3.1 DIMM sockets location 2-8 2.3.2 Memory configurations 2-8 2.3.3 Installing a DIMM 2-9 2.3.4 Removing a DIMM 2-9 2.4 Hard disk drives 2-10 2.5 Expansion slot 2-12 2.5.1 Installing an...
... 1-6 1.6.3 LAN (RJ-45) LEDs 1-6 Chapter 2: Hardware setup 2.1 Chassis cover 2-2 2.1.1 Removing the front cover 2-2 2.1.2 Removing the rear cover 2-2 2.1.3 Installing the cover 2-3 2.2 Central Processing Unit (CPU 2-4 2.2.1 Installing the CPU 2-4 2.2.2 Installing the CPU heatsink and airduct 2-6 2.3 System memory 2-8 2.3.1 DIMM sockets location 2-8 2.3.2 Memory configurations 2-8 2.3.3 Installing a DIMM 2-9 2.3.4 Removing a DIMM 2-9 2.4 Hard disk drives 2-10 2.5 Expansion slot 2-12 2.5.1 Installing an...
User Guide
Page 5
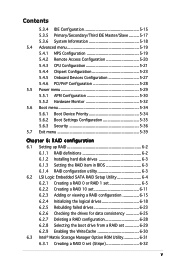
Contents 5.3.4 IDE Configuration 5-15 5.3.5 Primary/Secondary/Third IDE Master/Slave ......... 5-17 5.3.6 System Information 5-18 5.4 Advanced menu 5-19 5.4.1 MPS Configuration 5-19 5.4.2 Remote Access Configuration 5-20 5.4.3 CPU Configuration 5-21 5.4.4 Chipset Configuration 5-23 5.4.5 Onboard Devices Configuration 5-27 5.4.6 PCI/PnP Configuration 5-28 5.5 Power menu 5-29 5.5.1 APM Configuration 5-30 5.5.2 Hardware Monitor 5-32 5.6 Boot menu 5-34 5.6.1 ...
Contents 5.3.4 IDE Configuration 5-15 5.3.5 Primary/Secondary/Third IDE Master/Slave ......... 5-17 5.3.6 System Information 5-18 5.4 Advanced menu 5-19 5.4.1 MPS Configuration 5-19 5.4.2 Remote Access Configuration 5-20 5.4.3 CPU Configuration 5-21 5.4.4 Chipset Configuration 5-23 5.4.5 Onboard Devices Configuration 5-27 5.4.6 PCI/PnP Configuration 5-28 5.5 Power menu 5-29 5.5.1 APM Configuration 5-30 5.5.2 Hardware Monitor 5-32 5.6 Boot menu 5-34 5.6.1 ...
User Guide
Page 12
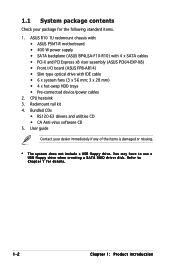
...and PCI Express x8 riser assembly (ASUS PCI64-EXP-X8) • Front I/O board (ASUS FPB-AR14) • Slim type optical drive with IDE cable • 6 x system fans (3 x 56 mm; 3 x 28 mm) • 4 x hot-swap HDD trays • Pre-connected device/power cables 2. Bundled CDs • RS120-E3 drivers and utilities CD •... package contents Check your dealer immediately if any of the items is damaged or missing. * The system does not include a USB floppy drive. CPU heatsink 3. Rackmount rail kit 4. User guide Contact your package for details. 1-2 Chapter 1: Product introduction
...and PCI Express x8 riser assembly (ASUS PCI64-EXP-X8) • Front I/O board (ASUS FPB-AR14) • Slim type optical drive with IDE cable • 6 x system fans (3 x 56 mm; 3 x 28 mm) • 4 x hot-swap HDD trays • Pre-connected device/power cables 2. Bundled CDs • RS120-E3 drivers and utilities CD •... package contents Check your dealer immediately if any of the items is damaged or missing. * The system does not include a USB floppy drive. CPU heatsink 3. Rackmount rail kit 4. User guide Contact your package for details. 1-2 Chapter 1: Product introduction
User Guide
Page 21
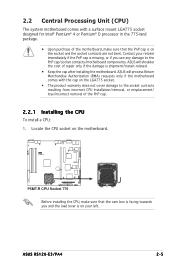
...the motherboard. Locate the CPU socket on the motherboard. ® P5MT-R P5MT-R CPU Socket 775 Before installing the CPU, make sure that the cam box is facing towards you see any damage to the PnP cap/socket contacts/motherboard components. Contact your left. ASUS RS120-E3/PA4 2-5 ASUS will shoulder the cost ...of repair only if the damage is on your retailer immediately if the PnP cap is missing, or if you and the load lever is on the socket and the socket contacts are not bent. ASUS will process Return...
...the motherboard. Locate the CPU socket on the motherboard. ® P5MT-R P5MT-R CPU Socket 775 Before installing the CPU, make sure that the cam box is facing towards you see any damage to the PnP cap/socket contacts/motherboard components. Contact your left. ASUS RS120-E3/PA4 2-5 ASUS will shoulder the cost ...of repair only if the damage is on your retailer immediately if the PnP cap is missing, or if you and the load lever is on the socket and the socket contacts are not bent. ASUS will process Return...
User Guide
Page 22
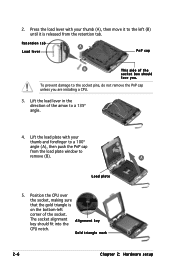
Retention tab A Load lever PnP cap B This side of the socket. Position the CPU over the socket, making sure that the gold triangle is released from the load plate window to the socket pins, do not remove the PnP ... the direction of the arrow to the left corner of the socket box should fit into the CPU notch. Gold triangle mark 2-6 Chapter 2: Hardware setup The socket alignment A l i g n m e n t k e y key should face you are installing a CPU. 3. Press the load lever with your thumb (A), then move it is on the bottom-left (B) until it...
Retention tab A Load lever PnP cap B This side of the socket. Position the CPU over the socket, making sure that the gold triangle is released from the load plate window to the socket pins, do not remove the PnP ... the direction of the arrow to the left corner of the socket box should fit into the CPU notch. Gold triangle mark 2-6 Chapter 2: Hardware setup The socket alignment A l i g n m e n t k e y key should face you are installing a CPU. 3. Press the load lever with your thumb (A), then move it is on the bottom-left (B) until it...
User Guide
Page 23
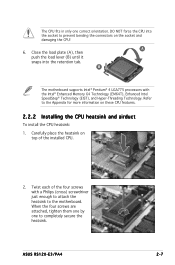
...; Enhanced Memory 64 Technology (EM64T), Enhanced Intel SpeedStep® Technology (EIST), and Hyper-Threading Technology. Carefully place the heatsink on the socket and damaging the CPU! Twist each of the installed CPU. 2. ASUS RS120-E3/PA4 2-7 The CPU fits in only one to the Appendix for more information on these...
...; Enhanced Memory 64 Technology (EM64T), Enhanced Intel SpeedStep® Technology (EIST), and Hyper-Threading Technology. Carefully place the heatsink on the socket and damaging the CPU! Twist each of the installed CPU. 2. ASUS RS120-E3/PA4 2-7 The CPU fits in only one to the Appendix for more information on these...
User Guide
Page 35
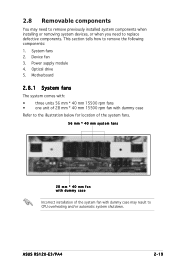
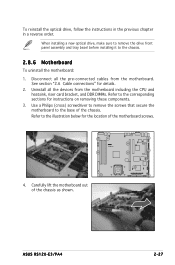
System fans 2. Power supply module 4. ASUS RS120-E3/PA4 2-19 This section tells how to replace defective components. Device fan 3. 2.8 Removable components You may result to CPU overheating and/or automatic system shutdown. Optical drive 5. Motherboard 2.8.1 System fans The system comes with: • three units 56 mm * 40 mm 15500 rpm fans &#...
System fans 2. Power supply module 4. ASUS RS120-E3/PA4 2-19 This section tells how to replace defective components. Device fan 3. 2.8 Removable components You may result to CPU overheating and/or automatic system shutdown. Optical drive 5. Motherboard 2.8.1 System fans The system comes with: • three units 56 mm * 40 mm 15500 rpm fans &#...
User Guide
Page 43
... tray bezel before installing it to the illustration below for the location of the motherboard screws. ® P5MT-R 4. ASUS RS120-E3/PA4 2-27 Uninstall all the pre-connected cables from the motherboard including the CPU and heatsink, riser card bracket, and DDR DIMMs. Refer to the base of the chassis as shown. Carefully lift...
... tray bezel before installing it to the illustration below for the location of the motherboard screws. ® P5MT-R 4. ASUS RS120-E3/PA4 2-27 Uninstall all the pre-connected cables from the motherboard including the CPU and heatsink, riser card bracket, and DDR DIMMs. Refer to the base of the chassis as shown. Carefully lift...
User Guide
Page 53
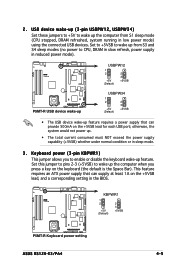
... +5VSB lead for each USB port; Set to +5VSB to wake up from S1 sleep mode (CPU stopped, DRAM refreshed, system running in the BIOS. ® P5MT-R KBPWR1 1 2 +5V (Default) 2 3 +5VSB P5MT-R Keyboard power setting ASUS RS120-E3/PA4 4-5 This feature requires an ATX power supply that can supply at least 1A on the...
... +5VSB lead for each USB port; Set to +5VSB to wake up from S1 sleep mode (CPU stopped, DRAM refreshed, system running in the BIOS. ® P5MT-R KBPWR1 1 2 +5V (Default) 2 3 +5VSB P5MT-R Keyboard power setting ASUS RS120-E3/PA4 4-5 This feature requires an ATX power supply that can supply at least 1A on the...
User Guide
Page 84
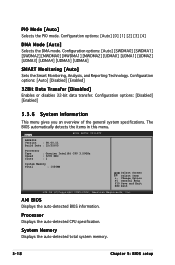
... menu. Main AMIBIOS Version : 08.00.11 Build Date : 12/22/05 BIOS SETUP UTILITY Processor Type Speed Count : Genuine Intel(R) CPU 3.20GHz : 3200 MHz : 1 System Memory Total : 1024MB Select Screen Select Item +- PIO Mode [Auto] Selects the PIO mode. ...of the general system specifications. System Memory Displays the auto-detected total system memory. 5-18 Chapter 5: BIOS setup Processor Displays the auto-detected CPU specification. AMI BIOS Displays the auto-detected BIOS information. Configuration options: [Auto] [SWDMA0] [SWDMA1] [SWDMA2] [MWDMA0] [MWDMA1] ...
... menu. Main AMIBIOS Version : 08.00.11 Build Date : 12/22/05 BIOS SETUP UTILITY Processor Type Speed Count : Genuine Intel(R) CPU 3.20GHz : 3200 MHz : 1 System Memory Total : 1024MB Select Screen Select Item +- PIO Mode [Auto] Selects the PIO mode. ...of the general system specifications. System Memory Displays the auto-detected total system memory. 5-18 Chapter 5: BIOS setup Processor Displays the auto-detected CPU specification. AMI BIOS Displays the auto-detected BIOS information. Configuration options: [Auto] [SWDMA0] [SWDMA1] [SWDMA2] [MWDMA0] [MWDMA1] ...
User Guide
Page 85
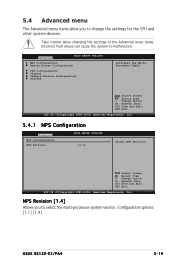
... the settings of the Advanced menu items. Incorrect field values can cause the system to change the settings for the CPU and other system devices. Select Screen Select Item +- Change Option F1 General Help F10 Save and Exit ESC Exit v02... American Megatrends, Inc. 5.4.1 MPS Configuration Advanced MPS Configuration MPS Revision BIOS SETUP UTILITY [1.4] Select MPS Revision. Configuration options: [1.1] [1.4] ASUS RS120-E3/PA4 5-19 5.4 Advanced menu The Advanced menu items allow you to select the multi-processor system version. Advanced BIOS SETUP UTILITY MPS Configuration...
... the settings of the Advanced menu items. Incorrect field values can cause the system to change the settings for the CPU and other system devices. Select Screen Select Item +- Change Option F1 General Help F10 Save and Exit ESC Exit v02... American Megatrends, Inc. 5.4.1 MPS Configuration Advanced MPS Configuration MPS Revision BIOS SETUP UTILITY [1.4] Select MPS Revision. Configuration options: [1.1] [1.4] ASUS RS120-E3/PA4 5-19 5.4 Advanced menu The Advanced menu items allow you to select the multi-processor system version. Advanced BIOS SETUP UTILITY MPS Configuration...
User Guide
Page 87
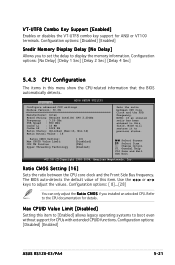
...Delay 2 Sec] [Delay 4 Sec] 5.4.3 CPU Configuration The items in this item. Change Option F1 General Help F10 Save and Exit ESC Exit v02.58 (C)Copyright 1985-2004, American Megatrends, Inc. Configuration options: [Disabled] [Enabled] ASUS RS120-E3/PA4 5-21 Refer to display the memory ...information. Ratio CMOS Setting [16] Sets the ratio between CPU Core Clock and the FSB Frequency. Use the < + > or < - > keys ...
...Delay 2 Sec] [Delay 4 Sec] 5.4.3 CPU Configuration The items in this item. Change Option F1 General Help F10 Save and Exit ESC Exit v02.58 (C)Copyright 1985-2004, American Megatrends, Inc. Configuration options: [Disabled] [Enabled] ASUS RS120-E3/PA4 5-21 Refer to display the memory ...information. Ratio CMOS Setting [16] Sets the ratio between CPU Core Clock and the FSB Frequency. Use the < + > or < - > keys ...

User Guide
Page 88
Configuration options: [Disabled] [Enabled] 5-22 Chapter 5: BIOS setup Refer to enable or disable the processor Hyper-Threading Technology. CPU TM funtion [TM1] Configuration options: [TM1] [TM2] The Hyper-Threading Technology item appears only when you installed a dual-core CPU. Hyper-Threading is not supported when you installed an Intel® Pentium® 4 CPU that supports the Hyper-Threading Technology. Hyper-Threading Technology [Enabled] Allows you to the Appendix for more information on the Hyper-Threading Technology.
Configuration options: [Disabled] [Enabled] 5-22 Chapter 5: BIOS setup Refer to enable or disable the processor Hyper-Threading Technology. CPU TM funtion [TM1] Configuration options: [TM1] [TM2] The Hyper-Threading Technology item appears only when you installed a dual-core CPU. Hyper-Threading is not supported when you installed an Intel® Pentium® 4 CPU that supports the Hyper-Threading Technology. Hyper-Threading Technology [Enabled] Allows you to the Appendix for more information on the Hyper-Threading Technology.
User Guide
Page 99
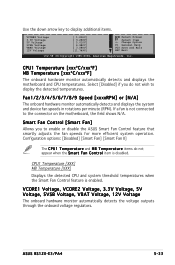
... displays the system and device fan speeds in rotations per minute (RPM). CPU1 Temperature [XXX] MB Temperature [XXX] Displays the detected CPU and system threshold temperatures when the Smart Fan Control feature is disabled. CPU1 Temperature [xxxºC/xxxº..., 12V Voltage The onboard hardware monitor automatically detects the voltage outputs through the onboard voltage regulators. Select [Disabled] if you to display the detected temperatures. ASUS RS120-E3/PA4 5-33 Smart Fan Control [Smart Fan] Allows you do not appear when the S m a r t F a n C o n t r o l item is ...
... displays the system and device fan speeds in rotations per minute (RPM). CPU1 Temperature [XXX] MB Temperature [XXX] Displays the detected CPU and system threshold temperatures when the Smart Fan Control feature is disabled. CPU1 Temperature [xxxºC/xxxº..., 12V Voltage The onboard hardware monitor automatically detects the voltage outputs through the onboard voltage regulators. Select [Disabled] if you to display the detected temperatures. ASUS RS120-E3/PA4 5-33 Smart Fan Control [Smart Fan] Allows you do not appear when the S m a r t F a n C o n t r o l item is ...

User Guide
Page 168
...to the expansion card or add-on the EM64T feature. • Visit www.microsoft.com for the motherboard components and devices from the ASUS website (www.asus.com/support/download/) if you need to verify if the card/device supports a 64-bit system. You can download the latest BIOS file...® XP SP2/Windows® Server 2003 SP1/Linux 2.6 kernel or later versions) A-2 Appendix: Reference information Install an Intel® Pentium® 4 CPU that supports the Intel® EM64T. 2. See Chapter 5 for details. • Visit www.intel.com for more information on Windows® 64-bit OS.
...to the expansion card or add-on the EM64T feature. • Visit www.microsoft.com for the motherboard components and devices from the ASUS website (www.asus.com/support/download/) if you need to verify if the card/device supports a 64-bit system. You can download the latest BIOS file...® XP SP2/Windows® Server 2003 SP1/Linux 2.6 kernel or later versions) A-2 Appendix: Reference information Install an Intel® Pentium® 4 CPU that supports the Intel® EM64T. 2. See Chapter 5 for details. • Visit www.intel.com for more information on Windows® 64-bit OS.

User Guide
Page 169
...p e r t i e s window. Turn on the desktop, then select Properties from the pop-up menu. 6. ASUS RS120-E3/PA4 A-3 item to save your changes and exit the BIOS setup. 5. After the computer restarts, right click on a blank...the Power schemes section, click , then select any option except H o m e / O f f i c e D e s k t o p or Always On. 9. After you adjust the power scheme, the CPU internal frequency slightly decreases when the CPU loading is low. The screen displays and procedures may vary depending on the Monitor power section to the A d v a n c e d M e n u, highlight C P U C o n f i g u...
...p e r t i e s window. Turn on the desktop, then select Properties from the pop-up menu. 6. ASUS RS120-E3/PA4 A-3 item to save your changes and exit the BIOS setup. 5. After the computer restarts, right click on a blank...the Power schemes section, click , then select any option except H o m e / O f f i c e D e s k t o p or Always On. 9. After you adjust the power scheme, the CPU internal frequency slightly decreases when the CPU loading is low. The screen displays and procedures may vary depending on the Monitor power section to the A d v a n c e d M e n u, highlight C P U C o n f i g u...

User Guide
Page 170
... i n g T e c h n o l o g y is supported under Windows® XP/2003 Server and Linux 2.4.x (kernel) and later versions only. If you installed a CPU that supports Hyper-Threading Techonology. 3. Restart the computer. A-4 Appendix: Reference information Using the Hyper-Threading Technology To use the Hyper-Threading compiler to compile the... code. Install an Intel® Pentium® 4 CPU that the item H y p e r - Under the A d v a n c e d M e n u, make sure that ...
... i n g T e c h n o l o g y is supported under Windows® XP/2003 Server and Linux 2.4.x (kernel) and later versions only. If you installed a CPU that supports Hyper-Threading Techonology. 3. Restart the computer. A-4 Appendix: Reference information Using the Hyper-Threading Technology To use the Hyper-Threading compiler to compile the... code. Install an Intel® Pentium® 4 CPU that the item H y p e r - Under the A d v a n c e d M e n u, make sure that ...


