

User Guide
Page 12
... RS100-E5-PI2 ASUS R09 1U Rackmount Chassis ASUS P5BV-M/RS100-E5 Server Board 1 x 220W 80+ Single Power Supply 2 x SATA Cables 1 x PCI Express x16 Riser Card (x8 link) 1 x Front I/O Board (ASUS FPB-R9) 1 x USB Board (ASUS USB-R9) 2 x System Fans (2 x 40x28) 1 x CPU Heatsink 1 x RS100-E5-PI2 User's Guide 1 x ASUS ASWM 2.0 User's Guide 1 x RS100-E5-PI2 Support CD (including ASWM*) 1 x Bag of Screws 1 x AC Power Cable Rackmount Rail...
... RS100-E5-PI2 ASUS R09 1U Rackmount Chassis ASUS P5BV-M/RS100-E5 Server Board 1 x 220W 80+ Single Power Supply 2 x SATA Cables 1 x PCI Express x16 Riser Card (x8 link) 1 x Front I/O Board (ASUS FPB-R9) 1 x USB Board (ASUS USB-R9) 2 x System Fans (2 x 40x28) 1 x CPU Heatsink 1 x RS100-E5-PI2 User's Guide 1 x ASUS ASWM 2.0 User's Guide 1 x RS100-E5-PI2 Support CD (including ASWM*) 1 x Bag of Screws 1 x AC Power Cable Rackmount Rail...

User Guide
Page 39
ASUS RS100-E5-PI2 3-3 Get one side for installation. 3. Orient the rack ear as shown. Select one rack ear and match the four screw holes to the correspoding side of the chassis. Attach the inner rail to the screw holes on each front-side of the chassis and secure with four screws. 5. Make sure the rail is oriented as shown. 4. Locate the four screw holes on the chassis. Secure the rack ear to the rack To attach the rack rails: 1. Repeat steps 2 - 4 to attach the other rack ear. 3.1.2 Attaching the rails to the chassis with three inner rail screws. 2.
ASUS RS100-E5-PI2 3-3 Get one side for installation. 3. Orient the rack ear as shown. Select one rack ear and match the four screw holes to the correspoding side of the chassis. Attach the inner rail to the screw holes on each front-side of the chassis and secure with four screws. 5. Make sure the rail is oriented as shown. 4. Locate the four screw holes on the chassis. Secure the rack ear to the rack To attach the rack rails: 1. Repeat steps 2 - 4 to attach the other rack ear. 3.1.2 Attaching the rails to the chassis with three inner rail screws. 2.
User Guide
Page 41
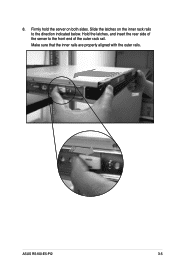
Hold the latches, and insert the rear side of the outer rack rail. ASUS RS100-E5-PI2 3-5 8. Firmly hold the server on the inner rack rails to the front end of the server to the direction indicated below. Make sure that the inner rails are properly aligned with the outer rails. Slide the latches on both sides.
Hold the latches, and insert the rear side of the outer rack rail. ASUS RS100-E5-PI2 3-5 8. Firmly hold the server on the inner rack rails to the front end of the server to the direction indicated below. Make sure that the inner rails are properly aligned with the outer rails. Slide the latches on both sides.