
User Guide
Page 49
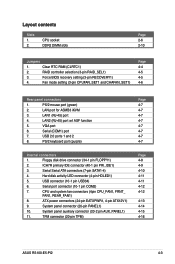
... panel auxiliary connector (20-2 pin AUX_PANEL1) 11. Clear RTC RAM (CLRTC1) 2. ATX power connectors (24-pin EATXPWR1, 4-pin ATX12V1) 9. System panel connector (20-pin PANEL1) 10. TPM connector (20-pin TPM) Page 4-7 4-7 4-7 4-7 4-7 4-7 4-7 4-7 Page 4-8 4-9 4-10 4-11 4-11 4-12 4-12 4-13 4-14 4-15 4-16 ASUS RS100-E5-PI2 4-3 USB connector (10-1 pin USB34) 6. PS/2 keyboard port...
... panel auxiliary connector (20-2 pin AUX_PANEL1) 11. Clear RTC RAM (CLRTC1) 2. ATX power connectors (24-pin EATXPWR1, 4-pin ATX12V1) 9. System panel connector (20-pin PANEL1) 10. TPM connector (20-pin TPM) Page 4-7 4-7 4-7 4-7 4-7 4-7 4-7 4-7 Page 4-8 4-9 4-10 4-11 4-11 4-12 4-12 4-13 4-14 4-15 4-16 ASUS RS100-E5-PI2 4-3 USB connector (10-1 pin USB34) 6. PS/2 keyboard port...

User Guide
Page 50
...memory of date, time, and system setup parameters by erasing the CMOS RTC RAM data. After the CMOS clearance, reinstall the battery. ® P5BV-M/RS100-E5 CLRTC1 12 23 Normal (Default) P5BV-M/RS100-E5 Clear RTC RAM Clear CMOS • You do not help, remove the onboard battery and ...move the cap back to clear the CMOS RTC RAM data. You can automatically reset parameter settings to default...
...memory of date, time, and system setup parameters by erasing the CMOS RTC RAM data. After the CMOS clearance, reinstall the battery. ® P5BV-M/RS100-E5 CLRTC1 12 23 Normal (Default) P5BV-M/RS100-E5 Clear RTC RAM Clear CMOS • You do not help, remove the onboard battery and ...move the cap back to clear the CMOS RTC RAM data. You can automatically reset parameter settings to default...
User Guide
Page 70
...performance. 5.2 BIOS setup program This motherboard supports a programmable firmware chip that the computer can recognize these changes and record them in the CMOS RAM of your computer in the future. Use the BIOS Setup program when you can update using this motherboard. 5-8 Chapter 5: BIOS setup This... section explains how to "Run Setup". The firmware hub on your screen. • Visit the ASUS website (www.asus.com) to use the Setup program, you are for this utility. When you start up the computer, the system provides you wish to...
...performance. 5.2 BIOS setup program This motherboard supports a programmable firmware chip that the computer can recognize these changes and record them in the CMOS RAM of your computer in the future. Use the BIOS Setup program when you can update using this motherboard. 5-8 Chapter 5: BIOS setup This... section explains how to "Run Setup". The firmware hub on your screen. • Visit the ASUS website (www.asus.com) to use the Setup program, you are for this utility. When you start up the computer, the system provides you wish to...

User Guide
Page 92
... Boot Security Settings Supervisor Password User Password : Not Installed : Not Installed Change Supervisor Password Change User Password to erase the RTC RAM. After you have set a supervisor password, the other security settings. 5-30 Chapter 5: BIOS setup Confirm the password when prompted.... appears after you to change other items appear to allow you can clear it by erasing the CMOS Real Time Clock (RTC) RAM. The message "Password Uninstalled" appears. Change Supervisor Password Select this item shows Installed. Select an item then press to disable password...
... Boot Security Settings Supervisor Password User Password : Not Installed : Not Installed Change Supervisor Password Change User Password to erase the RTC RAM. After you have set a supervisor password, the other security settings. 5-30 Chapter 5: BIOS setup Confirm the password when prompted.... appears after you to change other items appear to allow you can clear it by erasing the CMOS Real Time Clock (RTC) RAM. The message "Password Uninstalled" appears. Change Supervisor Password Select this item shows Installed. Select an item then press to disable password...

User Guide
Page 94
... +- Discard Changes This option allows you to discard the selections you made changes to fields other changes before saving the values to the non-volatile RAM. 5-32 Chapter 5: BIOS setup After selecting this menu. Select YES to save changes and exit. Pressing does not immediately exit this option, ...ensure the values you selected are finished making your changes, the program prompts you with a message asking if you are saved to the CMOS RAM. Change Option F1 General Help F10 Save and Exit ESC Exit v02.58 (C)Copyright 1985-2007, American Megatrends, Inc. Exit & Save Changes...
... +- Discard Changes This option allows you to discard the selections you made changes to fields other changes before saving the values to the non-volatile RAM. 5-32 Chapter 5: BIOS setup After selecting this menu. Select YES to save changes and exit. Pressing does not immediately exit this option, ...ensure the values you selected are finished making your changes, the program prompts you with a message asking if you are saved to the CMOS RAM. Change Option F1 General Help F10 Save and Exit ESC Exit v02.58 (C)Copyright 1985-2007, American Megatrends, Inc. Exit & Save Changes...


