
User Guide
Page 3
... a DIMM 2-11 2.5 Replaceable components 2-12 2.5.1 Installing the chassis fans 2-12 2.5.2 Installing Serial ATA drives 2-13 2.5.3 Installing optical disk drive (ODD 2-17 Chapter 3: Installation options 3.1 Rackmount rail kit items 3-2 iii
... a DIMM 2-11 2.5 Replaceable components 2-12 2.5.1 Installing the chassis fans 2-12 2.5.2 Installing Serial ATA drives 2-13 2.5.3 Installing optical disk drive (ODD 2-17 Chapter 3: Installation options 3.1 Rackmount rail kit items 3-2 iii
User Guide
Page 4
Contents 3.1.1 Attaching the rack ears 3-2 3.1.2 Attaching the rails to the rack 3-3 3.2 Rackmount bracket kit (Optional 3-7 3.2.1 Attaching the long rack ears 3-7 3.2.2 Attaching... Connectors 4-7 4.3.1 Rear panel connectors 4-7 4.3.2 Internal connectors 4-8 Chapter 5: BIOS setup 5.1 Managing and updating your BIOS 5-2 5.1.1 Creating a bootable floppy disk 5-2 5.1.2 AFUDOS utility 5-3 5.1.3 ASUS CrashFree BIOS 3 utility 5-6 5.2 BIOS setup program 5-8 5.2.1 BIOS menu screen 5-9 5.2.2 Menu bar 5-9 5.2.3 Navigation keys 5-9 5.2.4 Menu items 5-10 5.2.5 Sub-menu items 5-10 5.2.6 ...
Contents 3.1.1 Attaching the rack ears 3-2 3.1.2 Attaching the rails to the rack 3-3 3.2 Rackmount bracket kit (Optional 3-7 3.2.1 Attaching the long rack ears 3-7 3.2.2 Attaching... Connectors 4-7 4.3.1 Rear panel connectors 4-7 4.3.2 Internal connectors 4-8 Chapter 5: BIOS setup 5.1 Managing and updating your BIOS 5-2 5.1.1 Creating a bootable floppy disk 5-2 5.1.2 AFUDOS utility 5-3 5.1.3 ASUS CrashFree BIOS 3 utility 5-6 5.2 BIOS setup program 5-8 5.2.1 BIOS menu screen 5-9 5.2.2 Menu bar 5-9 5.2.3 Navigation keys 5-9 5.2.4 Menu items 5-10 5.2.5 Sub-menu items 5-10 5.2.6 ...

User Guide
Page 12
...) 1 x Front I/O Board (ASUS FPB-R9) 1 x USB Board (ASUS USB-R9) 2 x System Fans (2 x 40x28) 1 x CPU Heatsink 1 x RS100-E5-PI2 User's Guide 1 x ASUS ASWM 2.0 User's Guide 1 x RS100-E5-PI2 Support CD (including ASWM*) 1 x Bag of Screws 1 x AC Power Cable Rackmount Rail Kit Slim-type Optical Device CA ...eTrust Anti-virus Software CD *ASUS System Web-based Management If any of the...
...) 1 x Front I/O Board (ASUS FPB-R9) 1 x USB Board (ASUS USB-R9) 2 x System Fans (2 x 40x28) 1 x CPU Heatsink 1 x RS100-E5-PI2 User's Guide 1 x ASUS ASWM 2.0 User's Guide 1 x RS100-E5-PI2 Support CD (including ASWM*) 1 x Bag of Screws 1 x AC Power Cable Rackmount Rail Kit Slim-type Optical Device CA ...eTrust Anti-virus Software CD *ASUS System Web-based Management If any of the...

User Guide
Page 38
To attach rack ears: 1. Outer rails Inner rails Rack screws Inner rail screws 3.1.1 Attaching the rack ears The bundled rack ears serve as handle when inserting or pulling the server from a rack cabinet. 3.1 Rackmount rail kit items The rackmount rail kit contains two pairs of rails (one pair for each side of the server system), six (6) pieces of inner rail screws, and two (2) pieces of eight (8) screws. Prepare the bundled pair of rack ears and set of rack screws. Pair of rack ears 3-2 Chapter 3: Installation options
To attach rack ears: 1. Outer rails Inner rails Rack screws Inner rail screws 3.1.1 Attaching the rack ears The bundled rack ears serve as handle when inserting or pulling the server from a rack cabinet. 3.1 Rackmount rail kit items The rackmount rail kit contains two pairs of rails (one pair for each side of the server system), six (6) pieces of inner rail screws, and two (2) pieces of eight (8) screws. Prepare the bundled pair of rack ears and set of rack screws. Pair of rack ears 3-2 Chapter 3: Installation options

User Guide
Page 39
2. Secure the rack ear to the rack To attach the rack rails: 1. Get one side for installation. 3. Orient the rack ear as shown. Repeat steps 2 - 4 to attach the other rack ear. 3.1.2 Attaching the rails to the chassis with three inner rail screws. Make sure the rail is oriented as shown. 4. ASUS RS100-E5-PI2 3-3 Attach the inner rail to the screw holes on each front-side of the chassis and secure with four screws. 5. Select one rack ear and match the four screw holes to the correspoding side of the chassis. Locate the four screw holes on the chassis.
2. Secure the rack ear to the rack To attach the rack rails: 1. Get one side for installation. 3. Orient the rack ear as shown. Repeat steps 2 - 4 to attach the other rack ear. 3.1.2 Attaching the rails to the chassis with three inner rail screws. Make sure the rail is oriented as shown. 4. ASUS RS100-E5-PI2 3-3 Attach the inner rail to the screw holes on each front-side of the chassis and secure with four screws. 5. Select one rack ear and match the four screw holes to the correspoding side of the chassis. Locate the four screw holes on the chassis.

User Guide
Page 40
Attach the second inner rail to the other outer rail. 3-4 Chapter 3: Installation options Select one unit of space (1U) on the front and three at the front and rear of the rack cabinet . 7. Place three (3) ... screws. 6. 2. Do the same to fit the length of the chassis and secure with two screws at the back. Adjust the length of the outer rail to the corresponding side of the rack cabinet then repeat steps 5 and 6 to install the server. 4. Find the corresponding 1U space on the other side...
Attach the second inner rail to the other outer rail. 3-4 Chapter 3: Installation options Select one unit of space (1U) on the front and three at the front and rear of the rack cabinet . 7. Place three (3) ... screws. 6. 2. Do the same to fit the length of the chassis and secure with two screws at the back. Adjust the length of the outer rail to the corresponding side of the rack cabinet then repeat steps 5 and 6 to install the server. 4. Find the corresponding 1U space on the other side...
User Guide
Page 41
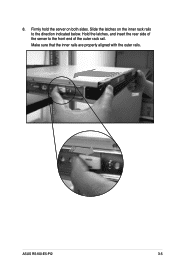
Hold the latches, and insert the rear side of the server to the direction indicated below. Slide the latches on both sides. Make sure that the inner rails are properly aligned with the outer rails. Firmly hold the server on the inner rack rails to the front end of the outer rack rail. ASUS RS100-E5-PI2 3-5 8.
Hold the latches, and insert the rear side of the server to the direction indicated below. Slide the latches on both sides. Make sure that the inner rails are properly aligned with the outer rails. Firmly hold the server on the inner rack rails to the front end of the outer rack rail. ASUS RS100-E5-PI2 3-5 8.
