
User Guide
Page 5
... 5-29 5.6.3 Security 5-30 5.7 Exit menu 5-32 Chapter 6: RAID configuration 6.1 RAID configurations 6-2 6.1.1 RAID definitions 6-2 6.1.2 Installing Serial ATA hard disks 6-3 6.1.3 Setting the RAID item in BIOS 6-3 6.1.4 RAID configuration utility 6-3 6.2 Intel® Matrix Storage Manager Option ROM Utility 6-4 6.2.1 Creating a RAID 0 set (striped 6-5 6.2.2 Creating a RAID 1 set (mirrored 6-6 6.2.3 Deleting a RAID set 6-7 6.2.4 6.2.5 Resetting Disks to Non-RAID 6-8 Exiting the Intel® Matrix Storage Manager utility...
... 5-29 5.6.3 Security 5-30 5.7 Exit menu 5-32 Chapter 6: RAID configuration 6.1 RAID configurations 6-2 6.1.1 RAID definitions 6-2 6.1.2 Installing Serial ATA hard disks 6-3 6.1.3 Setting the RAID item in BIOS 6-3 6.1.4 RAID configuration utility 6-3 6.2 Intel® Matrix Storage Manager Option ROM Utility 6-4 6.2.1 Creating a RAID 0 set (striped 6-5 6.2.2 Creating a RAID 1 set (mirrored 6-6 6.2.3 Deleting a RAID set 6-7 6.2.4 6.2.5 Resetting Disks to Non-RAID 6-8 Exiting the Intel® Matrix Storage Manager utility...

User Guide
Page 6
... drives 6-18 Rebuilding failed drives 6-23 Checking the drives for data consistency 6-25 Deleting a RAID configuration 6-28 Selecting the boot drive from a RAID set 6-29 Enabling the WriteCache 6-30 Chapter 7: Driver installation 7.1 RAID driver installation 7-2 7.1.1 Creating a RAID driver disk 7-2 7.1.2 Installing the RAID controller driver 7-4 7.2 LAN driver installation 7-14 7.2.1 Windows® Server 7-14 7.2.2 Red Hat®...
... drives 6-18 Rebuilding failed drives 6-23 Checking the drives for data consistency 6-25 Deleting a RAID configuration 6-28 Selecting the boot drive from a RAID set 6-29 Enabling the WriteCache 6-30 Chapter 7: Driver installation 7.1 RAID driver installation 7-2 7.1.1 Creating a RAID driver disk 7-2 7.1.2 Installing the RAID controller driver 7-4 7.2 LAN driver installation 7-14 7.2.1 Windows® Server 7-14 7.2.2 Red Hat®...
User Guide
Page 9
... the necessary drivers for system integrators, and experienced users with the server. Chapter 1: Product Introduction This chapter describes the general features of configuring a server. Chapter 6: RAID configuration This chapter tells how to when configuring the motherboard. Chapter 2: Hardware setup This chapter lists the hardware setup procedures that comes with at least...
... the necessary drivers for system integrators, and experienced users with the server. Chapter 1: Product Introduction This chapter describes the general features of configuring a server. Chapter 6: RAID configuration This chapter tells how to when configuring the motherboard. Chapter 2: Hardware setup This chapter lists the hardware setup procedures that comes with at least...
User Guide
Page 13
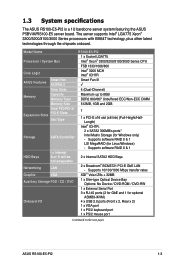
... MegaRAID (for Windows only) - Supports software RAID 0 & 1 2 x Internal SATA2 HDD Bays 2 x Broadcom® BCM5721 PCI-E GbE LAN - 1.3 System specifications The ASUS RS100-E5-PI2 is a 1U barebone server system featuring the ASUS P5BV-M/RS100-E5 server board. Model Name Processor / System Bus Core Logic ASUS Features Smart Fan ASWM2.0 Total Slots Memory Capacity Memory Type Memory Size ... (2 for GbE and 1 for optional ASMB3-iKVM) 4 x USB 2.0 ports (Front x 2, Rear x 2) 1 x VGA port 1 x PS/2 keyboard port 1 x PS/2 mouse port (continued on the next page) ASUS RS100-E5-PI2 1-3
... MegaRAID (for Windows only) - Supports software RAID 0 & 1 2 x Internal SATA2 HDD Bays 2 x Broadcom® BCM5721 PCI-E GbE LAN - 1.3 System specifications The ASUS RS100-E5-PI2 is a 1U barebone server system featuring the ASUS P5BV-M/RS100-E5 server board. Model Name Processor / System Bus Core Logic ASUS Features Smart Fan ASWM2.0 Total Slots Memory Capacity Memory Type Memory Size ... (2 for GbE and 1 for optional ASMB3-iKVM) 4 x USB 2.0 ports (Front x 2, Rear x 2) 1 x VGA port 1 x PS/2 keyboard port 1 x PS/2 mouse port (continued on the next page) ASUS RS100-E5-PI2 1-3
User Guide
Page 49
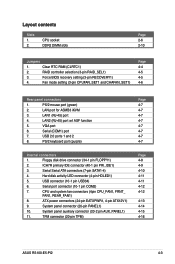
Clear RTC RAM (CLRTC1) 2. Fan mode setting (3-pin CPUFAN_SET1 and CHAFAN_SET1) Page 4-4 4-5 4-5 4-6 Rear panel connectors 1. LAN port for ASMB3 iKVM 3. LAN2 (RJ-45) port w/i ASF... 7. Hard disk activity LED connector (4-pin HDLED1) 5. Layout contents Slots 1. 2. LAN1 (RJ-45) port 4. RAID controller selection (3-pin RAID_SEL1) 3. System panel auxiliary connector (20-2 pin AUX_PANEL1) 11. VGA port 6. TPM connector (20-pin TPM) Page 4-7 4-7 4-7 4-7 4-7 4-7 4-7 4-7 Page 4-8 4-9 4-10 4-11 4-11 4-12 4-12 4-13 4-14 4-15 4-16 ASUS RS100-E5-PI2 4-3
Clear RTC RAM (CLRTC1) 2. Fan mode setting (3-pin CPUFAN_SET1 and CHAFAN_SET1) Page 4-4 4-5 4-5 4-6 Rear panel connectors 1. LAN port for ASMB3 iKVM 3. LAN2 (RJ-45) port w/i ASF... 7. Hard disk activity LED connector (4-pin HDLED1) 5. Layout contents Slots 1. 2. LAN1 (RJ-45) port 4. RAID controller selection (3-pin RAID_SEL1) 3. System panel auxiliary connector (20-2 pin AUX_PANEL1) 11. VGA port 6. TPM connector (20-pin TPM) Page 4-7 4-7 4-7 4-7 4-7 4-7 4-7 4-7 Page 4-8 4-9 4-10 4-11 4-11 4-12 4-12 4-13 4-14 4-15 4-16 ASUS RS100-E5-PI2 4-3
User Guide
Page 51
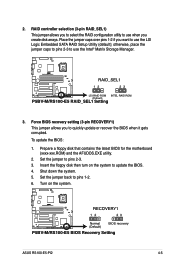
...the jumper to pins 1-2. 6. 2. Insert the floppy disk then turn on the system. ® P5BV-M/RS100-E5 RECOVERY1 12 23 Normal (Default) BIOS recovery P5BV-M/RS100-E5 BIOS Recovery Setting ASUS RS100-E5-PI2 4-5 otherwise, place the jumper caps to pins 2-3 to update the BIOS. 4. Prepare a floppy ...RAID_SEL1) This jumper allows you to select the RAID configuration utility to use when you to use the Intel® Matrix Storage Manager. ® P5BV-M/RS100-E5 RAID_SEL1 12 23 LSI RAID ROM INTEL RAID ROM (Default) P5BV-M/RS100-E5 RAID_SEL1 Setting 3. Place the jumper caps over...
...the jumper to pins 1-2. 6. 2. Insert the floppy disk then turn on the system. ® P5BV-M/RS100-E5 RECOVERY1 12 23 Normal (Default) BIOS recovery P5BV-M/RS100-E5 BIOS Recovery Setting ASUS RS100-E5-PI2 4-5 otherwise, place the jumper caps to pins 2-3 to update the BIOS. 4. Prepare a floppy ...RAID_SEL1) This jumper allows you to select the RAID configuration utility to use when you to use the Intel® Matrix Storage Manager. ® P5BV-M/RS100-E5 RAID_SEL1 12 23 LSI RAID ROM INTEL RAID ROM (Default) P5BV-M/RS100-E5 RAID_SEL1 Setting 3. Place the jumper caps over...
User Guide
Page 56
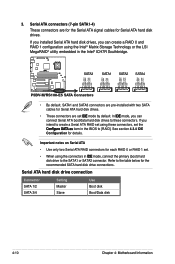
...IDE mode by default. If you can create a RAID 0 and RAID 1 configuration using the Intel® Matrix Storage Technology or the LSI MegaRAID® utility embedded in the Intel® ICH7R Southbridge. ® P5BV-M/RS100-E5 SATA3 SATA1 SATA2 SATA4 GND RSATA_RXN2 RSATA_RXP2 GND RSATA_TXN2... RSATA_RXN1 RSATA_RXP1 GND RSATA_TXN1 RSATA_TXP1 GND GND RSATA_RXN3 RSATA_RXP3 GND RSATA_TXN3 RSATA_TXP3 GND GND RSATA_RXN4 RSATA_RXP4 GND RSATA_TXN4 RSATA_TXP4 GND P5BV-M/RS100-E5 SATA Connectors • By default, SATA1 and SATA3 connectors are pre-installed with two SATA cables for Serial ATA hard...
...IDE mode by default. If you can create a RAID 0 and RAID 1 configuration using the Intel® Matrix Storage Technology or the LSI MegaRAID® utility embedded in the Intel® ICH7R Southbridge. ® P5BV-M/RS100-E5 SATA3 SATA1 SATA2 SATA4 GND RSATA_RXN2 RSATA_RXP2 GND RSATA_TXN2... RSATA_RXN1 RSATA_RXP1 GND RSATA_TXN1 RSATA_TXP1 GND GND RSATA_RXN3 RSATA_RXP3 GND RSATA_TXN3 RSATA_TXP3 GND GND RSATA_RXN4 RSATA_RXP4 GND RSATA_TXN4 RSATA_TXP4 GND P5BV-M/RS100-E5 SATA Connectors • By default, SATA1 and SATA3 connectors are pre-installed with two SATA cables for Serial ATA hard...

User Guide
Page 75
... [IDE] This sub-item appears only when you to enable or disable the HDD Self-Monitoring Analysis and Reporting Technology (SMART) feature. Configuration options: [IDE] [RAID] [AHCI] ASUS RS100-E5-PI2 5-13 Configuration options: [Auto] [0] [1] [2] [3] [4] DMA Mode [Auto] Selects the DMA mode. Change Option F1 General Help F10 Save and Exit ESC Exit v02...
... [IDE] This sub-item appears only when you to enable or disable the HDD Self-Monitoring Analysis and Reporting Technology (SMART) feature. Configuration options: [IDE] [RAID] [AHCI] ASUS RS100-E5-PI2 5-13 Configuration options: [Auto] [0] [1] [2] [3] [4] DMA Mode [Auto] Selects the DMA mode. Change Option F1 General Help F10 Save and Exit ESC Exit v02...

User Guide
Page 76
... Serial ATA hard disk drives as Parallel ATA physical storage devices, keep the default setting [IDE]. • If you want to create a RAID 0, RAID 1, RAID 5, RAID 10, or the Intel® Matrix Storage Technology configuration from the Serial ATA hard disk drives, set this item to [AHCI]. This will... IDE Channels [PATA Pri, SATA Sec] This sub-item appears only when you set the ATA/IDE Configuration item to [Compatible] and allows you to [RAID]. Configuration options: [0] [5] [10] [15] [20] [25] [30] [35] ATA(PI) 80Pin Cable Detection [Host] Selects the mechanism for detecting ATA/ATAPI...
... Serial ATA hard disk drives as Parallel ATA physical storage devices, keep the default setting [IDE]. • If you want to create a RAID 0, RAID 1, RAID 5, RAID 10, or the Intel® Matrix Storage Technology configuration from the Serial ATA hard disk drives, set this item to [AHCI]. This will... IDE Channels [PATA Pri, SATA Sec] This sub-item appears only when you set the ATA/IDE Configuration item to [Compatible] and allows you to [RAID]. Configuration options: [0] [5] [10] [15] [20] [25] [30] [35] ATA(PI) 80Pin Cable Detection [Host] Selects the mechanism for detecting ATA/ATAPI...

User Guide
Page 95
RAID Configuration Chapter 6 This chapter provides instructions for setting up, creating and configuring RAID sets using the available utilities. ASUS RS100-E5-PI2 6-1
RAID Configuration Chapter 6 This chapter provides instructions for setting up, creating and configuring RAID sets using the available utilities. ASUS RS100-E5-PI2 6-1

User Guide
Page 96
...identical hard disk drives. The Intel® Matrix Storage technology supported by the ICH7R chip allows you to create a virtual RAID 0 and RAID 1 sets. If you want to boot the system from the support CD to a floppy disk before you to the ... and write data in parallel, interleaved stacks. If one drive to section 7.1 RAID driver installation for details. 6-2 Chapter 6: RAID Configuration Intel® Matrix Storage. The motherboard supports the following RAID configurations: 6.1.1 RAID definitions RAID 0 (Data striping) optimizes two identical hard disk drives to the entire system....
...identical hard disk drives. The Intel® Matrix Storage technology supported by the ICH7R chip allows you to create a virtual RAID 0 and RAID 1 sets. If you want to boot the system from the support CD to a floppy disk before you to the ... and write data in parallel, interleaved stacks. If one drive to section 7.1 RAID driver installation for details. 6-2 Chapter 6: RAID Configuration Intel® Matrix Storage. The motherboard supports the following RAID configurations: 6.1.1 RAID definitions RAID 0 (Data striping) optimizes two identical hard disk drives to the entire system....

User Guide
Page 97
... entering and navigating through the BIOS Setup. 6.1.4 RAID configuration utility Depending on each drive. 6.1.3 Setting the RAID item in BIOS You must set the RAID item in the BIOS Setup before you can create a RAID set under Windows® Server or Red Hat...press . 3. Go to create a RAID 0 or RAID 1 under Windows® Server operating system. Connect a SATA power cable to create a RAID 0 or RAID 1 set (s). Select the item Configure SATA As, then press to create a RAID set. Refer to Chapter 5 for a RAID configuration: 1. ASUS RS100-E5-PI2 6-3 6.1.2 Installing Serial ATA ...
... entering and navigating through the BIOS Setup. 6.1.4 RAID configuration utility Depending on each drive. 6.1.3 Setting the RAID item in BIOS You must set the RAID item in the BIOS Setup before you can create a RAID set under Windows® Server or Red Hat...press . 3. Go to create a RAID 0 or RAID 1 under Windows® Server operating system. Connect a SATA power cable to create a RAID 0 or RAID 1 set (s). Select the item Configure SATA As, then press to create a RAID set. Refer to Chapter 5 for a RAID configuration: 1. ASUS RS100-E5-PI2 6-3 6.1.2 Installing Serial ATA ...

User Guide
Page 98
... ] Physical Disks: Port Drive Model 0 Hitachi HDS72161 3 Hitachi HDS72161 Serial # PVB300Z2R93D3D PVB300Z2R93D3D Size Type/Status(Vol ID) 153.4GB Non-RAID Disk 153.4GB Non-RAID Disk [↑↓]-Select [ESC]-Exit [ENTER]-Select Menu The navigation keys at the bottom of the screen allow you to create... RAID 0 or RAID 1 from Serial ATA hard disk drives that are for reference only and may not exactly match the items on the system. ...
... ] Physical Disks: Port Drive Model 0 Hitachi HDS72161 3 Hitachi HDS72161 Serial # PVB300Z2R93D3D PVB300Z2R93D3D Size Type/Status(Vol ID) 153.4GB Non-RAID Disk 153.4GB Non-RAID Disk [↑↓]-Select [ESC]-Exit [ENTER]-Select Menu The navigation keys at the bottom of the screen allow you to create... RAID 0 or RAID 1 from Serial ATA hard disk drives that are for reference only and may not exactly match the items on the system. ...

User Guide
Page 99
... key to select the stripe size for multimedia computer systems used to uniquely identify the RAID volume. 6.2.1 Creating a RAID 0 set (striped) To create a RAID 0 set , then press . 3. The available stripe size values range from 8 ...ROM v5.6.2.1002 ICH7R wRAID5 Copyright(C) 2003-06 Intel Corporation. All Rights Reserved. [ CREATE ARRAY MENU ] Name: RAID Level: Disks: Strip Size: Capacity: Volume0 RAID0(Stripe) Select Disks 128KB 306.8 GB Create Volume [ DISK/... 5. Press when the Create Volume item is 128 KB. ASUS RS100-E5-PI2 6-5 The default stripe size is highlighted.
... key to select the stripe size for multimedia computer systems used to uniquely identify the RAID volume. 6.2.1 Creating a RAID 0 set (striped) To create a RAID 0 set , then press . 3. The available stripe size values range from 8 ...ROM v5.6.2.1002 ICH7R wRAID5 Copyright(C) 2003-06 Intel Corporation. All Rights Reserved. [ CREATE ARRAY MENU ] Name: RAID Level: Disks: Strip Size: Capacity: Volume0 RAID0(Stripe) Select Disks 128KB 306.8 GB Create Volume [ DISK/... 5. Press when the Create Volume item is 128 KB. ASUS RS100-E5-PI2 6-5 The default stripe size is highlighted.

User Guide
Page 100
...) Select Disks N/A XX.X GB Create Volume [ HELP ] Enter a string between 1 and 16 characters in the RAID volume capacity that can be used to select RAID 1(Mirror), then press . 4. When the Capacity item is case sensitive and cannot contain special characters. [↑↓]-...up/down arrow key to uniquely identify the RAID volume. 6.2.2 Creating a RAID 1 set (mirrored) To create a RAID 1 set , then press . 3. Intel(R) Matrix Storage Manager Option ROM v5.6.2.1002 ICH7R wRAID5 Copyright(C) 2003-06 Intel Corporation. Create RAID Volume, then press . The default value indicates...
...) Select Disks N/A XX.X GB Create Volume [ HELP ] Enter a string between 1 and 16 characters in the RAID volume capacity that can be used to select RAID 1(Mirror), then press . 4. When the Capacity item is case sensitive and cannot contain special characters. [↑↓]-...up/down arrow key to uniquely identify the RAID volume. 6.2.2 Creating a RAID 1 set (mirrored) To create a RAID 1 set , then press . 3. Intel(R) Matrix Storage Manager Option ROM v5.6.2.1002 ICH7R wRAID5 Copyright(C) 2003-06 Intel Corporation. Create RAID Volume, then press . The default value indicates...

User Guide
Page 101
...the Delete Volume menu. Use the up/down arrow key to select the RAID set . otherwise, press to return to become available as non-RAID disks. 6.2.3 Deleting a RAID set Take caution when deleting a RAID set you want to display this screen. WARNING: EXISTING DATA WITHIN THIS VOLUME... on the hard disk drives when you want to delete, then press . To delete a RAID set: 1. This window appears. [ DELETE VOLUME VERIFICATION ] ALL DATA IN THE VOLUME WILL BE LOST! ASUS RS100-E5-PI2 6-7 Intel(R) Matrix Storage Manager Option ROM v5.6.2.1002 ICH7R wRAID5 Copyright(C) 2003-06 Intel...
...the Delete Volume menu. Use the up/down arrow key to select the RAID set . otherwise, press to return to become available as non-RAID disks. 6.2.3 Deleting a RAID set Take caution when deleting a RAID set you want to display this screen. WARNING: EXISTING DATA WITHIN THIS VOLUME... on the hard disk drives when you want to delete, then press . To delete a RAID set: 1. This window appears. [ DELETE VOLUME VERIFICATION ] ALL DATA IN THE VOLUME WILL BE LOST! ASUS RS100-E5-PI2 6-7 Intel(R) Matrix Storage Manager Option ROM v5.6.2.1002 ICH7R wRAID5 Copyright(C) 2003-06 Intel...

User Guide
Page 102
.../Next [SPACE]-Selects [ENTER]-Selection Complete 2. Press to exit or press to return to the utility main menu. 5. Resetting a RAID volume HDD deletes all data on the drive. Port Drive Model Serial # Size Status 0 XXXXXXXXXXXX XXXXXXXX XX.XGB Member Disk 1 ...reset the drive or press to return to the utility main menu. 6-8 Chapter 6: RAID Configuration Press to reset the RAID set drive you reset a RAID volume HDD to non-RAID. 6.2.4 Resetting Disks to Non-RAID Take caution before you want to exit? (Y/N): 2. This window appears. [ CONFIRM ...
.../Next [SPACE]-Selects [ENTER]-Selection Complete 2. Press to exit or press to return to the utility main menu. 5. Resetting a RAID volume HDD deletes all data on the drive. Port Drive Model Serial # Size Status 0 XXXXXXXXXXXX XXXXXXXX XX.XGB Member Disk 1 ...reset the drive or press to return to the utility main menu. 6-8 Chapter 6: RAID Configuration Press to reset the RAID set drive you reset a RAID volume HDD to non-RAID. 6.2.4 Resetting Disks to Non-RAID Take caution before you want to exit? (Y/N): 2. This window appears. [ CONFIRM ...

User Guide
Page 103
...HDS72161 3 Hitachi HDS72161 Serial # PVB300Z2R93D3D PVB300Z2R93D3D Size Type/Status(Vol ID) 153.4GB Non-RAID Disk 153.4GB Non-RAID Disk [↑↓]-Select [ESC]-Exit [ENTER]-Select Menu ASUS RS100-E5-PI2 6-9 Press , then use up/down arrow keys to select the destination disk or ...press to rebuild the RAID. If there is changed to exit): Port Drive Model 3HDS722580VLSA80 Serial# VN6Bxxxx Size 76....
...HDS72161 3 Hitachi HDS72161 Serial # PVB300Z2R93D3D PVB300Z2R93D3D Size Type/Status(Vol ID) 153.4GB Non-RAID Disk 153.4GB Non-RAID Disk [↑↓]-Select [ESC]-Exit [ENTER]-Select Menu ASUS RS100-E5-PI2 6-9 Press , then use up/down arrow keys to select the destination disk or ...press to rebuild the RAID. If there is changed to exit): Port Drive Model 3HDS722580VLSA80 Serial# VN6Bxxxx Size 76....

User Guide
Page 104
...the same specification into the same SATA Port. Go to "Normal". When the confirmation window appears, select OK, then press . 6-10 Chapter 6: RAID Configuration Use up/down arrow keys to view the rebuilding status. From the Exit menu, select Exit & Save Changes, then press . 5. From the... Set at least one of the Intel Matrix Storage Console. 7. Reboot the system and press to 5.6.1 Boot Device Priority for your RAID arrays when creating multi-RAID using the Intel® Matrix Storage Manager. Refer to enter the BIOS setup utility during POST. Select Start > Programs > Intel Matrix...
...the same specification into the same SATA Port. Go to "Normal". When the confirmation window appears, select OK, then press . 6-10 Chapter 6: RAID Configuration Use up/down arrow keys to view the rebuilding status. From the Exit menu, select Exit & Save Changes, then press . 5. From the... Set at least one of the Intel Matrix Storage Console. 7. Reboot the system and press to 5.6.1 Boot Device Priority for your RAID arrays when creating multi-RAID using the Intel® Matrix Storage Manager. Refer to enter the BIOS setup utility during POST. Select Start > Programs > Intel Matrix...
User Guide
Page 105
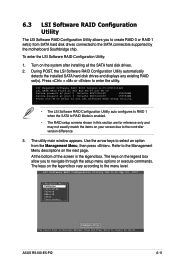
... SATA hard disk drives. 2. LSI Software RAID Configuration Utility Ver A.53 Sep 06, 2007 Management Menu Configure Initialize Objects Rebuild Check Consistency Configure VD(s) Use Cursor Keys to enter the utility. Press + or to Navigate Between Items And Press Enter To Select An Option ASUS RS100-E5-PI2 6-11 Use the arrow keys to...
... SATA hard disk drives. 2. LSI Software RAID Configuration Utility Ver A.53 Sep 06, 2007 Management Menu Configure Initialize Objects Rebuild Check Consistency Configure VD(s) Use Cursor Keys to enter the utility. Press + or to Navigate Between Items And Press Enter To Select An Option ASUS RS100-E5-PI2 6-11 Use the arrow keys to...