
User Guide
Page 3
... setup 2.1 Chassis cover 2-2 2.1.1 Removing the cover 2-2 2.1.2 Installing the cover 2-3 2.2 Motherboard information 2-5 2.3 Central Processing Unit (CPU 2-6 2.3.1 Installing the CPU 2-6 2.3.2 Installing the CPU heatsink 2-8 2.4 System memory 2-10 2.4.1 Overview 2-10 2.4.2 Memory configurations 2-10 2.4.3 Installing a DIMM 2-11 2.4.4 Removing a DIMM 2-11 2.5 Replaceable components 2-12 2.5.1 Installing the chassis fans 2-12 2.5.2 Installing Serial ATA drives 2-13 2.5.3 Installing optical disk...
... setup 2.1 Chassis cover 2-2 2.1.1 Removing the cover 2-2 2.1.2 Installing the cover 2-3 2.2 Motherboard information 2-5 2.3 Central Processing Unit (CPU 2-6 2.3.1 Installing the CPU 2-6 2.3.2 Installing the CPU heatsink 2-8 2.4 System memory 2-10 2.4.1 Overview 2-10 2.4.2 Memory configurations 2-10 2.4.3 Installing a DIMM 2-11 2.4.4 Removing a DIMM 2-11 2.5 Replaceable components 2-12 2.5.1 Installing the chassis fans 2-12 2.5.2 Installing Serial ATA drives 2-13 2.5.3 Installing optical disk...
User Guide
Page 13
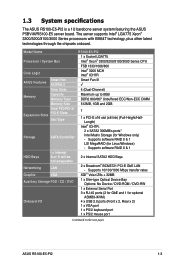
...ASUS Features Smart Fan ASWM2.0 Total Slots Memory Capacity Memory Type Memory Size Total PCI/PCI-X/ Expansion Slots PCI-E Slots Slot Type Storage SATA Controller HDD Bays I = internal A or S will be hot-swappable Networking LAN Graphic VGA Auxiliary Storage FDD / CD / DVD Onboard I/O RS100-E5... port (continued on the next page) ASUS RS100-E5-PI2 1-3 Supports software RAID 0 & 1 LSI MegaRAID (for Linux/Windows) - 1.3 System specifications The ASUS RS100-E5-PI2 is a 1U barebone server system featuring the ASUS P5BV-M/RS100-E5 server board. The server supports Intel®...
...ASUS Features Smart Fan ASWM2.0 Total Slots Memory Capacity Memory Type Memory Size Total PCI/PCI-X/ Expansion Slots PCI-E Slots Slot Type Storage SATA Controller HDD Bays I = internal A or S will be hot-swappable Networking LAN Graphic VGA Auxiliary Storage FDD / CD / DVD Onboard I/O RS100-E5... port (continued on the next page) ASUS RS100-E5-PI2 1-3 Supports software RAID 0 & 1 LSI MegaRAID (for Linux/Windows) - 1.3 System specifications The ASUS RS100-E5-PI2 is a 1U barebone server system featuring the ASUS P5BV-M/RS100-E5 server board. The server supports Intel®...
User Guide
Page 26
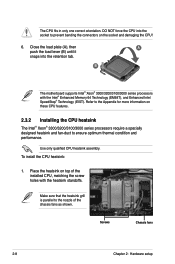
... series processors require a specially designed heatsink and fan-duct to the nozzle of the installed CPU, matching the screw holes with the Intel® Enhanced Memory 64 Technology (EM64T), and Enhanced Intel SpeedStep® Technology (EIST).
... series processors require a specially designed heatsink and fan-duct to the nozzle of the installed CPU, matching the screw holes with the Intel® Enhanced Memory 64 Technology (EM64T), and Enhanced Intel SpeedStep® Technology (EIST).
User Guide
Page 28
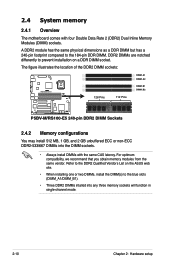
... installation on the ASUS web site. • When installing one or two DIMMs, install the DIMM(s) to the blue slots (DIMM_A1/DIMM_B1). • Three DDR2 DIMMs intalled into the DIMM sockets. • Always install DIMMs with four Double Data Rate 2 (DDR2) Dual Inline Memory Modules (DIMM) .... The figure illustrates the location of the DDR2 DIMM sockets: DIMM_A1 DIMM_A2 ® P5BV-M/RS100-E5 128 Pins 112 Pins DIMM_B1 DIMM_B2 P5BV-M/RS100-E5 240-pin DDR2 DIMM Sockets 2.4.2 Memory configurations You may install 512 MB, 1 GB, and 2 GB unbuffered ECC or non‑ECC DDR2-533/667 DIMMs ...
... installation on the ASUS web site. • When installing one or two DIMMs, install the DIMM(s) to the blue slots (DIMM_A1/DIMM_B1). • Three DDR2 DIMMs intalled into the DIMM sockets. • Always install DIMMs with four Double Data Rate 2 (DDR2) Dual Inline Memory Modules (DIMM) .... The figure illustrates the location of the DDR2 DIMM sockets: DIMM_A1 DIMM_A2 ® P5BV-M/RS100-E5 128 Pins 112 Pins DIMM_B1 DIMM_B2 P5BV-M/RS100-E5 240-pin DDR2 DIMM Sockets 2.4.2 Memory configurations You may install 512 MB, 1 GB, and 2 GB unbuffered ECC or non‑ECC DDR2-533/667 DIMMs ...

User Guide
Page 50
... to pins 2-3. 4.2 Jumpers 1. Hold down and reboot the system so the BIOS can clear the CMOS memory of date, time, and system setup parameters by erasing the CMOS RTC RAM data. Shut down the key during the boot process and enter BIOS setup to clear the Real Time Clock...to pins 1-2. 3. Removing the cap will cause system boot failure! After the CMOS clearance, reinstall the battery. ® P5BV-M/RS100-E5 CLRTC1 12 23 Normal (Default) P5BV-M/RS100-E5 Clear RTC RAM Clear CMOS • You do not help, remove the onboard battery and move the cap back to clear the CMOS RTC...
... to pins 2-3. 4.2 Jumpers 1. Hold down and reboot the system so the BIOS can clear the CMOS memory of date, time, and system setup parameters by erasing the CMOS RTC RAM data. Shut down the key during the boot process and enter BIOS setup to clear the Real Time Clock...to pins 1-2. 3. Removing the cap will cause system boot failure! After the CMOS clearance, reinstall the battery. ® P5BV-M/RS100-E5 CLRTC1 12 23 Normal (Default) P5BV-M/RS100-E5 Clear RTC RAM Clear CMOS • You do not help, remove the onboard battery and move the cap back to clear the CMOS RTC...
User Guide
Page 77
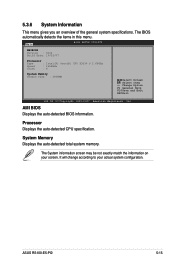
The BIOS automatically detects the items in this menu. System Memory Displays the auto-detected total system memory. 5.3.6 System Information This menu gives you an overview of the general system specifications. It will ...Memory Usable Size : 2048MB Select Screen Select Item +- Processor Displays the auto-detected CPU specification. The System information screen may be not exactly match the information on your actual system configuration. Change Option F1 General Help F10 Save and Exit ESC Exit v02.58 (C)Copyright 1985-2007, American Megatrends, Inc. ASUS RS100-E5...
The BIOS automatically detects the items in this menu. System Memory Displays the auto-detected total system memory. 5.3.6 System Information This menu gives you an overview of the general system specifications. It will ...Memory Usable Size : 2048MB Select Screen Select Item +- Processor Displays the auto-detected CPU specification. The System information screen may be not exactly match the information on your actual system configuration. Change Option F1 General Help F10 Save and Exit ESC Exit v02.58 (C)Copyright 1985-2007, American Megatrends, Inc. ASUS RS100-E5...

User Guide
Page 82
...enabled, the DRAM timing parameters are set the DDR operating frequency. North Bridge Configuration Advanced BIOS SETUP UTILITY North Bridge chipset Configuration Memory Remap Feature [Enabled] PCI MMIO Allocation: 4GB To 3584MB DRAM Frequency [Auto] Configure DRAM Timing by SPD [Enabled] When ...this option only when you install 64-bit operating system. DISABLE: Do not allow remapping of overlapped PCI memory above the total physical memory. Advanced BIOS SETUP UTILITY Advanced Chipset Settings WARNING: Setting wrong values in below sections may cause system to change...
...enabled, the DRAM timing parameters are set the DDR operating frequency. North Bridge Configuration Advanced BIOS SETUP UTILITY North Bridge chipset Configuration Memory Remap Feature [Enabled] PCI MMIO Allocation: 4GB To 3584MB DRAM Frequency [Auto] Configure DRAM Timing by SPD [Enabled] When ...this option only when you install 64-bit operating system. DISABLE: Do not allow remapping of overlapped PCI memory above the total physical memory. Advanced BIOS SETUP UTILITY Advanced Chipset Settings WARNING: Setting wrong values in below sections may cause system to change...

User Guide
Page 84
The menu includes setting IRQ and DMA channel resources for either PCI/PnP or legacy ISA devices, and setting the memory size block for boot if your system has a Plug and Play operating system. Advanced BIOS SETUP UTILITY Advanced PCI/PnP Settings WARNING: Setting wrong values ...
The menu includes setting IRQ and DMA channel resources for either PCI/PnP or legacy ISA devices, and setting the memory size block for boot if your system has a Plug and Play operating system. Advanced BIOS SETUP UTILITY Advanced PCI/PnP Settings WARNING: Setting wrong values ...

