

User Guide
Page 12
... Chassis Motherboard Component Accessories Optional Items RS100-E5-PI2 ASUS R09 1U Rackmount Chassis ASUS P5BV-M/RS100-E5 Server Board 1 x 220W 80+ Single Power Supply 2 x SATA Cables 1 x PCI Express x16 Riser Card (x8 link) 1 x Front I/O Board (ASUS FPB-R9) 1 x USB Board (ASUS USB-R9) 2 x System Fans (2 x 40x28) 1 x CPU Heatsink 1 x RS100-E5-PI2 User's Guide 1 x ASUS ASWM 2.0 User's Guide 1 x RS100-E5-PI2 Support CD (including ASWM*) 1 x Bag of...
... Chassis Motherboard Component Accessories Optional Items RS100-E5-PI2 ASUS R09 1U Rackmount Chassis ASUS P5BV-M/RS100-E5 Server Board 1 x 220W 80+ Single Power Supply 2 x SATA Cables 1 x PCI Express x16 Riser Card (x8 link) 1 x Front I/O Board (ASUS FPB-R9) 1 x USB Board (ASUS USB-R9) 2 x System Fans (2 x 40x28) 1 x CPU Heatsink 1 x RS100-E5-PI2 User's Guide 1 x ASUS ASWM 2.0 User's Guide 1 x RS100-E5-PI2 Support CD (including ASWM*) 1 x Bag of...
User Guide
Page 13
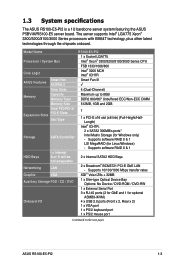
... x VGA port 1 x PS/2 keyboard port 1 x PS/2 mouse port (continued on the next page) ASUS RS100-E5-PI2 1-3 Model Name Processor / System Bus Core Logic ASUS Features Smart Fan ASWM2.0 Total Slots Memory Capacity Memory Type Memory Size Total PCI/PCI-X/ Expansion Slots PCI-E Slots... Windows only) - 1.3 System specifications The ASUS RS100-E5-PI2 is a 1U barebone server system featuring the ASUS P5BV-M/RS100-E5 server board. Supports software RAID 0 & 1 2 x Internal SATA2 HDD Bays 2 x Broadcom® BCM5721 PCI-E GbE LAN - The server supports Intel® LGA775 Xeon® 3300...
... x VGA port 1 x PS/2 keyboard port 1 x PS/2 mouse port (continued on the next page) ASUS RS100-E5-PI2 1-3 Model Name Processor / System Bus Core Logic ASUS Features Smart Fan ASWM2.0 Total Slots Memory Capacity Memory Type Memory Size Total PCI/PCI-X/ Expansion Slots PCI-E Slots... Windows only) - 1.3 System specifications The ASUS RS100-E5-PI2 is a 1U barebone server system featuring the ASUS P5BV-M/RS100-E5 server board. Supports software RAID 0 & 1 2 x Internal SATA2 HDD Bays 2 x Broadcom® BCM5721 PCI-E GbE LAN - The server supports Intel® LGA775 Xeon® 3300...
User Guide
Page 15
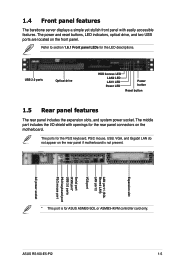
... and reset buttons, LED indicators, optical drive, and two USB ports are located on the rear panel if motherboard is for ASUS ASMB3-SOL or ASMB3-iKVM controller card only. ASUS RS100-E5-PI2 1-5 1.4 Front panel features The barebone server displays a simple yet stylish front panel with openings for the rear panel connectors on the motherboard.
... and reset buttons, LED indicators, optical drive, and two USB ports are located on the rear panel if motherboard is for ASUS ASMB3-SOL or ASMB3-iKVM controller card only. ASUS RS100-E5-PI2 1-5 1.4 Front panel features The barebone server displays a simple yet stylish front panel with openings for the rear panel connectors on the motherboard.
User Guide
Page 37
ASUS RS100-E5-PI2 2- Installation options Chapter 3 This chapter describes how to install the optional components and devices into the barebone server.
ASUS RS100-E5-PI2 2- Installation options Chapter 3 This chapter describes how to install the optional components and devices into the barebone server.
User Guide
Page 41
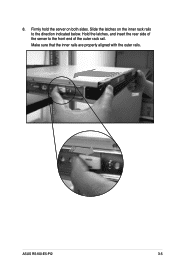
Hold the latches, and insert the rear side of the server to the direction indicated below. Firmly hold the server on the inner rack rails to the front end of the outer rack rail. Slide the latches on both sides. Make sure that the inner rails are properly aligned with the outer rails. 8. ASUS RS100-E5-PI2 3-5
Hold the latches, and insert the rear side of the server to the direction indicated below. Firmly hold the server on the inner rack rails to the front end of the outer rack rail. Slide the latches on both sides. Make sure that the inner rails are properly aligned with the outer rails. 8. ASUS RS100-E5-PI2 3-5

User Guide
Page 43
...holes on the chassis. ASUS RS100-E5-PI2 3-7 Get one side for installation. 3. Repeat steps 2 - 4 to the chassis with six screws. 5. Prepare the pair of long rack ears and set of the chassis.Select one long rack ear and match the six screw holes to support the server system in a rack cabinet... the rack ear as shown. 4. 3.2 Rackmount bracket kit (Optional) The rackmount bracket kit provides a convenient and economical way to install the server to the rack cabinet. 3.2.1 Attaching the long rack ears The long rack ears are used to the screw holes on each front-side of twelve...
...holes on the chassis. ASUS RS100-E5-PI2 3-7 Get one side for installation. 3. Repeat steps 2 - 4 to the chassis with six screws. 5. Prepare the pair of long rack ears and set of the chassis.Select one long rack ear and match the six screw holes to support the server system in a rack cabinet... the rack ear as shown. 4. 3.2 Rackmount bracket kit (Optional) The rackmount bracket kit provides a convenient and economical way to install the server to the rack cabinet. 3.2.1 Attaching the long rack ears The long rack ears are used to the screw holes on each front-side of twelve...

User Guide
Page 45
Prepare the bundled pair of front panel connectors and a set of twelve (12) screws. 2. Secure the rack ear to the rack ear. 3. Secure the front panel connector to the chassis with four screws. 4. ASUS RS100-E5-PI2 3-9 Repeat steps 2 - 3 to protect and decorate the front server panel. 1. 3.3 Front panel cover kit (Optional) The front panel cover kit provides a convenient way to attach the other rack ear.
Prepare the bundled pair of front panel connectors and a set of twelve (12) screws. 2. Secure the rack ear to the rack ear. 3. Secure the front panel connector to the chassis with four screws. 4. ASUS RS100-E5-PI2 3-9 Repeat steps 2 - 3 to protect and decorate the front server panel. 1. 3.3 Front panel cover kit (Optional) The front panel cover kit provides a convenient way to attach the other rack ear.

User Guide
Page 47
Motherboard Info Chapter 4 This chapter gives inforamtion about the motherboard that comes with the server. This chapter includes the motherboard layout, jumper settings, and connector locations. ASUS RS100-E5-PI2 4-1
Motherboard Info Chapter 4 This chapter gives inforamtion about the motherboard that comes with the server. This chapter includes the motherboard layout, jumper settings, and connector locations. ASUS RS100-E5-PI2 4-1

User Guide
Page 61
...GND I2CDATA1 +5VSB LAN1_LINKACTLEDLAN1_LINKACTLED+ LAN2_LINKACTLED+ LAN2_LINKACTLED- +5VSB CASEOPEN GND LOCATORLED1+ LOCATORLED1LOCATORBTN# GND LOCAT ORLED2LOCATORLED2+ P5BV-M/RS100-E5 Auxiliary Panel Connector 3 454 • Front panel SMB (6-1 pin FPSMB) These leads connect the front... This requires an external detection mechanism such as a chassis intrusion sensor or microswitch. ASUS RS100-E5-PI2 4-15 System panel auxiliary connector (20-2 pin AUX_PANEL1) This connector supports several server system functions. Connect the Locator LED cables to record a chassis intrusion event. ...
...GND I2CDATA1 +5VSB LAN1_LINKACTLEDLAN1_LINKACTLED+ LAN2_LINKACTLED+ LAN2_LINKACTLED- +5VSB CASEOPEN GND LOCATORLED1+ LOCATORLED1LOCATORBTN# GND LOCAT ORLED2LOCATORLED2+ P5BV-M/RS100-E5 Auxiliary Panel Connector 3 454 • Front panel SMB (6-1 pin FPSMB) These leads connect the front... This requires an external detection mechanism such as a chassis intrusion sensor or microswitch. ASUS RS100-E5-PI2 4-15 System panel auxiliary connector (20-2 pin AUX_PANEL1) This connector supports several server system functions. Connect the Locator LED cables to record a chassis intrusion event. ...

User Guide
Page 97
...sections for details on the RAID_SEL1 jumper settings. Connect the SATA signal cables. 3. ASUS RS100-E5-PI2 6-3 Refer to use the RAID configuration utilities. Refer to create a RAID set under Windows® Server or Red Hat® Enterprise operating system. Save your changes, then exit the BIOS... Setup. Use the Intel® Matrix Storage Manager to create a RAID 0 or RAID 1 under Windows® Server operating system. For optimal performance, install identical drives of the same model and capacity when creating a disk array. Use the LSI Software...
...sections for details on the RAID_SEL1 jumper settings. Connect the SATA signal cables. 3. ASUS RS100-E5-PI2 6-3 Refer to use the RAID configuration utilities. Refer to create a RAID set under Windows® Server or Red Hat® Enterprise operating system. Save your changes, then exit the BIOS... Setup. Use the Intel® Matrix Storage Manager to create a RAID 0 or RAID 1 under Windows® Server operating system. For optimal performance, install identical drives of the same model and capacity when creating a disk array. Use the LSI Software...

User Guide
Page 99
...is highlighted, press the up /down arrow key to create this volume? (Y/N): 7. WARNING: ALL DATA ON SELECTED DISKS WILL BE LOST. ASUS RS100-E5-PI2 6-5 The default stripe size is case sensitive and cannot contain special characters. [↑↓]-Change [TAB]-Next [ESC]-Previous Menu [Enter]-... size values range from 8 KB to the Create Volume menu. Create RAID Volume, then press . We recommend a lower stripe size for server systems, and a higher stripe size for multimedia computer systems used to select the stripe size for the RAID 0 set : 1. This name...
...is highlighted, press the up /down arrow key to create this volume? (Y/N): 7. WARNING: ALL DATA ON SELECTED DISKS WILL BE LOST. ASUS RS100-E5-PI2 6-5 The default stripe size is case sensitive and cannot contain special characters. [↑↓]-Change [TAB]-Next [ESC]-Previous Menu [Enter]-... size values range from 8 KB to the Create Volume menu. Create RAID Volume, then press . We recommend a lower stripe size for server systems, and a higher stripe size for multimedia computer systems used to select the stripe size for the RAID 0 set : 1. This name...
User Guide
Page 127
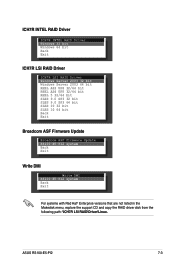
ASUS RS100-E5-PI2 7-3 ICH7R INTEL RAID Driver ICH7R INTEL RAID Driver Windows 32 bit Windows 64 bit Back Exit ICH7R LSI RAID Driver ICH7R LSI RAID Driver Windows Server 2003 32 bit Windows Server 2003 64 bit RHEL AS3 UP8 32/64 bit RHEL AS4 UP5 32/64 bit RHEL 5 32/64 bit SLES 9.0 SP3 32... bit SLES 9.0 SP3 64 bit SLES 10 32 bit SLES 10 64 bit Back Exit Broadcom ASF Firmware Update Broadcom ASF Firmware Update RS100-E5-PI2 system Back...
ASUS RS100-E5-PI2 7-3 ICH7R INTEL RAID Driver ICH7R INTEL RAID Driver Windows 32 bit Windows 64 bit Back Exit ICH7R LSI RAID Driver ICH7R LSI RAID Driver Windows Server 2003 32 bit Windows Server 2003 64 bit RHEL AS3 UP8 32/64 bit RHEL AS4 UP5 32/64 bit RHEL 5 32/64 bit SLES 9.0 SP3 32... bit SLES 9.0 SP3 64 bit SLES 10 32 bit SLES 10 64 bit Back Exit Broadcom ASF Firmware Update Broadcom ASF Firmware Update RS100-E5-PI2 system Back...

User Guide
Page 129
ENTER=Continue ESC=Cancel F3=Exit 5. For 64bit Windows Server OS, please select "LSI Logic Embedded SATA RAID (Intel IA32E)" item. Select the SCSI Adapter you created earlier to the floppy disk drive, then press . 4. ... from the list, then press . LSI Logic Embedded SATA RAID LSI Logic Embedded SATA RAID (Intel IA32E) ENTER=Continue F3=Exit ASUS RS100-E5-PI2 7-5 Insert the RAID driver disk you want from the following list, or press ESC to return to configure a SCSI Adapter for 32bit Windows Server OS from the list, then press .
ENTER=Continue ESC=Cancel F3=Exit 5. For 64bit Windows Server OS, please select "LSI Logic Embedded SATA RAID (Intel IA32E)" item. Select the SCSI Adapter you created earlier to the floppy disk drive, then press . 4. ... from the list, then press . LSI Logic Embedded SATA RAID LSI Logic Embedded SATA RAID (Intel IA32E) ENTER=Continue F3=Exit ASUS RS100-E5-PI2 7-5 Insert the RAID driver disk you want from the following list, or press ESC to return to configure a SCSI Adapter for 32bit Windows Server OS from the list, then press .

User Guide
Page 131
...® desktop , then select Properties from the menu. 4. The Upgrade Device Driver Wizard window appears. Click Cancel. 3. Click Next. 8. ASUS RS100-E5-PI2 7-7 Right-click the My Computer icon on an existing Windows® Server OS: 1. Right-click the RAID controller item, then select Properties. 6. When found, click Next to the floppy disk drive. 9. Insert...
...® desktop , then select Properties from the menu. 4. The Upgrade Device Driver Wizard window appears. Click Cancel. 3. Click Next. 8. ASUS RS100-E5-PI2 7-7 Right-click the My Computer icon on an existing Windows® Server OS: 1. Right-click the RAID controller item, then select Properties. 6. When found, click Next to the floppy disk drive. 9. Insert...

User Guide
Page 143
ASUS RS100-E5-PI2 7-19 Click on an item to install. Click on an item to install. 7.4.4 Utilities menu The Utilities menu displays the software applications and utilities that the motherboard supports. 7.4.3 Management Software menu The Management Software menu displays the available network and server monitoring application.
ASUS RS100-E5-PI2 7-19 Click on an item to install. Click on an item to install. 7.4.4 Utilities menu The Utilities menu displays the software applications and utilities that the motherboard supports. 7.4.3 Management Software menu The Management Software menu displays the available network and server monitoring application.