Asus Prodigy P4BL Support and Manuals
Get Help and Manuals for this Asus item
View All Support Options Below
Free Asus Prodigy P4BL manuals!
Problems with Asus Prodigy P4BL?
Ask a Question
Free Asus Prodigy P4BL manuals!
Problems with Asus Prodigy P4BL?
Ask a Question
Popular Asus Prodigy P4BL Manual Pages
Prodigy P4 User''s Manual E1099 for English Version - Page 2
... updated manuals, BIOS, drivers, or product release information, contact ASUS at http://www.asus.com.tw or through any means, except documentation kept by the third digit in it, may not be extended if: (1) the product is repaired, modified or altered, unless such repair, modification of their respective companies, and are both printed on the following page. SPECIFICATIONS...
Prodigy P4 User''s Manual E1099 for English Version - Page 3
...: General Email:
6737 Mowry Avenue, Mowry Business Center, Building 2, Newark, CA 94560, USA +1-510-608-4555 tmd1@asus.com
Technical Support
Support Fax:
+1-510-608-4555
General Support:
+1-502-995-0883
Web Site:
www.asus.com
Support Email:
tsd@asus.com
ASUS COMPUTER GmbH (Europe)
Address: General Fax: General Email:
Harkortstr. 25, 40880 Ratingen, BRD, Germany +49-2102...
Prodigy P4 User''s Manual E1099 for English Version - Page 4

... does cause harmful interference to assure compliance with FCC Rules Part 15. Operation is subject to the following measures: •...to an outlet on a circuit different from digital apparatus set out in the Radio Interference Regulations of the Canadian ...radio frequency energy and, if not installed and used in accordance with manufacturer's instructions, may not cause harmful interference, ...
Prodigy P4 User''s Manual E1099 for English Version - Page 5
Table of contents
Disclaimer/Copyrights 2 ASUS contact information 3 Notices 4 Table of Contents 5 System package contents 6 About this guide 7
Chapter 1: System Introduction 9
1.1 Front panel features 10 1.2 Rear panel features 11 1.3 Internal features 12
Chapter 2: System Assembly 13
2.1 Opening the chassis 14 2.2 Remove the disk drive assembly 16 2.3 Install the hard disk drive 17...
Prodigy P4 User''s Manual E1099 for English Version - Page 6
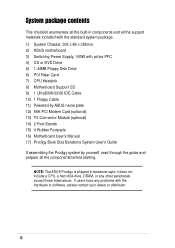
...) 2 Foot Stands 15) 4 Rubber Footpads 16) Motherboard User's Manual 17) Prodigy Book Size Barebone System User's Guide
If assembling the Prodigy system by yourself, read through the guide and prepare all the support materials included with the standard system package. 1) System Chassis: 305 x 88 x 385mm. 2) ASUS motherboard 3) Switching Power Supply, 165W with the hardware or...
Prodigy P4 User''s Manual E1099 for English Version - Page 7
... parts: 1. Chapter 2: System assembly Step-by-step instructions on how to maximize work space and afford more convenience.
7 Chapter 4: System placement Two system placement options help to install basic components. 3. Chapter 1: System Introduction
All about the ASUS Prodigy Book Size Barebone System. Chapter 3: Optional procedures How to install optional components. 4. How this guide...
Prodigy P4 User''s Manual E1099 for English Version - Page 9
Chapter 1
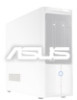
All about the ASUS Prodigy Book Size Barebone System: the front and rear panel features, and the internal layout and design. System Introduction
ASUS Prodigy Book Size Barebone System
9
Prodigy P4 User''s Manual E1099 for English Version - Page 10

... HDD LED
CD-ROM / DVD Drive
Floppy Drive I/O Panel, (behind door) "Powered by ASUS" name plate
USB Ports (2&3)
SPDIF out (optional) PCMCIA (optional) Microphone
Headphone
6-pin 1394 ... USB connectors (Ports 2&3), headphone and microphone connectors. 1.1 Front Panel Features
The ASUS Prodigy Book Size Barebone System includes the ASUS motherboard, a power supply, a CD-ROM or DVD drive and a floppy...
Prodigy P4 User''s Manual E1099 for English Version - Page 11

ASUS Prodigy Book Size Barebone System
11 The rear panel features:
PS/2 Keyboard USB (0&1) Serial Port
VGA Port Line ... rear panel optional features may vary as shown in the above pictures. 1.2 Rear Panel Features
The rear panel of the ASUS Prodigy Book Size Barebone System includes the standard PC99 I/O connectors for external devices, power supply socket, and optional feature connectors.
Prodigy P4 User''s Manual E1099 for English Version - Page 12

The standard components are already installed. ASUS Motherboard CPU Cooler
CD / DVD ROM Drive
Power Supply PCI Riser Card
3.5" Floppy Drive
12
Chapter 1: System Introduction 1.3 Internal Features
The figure below shows the system from above.
Prodigy P4 User''s Manual E1099 for English Version - Page 13
... than the original supplied by -step instructions on the back panel. It is not advisable to accept an ASUS "Flex ATX" motherboard with dimensions between 19.1 x 22.9 cm, (or 7.5 x 9 inches). Prodigy Book Size Barebone System
13 Before installing any motherboard other boards.
System Assembly
Chapter 2
Step-by ASUS, make sure that it fits into...
Prodigy P4 User''s Manual E1099 for English Version - Page 15
Prodigy Book Size Barebone System
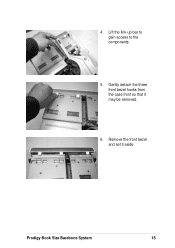
15 Gently detach the three front bezel hooks from the case front so that it aside. Remove the front bezel and set it may be removed.
6. 4.
Lift the link-up bar to gain access to the components.
5.
Prodigy P4 User''s Manual E1099 for English Version - Page 18
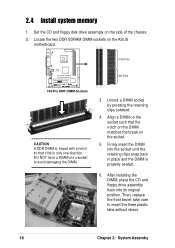
... its original position. After installing the DIMM, place the CD and floppy drive assembly back into a socket to insert the three plastic tabs without stress.
18
Chapter 2: System Assemby take care to avoid damaging the DIMM.
80 Pins
3. Set the CD and floppy disk drive assemply on the ASUS
motherboard.
104 Pins
®...
Prodigy P4 User''s Manual E1099 for English Version - Page 28
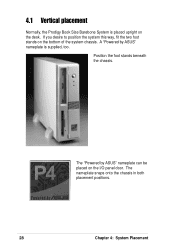
... can be placed on the bottom of the system chassis. 4.1 Vertical placement
Normally, the Prodigy Book Size Barebone System is supplied, too. The "Powered by ASUS" nameplate is placed upright on the desk.
Position the foot stands beneath the chassis. The nameplate snaps onto the chassis in both placement positions.
28...
Prodigy P4 User''s Manual E1099 for English Version - Page 29
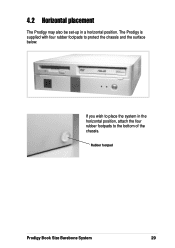
If you wish to place the system in a horizontal position. Rubber footpad
Prodigy Book Size Barebone System
29 The Prodigy is supplied with four rubber footpads to the bottom of the chassis.
4.2 Horizontal placement
The Prodigy may also be set-up in the horizontal position, attach the four rubber footpads to protect the chassis and the surface below.
Asus Prodigy P4BL Reviews
We have not received any reviews for Asus yet.