
PA24A Series User Guide
Page 3
...1.2 Package contents 1-1 1.3 Monitor introduction 1-2 1.3.1 Front view 1-2 1.3.2 Back view 1-3 1.3.3 Other Function(s 1-4 Chapter 2: Setup 2.1 Attaching the arm/base 2-1 2.2 Detaching the arm/base (for VESA wall mount 2-1 2.3 Adjusting the monitor 2-2 2.4 Connecting the cables 2-4 2.5 Turning on the monitor 2-5 Chapter 3: General instructions 3.1 OSD (On-Screen Display) menu 3-1 3.1.1 How to reconfigure 3-1 3.1.2 OSD function introduction 3-2 3.2 Specifications summary 3-12 3.3 Outline Dimensions 3-14 3.4 Troubleshooting (FAQ 3-15 3.5 Supported operating modes 3-16 iii
...1.2 Package contents 1-1 1.3 Monitor introduction 1-2 1.3.1 Front view 1-2 1.3.2 Back view 1-3 1.3.3 Other Function(s 1-4 Chapter 2: Setup 2.1 Attaching the arm/base 2-1 2.2 Detaching the arm/base (for VESA wall mount 2-1 2.3 Adjusting the monitor 2-2 2.4 Connecting the cables 2-4 2.5 Turning on the monitor 2-5 Chapter 3: General instructions 3.1 OSD (On-Screen Display) menu 3-1 3.1.1 How to reconfigure 3-1 3.1.2 OSD function introduction 3-2 3.2 Specifications summary 3-12 3.3 Outline Dimensions 3-14 3.4 Troubleshooting (FAQ 3-15 3.5 Supported operating modes 3-16 iii

PA24A Series User Guide
Page 4
... interference will not occur in a residential installation. iv The use of shielded cables for connection of the monitor to the graphics card is connected. • Consult the dealer or an experienced radio/TV technician for help. Notices Federal Communications Commission Statement This device complies with the limits for a Class B digital device, pursuant to Part 15 of the FCC Rules. Cet...
... interference will not occur in a residential installation. iv The use of shielded cables for connection of the monitor to the graphics card is connected. • Consult the dealer or an experienced radio/TV technician for help. Notices Federal Communications Commission Statement This device complies with the limits for a Class B digital device, pursuant to Part 15 of the FCC Rules. Cet...

PA24A Series User Guide
Page 5
... your dealer or local power company. • Use the appropriate power plug which have appropriate configured receptacles marked between 100-240V AC. • If you are not damaged. Safety information • Before setting up the monitor, carefully read all cables are correctly connected and the power cables are not sure of the type of power supply to open the monitor cabinet. AEEE yönetmeli...
... your dealer or local power company. • Use the appropriate power plug which have appropriate configured receptacles marked between 100-240V AC. • If you are not damaged. Safety information • Before setting up the monitor, carefully read all cables are correctly connected and the power cables are not sure of the type of power supply to open the monitor cabinet. AEEE yönetmeli...

PA24A Series User Guide
Page 6
... turn off the Power Switch for hours. • When the screen becomes black or flashes, or cannot work anymore, contact your monitor off and unplug the power cord. CAUTION: Information to prevent damage to the components when trying to complete a task. Do not lift the display by yourself! Use a cleaner intended for use . • When the same image is better to disconnect the cables and power cord...
... turn off the Power Switch for hours. • When the screen becomes black or flashes, or cannot work anymore, contact your monitor off and unplug the power cord. CAUTION: Information to prevent damage to the components when trying to complete a task. Do not lift the display by yourself! Use a cleaner intended for use . • When the same image is better to disconnect the cables and power cord...

PA24A Series User Guide
Page 9
... you for PA24AC-K only) If any of features that enhance your retailer immediately. Thank you ! 1.2 Package contents Check your package for the following items: LCD monitor Monitor base Quick start guide Warranty card Power cord HDMI cable USB Type-C to Type-C cable USB Type-C to Type-A cable DisplayPort cable Cable clip Color Calibration Testing Report Input/Output port cover Color Calibrator (for purchasing the ASUS® LCD monitor! 1.1 Welcome! The latest widescreen LCD monitor from ASUS provides a broader, brighter and crystal-clear display, plus...
... you for PA24AC-K only) If any of features that enhance your retailer immediately. Thank you ! 1.2 Package contents Check your package for the following items: LCD monitor Monitor base Quick start guide Warranty card Power cord HDMI cable USB Type-C to Type-C cable USB Type-C to Type-A cable DisplayPort cable Cable clip Color Calibration Testing Report Input/Output port cover Color Calibrator (for purchasing the ASUS® LCD monitor! 1.1 Welcome! The latest widescreen LCD monitor from ASUS provides a broader, brighter and crystal-clear display, plus...

PA24A Series User Guide
Page 10
.../down/left/right. 2. Press button (Input Select button) to display HDMI-1, HDMI-2, DisplayPort or USB Type C signal after you connect HDMI/DisplayPort/USB cable with a long press for 5 seconds. 3. 1.3 Monitor introduction 1.3.1 Front view Menu Close Input Select Brightness 1 2 3 4 5 1. Close button: • Exits the OSD menu. • Toggles the Key Lock function between on /off with the monitor. 4. Power button/power indicator • Turns the monitor on and off . • The color definition of the power indicator is as the...
.../down/left/right. 2. Press button (Input Select button) to display HDMI-1, HDMI-2, DisplayPort or USB Type C signal after you connect HDMI/DisplayPort/USB cable with a long press for 5 seconds. 3. 1.3 Monitor introduction 1.3.1 Front view Menu Close Input Select Brightness 1 2 3 4 5 1. Close button: • Exits the OSD menu. • Toggles the Key Lock function between on /off with the monitor. 4. Power button/power indicator • Turns the monitor on and off . • The color definition of the power indicator is as the...
PA24A Series User Guide
Page 11
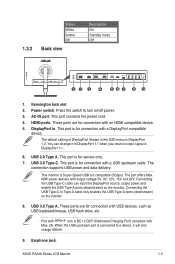
.... 7. You can input the DisplayPort source, output power and enable the USB Type-A ports (downstream) on the monitor. ASUS PA24A Series LCD Monitor 1-3 When the USB upstream port is DisplayPort 1.1. 6. Connecting the USB Type-C cable can change it to DisplayPort 1.1 when your device output signal is connected to Type-A cable only enables the USB Type-A ports (downstream) on /off power. 3. The connection supports USB power and data delivery. Power switch. Kensington lock slot. 2. 1.3.2 Status White Amber Off Back view Description On...
.... 7. You can input the DisplayPort source, output power and enable the USB Type-A ports (downstream) on the monitor. ASUS PA24A Series LCD Monitor 1-3 When the USB upstream port is DisplayPort 1.1. 6. Connecting the USB Type-C cable can change it to DisplayPort 1.1 when your device output signal is connected to Type-A cable only enables the USB Type-A ports (downstream) on /off power. 3. The connection supports USB power and data delivery. Power switch. Kensington lock slot. 2. 1.3.2 Status White Amber Off Back view Description On...

PA24A Series User Guide
Page 16
... OSD menu. 2-4 Chapter 2: Setup b. When these cables are connected, you can be used for Color Calibrator. Make sure your device to Type-A cable. Connect the cables as the following instructions: For service only • To connect the power cord: Connect one end of the power cord securely to the monitor's AC input port, the other end of your computer is fed. • To use the earphone: connect the end with the latest Windows 7/Windows 8.1/Windows 10 operating system. Plug...
... OSD menu. 2-4 Chapter 2: Setup b. When these cables are connected, you can be used for Color Calibrator. Make sure your device to Type-A cable. Connect the cables as the following instructions: For service only • To connect the power cord: Connect one end of the power cord securely to the monitor's AC input port, the other end of your computer is fed. • To use the earphone: connect the end with the latest Windows 7/Windows 8.1/Windows 10 operating system. Plug...

PA24A Series User Guide
Page 20
... save one or two ProArt Calibration profiles as User Mode 1/User Mode 2 after executing ProArt Calibration and then have quick access here. 3.1.2 OSD function introduction 1. Please apply the following : disable HDR on your device. Splendid Standard Mode sRGB Mode Rec.709 Mode Scenery Mode Reading Mode Darkroom Mode User Mode 1 User Mode 2 ASUS PA24AC Standard Mode DisplayPort 1920 x 1200@ 60Hz • Standard Mode: Best choice for document editing with SplendidPlus Video Enhancement. • sRGB Mode: Compatible with sRGB color space, sRGB mode...
... save one or two ProArt Calibration profiles as User Mode 1/User Mode 2 after executing ProArt Calibration and then have quick access here. 3.1.2 OSD function introduction 1. Please apply the following : disable HDR on your device. Splendid Standard Mode sRGB Mode Rec.709 Mode Scenery Mode Reading Mode Darkroom Mode User Mode 1 User Mode 2 ASUS PA24AC Standard Mode DisplayPort 1920 x 1200@ 60Hz • Standard Mode: Best choice for document editing with SplendidPlus Video Enhancement. • sRGB Mode: Compatible with sRGB color space, sRGB mode...
PA24A Series User Guide
Page 21
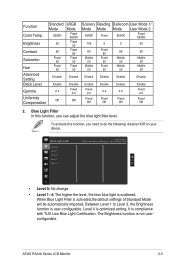
... blue light filter level. To activate this function, you need to Level 3, the Brightness function is optimized setting. ASUS PA24A Series LCD Monitor 3-3 Between Level 1 to do the following: disable HDR on your device. Function Standard sRGB Mode Mode Color Temp. 6500K Fixed 6500K Brightness 50 Fixed 50 Contrast 80 Fixed 80 Saturation Fixed 50 Fixed 50 Hue Fixed 50 Fixed 50 Advanced Setting Disable Disable Black Level Enable Disable Gamma 2.2 Fixed 2.2 Uniformity Compensation Off Off Scenery Reading Darkroom User Mode 1/ Mode Mode Mode User Mode...
... blue light filter level. To activate this function, you need to Level 3, the Brightness function is optimized setting. ASUS PA24A Series LCD Monitor 3-3 Between Level 1 to do the following: disable HDR on your device. Function Standard sRGB Mode Mode Color Temp. 6500K Fixed 6500K Brightness 50 Fixed 50 Contrast 80 Fixed 80 Saturation Fixed 50 Fixed 50 Hue Fixed 50 Fixed 50 Advanced Setting Disable Disable Black Level Enable Disable Gamma 2.2 Fixed 2.2 Uniformity Compensation Off Off Scenery Reading Darkroom User Mode 1/ Mode Mode Mode User Mode...
PA24A Series User Guide
Page 22
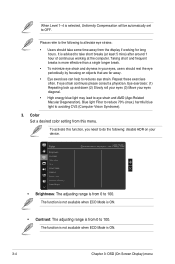
... blue light to 100. To activate this menu. If eye strain continues please consult a physician. Gamma Black Level Advanced Setting Color Reset ASUS PA24AC Standard Mode DisplayPort 1920 x 1200@ 60Hz • Brightness: The adjusting range is from 0 to avoiding CVS (Computer Vision Syndrome). 3. The function is not available when ECO Mode is advised to OFF. Color Brightness Contrast Saturation Hue Color Temp. Repeat these exercises often. Color Set a desired color setting from...
... blue light to 100. To activate this menu. If eye strain continues please consult a physician. Gamma Black Level Advanced Setting Color Reset ASUS PA24AC Standard Mode DisplayPort 1920 x 1200@ 60Hz • Brightness: The adjusting range is from 0 to avoiding CVS (Computer Vision Syndrome). 3. The function is not available when ECO Mode is advised to OFF. Color Brightness Contrast Saturation Hue Color Temp. Repeat these exercises often. Color Set a desired color setting from...
PA24A Series User Guide
Page 23
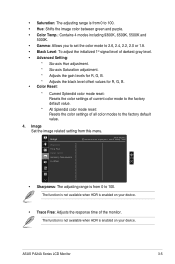
... * Adjusts the gain levels for R, G, B. * Adjusts the black level offset values for R, G, B. • Color Reset: * Current Splendid color mode reset: Resets the color settings of current color mode to the factory default value. * All Splendid color mode reset: Resets the color settings of the monitor. The function is not available when HDR is enabled on your device. ASUS PA24A Series LCD Monitor 3-5 Image Set the image related setting from 0 to the factory default value. 4. Image Sharpness Trace Free Aspect Control Uniformity Compensation VividPixel ASUS PA24AC Standard Mode...
... * Adjusts the gain levels for R, G, B. * Adjusts the black level offset values for R, G, B. • Color Reset: * Current Splendid color mode reset: Resets the color settings of current color mode to the factory default value. * All Splendid color mode reset: Resets the color settings of the monitor. The function is not available when HDR is enabled on your device. ASUS PA24A Series LCD Monitor 3-5 Image Set the image related setting from 0 to the factory default value. 4. Image Sharpness Trace Free Aspect Control Uniformity Compensation VividPixel ASUS PA24AC Standard Mode...
PA24A Series User Guide
Page 24
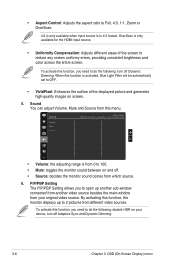
... need to do the following : turn off Dynamic Dimming. To activate this menu. OverScan is in 4:3 format. Sound Volume Mute Source ASUS PA24AC Standard Mode DisplayPort 1920 x 1200@ 60Hz • Volume: the adjusting range is activated, Blue Light Filter will be automatically set to reduce any screen uniformy errors, providing consistent brightness and color across the entire screen. When this function, the monitor displays up another sub-window connected from another video source besides the main-window...
... need to do the following : turn off Dynamic Dimming. To activate this menu. OverScan is in 4:3 format. Sound Volume Mute Source ASUS PA24AC Standard Mode DisplayPort 1920 x 1200@ 60Hz • Volume: the adjusting range is activated, Blue Light Filter will be automatically set to reduce any screen uniformy errors, providing consistent brightness and color across the entire screen. When this function, the monitor displays up another sub-window connected from another video source besides the main-window...
PA24A Series User Guide
Page 25
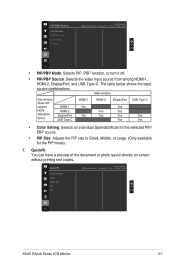
... Series LCD Monitor 3-7 QuickFit You can have a preview of the document or photo layout directly on screen without printing test copies. PIP/PBP Setting PIP/PBP Mode PIP/PBP Source Color Setting PIP Size ASUS PA24AC Standard Mode DisplayPort 1920 x 1200@ 60Hz • PIP/PBP Mode: Selects PIP, PBP function, or turn it off. • PIP/PBP Source: Selects the video input source from among HDMI-1, HDMI-2, DisplayPort, and USB Type-C. Main-window...
... Series LCD Monitor 3-7 QuickFit You can have a preview of the document or photo layout directly on screen without printing test copies. PIP/PBP Setting PIP/PBP Mode PIP/PBP Source Color Setting PIP Size ASUS PA24AC Standard Mode DisplayPort 1920 x 1200@ 60Hz • PIP/PBP Mode: Selects PIP, PBP function, or turn it off. • PIP/PBP Source: Selects the video input source from among HDMI-1, HDMI-2, DisplayPort, and USB Type-C. Main-window...
PA24A Series User Guide
Page 27
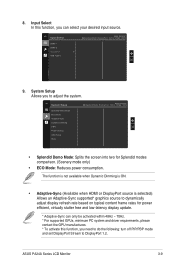
... activate this function, you need to do the following: turn off PIP/PBP mode and set DisplayPort Stream to DisplayPort 1.2. System Setup Splendid Demo Mode ECO Mode Adaptive-Sync Dynamic Dimming HDR Power Saving OSD Setup More ASUS PA24AC Standard Mode DisplayPort 1920 x 1200@ 60Hz • Splendid Demo Mode: Splits the screen into two for power efficient, virtually stutter free and low-latency display update. * Adaptive-Sync can select your desired input source. The function is...
... activate this function, you need to do the following: turn off PIP/PBP mode and set DisplayPort Stream to DisplayPort 1.2. System Setup Splendid Demo Mode ECO Mode Adaptive-Sync Dynamic Dimming HDR Power Saving OSD Setup More ASUS PA24AC Standard Mode DisplayPort 1920 x 1200@ 60Hz • Splendid Demo Mode: Splits the screen into two for power efficient, virtually stutter free and low-latency display update. * Adaptive-Sync can select your desired input source. The function is...
PA24A Series User Guide
Page 28
... saving power. When this function, you need to execute backlight dynamic dimming. USB Type-C signal can charge the device with graphic card. Select DisplayPort 1.1 or DisplayPort 1.2 by graphic card DP version. DisplayPort 1.1 is only available when Adaptive-Sync is OFF. • Key Lock: To disable all ports to charge external devices and keeps signals from the top over five seconds to transparent. * Adjusts the OSD rotation. • Language...
... saving power. When this function, you need to execute backlight dynamic dimming. USB Type-C signal can charge the device with graphic card. Select DisplayPort 1.1 or DisplayPort 1.2 by graphic card DP version. DisplayPort 1.1 is only available when Adaptive-Sync is OFF. • Key Lock: To disable all ports to charge external devices and keeps signals from the top over five seconds to transparent. * Adjusts the OSD rotation. • Language...
PA24A Series User Guide
Page 29
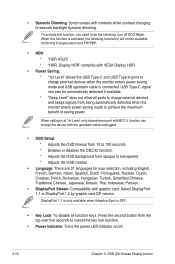
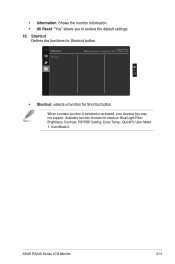
• Information: Shows the monitor information. • All Reset: "Yes" allows you to restore the default settings. 10. When a certain function is selected or activated, your shortcut key may not support. Shortcut Defines the functions for Shortcut button. Shortcut Shortcut ASUS PA24AC Standard Mode DisplayPort 1920 x 1200@ 60Hz • Shortcut: selects a function for Shortcut button. Available function choices for shortcut: Blue Light Filter, Brightness, Contrast, PIP/PBP Setting, Color Temp., QuickFit, User Mode 1, User Mode 2 ASUS PA24A Series LCD Monitor 3-11
• Information: Shows the monitor information. • All Reset: "Yes" allows you to restore the default settings. 10. When a certain function is selected or activated, your shortcut key may not support. Shortcut Defines the functions for Shortcut button. Shortcut Shortcut ASUS PA24AC Standard Mode DisplayPort 1920 x 1200@ 60Hz • Shortcut: selects a function for Shortcut button. Available function choices for shortcut: Blue Light Filter, Brightness, Contrast, PIP/PBP Setting, Color Temp., QuickFit, User Mode 1, User Mode 2 ASUS PA24A Series LCD Monitor 3-11

PA24A Series User Guide
Page 30
... 3: OSD (On-Screen Display) menu Resolution Pixel pitch Brightness (Typ.) Contrast Ratio (Typ.) Contrast Ratio (Max.) Viewing angle (H/V) CR>10 Display colors Color gamut (Typ.) Response time SplendidPlus Video Enhancement SplendidPlus selection Color temperature selection Digital input Earphone jack Audio input Speaker (Built-in) USB 3.0 port Colors Power LED Tilt Swivel Pivot Height Adjustment Kensington lock AC input voltage Power consumption Temperature (Operating) Temperature (Non-operating) Dimension (W x H x D) Weight (Esti.) Multi-languages TFT LCD 24.0" (16:10, 61.13 cm) wide screen...
... 3: OSD (On-Screen Display) menu Resolution Pixel pitch Brightness (Typ.) Contrast Ratio (Typ.) Contrast Ratio (Max.) Viewing angle (H/V) CR>10 Display colors Color gamut (Typ.) Response time SplendidPlus Video Enhancement SplendidPlus selection Color temperature selection Digital input Earphone jack Audio input Speaker (Built-in) USB 3.0 port Colors Power LED Tilt Swivel Pivot Height Adjustment Kensington lock AC input voltage Power consumption Temperature (Operating) Temperature (Non-operating) Dimension (W x H x D) Weight (Esti.) Multi-languages TFT LCD 24.0" (16:10, 61.13 cm) wide screen...

PA24A Series User Guide
Page 31
... Quick start guide, Warranty card, Power cord, HDMI cable, USB Type-C to Type-C cable, USB Type-C to Type-A cable, DisplayPort cable, Cable clip, Color Calibration Testing Report, Input/Output port cover, Color Calibrator (for PA24AC-K only) UL/cUL, CB, CE, EuP, FCC, CCC, BSMI, CU, VCCI, TCO, J-MOSS, RoHS, WEEE, PSE, KCC, ICES-3, ErP, CEL, ISO 9241-307, UkrSEPRO, RCM, MEPS, PC Recycle, KC, e-Standby, TUV Flicker Free, TUV Low Blue Light, Windows 7, 8.1 and 10 WHQL, Mac Compliance*** *Specifications...
... Quick start guide, Warranty card, Power cord, HDMI cable, USB Type-C to Type-C cable, USB Type-C to Type-A cable, DisplayPort cable, Cable clip, Color Calibration Testing Report, Input/Output port cover, Color Calibrator (for PA24AC-K only) UL/cUL, CB, CE, EuP, FCC, CCC, BSMI, CU, VCCI, TCO, J-MOSS, RoHS, WEEE, PSE, KCC, ICES-3, ErP, CEL, ISO 9241-307, UkrSEPRO, RCM, MEPS, PC Recycle, KC, e-Standby, TUV Flicker Free, TUV Low Blue Light, Windows 7, 8.1 and 10 WHQL, Mac Compliance*** *Specifications...
PA24A Series User Guide
Page 33
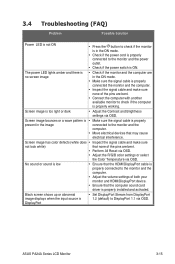
... abnormal image displays when the input source is DisplayPort • Set DisplayPort Stream from DisplayPort 1.2 (default) to the monitor and the computer. • Adjust the volume settings of both your monitor and HDMI/DisplayPort device. • Ensure that the HDMI/DisplayPort cable is ON. No sound or sound is low • Ensure that the computer sound card driver is too light or dark • Adjust the Contrast and Brightness settings via OSD. Screen image is properly installed and...
... abnormal image displays when the input source is DisplayPort • Set DisplayPort Stream from DisplayPort 1.2 (default) to the monitor and the computer. • Adjust the volume settings of both your monitor and HDMI/DisplayPort device. • Ensure that the HDMI/DisplayPort cable is ON. No sound or sound is low • Ensure that the computer sound card driver is too light or dark • Adjust the Contrast and Brightness settings via OSD. Screen image is properly installed and...


