User's Manual for English Edition
Page 3
...53 Storage Devices 54 Flash Memory Card Reader 54 Optical Drive ...55 Hard Disk Drive 58 Memory (RAM 60 Connections...61 Network Connection 61 Wireless LAN Connection (on selected models 63 Windows Wireless Network Connection 65 Bluetooth Wireless Connection(on selected models 67 USB Charger+...70 Appendix Optional Accessories A-2 Optional Connections A-2 Operating System and Software A-3 System BIOS Settings A-4 Common Problems and Solutions A-7 Recovering Your Notebook PC A-13 Using Recovery Partition A-13 Using Recovery DVD (on selected models A-14 Internal Modem Compliancy...
...53 Storage Devices 54 Flash Memory Card Reader 54 Optical Drive ...55 Hard Disk Drive 58 Memory (RAM 60 Connections...61 Network Connection 61 Wireless LAN Connection (on selected models 63 Windows Wireless Network Connection 65 Bluetooth Wireless Connection(on selected models 67 USB Charger+...70 Appendix Optional Accessories A-2 Optional Connections A-2 Operating System and Software A-3 System BIOS Settings A-4 Common Problems and Solutions A-7 Recovering Your Notebook PC A-13 Using Recovery Partition A-13 Using Recovery DVD (on selected models A-14 Internal Modem Compliancy...
User's Manual for English Edition
Page 6
... this guide, allowing you to data, components, or persons. The following are major sections of importance as being correct. Appendix Introduces you information on getting started with the Notebook PC. 4. The actual bundled operating system and applications differ by models and territories. Notes for safe operation. Introducing the Notebook PC Introduces you to use them. IMPORTANT! Knowing the Parts Gives...
... this guide, allowing you to data, components, or persons. The following are major sections of importance as being correct. Appendix Introduces you information on getting started with the Notebook PC. 4. The actual bundled operating system and applications differ by models and territories. Notes for safe operation. Introducing the Notebook PC Introduces you to use them. IMPORTANT! Knowing the Parts Gives...
User's Manual for English Edition
Page 7
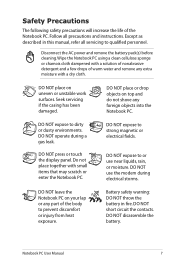
... modem during a gas leak. Battery safety warning: DO NOT throw the battery in this manual, refer all precautions and instructions. DO NOT press or touch the display panel. DO NOT short circuit the contacts. DO NOT expose to strong magnetic or electrical fields. DO NOT use near liquids, rain, or moisture. DO NOT disassemble the battery. DO NOT expose to...
... modem during a gas leak. Battery safety warning: DO NOT throw the battery in this manual, refer all precautions and instructions. DO NOT press or touch the display panel. DO NOT short circuit the contacts. DO NOT expose to strong magnetic or electrical fields. DO NOT use near liquids, rain, or moisture. DO NOT disassemble the battery. DO NOT expose to...

User's Manual for English Edition
Page 15
... display panel. 4 Power Switch The power switch allows powering ON and OFF the Notebook PC and recovering from STD. Two Windows function keys are provided to allow easy Windows or web navigation. Unlike desktop monitors, the LCD panel does not produce any radiation or flickering, so it is available after setting up the included touchpad utility to help ease navigation in the Windows operating system. 6 Touchpad The touchpad is opened. 5 Keyboard The keyboard provides full-sized keys...
... display panel. 4 Power Switch The power switch allows powering ON and OFF the Notebook PC and recovering from STD. Two Windows function keys are provided to allow easy Windows or web navigation. Unlike desktop monitors, the LCD panel does not produce any radiation or flickering, so it is available after setting up the included touchpad utility to help ease navigation in the Windows operating system. 6 Touchpad The touchpad is opened. 5 Keyboard The keyboard provides full-sized keys...
User's Manual for English Edition
Page 18
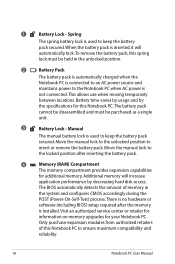
... decreasing hard disk access. Additional memory will automatically lock.To remove the battery pack, this Notebook PC.The battery pack cannot be disassembled and must be purchased as a single unit. 3 Battery Lock - Move the manual lock to the unlocked position to keep the battery pack secured. There is installed. Spring The spring battery lock is used to the locked position after the memory is no hardware or software (including BIOS) setup required after inserting the battery pack. 4 Memory (RAM...
... decreasing hard disk access. Additional memory will automatically lock.To remove the battery pack, this Notebook PC.The battery pack cannot be disassembled and must be purchased as a single unit. 3 Battery Lock - Move the manual lock to the unlocked position to keep the battery pack secured. There is installed. Spring The spring battery lock is used to the locked position after the memory is no hardware or software (including BIOS) setup required after inserting the battery pack. 4 Memory (RAM...
User's Manual for English Edition
Page 22
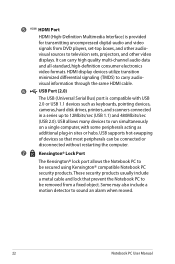
... the Notebook PC to be removed from DVD players, set-top boxes, and other video displays. These security products usually include a metal cable and lock that most peripherals can carry high quality multi-channel audio data and all-standard, high-definition consumer electronics video formats. 5 HDMI HDMI Port HDMI (High-Definition Multimedia Interface) is compatible with some peripherals acting as keyboards, pointing devices, cameras, hard disk drives, printers, and scanners connected in...
... the Notebook PC to be removed from DVD players, set-top boxes, and other video displays. These security products usually include a metal cable and lock that most peripherals can carry high quality multi-channel audio data and all-standard, high-definition consumer electronics video formats. 5 HDMI HDMI Port HDMI (High-Definition Multimedia Interface) is compatible with some peripherals acting as keyboards, pointing devices, cameras, hard disk drives, printers, and scanners connected in...
User's Manual for English Edition
Page 24
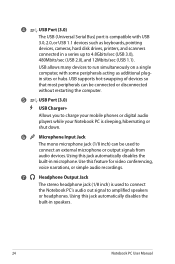
... headphone jack (1/8 inch) is sleeping, hibernating or shut down. 6 Microphone Input Jack The mono microphone jack (1/8 inch) can be connected or disconnected without restarting the computer. 5 USB Port (3.0) USB Charger+ Allows you to charge your mobile phones or digital audio players while your Notebook PC is used to connect an external microphone or output signals from audio devices. Using this jack automatically disables the built-in speakers. 24 Notebook PC User Manual USB allows many devices to...
... headphone jack (1/8 inch) is sleeping, hibernating or shut down. 6 Microphone Input Jack The mono microphone jack (1/8 inch) can be connected or disconnected without restarting the computer. 5 USB Port (3.0) USB Charger+ Allows you to charge your mobile phones or digital audio players while your Notebook PC is used to connect an external microphone or output signals from audio devices. Using this jack automatically disables the built-in speakers. 24 Notebook PC User Manual USB allows many devices to...
User's Manual for English Edition
Page 30
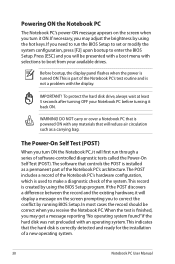
... adjust the brightness by using the hot keys. To protect the hard disk drive, always wait at least 5 seconds after turning OFF your available drives. Powering ON the Notebook PC The Notebook PC's power-ON message appears on the screen prompting you to enter the BIOS Setup. If necessary, you may get a message reporting "No operating system found" if the hard disk was not preloaded with the display. This indicates that is used to boot...
... adjust the brightness by using the hot keys. To protect the hard disk drive, always wait at least 5 seconds after turning OFF your available drives. Powering ON the Notebook PC The Notebook PC's power-ON message appears on the screen prompting you to enter the BIOS Setup. If necessary, you may get a message reporting "No operating system found" if the hard disk was not preloaded with the display. This indicates that is used to boot...

User's Manual for English Edition
Page 36
... allow full operation on demand. Sleep and Hibernate Power management settings can also use by putting components into a low power consumption mode as often as if you never left."Shut Down" will blink in the Windows > Control Panel > Hardware and Sound > Power Options. Because RAM is volatile, it requires power to activate this mode.) 36 Notebook PC User Manual ACPI power management settings are turned OFF. When you resume your work if any keyboard key except [Fn]. (NOTE: The power indicator will...
... allow full operation on demand. Sleep and Hibernate Power management settings can also use by putting components into a low power consumption mode as often as if you never left."Shut Down" will blink in the Windows > Control Panel > Hardware and Sound > Power Options. Because RAM is volatile, it requires power to activate this mode.) 36 Notebook PC User Manual ACPI power management settings are turned OFF. When you resume your work if any keyboard key except [Fn]. (NOTE: The power indicator will...
User's Manual for English Edition
Page 38
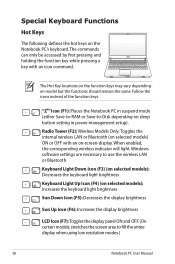
... internal wireless LAN or Bluetooth (on sleep button setting in power management setup). fn f1 "ZZf2" Iconf3 (F1)f4: Placef5 s thef6Notef7bookf8 PC inf9 suspf10end mode f11 f12 (either Save-to-RAM or Save-to fill the entire display when using low resolution modes.) 38 Notebook PC User Manual stretches the screen area to -Disk depending on selected models) ON or OFF with an icon command. Windows software settings are necessary to use the wireless LAN or Bluetooth. Special Keyboard Functions Hot Keys...
... internal wireless LAN or Bluetooth (on sleep button setting in power management setup). fn f1 "ZZf2" Iconf3 (F1)f4: Placef5 s thef6Notef7bookf8 PC inf9 suspf10end mode f11 f12 (either Save-to-RAM or Save-to fill the entire display when using low resolution modes.) 38 Notebook PC User Manual stretches the screen area to -Disk depending on selected models) ON or OFF with an icon command. Windows software settings are necessary to use the wireless LAN or Bluetooth. Special Keyboard Functions Hot Keys...
User's Manual for English Edition
Page 39
... indicator between the Notebook PC's LCD display and an external monitor in this series: LCD Only -> CRT Only (External Monitor) -> LCD + CRT Clone -> LCD + CRT Extend. (This function does not work in 256 Colors, select High Color in Display Property Settings.) NOTE: Must connect an external monitor "before" booting up. fn delete Scr Lk (Del): Toggles the "Scroll Lock" ON and OFF. Notebook PC User Manual 39 Allows you to use a larger portion of the keyboard for number entering...
... indicator between the Notebook PC's LCD display and an external monitor in this series: LCD Only -> CRT Only (External Monitor) -> LCD + CRT Clone -> LCD + CRT Extend. (This function does not work in 256 Colors, select High Color in Display Property Settings.) NOTE: Must connect an external monitor "before" booting up. fn delete Scr Lk (Del): Toggles the "Scroll Lock" ON and OFF. Notebook PC User Manual 39 Allows you to use a larger portion of the keyboard for number entering...
User's Manual for English Edition
Page 54
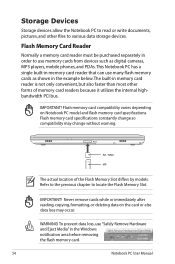
... User Manual Storage Devices Storage devices allow the Notebook PC to read or write documents, pictures, and other forms of the Flash Memory Slot differs by models. IMPORTANT! Flash memory card compatibility varies depending on the card or else data loss may change so compatibility may occur. To prevent data loss, use "Safely Remove Hardware and Eject Media" in order to use many flash memory cards as digital cameras, MP3 players, mobile phones, and PDAs. Flash memory card specifications...
... User Manual Storage Devices Storage devices allow the Notebook PC to read or write documents, pictures, and other forms of the Flash Memory Slot differs by models. IMPORTANT! Flash memory card compatibility varies depending on the card or else data loss may change so compatibility may occur. To prevent data loss, use "Safely Remove Hardware and Eject Media" in order to use many flash memory cards as digital cameras, MP3 players, mobile phones, and PDAs. Flash memory card specifications...

User's Manual for English Edition
Page 60
... no hardware or software (including BIOS) setup required after the memory is only an example.) Notebook PC User Manual Refer to the previous chapter to ensure maximum compatibility and reliability. WARNING! Installing a Memory Card: Removing a Memory Card: 33 (This is only an example.) 60 (This is installed. Only purchase expansion modules from authorized retailers of this Notebook PC to locate the memory. The actual location of memory in the system and configures CMOS...
... no hardware or software (including BIOS) setup required after the memory is only an example.) Notebook PC User Manual Refer to the previous chapter to ensure maximum compatibility and reliability. WARNING! Installing a Memory Card: Removing a Memory Card: 33 (This is only an example.) 60 (This is installed. Only purchase expansion modules from authorized retailers of this Notebook PC to locate the memory. The actual location of memory in the system and configures CMOS...
User's Manual for English Edition
Page 73
... may offer (depending on territory) its original working state provided that provides BIOS, drivers and applications to enable hardware features, extend functionality, help manage your Notebook PC, or add functionality not provided by the native operating system. A recovery disc is in order to provide additional software not included as part of hardware and software support may not work until the device drivers and utilities are installed. The choices and languages will depend on...
... may offer (depending on territory) its original working state provided that provides BIOS, drivers and applications to enable hardware features, extend functionality, help manage your Notebook PC, or add functionality not provided by the native operating system. A recovery disc is in order to provide additional software not included as part of hardware and software support may not work until the device drivers and utilities are installed. The choices and languages will depend on...
User's Manual for English Edition
Page 75
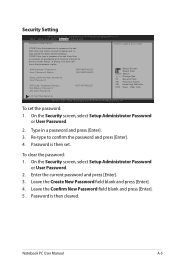
... Password or User Password. 2. On the Security screen, select Setup Administrator Password or User Password. 2. Leave the Create New Password field blank and press [Enter]. 4. If ONLY the Administrator's password is set , then this only limits access to Setup and is then set the password: 1. Administrator Password User Password Status NOT INSTALLED NOT INSTALLED Setup administrator password User Password HDD User Password Status : Set Master Password Set User Password NOT INSTALLED : Select Screen : Select Item Enter: Select +/-: Change Opt. Password is a power on password...
... Password or User Password. 2. On the Security screen, select Setup Administrator Password or User Password. 2. Leave the Create New Password field blank and press [Enter]. 4. If ONLY the Administrator's password is set , then this only limits access to Setup and is then set the password: 1. Administrator Password User Password Status NOT INSTALLED NOT INSTALLED Setup administrator password User Password HDD User Password Status : Set Master Password Set User Password NOT INSTALLED : Select Screen : Select Item Enter: Select +/-: Change Opt. Password is a power on password...
User's Manual for English Edition
Page 77
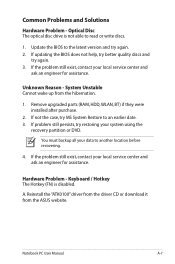
... an earlier date. 3. Update the BIOS to another location before recovering. 4. System Unstable Cannot wake up from the ASUS website. You must backup all your system using the recovery partition or DVD. A. Reinstall the "ATK0100" driver from the driver CD or download it from the hibernation. 1. If not the case, try MS System Restore to read or write discs. 1. Notebook PC User Manual A-7 Hardware Problem - If updating the BIOS does not help...
... an earlier date. 3. Update the BIOS to another location before recovering. 4. System Unstable Cannot wake up from the ASUS website. You must backup all your system using the recovery partition or DVD. A. Reinstall the "ATK0100" driver from the driver CD or download it from the hibernation. 1. If not the case, try MS System Restore to read or write discs. 1. Notebook PC User Manual A-7 Hardware Problem - If updating the BIOS does not help...
User's Manual for English Edition
Page 79
... viruses, use anti-virus software to another location before recovering. Adapter problem; Enter Control Panel -> Device Manager. FAN / Thermal Why is air flow from the main air vent. 2. Make sure that the FAN works when the CPU temperature is high and check whether there is the cooling fan always ON and the temperature high? 1. If none of the above help, try restoring your system using the recovery partition or disc. D. The problem may...
... viruses, use anti-virus software to another location before recovering. Adapter problem; Enter Control Panel -> Device Manager. FAN / Thermal Why is air flow from the main air vent. 2. Make sure that the FAN works when the CPU temperature is high and check whether there is the cooling fan always ON and the temperature high? 1. If none of the above help, try restoring your system using the recovery partition or disc. D. The problem may...
User's Manual for English Edition
Page 82
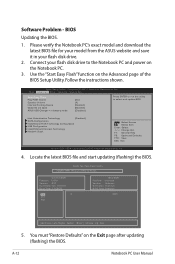
... BIOS file and start updating (flashing) the BIOS. You must "Restore Defaults" on the Notebook PC. 3. Connect your flash disk drive. 2. Aptio Setup Utility - FS1 FS2 New BIOS Platform: Unknown Version: Unknown Build Date: Unknown Build Time: Unknown [Up/Down/Left/Right] : Switch [Enter] : Choose [q] : Exit 5. BIOS Updating the BIOS. 1. Main Advanced Boot Security Save & Exit Start Easy Flash Play POST Sound Speaker Volume Internal Pointing Device Wake On Lid Open ASUS USB Charger+ in your flash disk drive to select and update BIOS. A-12 Notebook PC User Manual...
... BIOS file and start updating (flashing) the BIOS. You must "Restore Defaults" on the Notebook PC. 3. Connect your flash disk drive. 2. Aptio Setup Utility - FS1 FS2 New BIOS Platform: Unknown Version: Unknown Build Date: Unknown Build Time: Unknown [Up/Down/Left/Right] : Switch [Enter] : Choose [q] : Exit 5. BIOS Updating the BIOS. 1. Main Advanced Boot Security Save & Exit Start Easy Flash Play POST Sound Speaker Volume Internal Pointing Device Wake On Lid Open ASUS USB Charger+ in your flash disk drive to select and update BIOS. A-12 Notebook PC User Manual...
User's Manual for English Edition
Page 84
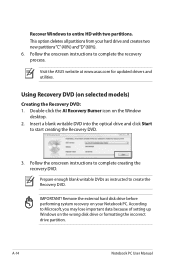
... setting up Windows on the Window desktop. 2. According to complete creating the recovery DVD. Follow the onscreen instructions to start creating the Recovery DVD. 3. Remove the external hard disk drive before performing system recovery on selected models) Creating the Recovery DVD: 1. Insert a blank writable DVD into the optical drive and click Start to complete the recovery process. IMPORTANT! Visit the ASUS website at www.asus.com for updated drivers and utilities. Double-click the AI Recovery Burner icon on the wrong disk drive...
... setting up Windows on the Window desktop. 2. According to complete creating the recovery DVD. Follow the onscreen instructions to start creating the Recovery DVD. 3. Remove the external hard disk drive before performing system recovery on selected models) Creating the Recovery DVD: 1. Insert a blank writable DVD into the optical drive and click Start to complete the recovery process. IMPORTANT! Visit the ASUS website at www.asus.com for updated drivers and utilities. Double-click the AI Recovery Burner icon on the wrong disk drive...
User's Manual for English Edition
Page 85
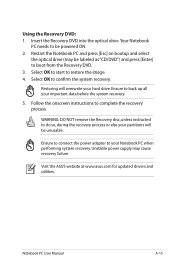
... do so, during the recovery process or else your partitions will overwrite your Notebook PC when performing system recovery. Visit the ASUS website at www.asus.com for updated drivers and utilities. Notebook PC User Manual A-15 Select OK to start to complete the recovery process. Follow the onscreen instructions to restore the image. 4. Select OK to your hard drive. Ensure to connect the power adapter to confirm the system recovery. Using the Recovery DVD: 1.
... do so, during the recovery process or else your partitions will overwrite your Notebook PC when performing system recovery. Visit the ASUS website at www.asus.com for updated drivers and utilities. Notebook PC User Manual A-15 Select OK to start to complete the recovery process. Follow the onscreen instructions to restore the image. 4. Select OK to your hard drive. Ensure to connect the power adapter to confirm the system recovery. Using the Recovery DVD: 1.


