User Guide
Page 2
... are used only for backup purposes, without intent to the listed contract price of each such instance, regardless of the basis on ASUS' part or other actual and direct damages resulted from ASUS, ASUS is the maximum for loss, damages or claims based in contract, tort or infringement under this Warranty Statement, up to infringe. SERVICE AND SUPPORT...
... are used only for backup purposes, without intent to the listed contract price of each such instance, regardless of the basis on ASUS' part or other actual and direct damages resulted from ASUS, ASUS is the maximum for loss, damages or claims based in contract, tort or infringement under this Warranty Statement, up to infringe. SERVICE AND SUPPORT...
User Guide
Page 3
......16 Right side...16 Rear view...19 Chapter 2: Using your ASUS All-in-One PC Positioning your ASUS All-in-One PC 21 Setting up your ASUS All-in-One PC 23 Connecting the wireless keyboard and mouse (optional 23 Powering on the system 24 Using the Onscreen Display (OSD) Menu 26 Using the OSD functions 27 Using the touch screen 29 Using touch screen panel gestures 30 ASUS All-in-One...
......16 Right side...16 Rear view...19 Chapter 2: Using your ASUS All-in-One PC Positioning your ASUS All-in-One PC 21 Setting up your ASUS All-in-One PC 23 Connecting the wireless keyboard and mouse (optional 23 Powering on the system 24 Using the Onscreen Display (OSD) Menu 26 Using the OSD functions 27 Using the touch screen 29 Using touch screen panel gestures 30 ASUS All-in-One...
User Guide
Page 4
... Start button...38 Customizing your Start screen 40 Working with Windows® apps 41 Launching apps...41 Customizing apps...42 Accessing the Apps screen 44 Charms bar...46 Snap feature...48 Other keyboard shortcuts 50 Setting up a secondary display via the HDMI-output port 52 Connecting to the Internet 54 Setting up a Wi-Fi connection in Windows® 8.1 54 Configuring your Wi-Fi bandwidth 55 Wired connection...56 Setting up a Bluetooth Wireless Connection 58 Turning...
... Start button...38 Customizing your Start screen 40 Working with Windows® apps 41 Launching apps...41 Customizing apps...42 Accessing the Apps screen 44 Charms bar...46 Snap feature...48 Other keyboard shortcuts 50 Setting up a secondary display via the HDMI-output port 52 Connecting to the Internet 54 Setting up a Wi-Fi connection in Windows® 8.1 54 Configuring your Wi-Fi bandwidth 55 Wired connection...56 Setting up a Bluetooth Wireless Connection 58 Turning...

User Guide
Page 9
... turned off, a small amount of safety for information technology equipment. Safety information Your All-in-One ASUS All-in-One PC is designed and tested to meet the latest standards of electrical current still remains in the product. Always unplug all power, modem, and network cables from the power outlets before you operate your system. • Do not use...
... turned off, a small amount of safety for information technology equipment. Safety information Your All-in-One ASUS All-in-One PC is designed and tested to meet the latest standards of electrical current still remains in the product. Always unplug all power, modem, and network cables from the power outlets before you operate your system. • Do not use...

User Guide
Page 10
... the operating instructions. - Do not spray the cleaner directly on the supplied cleaning cloth and gently wipe the surface of the screen. - To clean the screen: - The system performance changes. 10 ASUS All-in-One PC PT2001 The system does not function properly even if you encounter the following technical problems with the product, unplug the power cord and contact a qualified service...
... the operating instructions. - Do not spray the cleaner directly on the supplied cleaning cloth and gently wipe the surface of the screen. - To clean the screen: - The system performance changes. 10 ASUS All-in-One PC PT2001 The system does not function properly even if you encounter the following technical problems with the product, unplug the power cord and contact a qualified service...

User Guide
Page 15
... your ASUS All-in -One PC is turned on or on or off. Battery charge indicator This LED lights up from sleep or hibernate mode. Power button Press the power button to sleep or hibernate mode and wake it up when the ASUS All-in -One PC on sleep mode. You can also use the power button to put your ASUS All-in-One PC to turn your ASUS All-in -One PC PT2001...
... your ASUS All-in -One PC is turned on or on or off. Battery charge indicator This LED lights up from sleep or hibernate mode. Power button Press the power button to sleep or hibernate mode and wake it up when the ASUS All-in -One PC on sleep mode. You can also use the power button to put your ASUS All-in-One PC to turn your ASUS All-in -One PC PT2001...

User Guide
Page 17
... Port Connect this port to connect your ASUS All-in mode, use this port with devices equipped with an HDMI input port, such as a mouse, printer, scanner, camera, and others. Volume button Press to amplified speakers or headphones. USB 3.0 ports These Universal Serial Bus 3.0 (USB 3.0) ports connect to an external microphone. ASUS All-in -One PC (when used separately) to USB 3.0 devices such as an LCD monitor or projector. You can also use the HDMI Input port for receiving video/audio...
... Port Connect this port to connect your ASUS All-in mode, use this port with devices equipped with an HDMI input port, such as a mouse, printer, scanner, camera, and others. Volume button Press to amplified speakers or headphones. USB 3.0 ports These Universal Serial Bus 3.0 (USB 3.0) ports connect to an external microphone. ASUS All-in -One PC (when used separately) to USB 3.0 devices such as an LCD monitor or projector. You can also use the HDMI Input port for receiving video/audio...

User Guide
Page 18
... power adapter. Do not cover the adapter and keep it away from your ASUS All-in-One PC using Kensington® compatible security products. 18 ASUS All-in-One PC PT2001 Power supplied through this port. To prevent damage to the ASUS All-in-One PC, always use . USB 2.0 port (dedicated for use with USB 2.0 or USB 1.1 devices such as keyboards, pointing devices, flash disk drives, external HDDs, speakers, cameras and printers. Power input The bundled power adapter converts AC power...
... power adapter. Do not cover the adapter and keep it away from your ASUS All-in-One PC using Kensington® compatible security products. 18 ASUS All-in-One PC PT2001 Power supplied through this port. To prevent damage to the ASUS All-in-One PC, always use . USB 2.0 port (dedicated for use with USB 2.0 or USB 1.1 devices such as keyboards, pointing devices, flash disk drives, external HDDs, speakers, cameras and printers. Power input The bundled power adapter converts AC power...

User Guide
Page 23
You can begin using the wireless keyboard and mouse. ASUS All-in -One PC Connecting the wireless keyboard and mouse (optional) 1. Setting up your ASUS All-inOne PC. 3. Connect the wireless dongle for keyboard and mouse to the USB 2.0 port to automatically pair both devices to your ASUS All-in -One PC PT2001 23 Install batteries into the wireless keyboard and mouse. 2.
You can begin using the wireless keyboard and mouse. ASUS All-in -One PC Connecting the wireless keyboard and mouse (optional) 1. Setting up your ASUS All-inOne PC. 3. Connect the wireless dongle for keyboard and mouse to the USB 2.0 port to automatically pair both devices to your ASUS All-in -One PC PT2001 23 Install batteries into the wireless keyboard and mouse. 2.

User Guide
Page 26
Press the OSD menu button on the left side of your ASUS All-in-One PC for the location of the OSD menu buttons. 26 ASUS All-in-One PC PT2001 Connect an HDMI cable to know your ASUS All-inOne PC. 2. To activate the selected function, press the Menu button again. NOTE: Refer to the section Getting to the rear HDMI input port. To navigate through the OSD functions or modify OSD settings, press the Volume up or Volume down keys below the menu button. Using the Onscreen Display (OSD) Menu The Onscreen Display (OSD) menu will display when you: 1.
Press the OSD menu button on the left side of your ASUS All-in-One PC for the location of the OSD menu buttons. 26 ASUS All-in-One PC PT2001 Connect an HDMI cable to know your ASUS All-inOne PC. 2. To activate the selected function, press the Menu button again. NOTE: Refer to the section Getting to the rear HDMI input port. To navigate through the OSD functions or modify OSD settings, press the Volume up or Volume down keys below the menu button. Using the Onscreen Display (OSD) Menu The Onscreen Display (OSD) menu will display when you: 1.

User Guide
Page 28
...; HDMI: Display video input from the OSD menu. 28 ASUS All-in-One PC PT2001 Adjusts the horizontal position of OSD menu from 10 to 120 seconds. 4. Sets the display duration of the OSD menu. 2. OSD Timeout - DDC/CI - Exit Exit from the HDMI Input port. H-Position - Adjusts the vertical position of the OSD menu. 3. V-Position - System Setup • OSD Setup: 1. Enables or disables the DDC/CI (Display...
...; HDMI: Display video input from the OSD menu. 28 ASUS All-in-One PC PT2001 Adjusts the horizontal position of OSD menu from 10 to 120 seconds. 4. Sets the display duration of the OSD menu. 2. OSD Timeout - DDC/CI - Exit Exit from the HDMI Input port. H-Position - Adjusts the vertical position of the OSD menu. 3. V-Position - System Setup • OSD Setup: 1. Enables or disables the DDC/CI (Display...

User Guide
Page 33
... • Settings • Your account 5. ASUS All-in -One PC. Chapter 3: Working with Windows® 8.1 NOTE: The operating system varies with country or region. Wait for the first time, a series of screens appear to use on during the setup process. 6. Ensure that your apps and preferred settings. Follow the onscreen instructions to install your ASUS All-inOne PC is complete, the Start screen appears. Starting for...
... • Settings • Your account 5. ASUS All-in -One PC. Chapter 3: Working with Windows® 8.1 NOTE: The operating system varies with country or region. Wait for the first time, a series of screens appear to use on during the setup process. 6. Ensure that your apps and preferred settings. Follow the onscreen instructions to install your ASUS All-inOne PC is complete, the Start screen appears. Starting for...

User Guide
Page 38
The Start button may be accessed from the Start screen, while on Desktop mode, and on the display settings you opened app to switch between the two most recent apps you chose for your Start screen. Start button Windows® 8.1 features the Start button which allows you to call out the Start button. 38 ASUS All-in-One PC PT2001 Start button on the Start screen NOTE: The actual color of your Start button varies depending on any opened . Hover your mouse pointer over the left corner of your Start screen or any app that is currently open onscreen.
The Start button may be accessed from the Start screen, while on Desktop mode, and on the display settings you opened app to switch between the two most recent apps you chose for your Start screen. Start button Windows® 8.1 features the Start button which allows you to call out the Start button. 38 ASUS All-in-One PC PT2001 Start button on the Start screen NOTE: The actual color of your Start button varies depending on any opened . Hover your mouse pointer over the left corner of your Start screen or any app that is currently open onscreen.

User Guide
Page 52
... Windows® taskbar and click Playback devices. 3. From the Playback screen, select Digital Audio (HDMI). 4. NOTE: For more details, refer to configure the audio settings. Click Configure and the Speaker Setup window pops up a secondary display via an HDMI device: 1. From the Start screen, launch the Desktop Mode. To configure the audio output via the HDMI-output port If you want to use a high-definition TV as an audio output device, connect it to the Home Theater ASUS...
... Windows® taskbar and click Playback devices. 3. From the Playback screen, select Digital Audio (HDMI). 4. NOTE: For more details, refer to configure the audio settings. Click Configure and the Speaker Setup window pops up a secondary display via an HDMI device: 1. From the Start screen, launch the Desktop Mode. To configure the audio output via the HDMI-output port If you want to use a high-definition TV as an audio output device, connect it to the Home Theater ASUS...

User Guide
Page 54
Setting up a Wi-Fi connection in -One PC using wireless/WiFi or wired connection. Select the wireless network that you want to connect to from any application mode. Connecting to the Internet Access emails, surf the Internet, and share applications via social networking sites on or from your ASUS All-in Windows® 8.1 1. Launch the Charm bar from the Start screen or from the list. 4. NOTE: You may be prompted to enter a security...
Setting up a Wi-Fi connection in -One PC using wireless/WiFi or wired connection. Select the wireless network that you want to connect to from any application mode. Connecting to the Internet Access emails, surf the Internet, and share applications via social networking sites on or from your ASUS All-in Windows® 8.1 1. Launch the Charm bar from the Start screen or from the list. 4. NOTE: You may be prompted to enter a security...

User Guide
Page 56
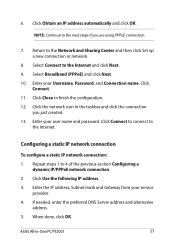
... to the sections Configuring a dynamic IP/PPPoE network connection or Configuring a static IP network connection. • Contact your Internet Service Provider (ISP) for details or assistance in setting up your ASUS All-in -One PC PT2001 From the Start screen, click Desktop to connect your Internet connection. Right-click on your LAN and select Properties. 5. Turn on your computer. 3. Use a network (RJ-45) cable to launch the Desktop mode. 2. From the Open Network and Sharing Center screen, click Change Adapter settings. 4. Wired connection 1.
... to the sections Configuring a dynamic IP/PPPoE network connection or Configuring a static IP network connection. • Contact your Internet Service Provider (ISP) for details or assistance in setting up your ASUS All-in -One PC PT2001 From the Start screen, click Desktop to connect your Internet connection. Right-click on your LAN and select Properties. 5. Turn on your computer. 3. Use a network (RJ-45) cable to launch the Desktop mode. 2. From the Open Network and Sharing Center screen, click Change Adapter settings. 4. Wired connection 1.
User Guide
Page 57
... previous section Configuring a dynamic IP/PPPoE network connection. 2 Click Use the following IP address. 3. When done, click OK. NOTE: Continue to the Network and Sharing Center and then click Set up a new connection or network. 8. Repeat steps 1 to the Internet and click Next. 9. Enter the IP address, Subnet mask and Gateway from your Username, Password, and Connection name. If needed, enter the preferred DNS Server address and...
... previous section Configuring a dynamic IP/PPPoE network connection. 2 Click Use the following IP address. 3. When done, click OK. NOTE: Continue to the Network and Sharing Center and then click Set up a new connection or network. 8. Repeat steps 1 to the Internet and click Next. 9. Enter the IP address, Subnet mask and Gateway from your Username, Password, and Connection name. If needed, enter the preferred DNS Server address and...
User Guide
Page 61
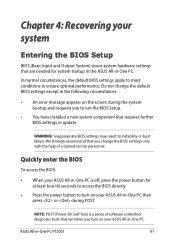
... of software controlled diagnostic tests that run when you change the default BIOS settings except in the following circumstances: • An error message appears on your system Entering the BIOS Setup BIOS (Basic Input and Output System) stores system hardware settings that are needed for at least four (4) seconds to access the BIOS directly. • Press the power button to run the BIOS Setup. • You have installed a new system component that you turn on the screen during...
... of software controlled diagnostic tests that run when you change the default BIOS settings except in the following circumstances: • An error message appears on your system Entering the BIOS Setup BIOS (Basic Input and Output System) stores system hardware settings that are needed for at least four (4) seconds to access the BIOS directly. • Press the power button to run the BIOS Setup. • You have installed a new system component that you turn on the screen during...

User Guide
Page 62
To go through POST, follow any of the ways described in the section Quickly enter the BIOS in -One PC PT2001 IMPORTANT! Back up all your PC: 1. Select Only the drive where the Windows is installed. 6. To reset your data before using this option. Press during bootup. Select Just remove my files. 7. Select Reset your PC to its factory default settings. IMPORTANT! Click Reset. 62 ASUS All-in Chapter 3. 2. Recovering your system Resetting your PC The Reset your PC option restores your PC. 4. Click Next. 5. From the screen, click Troubleshoot. 3.
To go through POST, follow any of the ways described in the section Quickly enter the BIOS in -One PC PT2001 IMPORTANT! Back up all your PC: 1. Select Only the drive where the Windows is installed. 6. To reset your data before using this option. Press during bootup. Select Just remove my files. 7. Select Reset your PC to its factory default settings. IMPORTANT! Click Reset. 62 ASUS All-in Chapter 3. 2. Recovering your system Resetting your PC The Reset your PC option restores your PC. 4. Click Next. 5. From the screen, click Troubleshoot. 3.

User Guide
Page 64
... reinstallation and reset process. 64 ASUS All-in PC Settings. Scroll down to view the Remove everything and reinstall option in -One PC PT2001 Removing everything and reinstalling Windows Restoring your data before using the Remove everything and reinstall Windows option. Refer to the steps below to use this option. Under this option, click Get Started. 4. Click Settings > Change PC Settings > General. 3. Launch the Charms bar. 2. Follow the onscreen instructions to...
... reinstallation and reset process. 64 ASUS All-in PC Settings. Scroll down to view the Remove everything and reinstall option in -One PC PT2001 Removing everything and reinstalling Windows Restoring your data before using the Remove everything and reinstall Windows option. Refer to the steps below to use this option. Under this option, click Get Started. 4. Click Settings > Change PC Settings > General. 3. Launch the Charms bar. 2. Follow the onscreen instructions to...


