
Users Manual
Page 3
Table of Contents About this manual...7 Conventions used in this manual 9 Icons...9 Typography...9 Safety precautions...10 Using your Notebook PC 10 Caring for your Notebook PC 11 Proper disposal...12 Chapter 1: Hardware Setup Getting to know your Notebook PC 14 Top View...14 Bottom...17 Right Side...19 Left Side...20 Chapter 2: Using your Notebook PC Getting started...26 Charge your Notebook PC 26 Lift to open the display panel 28 Press the power button 28 Using the touchpad...29 Using the keyboard...36 Function keys...36 Windows® 10 keys...37 Notebook PC E-Manual 3
Table of Contents About this manual...7 Conventions used in this manual 9 Icons...9 Typography...9 Safety precautions...10 Using your Notebook PC 10 Caring for your Notebook PC 11 Proper disposal...12 Chapter 1: Hardware Setup Getting to know your Notebook PC 14 Top View...14 Bottom...17 Right Side...19 Left Side...20 Chapter 2: Using your Notebook PC Getting started...26 Charge your Notebook PC 26 Lift to open the display panel 28 Press the power button 28 Using the touchpad...29 Using the keyboard...36 Function keys...36 Windows® 10 keys...37 Notebook PC E-Manual 3

Users Manual
Page 4
... Snap hotspots...48 Action Center...50 Other keyboard shortcuts 51 Connecting to wireless networks 53 Wi-Fi...53 Bluetooth...54 Airplane mode...55 Turning your Notebook PC off 56 Putting your Notebook PC to sleep 57 Chapter 4: Power-On Self-Test (POST) The Power-On Self-Test (POST 60 Using POST to access BIOS and Troubleshoot 60 BIOS...60 Accessing BIOS...60 BIOS Settings...61 Recovering your system 68 Performing a recovery option 69 4 Notebook PC E-Manual
... Snap hotspots...48 Action Center...50 Other keyboard shortcuts 51 Connecting to wireless networks 53 Wi-Fi...53 Bluetooth...54 Airplane mode...55 Turning your Notebook PC off 56 Putting your Notebook PC to sleep 57 Chapter 4: Power-On Self-Test (POST) The Power-On Self-Test (POST 60 Using POST to access BIOS and Troubleshoot 60 BIOS...60 Accessing BIOS...60 BIOS Settings...61 Recovering your system 68 Performing a recovery option 69 4 Notebook PC E-Manual

Users Manual
Page 5
Chapter 5: Upgrading your Notebook PC Removing the compartment cover 72 Installing a RAM module 74 Installing the Hard Disk Drive 76 Installing an M.2 card 80 Tips and FAQs Useful tips for your Notebook PC 84 Hardware FAQs...85 Software FAQs...88 Appendices DVD-ROM Drive Information 92 Blu-ray ROM Drive Information 94 Federal Communications Commission Interference Statement 95 FCC Radio Frequency (RF) Exposure Caution Statement 96 Compliance Statement of Innovation, Science and Economic...
Chapter 5: Upgrading your Notebook PC Removing the compartment cover 72 Installing a RAM module 74 Installing the Hard Disk Drive 76 Installing an M.2 card 80 Tips and FAQs Useful tips for your Notebook PC 84 Hardware FAQs...85 Software FAQs...88 Appendices DVD-ROM Drive Information 92 Blu-ray ROM Drive Information 94 Federal Communications Commission Interference Statement 95 FCC Radio Frequency (RF) Exposure Caution Statement 96 Compliance Statement of Innovation, Science and Economic...

Users Manual
Page 8
Chapter 5: Upgrading your Notebook PC This chapter guides you can refer to for your Notebook PC. Appendices This section includes notices and safety statements for maintaining and fixing common issues with your Notebook PC. Tips and FAQs This section presents some recommended tips, hardware FAQs, and software FAQs you through the process of replacing and upgrading parts of your Notebook PC. 8 Notebook PC E-Manual
Chapter 5: Upgrading your Notebook PC This chapter guides you can refer to for your Notebook PC. Appendices This section includes notices and safety statements for maintaining and fixing common issues with your Notebook PC. Tips and FAQs This section presents some recommended tips, hardware FAQs, and software FAQs you through the process of replacing and upgrading parts of your Notebook PC. 8 Notebook PC E-Manual

Users Manual
Page 11
... leaks. Do not expose your Notebook PC. Notebook PC E-Manual 11 Use a clean cellulose sponge or chamois cloth dampened with a solution of nonabrasive detergent and a few drops of your Notebook PC to strong magnetic or electrical fields. Do not expose your Notebook PC. Caring for your Notebook PC Disconnect the AC power and remove the battery pack (if applicable) before...
... leaks. Do not expose your Notebook PC. Notebook PC E-Manual 11 Use a clean cellulose sponge or chamois cloth dampened with a solution of nonabrasive detergent and a few drops of your Notebook PC to strong magnetic or electrical fields. Do not expose your Notebook PC. Caring for your Notebook PC Disconnect the AC power and remove the battery pack (if applicable) before...

Users Manual
Page 15
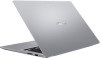
... audio recording. Array microphones The array microphones feature echo canceling, noise suppression, and beam forming functions for typing. Display panel This high-definition display panel provides excellent viewing features for photos, videos, and other multimedia functions. Notebook PC E-Manual 15 It also enables you to Windows®, and controls other multimedia files on your Notebook PC. Camera indicator The camera indicator lights up when the built-in camera is in camera allows you to use...
... audio recording. Array microphones The array microphones feature echo canceling, noise suppression, and beam forming functions for typing. Display panel This high-definition display panel provides excellent viewing features for photos, videos, and other multimedia functions. Notebook PC E-Manual 15 It also enables you to Windows®, and controls other multimedia files on your Notebook PC. Camera indicator The camera indicator lights up when the built-in camera is in camera allows you to use...

Users Manual
Page 21
... Notebook PC through a low-voltage power source. The adapter may vary per model. Notebook PC E-Manual 21 IMPORTANT! NOTE: Transfer rate of up to a power source. Insert the bundled power adapter into this port may become warm to connect your Notebook PC. Use a USB Type-C™ adapter to hot while in use. Use only the bundled power adapter to charge the battery pack and supply power to your Notebook PC to USB 2.0. HDMI port This port is for the HDMI...
... Notebook PC through a low-voltage power source. The adapter may vary per model. Notebook PC E-Manual 21 IMPORTANT! NOTE: Transfer rate of up to a power source. Insert the bundled power adapter into this port may become warm to connect your Notebook PC. Use a USB Type-C™ adapter to hot while in use. Use only the bundled power adapter to charge the battery pack and supply power to your Notebook PC to USB 2.0. HDMI port This port is for the HDMI...

Users Manual
Page 27
...'s battery: • Only ASUS-authorized technicians should remove the battery inside the device (for non-removable battery only). • Discontinue usage if leakage is connected to disassemble and reassemble the battery (for non-removable battery only). • The battery used in fire. • Never attempt to short-circuit your Notebook PC's battery. • Never attempt to the power adapter before turning it matches the input/output rating information on power adapter mode...
...'s battery: • Only ASUS-authorized technicians should remove the battery inside the device (for non-removable battery only). • Discontinue usage if leakage is connected to disassemble and reassemble the battery (for non-removable battery only). • The battery used in fire. • Never attempt to short-circuit your Notebook PC's battery. • Never attempt to the power adapter before turning it matches the input/output rating information on power adapter mode...

Users Manual
Page 36
Using the keyboard Function keys The function keys on your Notebook PC. 36 Notebook PC E-Manual Turns the backlit keyboard light off Turns the backlit keyboard light on Decreases display brightness Increases display brightness Turns the display panel on or off Toggles the display mode NOTE: Ensure that the second display is connected to your Notebook PC's keyboard can trigger the following commands: Puts the Notebook PC into Sleep mode Turns Airplane mode on or off NOTE: When enabled, the Airplane mode disables all wireless connectivity.
Using the keyboard Function keys The function keys on your Notebook PC. 36 Notebook PC E-Manual Turns the backlit keyboard light off Turns the backlit keyboard light on Decreases display brightness Increases display brightness Turns the display panel on or off Toggles the display mode NOTE: Ensure that the second display is connected to your Notebook PC's keyboard can trigger the following commands: Puts the Notebook PC into Sleep mode Turns Airplane mode on or off NOTE: When enabled, the Airplane mode disables all wireless connectivity.

Users Manual
Page 41
... to sleep Launch Settings Launch File Explorer You can use the Start menu to a different user account Notebook PC E-Manual 41 Start menu The Start menu is the main gateway to your Notebook PC • Log off from Windows or switch to do these common activities: • Start programs or Windows® apps • Open commonly used programs or Windows® apps • Adjust Notebook PC settings • Get help with the Windows operating system • Turn...
... to sleep Launch Settings Launch File Explorer You can use the Start menu to a different user account Notebook PC E-Manual 41 Start menu The Start menu is the main gateway to your Notebook PC • Log off from Windows or switch to do these common activities: • Start programs or Windows® apps • Open commonly used programs or Windows® apps • Adjust Notebook PC settings • Get help with the Windows operating system • Turn...
Users Manual
Page 60
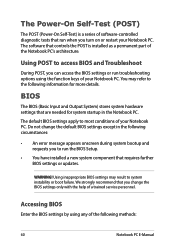
... system startup in the following methods: 60 Notebook PC E-Manual We strongly recommend that you can access the BIOS settings or run the BIOS Setup. • You have installed a new system component that are needed for more details. Do not change the BIOS settings only with the help of a trained service personnel. Using inappropriate BIOS settings may refer to system instability or boot failure. Accessing BIOS Enter the BIOS settings by using the function keys of your Notebook...
... system startup in the following methods: 60 Notebook PC E-Manual We strongly recommend that you can access the BIOS settings or run the BIOS Setup. • You have installed a new system component that are needed for more details. Do not change the BIOS settings only with the help of a trained service personnel. Using inappropriate BIOS settings may refer to system instability or boot failure. Accessing BIOS Enter the BIOS settings by using the function keys of your Notebook...

Users Manual
Page 61
... the Start menu, and choose Settings > Update & security > Recovery, then select Restart now under Advanced startup. BIOS Settings NOTE: The BIOS screens in this section are for the advanced BIOS settings, select Advanced Mode (F7) or press . When you an overview of the basic system information. Notebook PC E-Manual 61 EZ Mode This menu appears when you enter the BIOS setup program and provides you enter the Advanced startup screen, select Troubleshoot > Advanced options > UEFI Firmware Settings...
... the Start menu, and choose Settings > Update & security > Recovery, then select Restart now under Advanced startup. BIOS Settings NOTE: The BIOS screens in this section are for the advanced BIOS settings, select Advanced Mode (F7) or press . When you an overview of the basic system information. Notebook PC E-Manual 61 EZ Mode This menu appears when you enter the BIOS setup program and provides you enter the Advanced startup screen, select Troubleshoot > Advanced options > UEFI Firmware Settings...

Users Manual
Page 63
Notebook PC E-Manual 63 NOTE: • If you install a User Password, you will be prompted to input this before entering the operating system. • If you install an Administrator Password, you to set up the administrator and user password of your Notebook PC's hard disk drive, input/output (I/O) interface, and USB interface. It also allows you to control the access to input this before entering BIOS. Security This menu allows you will be prompted to your Notebook PC.
Notebook PC E-Manual 63 NOTE: • If you install a User Password, you will be prompted to input this before entering the operating system. • If you install an Administrator Password, you to set up the administrator and user password of your Notebook PC's hard disk drive, input/output (I/O) interface, and USB interface. It also allows you to control the access to input this before entering BIOS. Security This menu allows you will be prompted to your Notebook PC.
Users Manual
Page 66
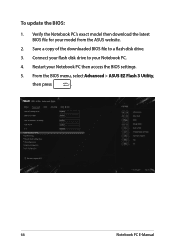
Restart your Notebook PC. 4. From the BIOS menu, select Advanced > ASUS EZ Flash 3 Utility, then press . 66 Notebook PC E-Manual Save a copy of the downloaded BIOS file to your Notebook PC then access the BIOS settings. 5. Connect your flash disk drive to a flash disk drive. 3. To update the BIOS: 1. Verify the Notebook PC's exact model then download the latest BIOS file for your model from the ASUS website. 2.
Restart your Notebook PC. 4. From the BIOS menu, select Advanced > ASUS EZ Flash 3 Utility, then press . 66 Notebook PC E-Manual Save a copy of the downloaded BIOS file to your Notebook PC then access the BIOS settings. 5. Connect your flash disk drive to a flash disk drive. 3. To update the BIOS: 1. Verify the Notebook PC's exact model then download the latest BIOS file for your model from the ASUS website. 2.

Users Manual
Page 68
..., videos, documents). Windows® 10 allows you to a power source before doing any recovery option on your Notebook PC allows you to restore the system to its original state or simply refresh its default settings and delete other installed apps. • Remove everything - This option allows you refresh your data before resetting your Notebook PC to its factory settings. Using this option. 68 Notebook PC E-Manual Recovering your system Using recovery options on your Notebook...
..., videos, documents). Windows® 10 allows you to a power source before doing any recovery option on your Notebook PC allows you to restore the system to its original state or simply refresh its default settings and delete other installed apps. • Remove everything - This option allows you refresh your data before resetting your Notebook PC to its factory settings. Using this option. 68 Notebook PC E-Manual Recovering your system Using recovery options on your Notebook...
Users Manual
Page 76
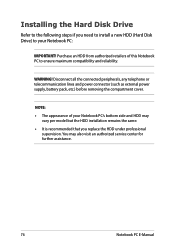
... Notebook PC E-Manual You may vary per model but the HDD installation remains the same. • It is recommended that you need to install a new HDD (Hard Disk Drive) to ensure maximum compatibility and reliability. Disconnect all the connected peripherals, any telephone or telecommunication lines and power connector (such as external power supply, battery pack, etc.) before removing the compartment cover. WARNING! Purchase an HDD from authorized retailers of your Notebook...
... Notebook PC E-Manual You may vary per model but the HDD installation remains the same. • It is recommended that you need to install a new HDD (Hard Disk Drive) to ensure maximum compatibility and reliability. Disconnect all the connected peripherals, any telephone or telecommunication lines and power connector (such as external power supply, battery pack, etc.) before removing the compartment cover. WARNING! Purchase an HDD from authorized retailers of your Notebook...

Users Manual
Page 84
... battery is removable. • Disconnect all external devices and ensure you can follow: • Update Windows® periodically to ensure that you have the following items prior to resetting your Notebook PC: - Product key for a long period of time (at extremely high temperatures. Backup data - Log in an external storage drive. • Refrain from using force shutdown to turn off your Notebook PC. • Always backup...
... battery is removable. • Disconnect all external devices and ensure you can follow: • Update Windows® periodically to ensure that you have the following items prior to resetting your Notebook PC: - Product key for a long period of time (at extremely high temperatures. Backup data - Log in an external storage drive. • Refrain from using force shutdown to turn off your Notebook PC. • Always backup...
Users Manual
Page 85
... Notebook PC. You can I fix this? My display panel has an uneven color and brightness. How can try doing any of the following suggestions: • Use the function keys to adjust the appearance of your display panel may use the function keys or the display settings in your operating system to adjust the display brightness. • If you are not using any Wi-Fi connection, switch your system into Airplane mode. • Disconnect unused USB devices...
... Notebook PC. You can I fix this? My display panel has an uneven color and brightness. How can try doing any of the following suggestions: • Use the function keys to adjust the appearance of your display panel may use the function keys or the display settings in your operating system to adjust the display brightness. • If you are not using any Wi-Fi connection, switch your system into Airplane mode. • Disconnect unused USB devices...
Users Manual
Page 86
... the power outlet and Notebook PC. • If the problem still exists, contact your Notebook PC and remove it. 7. Contact your touchpad. 6. 4. My battery charge indicator does not light up the speaker volume. • Check if your speakers were set to enable your local ASUS service center for assistance. 5. Why is my touchpad not working ? When I play audio and video files, why can try doing any sound from my Notebook PC's audio...
... the power outlet and Notebook PC. • If the problem still exists, contact your Notebook PC and remove it. 7. Contact your touchpad. 6. 4. My battery charge indicator does not light up the speaker volume. • Check if your speakers were set to enable your local ASUS service center for assistance. 5. Why is my touchpad not working ? When I play audio and video files, why can try doing any sound from my Notebook PC's audio...
Users Manual
Page 88
...: "Remove disks or other media. Press any key to fix this ? You can try doing any optical discs that are inserted correctly then turn on my Notebook PC, the power indicator lights up but nothing appears on your Notebook PC. • If the problem still exists, contact your Notebook PC by pressing the power button for assistance. 2. What can I turn on my screen. Contact your system. 88 Notebook PC E-Manual...
...: "Remove disks or other media. Press any key to fix this ? You can try doing any optical discs that are inserted correctly then turn on my Notebook PC, the power indicator lights up but nothing appears on your Notebook PC. • If the problem still exists, contact your Notebook PC by pressing the power button for assistance. 2. What can I turn on my screen. Contact your system. 88 Notebook PC E-Manual...


