
PRIME Z270-K Users manual English
Page 12
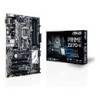
... Front panel audio connector (10-1 pin AAFP) 14. DDR4 DIMM slots 5. Clear RTC RAM (2-pin CLRTC) 10. Digital audio connector (4-1 pin SPDIF_OUT) 13. PCI slots 15. ...aspx?SLanguage=en-us for your system, refer to install additional devices. Intel® LGA1151 CPU socket 4....intend to the Recommended Power Supply Wattage Calculator at http://support.asus.com/PowerSupplyCalculator/PSCalculator. 1.2.1 Layout contents Connectors/Jumpers/Slots/LED ...CHA_FAN1~2, 4-pin AIO_PUMP FAN) 3. Intel® Z270 Serial ATA 6.0 Gb/s connector (7-pin SATA6G_1~6) 8. System panel connector (20-5 pin PANEL...
... Front panel audio connector (10-1 pin AAFP) 14. DDR4 DIMM slots 5. Clear RTC RAM (2-pin CLRTC) 10. Digital audio connector (4-1 pin SPDIF_OUT) 13. PCI slots 15. ...aspx?SLanguage=en-us for your system, refer to install additional devices. Intel® LGA1151 CPU socket 4....intend to the Recommended Power Supply Wattage Calculator at http://support.asus.com/PowerSupplyCalculator/PSCalculator. 1.2.1 Layout contents Connectors/Jumpers/Slots/LED ...CHA_FAN1~2, 4-pin AIO_PUMP FAN) 3. Intel® Z270 Serial ATA 6.0 Gb/s connector (7-pin SATA6G_1~6) 8. System panel connector (20-5 pin PANEL...

PRIME Z270-K Users manual English
Page 15
... opening at the back of the system chassis. +5V SPDIFOUT GND SPDIF_OUT ASUS PRIME Z270-K 1-5 Plug the power cord and turn ON the computer. 4. Connect the serial port module cable to this connector, then install the module to clear the CMOS RTC RAM data of the system chassis. COM PIN 1 DCD TXD GND RTS RI...
... opening at the back of the system chassis. +5V SPDIFOUT GND SPDIF_OUT ASUS PRIME Z270-K 1-5 Plug the power cord and turn ON the computer. 4. Connect the serial port module cable to this connector, then install the module to clear the CMOS RTC RAM data of the system chassis. COM PIN 1 DCD TXD GND RTS RI...

PRIME Z270-K Users manual English
Page 40
... The Main menu screen appears when you enter the Advanced Mode of the screen show Installed. 2-16 Chapter 2: Getting started See section 1.2 Motherboard overview for information on how to erase the RTC RAM. • The Administrator or User Password items on top of the BIOS Setup program...the basic system information, and allows you to set a password, these items show the default Not Installed. After you have forgotten your BIOS password, erase the CMOS Real Time Clock (RTC) RAM to choose the BIOS language version from the options. Configuration options: [English] [Español...
... The Main menu screen appears when you enter the Advanced Mode of the screen show Installed. 2-16 Chapter 2: Getting started See section 1.2 Motherboard overview for information on how to erase the RTC RAM. • The Administrator or User Password items on top of the BIOS Setup program...the basic system information, and allows you to set a password, these items show the default Not Installed. After you have forgotten your BIOS password, erase the CMOS Real Time Clock (RTC) RAM to choose the BIOS language version from the options. Configuration options: [English] [Español...


