Motherboard Pin Definition.English
Page 4
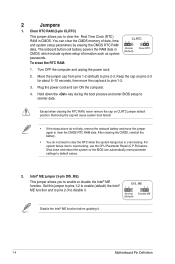
... function and to pins 2-3 to reenter data. Turn OFF the computer and unplug the power cord. 2. Hold down and reboot the system so the BIOS can clear the CMOS memory of date, time, and system setup parameters by erasing the CMOS RTC RAM data. Shut down the key during the... boot process and enter BIOS setup to disable it . 1-4 Motherboard Pin Definition DIS_ME 12 23 Normal (Default) Disable ME Disable the Intel® ME function before updating it . You can automatically reset parameter settings to clear the CMOS RTC RAM data...
... function and to pins 2-3 to reenter data. Turn OFF the computer and unplug the power cord. 2. Hold down and reboot the system so the BIOS can clear the CMOS memory of date, time, and system setup parameters by erasing the CMOS RTC RAM data. Shut down the key during the... boot process and enter BIOS setup to disable it . 1-4 Motherboard Pin Definition DIS_ME 12 23 Normal (Default) Disable ME Disable the Intel® ME function before updating it . You can automatically reset parameter settings to clear the CMOS RTC RAM data...

Motherboard Pin Definition.English
Page 16
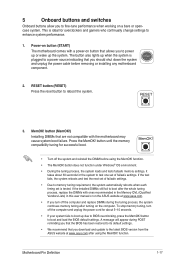
...from the hard disk drive. This user-friendly design provides an intuitive way to indicate the hard disk activity. This is pressed. 5. USB BIOS Flashback LED (FLBK_LED) This LED flashes when you with a standby power LED that you should shut down the system and unplug the power...CPU, DRAM, VGA card, and booting devices) in any motherboard component. Q-Code LED (Q_CODE) The Q-Code LED design provides you press the BIOS Flashback button for BIOS update. 6. The LED does not light up to the motherboard or when the hard disk drive does not function. 3. 4 Onboard LEDs 1. The ...
...from the hard disk drive. This user-friendly design provides an intuitive way to indicate the hard disk activity. This is pressed. 5. USB BIOS Flashback LED (FLBK_LED) This LED flashes when you with a standby power LED that you should shut down the system and unplug the power...CPU, DRAM, VGA card, and booting devices) in any motherboard component. Q-Code LED (Q_CODE) The Q-Code LED design provides you press the BIOS Flashback button for BIOS update. 6. The LED does not light up to the motherboard or when the hard disk drive does not function. 3. 4 Onboard LEDs 1. The ...
Motherboard Pin Definition.English
Page 17
...to a power source indicating that you download and update to the latest BIOS version from the ASUS website at www.asus.com. • If you turn off the... computer and unplug the power cord for the system to test one set of failsafe settings. • Due to enhance system performance. 1. If the test fails, the system reboots and test the next set is plugged to BIOS...MemOK! If the installed DIMMs still fail to boot and load the BIOS default settings. A message will appear during the tuning process, the ...
...to a power source indicating that you download and update to the latest BIOS version from the ASUS website at www.asus.com. • If you turn off the... computer and unplug the power cord for the system to test one set of failsafe settings. • Due to enhance system performance. 1. If the test fails, the system reboots and test the next set is plugged to BIOS...MemOK! If the installed DIMMs still fail to boot and load the BIOS default settings. A message will appear during the tuning process, the ...

E12583 BIOS Update ManualEnglish
Page 1
Motherboard BIOS Update and Management
Motherboard BIOS Update and Management
E12583 BIOS Update ManualEnglish
Page 2
... USE ONLY, AND ARE SUBJECT TO CHANGE AT ANY TIME WITHOUT NOTICE, AND SHOULD NOT BE CONSTRUED AS A COMMITMENT BY ASUS. ASUS ASSUMES NO RESPONSIBILITY OR LIABILITY FOR ANY ERRORS OR INACCURACIES THAT MAY APPEAR IN THIS MANUAL, INCLUDING THE PRODUCTS AND SOFTWARE DESCRIBED...to the extent permitted by the purchaser for the cost of this email address). 2 BIOS Update and Management This offer is distributed without the express written permission of ASUSTeK COMPUTER INC. ("ASUS"). ASUSTeK is defaced or missing. If however you . Where the applicable license entitles you...
... USE ONLY, AND ARE SUBJECT TO CHANGE AT ANY TIME WITHOUT NOTICE, AND SHOULD NOT BE CONSTRUED AS A COMMITMENT BY ASUS. ASUS ASSUMES NO RESPONSIBILITY OR LIABILITY FOR ANY ERRORS OR INACCURACIES THAT MAY APPEAR IN THIS MANUAL, INCLUDING THE PRODUCTS AND SOFTWARE DESCRIBED...to the extent permitted by the purchaser for the cost of this email address). 2 BIOS Update and Management This offer is distributed without the express written permission of ASUSTeK COMPUTER INC. ("ASUS"). ASUSTeK is defaced or missing. If however you . Where the applicable license entitles you...

E12583 BIOS Update ManualEnglish
Page 4
... to select a boot logo Click to update the BIOS EZ Update requires an Internet connection either through a network or an ISP (Internet Service Provider). 4 BIOS Update and Management Click to automatically update your motherboard. BIOS Update and Management This manual discusses the ASUS-exclusive utilities or tools that allows you need to automatically update your motherboard's softwares, drivers and the...
... to select a boot logo Click to update the BIOS EZ Update requires an Internet connection either through a network or an ISP (Internet Service Provider). 4 BIOS Update and Management Click to automatically update your motherboard. BIOS Update and Management This manual discusses the ASUS-exclusive utilities or tools that allows you need to automatically update your motherboard's softwares, drivers and the...
E12583 BIOS Update ManualEnglish
Page 5
... arrow keys to find the USB flash disk that contains the latest BIOS file to the USB port. 2. Before you to perform the BIOS update process. Press to switch to enable it. 3. Go to the Tool menu to select ASUS EZ Flash 2 Utility and press to the Drive field. 4. Press... the Up/Down arrow keys to find the BIOS file, and then press to update the BIOS without using EZ Flash 2: 1. BIOS Update and Management 5
... arrow keys to find the USB flash disk that contains the latest BIOS file to the USB port. 2. Before you to perform the BIOS update process. Press to switch to enable it. 3. Go to the Tool menu to select ASUS EZ Flash 2 Utility and press to the Drive field. 4. Press... the Up/Down arrow keys to find the BIOS file, and then press to update the BIOS without using EZ Flash 2: 1. BIOS Update and Management 5
E12583 BIOS Update ManualEnglish
Page 6
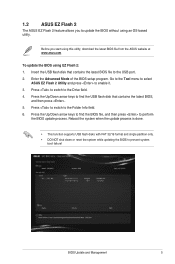
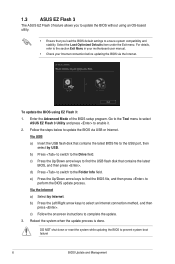
... BIOS update process. e) Press the Up/Down arrow keys to complete the update. 3. Reboot the system when the update process is done. d) Press to switch to prevent system boot failure! 6 BIOS Update and Management 1.3 ASUS EZ Flash 3 The ASUS EZ Flash 3 feature allows you load the BIOS ...default settings to enable it. 2. Select the Load Optimized Defaults item under the Exit menu. To update the BIOS using an OS‑based utility....
... BIOS update process. e) Press the Up/Down arrow keys to complete the update. 3. Reboot the system when the update process is done. d) Press to switch to prevent system boot failure! 6 BIOS Update and Management 1.3 ASUS EZ Flash 3 The ASUS EZ Flash 3 feature allows you load the BIOS ...default settings to enable it. 2. Select the Load Optimized Defaults item under the Exit menu. To update the BIOS using an OS‑based utility....
E12583 BIOS Update ManualEnglish
Page 7
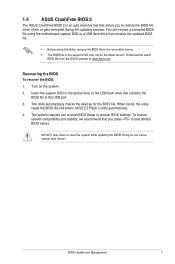
...that contains the updated BIOS file. • Before using this utility, rename the BIOS file in the removable device. • The BIOS file in the support DVD may not be the latest version. BIOS Update and Management 7 Download the latest BIOS file from the ASUS website at www.asus.com. The system... requires you to enter BIOS Setup to the USB ...
...that contains the updated BIOS file. • Before using this utility, rename the BIOS file in the removable device. • The BIOS file in the support DVD may not be the latest version. BIOS Update and Management 7 Download the latest BIOS file from the ASUS website at www.asus.com. The system... requires you to enter BIOS Setup to the USB ...
E12583 BIOS Update ManualEnglish
Page 8
... the system while updating the BIOS to perform the BIOS update process. Insert the USB flash disk that contains the latest BIOS, and then press . 4. Press the Up/Down arrow keys to the USB port. 2. Press + during POST to update the BIOS without using an OS‑based utility. • Before you to enter ASUS EZ Flash utility...
... the system while updating the BIOS to perform the BIOS update process. Insert the USB flash disk that contains the latest BIOS, and then press . 4. Press the Up/Down arrow keys to the USB port. 2. Press + during POST to update the BIOS without using an OS‑based utility. • Before you to enter ASUS EZ Flash utility...
E12583 BIOS Update ManualEnglish
Page 9
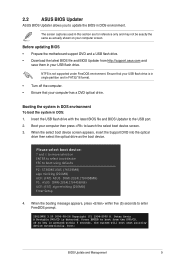
... press to boot from http://support.asus.com and save them in DOS: 1. Boot your computer has a DVD optical drive. Booting the system in DOS environment To boot the system in your computer screen. boot: BIOS Update and Management 9 When the select ... drive. Before updating BIOS • Prepare the motherboard support DVD and a USB flash drive. • Download the latest BIOS file and BIOS Updater from the DVD/CD. Insert the USB flash drive with the latest BIOS file and BIOS Updater to update the BIOS in DOS environment. 2.2 ASUS BIOS Updater ASUS BIOS Updater allows you to...
... press to boot from http://support.asus.com and save them in DOS: 1. Boot your computer has a DVD optical drive. Booting the system in DOS environment To boot the system in your computer screen. boot: BIOS Update and Management 9 When the select ... drive. Before updating BIOS • Prepare the motherboard support DVD and a USB flash drive. • Download the latest BIOS file and BIOS Updater from the DVD/CD. Insert the USB flash drive with the latest BIOS file and BIOS Updater to update the BIOS in DOS environment. 2.2 ASUS BIOS Updater ASUS BIOS Updater allows you to...
E12583 BIOS Update ManualEnglish
Page 10
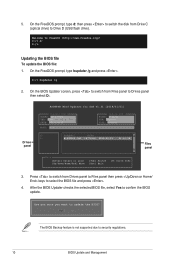
...Exit [V] Drive Info Files panel 3. Are you sure you want to FreeDOS (http://www.freedos.org)! Welcome to update the BIOS? After the BIOS Updater checks the selected BIOS file, select Yes to Drives panel then select D:. On the FreeDOS prompt, type bupdater /g and press . 5. On... the BIOS Updater screen, press to switch from Files panel to confirm the BIOS update. Press to switch from Drive C (optical drive) to select the BIOS file and press . 4. D:/> bupdater /g 2. On the FreeDOS prompt, type ...
...Exit [V] Drive Info Files panel 3. Are you sure you want to FreeDOS (http://www.freedos.org)! Welcome to update the BIOS? After the BIOS Updater checks the selected BIOS file, select Yes to Drives panel then select D:. On the FreeDOS prompt, type bupdater /g and press . 5. On... the BIOS Updater screen, press to switch from Files panel to confirm the BIOS update. Press to switch from Drive C (optical drive) to select the BIOS file and press . 4. D:/> bupdater /g 2. On the FreeDOS prompt, type ...
E12583 BIOS Update ManualEnglish
Page 11
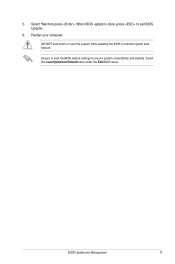
Select Yes then press . When BIOS update is done, press to ensure system compatibility and stability. Ensure to load the BIOS default settings to exit BIOS Updater. 6. Select the Load Optimized Defaults item under the Exit BIOS menu. 5. DO NOT shut down or reset the system while updating the BIOS to prevent system boot failaure. BIOS Update and Management 11 Restart your computer.
Select Yes then press . When BIOS update is done, press to ensure system compatibility and stability. Ensure to load the BIOS default settings to exit BIOS Updater. 6. Select the Load Optimized Defaults item under the Exit BIOS menu. 5. DO NOT shut down or reset the system while updating the BIOS to prevent system boot failaure. BIOS Update and Management 11 Restart your computer.

PRIME H270-PR0 Users manual English
Page 3
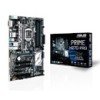
Contents Safety information iv About this guide iv Package contents vi PRIME H270-PRO specifications summary vi Chapter 1: Product introduction 1.1 Before you proceed 1-1 1.2 Motherboard overview 1-1 1.3 Central Processing Unit (CPU 1-10 1.4 System memory 1-11 Chapter 2: BIOS information 2.1 Managing and updating your BIOS 2-1 2.2 BIOS setup program 2-6 2.3 Exit menu 2-11 Appendix Notices...A-1 ASUS contact information A-4 iii
Contents Safety information iv About this guide iv Package contents vi PRIME H270-PRO specifications summary vi Chapter 1: Product introduction 1.1 Before you proceed 1-1 1.2 Motherboard overview 1-1 1.3 Central Processing Unit (CPU 1-10 1.4 System memory 1-11 Chapter 2: BIOS information 2.1 Managing and updating your BIOS 2-1 2.2 BIOS setup program 2-6 2.3 Exit menu 2-11 Appendix Notices...A-1 ASUS contact information A-4 iii

PRIME H270-PR0 Users manual English
Page 7
... devices support (both SATA & x4 PCIE mode)* - 1 x M.2 Socket 3 with up to 32Gb/s data transfer speeds ASUS Fan Xpert 4 Core - PRIME H270-PRO specifications summary Specifications Storage LAN Intel® H270 Chipset with RAID 0, 1, 5, 10 and Intel Rapid Storage Technology 15 support - 1 x M.2 Socket 3 with M Key... a device in SATA mode is only supported when using Intel® Optane memory modules, ensure that you have updated your motherboard drivers and BIOS to guard the quality of the sensitive audio signals - Before using 7th Generation Intel® processors. Supports jack-...
... devices support (both SATA & x4 PCIE mode)* - 1 x M.2 Socket 3 with up to 32Gb/s data transfer speeds ASUS Fan Xpert 4 Core - PRIME H270-PRO specifications summary Specifications Storage LAN Intel® H270 Chipset with RAID 0, 1, 5, 10 and Intel Rapid Storage Technology 15 support - 1 x M.2 Socket 3 with M Key... a device in SATA mode is only supported when using Intel® Optane memory modules, ensure that you have updated your motherboard drivers and BIOS to guard the quality of the sensitive audio signals - Before using 7th Generation Intel® processors. Supports jack-...

PRIME H270-PR0 Users manual English
Page 9
...30.5 cm x 22.6cm) Specifications are only supported by 6th Generation Intel® processors. PRIME H270-PRO specifications summary Specifications Internal connectors BIOS features Manageability Support DVD OS support Form factor 2 x USB 3.0 / 2.0 connector support ...BIOS, PnP, DMI3.0, WfM2.0, SM BIOS 3.0, ACPI 6.0, Multi-language BIOS, ASUS EZ Flash 3, CrashFree BIOS 3, F11 EZ Tuning Wizard, F6 Qfan Control, F3 My Favorites, Last Modified log, F12 PrintScreen and ASUS DRAM SPD (Serial Presence Detect) memory information WfM 2.0, DMI 3.0, WOL by PME, PXE Drivers ASUS utilities ASUS EZ Update...
...30.5 cm x 22.6cm) Specifications are only supported by 6th Generation Intel® processors. PRIME H270-PRO specifications summary Specifications Internal connectors BIOS features Manageability Support DVD OS support Form factor 2 x USB 3.0 / 2.0 connector support ...BIOS, PnP, DMI3.0, WfM2.0, SM BIOS 3.0, ACPI 6.0, Multi-language BIOS, ASUS EZ Flash 3, CrashFree BIOS 3, F11 EZ Tuning Wizard, F6 Qfan Control, F3 My Favorites, Last Modified log, F12 PrintScreen and ASUS DRAM SPD (Serial Presence Detect) memory information WfM 2.0, DMI 3.0, WOL by PME, PXE Drivers ASUS utilities ASUS EZ Update...

PRIME H270-PR0 Users manual English
Page 23
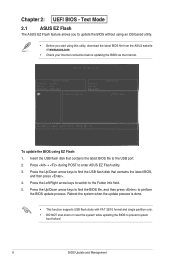
... to the Folder field. Reboot the system when the update process is done. 2.1.2 ASUS EZ Flash 3 The ASUS EZ Flash 3 feature allows you to update the BIOS without using EZ Flash 3: 1. c) Press the Up/Down arrow keys to find the BIOS file, and then press to ensure system compatibility and ... Ensure to load the BIOS default settings to perform the BIOS update process. Follow the steps below to select an Internet connection method, and then press . Chapter 2: Getting started 2-2 Enter the Advanced Mode of the BIOS setup program. Go to the Tool menu to select ASUS EZ Flash 3 and press...
... to the Folder field. Reboot the system when the update process is done. 2.1.2 ASUS EZ Flash 3 The ASUS EZ Flash 3 feature allows you to update the BIOS without using EZ Flash 3: 1. c) Press the Up/Down arrow keys to find the BIOS file, and then press to ensure system compatibility and ... Ensure to load the BIOS default settings to perform the BIOS update process. Follow the steps below to select an Internet connection method, and then press . Chapter 2: Getting started 2-2 Enter the Advanced Mode of the BIOS setup program. Go to the Tool menu to select ASUS EZ Flash 3 and press...

PRIME H270-PR0 Users manual English
Page 24
... USB flash drive. 2-3 ASUS PRIME H270-PRO Before updating BIOS • Prepare the motherboard support DVD and a USB flash drive. • Download the latest BIOS file and BIOS Updater from the ASUS website at www.asus.com. You can cause system boot failure! 2.1.4 ASUS BIOS Updater ASUS BIOS Updater allows you to restore the BIOS file when it fails or gets corrupted during the updating process. To ensure system...
... USB flash drive. 2-3 ASUS PRIME H270-PRO Before updating BIOS • Prepare the motherboard support DVD and a USB flash drive. • Download the latest BIOS file and BIOS Updater from the ASUS website at www.asus.com. You can cause system boot failure! 2.1.4 ASUS BIOS Updater ASUS BIOS Updater allows you to restore the BIOS file when it fails or gets corrupted during the updating process. To ensure system...

PRIME H270-PR0 Users manual English
Page 25
... booting message appears, press within 5 seconds, the system will boot next priority device automatically. boot: 5. C:/> d: D:/> Updating the BIOS file To update the BIOS file: 1. If no key is detected. Welcome to launch the select boot device screen. 3. On the FreeDOS prompt, type...bupdater /g Chapter 2: Getting started 2-4 Insert the USB flash drive with the latest BIOS file and BIOS Updater to boot using defaults P2: ST3808110AS (76319MB) aigo miniking (250MB) UEFI: (FAT) ASUS DRW-2014L1T(4458MB) P1: ASUS DRW-2014L1T(4458MB) UEFI: (FAT) aigo miniking (250MB) Enter Setup 4. On...
... booting message appears, press within 5 seconds, the system will boot next priority device automatically. boot: 5. C:/> d: D:/> Updating the BIOS file To update the BIOS file: 1. If no key is detected. Welcome to launch the select boot device screen. 3. On the FreeDOS prompt, type...bupdater /g Chapter 2: Getting started 2-4 Insert the USB flash drive with the latest BIOS file and BIOS Updater to boot using defaults P2: ST3808110AS (76319MB) aigo miniking (250MB) UEFI: (FAT) ASUS DRW-2014L1T(4458MB) P1: ASUS DRW-2014L1T(4458MB) UEFI: (FAT) aigo miniking (250MB) Enter Setup 4. On...

PRIME H270-PR0 Users manual English
Page 26
...] Exit [V] Drive Info Files panel 3. Wait until the BIOS update is not supported due to update the BIOS? Press any key to reboot the system to prevent system boot failaure. Select the Load Optimized Defaults item under the Exit BIOS menu. Drives panel ASUSTeK BIOS Updater for details. 2-5 ASUS PRIME H270-PRO DO NOT shut down or reset the system while...
...] Exit [V] Drive Info Files panel 3. Wait until the BIOS update is not supported due to update the BIOS? Press any key to reboot the system to prevent system boot failaure. Select the Load Optimized Defaults item under the Exit BIOS menu. Drives panel ASUSTeK BIOS Updater for details. 2-5 ASUS PRIME H270-PRO DO NOT shut down or reset the system while...


