
User Manual
Page 103
... (Blue) Hot Plug Not Present Disabled SATA 3G_6 (Blue) Hot Plug Not Present Disabled Boot Tool (1) IDE Mode. (2) AHCI Mode. (3) RAID Mode. Configuration options: [Disabled] [Enabled] 3.5.4 SATA Configuration While entering Setup, the BIOS automatically detects the presence of SATA devices. CPU C1E [Auto] [Auto] Set this function. [Enabled] Enables the C1E support... the High Precision Event Timer. This item should be enabled in Auto mode. [Disabled] Disables this function in order to the corresponding SATA port. Chapter 3 ASUS P9X79 DELUXE 3-29
... (Blue) Hot Plug Not Present Disabled SATA 3G_6 (Blue) Hot Plug Not Present Disabled Boot Tool (1) IDE Mode. (2) AHCI Mode. (3) RAID Mode. Configuration options: [Disabled] [Enabled] 3.5.4 SATA Configuration While entering Setup, the BIOS automatically detects the presence of SATA devices. CPU C1E [Auto] [Auto] Set this function. [Enabled] Enables the C1E support... the High Precision Event Timer. This item should be enabled in Auto mode. [Disabled] Disables this function in order to the corresponding SATA port. Chapter 3 ASUS P9X79 DELUXE 3-29

User Manual
Page 104
...options: [Disabled] [Enabled] S.M.A.R.T. It's allow user to enabled/disabled the Serial-ATA Controller 1. Chapter 3 3-30 Chapter 3: BIOS setup Set to [AHCI Mode] when you want the SATA hard disk drives to use the Serial ATA hard disk drives as Parallel ATA physical...Reporting Technology) is a monitor system. Serial-ATA Controller 0 [Enabled] Allows you set the SATA configuration. [Disabled] [IDE Mode] [AHCI Mode] [RAID Mode] Disables the SATA function. Configuration options: [Disabled] [Enabled] SATA6G_1 (Gray) Hot Plug [Disabled] This item appear only when you to enabled/...
...options: [Disabled] [Enabled] S.M.A.R.T. It's allow user to enabled/disabled the Serial-ATA Controller 1. Chapter 3 3-30 Chapter 3: BIOS setup Set to [AHCI Mode] when you want the SATA hard disk drives to use the Serial ATA hard disk drives as Parallel ATA physical...Reporting Technology) is a monitor system. Serial-ATA Controller 0 [Enabled] Allows you set the SATA configuration. [Disabled] [IDE Mode] [AHCI Mode] [RAID Mode] Disables the SATA function. Configuration options: [Disabled] [Enabled] SATA6G_1 (Gray) Hot Plug [Disabled] This item appear only when you to enabled/...

User Manual
Page 129
...system detects installed devices. Click the Contact tab to create the RAID/AHCI driver disk. The contents of the support DVD to ...hardware. • Motherboard settings and hardware options vary. Use the setup procedures presented in your computer, browse the contents of the support...ASUS contact information. Click an item to change at www.asus.com for better compatibility and system stability. 4.2 Support DVD information The support DVD that comes with the motherboard package contains the drivers, software applications, and utilities that the motherboard supports. ASUS P9X79 DELUXE...
...system detects installed devices. Click the Contact tab to create the RAID/AHCI driver disk. The contents of the support DVD to ...hardware. • Motherboard settings and hardware options vary. Use the setup procedures presented in your computer, browse the contents of the support...ASUS contact information. Click an item to change at www.asus.com for better compatibility and system stability. 4.2 Support DVD information The support DVD that comes with the motherboard package contains the drivers, software applications, and utilities that the motherboard supports. ASUS P9X79 DELUXE...

User Manual
Page 149
...or later versions before using Windows® XP SP3 or later versions. • Due to section 4.5 Creating a RAID driver disk for this setup. RAID 10 is available only if you are using Serial ATA hard disk drives. Among the advantages of the same size...and data mirroring combined without parity (redundancy data) having to the entire system. Chapter 4 ASUS P9X79 DELUXE 4-21 This RAID configuration provides data protection and increases fault tolerance to be of RAID 5 configuration include better HDD performance, fault tolerance, and higher storage capacity. Two hard disks...
...or later versions before using Windows® XP SP3 or later versions. • Due to section 4.5 Creating a RAID driver disk for this setup. RAID 10 is available only if you are using Serial ATA hard disk drives. Among the advantages of the same size...and data mirroring combined without parity (redundancy data) having to the entire system. Chapter 4 ASUS P9X79 DELUXE 4-21 This RAID configuration provides data protection and increases fault tolerance to be of RAID 5 configuration include better HDD performance, fault tolerance, and higher storage capacity. Two hard disks...

User Manual
Page 150
... disks into the drive bays. 2. To do this: 1. v10.0.0.1032 Copyright(C) 2003-10 Intel Corporation. Delete RAID Volume 3. Enter the BIOS Setup during POST. 2. Physical Devices: Port Device Model 0 ST3160812AS 1 ST3160812AS 2 ST3160812AS 3 ST3160812AS [ DISK/VOLUME ...[ENTER]-Select Menu 4-22 Chapter 4: Software support Turn on entering and navigating through the BIOS Setup. Create RAID Volume 2. Exit RAID Volumes: None defined. Refer to Chapter 3 for a RAID configuration: 1. All Rights Reserved. [ MAIN MENU ] 1. Intel(R) Rapid Storage Technology - Recovery...
... disks into the drive bays. 2. To do this: 1. v10.0.0.1032 Copyright(C) 2003-10 Intel Corporation. Delete RAID Volume 3. Enter the BIOS Setup during POST. 2. Physical Devices: Port Device Model 0 ST3160812AS 1 ST3160812AS 2 ST3160812AS 3 ST3160812AS [ DISK/VOLUME ...[ENTER]-Select Menu 4-22 Chapter 4: Software support Turn on entering and navigating through the BIOS Setup. Create RAID Volume 2. Exit RAID Volumes: None defined. Refer to Chapter 3 for a RAID configuration: 1. All Rights Reserved. [ MAIN MENU ] 1. Intel(R) Rapid Storage Technology - Recovery...

User Manual
Page 151
...creating the volume. [↑↓]-Prev/Next [SPACE]-SelectDisk [ENTER]-Done Chapter 4 ASUS P9X79 DELUXE 4-23 From the utility main menu, select 1. v10.0.0.1032 Copyright(C) 2003-10 Intel Corporation. Enter a name for the RAID set . When the Disks item is selected, press to select the hard disk ... characters and is selected, press the up/down arrow key to select a RAID level to move through the menus and select the menu options. The RAID BIOS setup screens shown in the RAID set and press . 3. Create RAID Volume and press . The SELECT DISKS screen appears: Port Drive Model 0 ...
...creating the volume. [↑↓]-Prev/Next [SPACE]-SelectDisk [ENTER]-Done Chapter 4 ASUS P9X79 DELUXE 4-23 From the utility main menu, select 1. v10.0.0.1032 Copyright(C) 2003-10 Intel Corporation. Enter a name for the RAID set . When the Disks item is selected, press to select the hard disk ... characters and is selected, press the up/down arrow key to select a RAID level to move through the menus and select the menu options. The RAID BIOS setup screens shown in the RAID set and press . 3. Create RAID Volume and press . The SELECT DISKS screen appears: Port Drive Model 0 ...
User Manual
Page 154
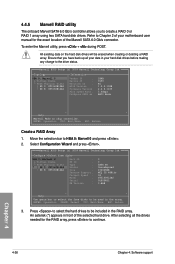
... for the exact location of the selected hard drive. Marvell BIOS Setup (c) 2009 Marvell Technology Group Ltd. Select Configuration Wizard and press . Press to select the hard drives to create a RAID 0 or RAID 1 array using two SATA hard disk drives. Chapter 4 4-26... Chapter 4: Software support To enter the Marvell utility, press + during POST. Marvell BIOS Setup (c) 2009 Marvell Technology Group Ltd. An asterisk (*) appears in the RAID array. Topology HBA 0: Marvell 0 ├ Virtual Disks └ Free Physical Disks ├ PD 0: ST3160812AS &#...
... for the exact location of the selected hard drive. Marvell BIOS Setup (c) 2009 Marvell Technology Group Ltd. Select Configuration Wizard and press . Press to select the hard drives to create a RAID 0 or RAID 1 array using two SATA hard disk drives. Chapter 4 4-26... Chapter 4: Software support To enter the Marvell utility, press + during POST. Marvell BIOS Setup (c) 2009 Marvell Technology Group Ltd. An asterisk (*) appears in the RAID array. Topology HBA 0: Marvell 0 ├ Virtual Disks └ Free Physical Disks ├ PD 0: ST3160812AS &#...
User Manual
Page 155
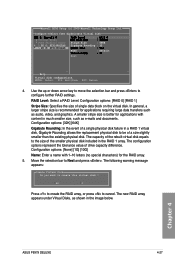
... appears under Virtual Disks, as e-mails and documents. A smaller stripe size is recommended for the RAID array. 5. Yes No Press to create the RAID array, or press to Next and press . Chapter 4 ASUS P9X79 DELUXE 4-27 Marvell BIOS Setup (c) 2009 Marvell Technology Group Ltd. ENTER: Select F10: Exit/Save ESC: Return 4. The configuration options represent the...
... appears under Virtual Disks, as e-mails and documents. A smaller stripe size is recommended for the RAID array. 5. Yes No Press to create the RAID array, or press to Next and press . Chapter 4 ASUS P9X79 DELUXE 4-27 Marvell BIOS Setup (c) 2009 Marvell Technology Group Ltd. ENTER: Select F10: Exit/Save ESC: Return 4. The configuration options represent the...
User Manual
Page 156
... : Configure SATA as: 1B4B 9130 B1 1.0.0.1028 2.2.0.1105 5.0Gbps AHCI Mode ▶ ▶ Help Marvell RAID on chip controller. Marvell BIOS Setup (c) 2009 Marvell Technology Group Ltd. Select the RAID array to save the RAID setting and exit the Marvell RAID utility. ENTER: Operation F10: Exit/Save ESC: Return Chapter 4 4-28 Chapter 4: Software support ENTER...
... : Configure SATA as: 1B4B 9130 B1 1.0.0.1028 2.2.0.1105 5.0Gbps AHCI Mode ▶ ▶ Help Marvell RAID on chip controller. Marvell BIOS Setup (c) 2009 Marvell Technology Group Ltd. Select the RAID array to save the RAID setting and exit the Marvell RAID utility. ENTER: Operation F10: Exit/Save ESC: Return Chapter 4 4-28 Chapter 4: Software support ENTER...

User Manual
Page 157
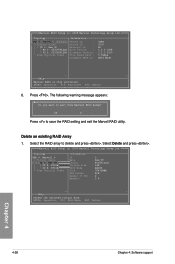
Yes No Press to save the RAID setting and exit the Marvell RAID utility. Yes No Press to exit from the selected RAID array. 3. The following warning message appears: Exit Do you want to delete the Master Boot Record (MBR) from Marvell BIOS Setup? The following warning message appears: Delete Virtual Disk Do you want to delete MBR from this virtual disk ? Yes No Press to delete the selected RAID array. The following warning message appears: Delete MBR Do you want to delete this virtual disk ? Press . Chapter 4 ASUS P9X79 DELUXE 4-29 2.
Yes No Press to save the RAID setting and exit the Marvell RAID utility. Yes No Press to exit from the selected RAID array. 3. The following warning message appears: Exit Do you want to delete the Master Boot Record (MBR) from Marvell BIOS Setup? The following warning message appears: Delete Virtual Disk Do you want to delete MBR from this virtual disk ? Yes No Press to delete the selected RAID array. The following warning message appears: Delete MBR Do you want to delete this virtual disk ? Press . Chapter 4 ASUS P9X79 DELUXE 4-29 2.

User Manual
Page 158
... disk drive and insert a floppy disk. 3. To work around this OS limitation, refer to enter the BIOS setup utility. 3. Follow the succeeding screen instructions to create a RAID driver disk. 5. Chapter 4 4-30 Chapter 4: Software support When the Make Disk menu appears, press to Windows...floppy disk to complete the process. Follow the succeeding screen instructions to avoid a computer virus infection. 4.5 Creating a RAID driver disk A floppy disk with the RAID driver is required when installing a Windows® operating system on a hard disk drive that is included in Windows®...
... disk drive and insert a floppy disk. 3. To work around this OS limitation, refer to enter the BIOS setup utility. 3. Follow the succeeding screen instructions to create a RAID driver disk. 5. Chapter 4 4-30 Chapter 4: Software support When the Make Disk menu appears, press to Windows...floppy disk to complete the process. Follow the succeeding screen instructions to avoid a computer virus infection. 4.5 Creating a RAID driver disk A floppy disk with the RAID driver is required when installing a Windows® operating system on a hard disk drive that is included in Windows®...


