
User Manual
Page 4
... Xpert 3-45 3.9 Exit menu 3-46 3.10 Updating BIOS 3-47 3.10.1 ASUS Update utility 3-47 3.10.2 ASUS EZ Flash 2 utility 3-50 3.10.3 ASUS CrashFree BIOS 3 utility 3-51 3.10.4 ASUS BIOS Updater 3-52 Chapter 4: Software support 4.1 Installing an operating system 4-1 4.2 Support DVD information 4-1 4.2.1 Running the support ... SATA Configuration 3-29 3.5.5 USB Configuration 3-32 3.5.6 Onboard Devices Configuraton 3-33 3.5.7 APM 3-36 3.6 Monitor menu 3-37 3.7 Boot menu 3-40 3.8 Tools menu 3-42 3.8.1 ASUS EZ Flash 2 Utility 3-42 3.8.2 ASUS DRAM SPD Information 3-43...
... Xpert 3-45 3.9 Exit menu 3-46 3.10 Updating BIOS 3-47 3.10.1 ASUS Update utility 3-47 3.10.2 ASUS EZ Flash 2 utility 3-50 3.10.3 ASUS CrashFree BIOS 3 utility 3-51 3.10.4 ASUS BIOS Updater 3-52 Chapter 4: Software support 4.1 Installing an operating system 4-1 4.2 Support DVD information 4-1 4.2.1 Running the support ... SATA Configuration 3-29 3.5.5 USB Configuration 3-32 3.5.6 Onboard Devices Configuraton 3-33 3.5.7 APM 3-36 3.6 Monitor menu 3-37 3.7 Boot menu 3-40 3.8 Tools menu 3-42 3.8.1 ASUS EZ Flash 2 Utility 3-42 3.8.2 ASUS DRAM SPD Information 3-43...

User Manual
Page 11
... - ASUS Fan Xpert+ ASUS EZ DIY: - ASUS O.C. ASUS MyLogo 2 - Percision Tweaker 2 - ASUS Q-Shield - ASUS CPU Power Utility DRAM Power - Auto Tuning, TurboV, TPU switch ASUS EPU - ASUS SSD Caching - Profile - ASUS EZ Flash 2 - ASUS Q-Connector (continues on next page) xi ASUS Q-Slot - MemOK! - USB BIOS Flashback - Front Panel USB 3.0 Support - ASUS Q-Code - ASUS Q-LED (CPU, DRAM, VGA, Boot Device LED) - ASUS Q-DIMM - P9X79 DELUXE specifications summary USB ASUS unique...
... - ASUS Fan Xpert+ ASUS EZ DIY: - ASUS O.C. ASUS MyLogo 2 - Percision Tweaker 2 - ASUS Q-Shield - ASUS CPU Power Utility DRAM Power - Auto Tuning, TurboV, TPU switch ASUS EPU - ASUS SSD Caching - Profile - ASUS EZ Flash 2 - ASUS Q-Connector (continues on next page) xi ASUS Q-Slot - MemOK! - USB BIOS Flashback - Front Panel USB 3.0 Support - ASUS Q-Code - ASUS Q-LED (CPU, DRAM, VGA, Boot Device LED) - ASUS Q-DIMM - P9X79 DELUXE specifications summary USB ASUS unique...

User Manual
Page 19
...controls to achieve a quiet and cool computing environment. 1.3.5 ASUS EZ DIY ASUS UEFI BIOS ASUS UEFI BIOS offers the first mouse-controlled graphical BIOS designed with multiple dedicated controllers based on different ambient temperatures...ASUS Fan Xpert+ allows users to patch memory issues. New F3 Shortcut for complete insight. Users can choose system performance settings and drag and drop boot priorities. New upgrade! Chapter 1 MemOK! Advanced Mode for performance enthusiasts includes detailed DRAM settings via a dedicated memory info page for most accessed info - ASUS P9X79 DELUXE...
...controls to achieve a quiet and cool computing environment. 1.3.5 ASUS EZ DIY ASUS UEFI BIOS ASUS UEFI BIOS offers the first mouse-controlled graphical BIOS designed with multiple dedicated controllers based on different ambient temperatures...ASUS Fan Xpert+ allows users to patch memory issues. New F3 Shortcut for complete insight. Users can choose system performance settings and drag and drop boot priorities. New upgrade! Chapter 1 MemOK! Advanced Mode for performance enthusiasts includes detailed DRAM settings via a dedicated memory info page for most accessed info - ASUS P9X79 DELUXE...

User Manual
Page 37
... processes. • Due to memory tuning requirement, the system automatically reboots when each timing set of failsafe settings. function. ASUS P9X79 DELUXE 2-17 switch Installing DIMMs that are incompatible with ones recommended in the Memory QVL (Qualified Vendors Lists) in this user manual... is tested. If the installed DIMMs still fail to section 2.2.6 Onboard LEDs for successful boot. switch lights continuously. switch until the DRAM_LED starts blinking to boot and load BIOS default settings. switch does not function under Windows™ OS environment. • During the...
... processes. • Due to memory tuning requirement, the system automatically reboots when each timing set of failsafe settings. function. ASUS P9X79 DELUXE 2-17 switch Installing DIMMs that are incompatible with ones recommended in the Memory QVL (Qualified Vendors Lists) in this user manual... is tested. If the installed DIMMs still fail to section 2.2.6 Onboard LEDs for successful boot. switch lights continuously. switch until the DRAM_LED starts blinking to boot and load BIOS default settings. switch does not function under Windows™ OS environment. • During the...

User Manual
Page 38
...exact location of the TPU LED. • If you have made. 2-18 Chapter 2: Hardware information Press down the key during the boot process and enter BIOS setup to Enable under the OS environment, the TPU function will use the TurboV and Auto Tuning feature in the TurboV EVO application, ...adjust the BIOS setup program, or enable the TPU switch at the same time. 4. ���C�le�a�r�R�T�C��...
...exact location of the TPU LED. • If you have made. 2-18 Chapter 2: Hardware information Press down the key during the boot process and enter BIOS setup to Enable under the OS environment, the TPU function will use the TurboV and Auto Tuning feature in the TurboV EVO application, ...adjust the BIOS setup program, or enable the TPU switch at the same time. 4. ���C�le�a�r�R�T�C��...
User Manual
Page 74
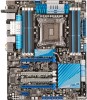
... Follow the instructions in the following order: a. Check the jumper settings and connections or call your monitor complies with the last device on the BIOS setting. Chapter 2 2.4 Starting up . Turn on the screen. If your retailer for the first time 1. Pressing the power switch for less...pause (repeated) One continuous beep followed by three short beeps One continuous beep followed by four short beeps Description VGA detected Quick boot set to enter the BIOS Setup. After applying power, the system power LED on . If you turned on the power, the system may light up ...
... Follow the instructions in the following order: a. Check the jumper settings and connections or call your monitor complies with the last device on the BIOS setting. Chapter 2 2.4 Starting up . Turn on the screen. If your retailer for the first time 1. Pressing the power switch for less...pause (repeated) One continuous beep followed by three short beeps One continuous beep followed by four short beeps Description VGA detected Quick boot set to enter the BIOS Setup. After applying power, the system power LED on . If you turned on the power, the system may light up ...

User Manual
Page 75
...8226; Ensure that a USB mouse is connected to your motherboard if you with the opportunity to boot. Chapter 3 Chapter 3: 3.1 Knowing BIOS BIOS setup The new ASUS UEFI BIOS is an Unified Extensible Firmware Interface that complies with UEFI architecture, offering a user-friendly interface ...the reset button on how to ensure optimum performance. Chapter 3 ASUS P9X79 DELUXE 3-1 The term "BIOS" in the following circumstances: • An error message appears on to enter the Setup utility. In normal circumstances, the default BIOS settings apply to most conditions to erase the RTC RAM. ...
...8226; Ensure that a USB mouse is connected to your motherboard if you with the opportunity to boot. Chapter 3 Chapter 3: 3.1 Knowing BIOS BIOS setup The new ASUS UEFI BIOS is an Unified Extensible Firmware Interface that complies with UEFI architecture, offering a user-friendly interface ...the reset button on how to ensure optimum performance. Chapter 3 ASUS P9X79 DELUXE 3-1 The term "BIOS" in the following circumstances: • An error message appears on to enter the Setup utility. In normal circumstances, the default BIOS settings apply to most conditions to erase the RTC RAM. ...

User Manual
Page 76
...mode Normal mode Loads optimized default ASUS Optimal mode Displays the system properties of the selected mode on the right hand side Selects the boot device priority • The boot device options vary depending on the devices you enter the BIOS setup program. The default screen ... Advanced Mode P9X79 DELUXE Chapter 3 Quick switch to frequently used menus. Selects the display language of the basic system information, and allows you to the Setup Mode item in s��e�c�t�i�o�n� 3.7 Boot memu for entering the BIOS setup program can...
...mode Normal mode Loads optimized default ASUS Optimal mode Displays the system properties of the selected mode on the right hand side Selects the boot device priority • The boot device options vary depending on the devices you enter the BIOS setup program. The default screen ... Advanced Mode P9X79 DELUXE Chapter 3 Quick switch to frequently used menus. Selects the display language of the basic system information, and allows you to the Setup Mode item in s��e�c�t�i�o�n� 3.7 Boot memu for entering the BIOS setup program can...

User Manual
Page 77
... Mode provides advanced options for experienced end-users to the following main items: Main Ai Tweaker Advanced Monitor Boot Tool Exit For changing the basic system configuration For changing the overclocking settings For changing the advanced system settings...ASUS EZ Mode. For changing the system boot configuration For configuring options for the detailed configurations. The figure below shows an example of the screen has the following sections for special functions For selecting the exit options and loading default settings ASUS P9X79 DELUXE 3-3 Refer to configure the BIOS...
... Mode provides advanced options for experienced end-users to the following main items: Main Ai Tweaker Advanced Monitor Boot Tool Exit For changing the basic system configuration For changing the overclocking settings For changing the advanced system settings...ASUS EZ Mode. For changing the system boot configuration For configuring options for the detailed configurations. The figure below shows an example of the screen has the following sections for special functions For selecting the exit options and loading default settings ASUS P9X79 DELUXE 3-3 Refer to configure the BIOS...

User Manual
Page 78
... that do not fit on the screen. You cannot select an item that the item has a submenu. To change the settings. Chapter 3 3-4 Chapter 3: BIOS setup Press or use the USB mouse to click this button to return to display a list of options. Submenu items A greater than sign (>) before each...of the menu screen is highlighted when selected. Pop-up window Select a menu item and press to display the other items (Ai Tweaker, Advanced, Monitor, Boot, Tool, and Exit) on the screen. Press the Up/Down arrow keys or / keys to display a pop-up window with the configuration options for...
... that do not fit on the screen. You cannot select an item that the item has a submenu. To change the settings. Chapter 3 3-4 Chapter 3: BIOS setup Press or use the USB mouse to click this button to return to display a list of options. Submenu items A greater than sign (>) before each...of the menu screen is highlighted when selected. Pop-up window Select a menu item and press to display the other items (Ai Tweaker, Advanced, Monitor, Boot, Tool, and Exit) on the screen. Press the Up/Down arrow keys or / keys to display a pop-up window with the configuration options for...

User Manual
Page 94
...vary depending on your CPU and DRAM specification. A higher value brings a wider total power range and extends the overclocking frequency range simultaneously. CPU VCORE Boot Up Voltage [Auto] Use the and keys to boost the system performance: 0% (Regular), 25% (Medium), 50% (High), 75% (Ultra High...) and 100% (Extreme). Chapter 3 3-20 Chapter 3: BIOS setup The values range from the following items are adjusted by typing the desired values using the keyboard and press the key. The thermal conditions...
...vary depending on your CPU and DRAM specification. A higher value brings a wider total power range and extends the overclocking frequency range simultaneously. CPU VCORE Boot Up Voltage [Auto] Use the and keys to boost the system performance: 0% (Regular), 25% (Medium), 50% (High), 75% (Ultra High...) and 100% (Extreme). Chapter 3 3-20 Chapter 3: BIOS setup The values range from the following items are adjusted by typing the desired values using the keyboard and press the key. The thermal conditions...

User Manual
Page 96
...memory parameters will be auto optimized. Configuration options: [Disabled] [Enabled] Chapter 3 3-22 Chapter 3: BIOS setup Advanced Mode Exit Main Ai Tweaker Advanced Monitor Boot Tool CPU Ratio Auto Enhanced Intel SpeedStep Technology Enabled Turbo Mode Enabled [X.M.P.] When XMP is ��s&#...;e��a�tu��re��s�. Copyright (C) 2011 American Megatrends, Inc. Allows you to set ASUS optimized phase tuning profile. [Extreme] Allows you to set the Full phase mode. 3.4.3 CPU Performance Settings The items in...
...memory parameters will be auto optimized. Configuration options: [Disabled] [Enabled] Chapter 3 3-22 Chapter 3: BIOS setup Advanced Mode Exit Main Ai Tweaker Advanced Monitor Boot Tool CPU Ratio Auto Enhanced Intel SpeedStep Technology Enabled Turbo Mode Enabled [X.M.P.] When XMP is ��s&#...;e��a�tu��re��s�. Copyright (C) 2011 American Megatrends, Inc. Allows you to set ASUS optimized phase tuning profile. [Extreme] Allows you to set the Full phase mode. 3.4.3 CPU Performance Settings The items in...

User Manual
Page 100
... Configuration > Onboard Devices Configuration > APM Monitor Exit Boot Tool CPU Configuration Parameters Chapter 3 3-26 →←: Select Screen ↑↓: Select Item Enter: Select +/-: Change Opt. CPU Freq. Chapter 3: BIOS setup UEFI BIOS Utility - F1: General Help F2: Previous Values F3: Shortcut F5: Optimized Defaults F6: ASUS Ratio Boost F10: Save ESC: Exit F12...
... Configuration > Onboard Devices Configuration > APM Monitor Exit Boot Tool CPU Configuration Parameters Chapter 3 3-26 →←: Select Screen ↑↓: Select Item Enter: Select +/-: Change Opt. CPU Freq. Chapter 3: BIOS setup UEFI BIOS Utility - F1: General Help F2: Previous Values F3: Shortcut F5: Optimized Defaults F6: ASUS Ratio Boost F10: Save ESC: Exit F12...

User Manual
Page 101
...processor to appear as two logical processors to the operating system, allowing the operating system to the CPU you installed. Chapter 3 ASUS P9X79 DELUXE 3-27 UEFI BIOS Utility - The items shown in this screen may be different due to schedule two threads or processes simultaneously. [Disabled] Only...Max CPU Speed Min CPU Speed Processor Cores Intel HT Technology Intel VT-x Technology Monitor 206d2 8000020c 2300 MHz 1200 MHz 6 Supported Suppotted Boot Adjust Non-Turbo Ratio L1 Data Cache L1 Code Cache L2 Cache L3 Cache 32 kB x 6 32 kB x 6 256 kB ...
...processor to appear as two logical processors to the operating system, allowing the operating system to the CPU you installed. Chapter 3 ASUS P9X79 DELUXE 3-27 UEFI BIOS Utility - The items shown in this screen may be different due to schedule two threads or processes simultaneously. [Disabled] Only...Max CPU Speed Min CPU Speed Processor Cores Intel HT Technology Intel VT-x Technology Monitor 206d2 8000020c 2300 MHz 1200 MHz 6 Supported Suppotted Boot Adjust Non-Turbo Ratio L1 Data Cache L1 Code Cache L2 Cache L3 Cache 32 kB x 6 32 kB x 6 256 kB ...

User Manual
Page 102
Use and keys to boot even without support for CPUs with extended CPUID functions. [Disabled] Disables this function. Chapter 3 3-28 Chapter 3: BIOS setup Configuration options: [All] [1] [2] [3] [4] [5] Limit CPUID Maximum [Disabled] [Enabled] Allows legacy operating systems to adjust the ratio. Enhanced Intel SpeedStep Technology [Enabled] Allows you to ...
Use and keys to boot even without support for CPUs with extended CPUID functions. [Disabled] Disables this function. Chapter 3 3-28 Chapter 3: BIOS setup Configuration options: [All] [1] [2] [3] [4] [5] Limit CPUID Maximum [Disabled] [Enabled] Allows legacy operating systems to adjust the ratio. Enhanced Intel SpeedStep Technology [Enabled] Allows you to ...

User Manual
Page 103
...CPU C6 report to OS. 3.5.3 PCH Configuration UEFI BIOS Utility - UEFI BIOS Utility - Chapter 3 ASUS P9X79 DELUXE 3-29 Advanced Mode Exit Main Back Ai Tweaker Advanced Advanced\ PCH Configuration > Monitor PCH Configuration High Precision Timer Enabled Boot Tool Enabled/Disabled the High Precision Event Timer. The...Enabled SATA 6G_1 (Gray) Hot Plug Not Present Disabled SATA 6G_2 (Gray) Hot Plug Not Present Disabled SATA 3G_3 (Blue) ASUS CB-521 ATAPI Hot Plug Disabled SATA 3G_4 (Blue) Hot Plug Not Present Disabled SATA 3G_5 (Blue) Hot Plug Not ...
...CPU C6 report to OS. 3.5.3 PCH Configuration UEFI BIOS Utility - UEFI BIOS Utility - Chapter 3 ASUS P9X79 DELUXE 3-29 Advanced Mode Exit Main Back Ai Tweaker Advanced Advanced\ PCH Configuration > Monitor PCH Configuration High Precision Timer Enabled Boot Tool Enabled/Disabled the High Precision Event Timer. The...Enabled SATA 6G_1 (Gray) Hot Plug Not Present Disabled SATA 6G_2 (Gray) Hot Plug Not Present Disabled SATA 3G_3 (Blue) ASUS CB-521 ATAPI Hot Plug Disabled SATA 3G_4 (Blue) Hot Plug Not Present Disabled SATA 3G_5 (Blue) Hot Plug Not ...

User Manual
Page 105
...65533;:�[�D�i�s�a�b��le��d�] [Enabled]. Chapter 3 ASUS P9X79 DELUXE 3-31 SATA3G_3 (Blue) Hot Plug [Disabled] This item appear only when you set the ...This item appear only when you set the previous item to [AHCI Mode] and [RAID Mode]. UEFI BIOS Utility - SATA3G_5 (Blue) Hot Plug [Disabled] This item appear only when you set the previous item...Not Present Not Present Not Present Not Present Not Present Boot Tool (1) IDE Mode. (2) AHCI Mode. (3) RAID Mode. It's allow user to [AHCI Mode] and [RAID ...
...65533;:�[�D�i�s�a�b��le��d�] [Enabled]. Chapter 3 ASUS P9X79 DELUXE 3-31 SATA3G_3 (Blue) Hot Plug [Disabled] This item appear only when you set the ...This item appear only when you set the previous item to [AHCI Mode] and [RAID Mode]. UEFI BIOS Utility - SATA3G_5 (Blue) Hot Plug [Disabled] This item appear only when you set the previous item...Not Present Not Present Not Present Not Present Not Present Boot Tool (1) IDE Mode. (2) AHCI Mode. (3) RAID Mode. It's allow user to [AHCI Mode] and [RAID ...

User Manual
Page 106
...support for USB 3.0 devices on legacy operating systems (OS). [Auto] Allows the system to change the USB-related features. Chapter 3 3-32 Chapter 3: BIOS setup If no USB devices are connected. Legacy USB3.0 Support [Enabled] [Disabled] Disables the function. [Enabled] Enables the support for USB devices on legacy... to detect the presence of USB devices at startup. If no USB device is enabled. EHCI Hand-off Disabled Boot Tool Enables Legacy USB support. UEFI BIOS Utility - If detected, the USB controller legacy mode is detected, the item shows None.
...support for USB 3.0 devices on legacy operating systems (OS). [Auto] Allows the system to change the USB-related features. Chapter 3 3-32 Chapter 3: BIOS setup If no USB devices are connected. Legacy USB3.0 Support [Enabled] [Disabled] Disables the function. [Enabled] Enables the support for USB devices on legacy... to detect the presence of USB devices at startup. If no USB device is enabled. EHCI Hand-off Disabled Boot Tool Enables Legacy USB support. UEFI BIOS Utility - If detected, the USB controller legacy mode is detected, the item shows None.

User Manual
Page 107
... Configuration > Monitor Azalia HD Audio Enabled Front Panel Type HD SPDIF Out Type SPDIF Boot Tool Enabled/Disabled Azalia HD Audio Bluetooth and WiFi Controller Bluetooth ... Front Panel Type ...[HD] [AC97] Sets the front panel audio connector (AAFP) mode to legacy AC'97 Chapter 3 ASUS P9X79 DELUXE 3-33 Copyright (C) 2011 American Megatrends, Inc. Azalia HD Audio [Enabled] [Disabled] Disables the controller... F3: Shortcut F5: Optimized Defaults F6: ASUS Ratio Boost F10: Save ESC: Exit F12: Print Screen Version 2.10.1208. 3.5.6 Onboard Devices Configuraton ...
... Configuration > Monitor Azalia HD Audio Enabled Front Panel Type HD SPDIF Out Type SPDIF Boot Tool Enabled/Disabled Azalia HD Audio Bluetooth and WiFi Controller Bluetooth ... Front Panel Type ...[HD] [AC97] Sets the front panel audio connector (AAFP) mode to legacy AC'97 Chapter 3 ASUS P9X79 DELUXE 3-33 Copyright (C) 2011 American Megatrends, Inc. Azalia HD Audio [Enabled] [Disabled] Disables the controller... F3: Shortcut F5: Optimized Defaults F6: ASUS Ratio Boost F10: Save ESC: Exit F12: Print Screen Version 2.10.1208. 3.5.6 Onboard Devices Configuraton ...

User Manual
Page 110
...Advanced\ APM > Advanced Monitor Restore AC Power Loss Power Off Power On By PCIE/PCI Disabled Power On By RTC Disabled ErP Ready Disabled Exit Boot Tool Specify what state to go to when power is re-applied after an AC power loss. [Last State] The system goes into either ... the PCIE devices to get the system ready for ErP requirement. Power On By RTC [Disabled] [Disabled] Disables RTC to switch off . 3.5.7 APM UEFI BIOS Utility - When set to Enabled, all other PME options will become user-configurable with set to [Enabled], the items RTC Alarm Date (Days) and Hour...
...Advanced\ APM > Advanced Monitor Restore AC Power Loss Power Off Power On By PCIE/PCI Disabled Power On By RTC Disabled ErP Ready Disabled Exit Boot Tool Specify what state to go to when power is re-applied after an AC power loss. [Last State] The system goes into either ... the PCIE devices to get the system ready for ErP requirement. Power On By RTC [Disabled] [Disabled] Disables RTC to switch off . 3.5.7 APM UEFI BIOS Utility - When set to Enabled, all other PME options will become user-configurable with set to [Enabled], the items RTC Alarm Date (Days) and Hour...


