
User Guide
Page 3
... Australia statement notice ix About this guide...x How this guide is organized x Where to find more information x P9D-E/4L Specifications Summary xii Chapter 1: Product Introduction 1.1 Welcome!...1-3 1.2 Package contents 1-3 1.3 Serial number label 1-4 1.4 Special features 1-4 1.4.1 Product highlights 1-4 1.4.2 Innovative ASUS features 1-6 Chapter 2: Hardware Information 2.1 Before you proceed 2-3 2.2 Motherboard overview 2-4 2.2.1 Placement direction 2-4 2.2.2 Screw holes 2-4 2.2.3 Motherboard layout 2-5 2.2.4 Layout...
... Australia statement notice ix About this guide...x How this guide is organized x Where to find more information x P9D-E/4L Specifications Summary xii Chapter 1: Product Introduction 1.1 Welcome!...1-3 1.2 Package contents 1-3 1.3 Serial number label 1-4 1.4 Special features 1-4 1.4.1 Product highlights 1-4 1.4.2 Innovative ASUS features 1-6 Chapter 2: Hardware Information 2.1 Before you proceed 2-3 2.2 Motherboard overview 2-4 2.2.1 Placement direction 2-4 2.2.2 Screw holes 2-4 2.2.3 Motherboard layout 2-5 2.2.4 Layout...

User Guide
Page 12
... 6G HW RAID card ASUS PIKE 2208 8-port SAS 6G HW RAID card ASUS PIKE 2308 8-port SAS 6G RAID card ASUS PIKE 9230 4-port SATA 6G RAID card * Refer to x8 link if slot 5 is occupied) 1 x PCI-E x1 (x1 Gen2 link); P9D-E/4L Specifications Summary Processor Support .../ System Bus Core Logic Form Factor Fan Speed Control Rack Ready ASUS Features (Rack and Pedestal dual use) ASWM Enterprise Memory Total Slots Capacity Memory Type Total PCI/PCI-E Slots Slot Location 1 Slot Location 2 Expansion...
... 6G HW RAID card ASUS PIKE 2208 8-port SAS 6G HW RAID card ASUS PIKE 2308 8-port SAS 6G RAID card ASUS PIKE 9230 4-port SATA 6G RAID card * Refer to x8 link if slot 5 is occupied) 1 x PCI-E x1 (x1 Gen2 link); P9D-E/4L Specifications Summary Processor Support .../ System Bus Core Logic Form Factor Fan Speed Control Rack Ready ASUS Features (Rack and Pedestal dual use) ASWM Enterprise Memory Total Slots Capacity Memory Type Total PCI/PCI-E Slots Slot Location 1 Slot Location 2 Expansion...

User Guide
Page 18
...shown as the figure below its power, current, and temperature specification limits. The Intel® EM64T feature allows your problems. P9D-E/4L xxS2xxxxxxxx Made in China 合格 1.4 Special features 1.4.1 Product highlights Latest processor technology This motherboard supports the latest Intel&#... single-threaded workloads. This technology increases performance of the product, ASUS Technical Support team members can then offer a quicker and satisfying solution to your computer to support 2-channel (4 DIMMs) DDR3 memory and 16 PCI Express 3.0 lanes. Intel® Hyper Threading...
...shown as the figure below its power, current, and temperature specification limits. The Intel® EM64T feature allows your problems. P9D-E/4L xxS2xxxxxxxx Made in China 合格 1.4 Special features 1.4.1 Product highlights Latest processor technology This motherboard supports the latest Intel&#... single-threaded workloads. This technology increases performance of the product, ASUS Technical Support team members can then offer a quicker and satisfying solution to your computer to support 2-channel (4 DIMMs) DDR3 memory and 16 PCI Express 3.0 lanes. Intel® Hyper Threading...

User Guide
Page 22
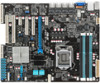
Chapter summary 2 This chapter lists the hardware setup procedures that you proceed 2-3 2.2 Motherboard overview 2-4 2.3 Central Processing Unit (CPU 2-8 2.4 System memory 2-14 2.5 Expansion slots 2-16 2.6 Onboard LEDs 2-23 2.7 Jumpers...2-26 2.8 Connectors 2-29 ASUS P9D-E/4L This chapter contains the following sections: 2.1 Before you have to perform when installing system components. It includes description of the jumpers and connectors on the motherboard.
Chapter summary 2 This chapter lists the hardware setup procedures that you proceed 2-3 2.2 Motherboard overview 2-4 2.3 Central Processing Unit (CPU 2-8 2.4 System memory 2-14 2.5 Expansion slots 2-16 2.6 Onboard LEDs 2-23 2.7 Jumpers...2-26 2.8 Connectors 2-29 ASUS P9D-E/4L This chapter contains the following sections: 2.1 Before you have to perform when installing system components. It includes description of the jumpers and connectors on the motherboard.

User Guide
Page 34
... compatibility, it is notched differently to prevent installation on a DDR2 DIMM socket. The figure illustrates the location of the DDR3 DIMM sockets: 2.4.2 Memory Configurations You may install 2 GB, 4 GB, and 8 GB Unbuffered with the same CAS latency. DIMM Slot Per DIMM Populated Channel per ...DIMM Single Rank, Dual Rank Single Rank, Dual Rank • Always install DIMMs with ECC DDR3 DIMMs into the DIMM sockets using the memory configurations in slots A2 and B2 (Blue). 2-14 Chapter 2: Hardware information DDR3 modules are developed for better performance with four Double Data ...
... compatibility, it is notched differently to prevent installation on a DDR2 DIMM socket. The figure illustrates the location of the DDR3 DIMM sockets: 2.4.2 Memory Configurations You may install 2 GB, 4 GB, and 8 GB Unbuffered with the same CAS latency. DIMM Slot Per DIMM Populated Channel per ...DIMM Single Rank, Dual Rank Single Rank, Dual Rank • Always install DIMMs with ECC DDR3 DIMMs into the DIMM sockets using the memory configurations in slots A2 and B2 (Blue). 2-14 Chapter 2: Hardware information DDR3 modules are developed for better performance with four Double Data ...

User Guide
Page 35
ASUS P9D-E/4L 2-15 Hold the DIMM by pressing the DIMM notch retaining clip outward. 2. Remove the DIMM from a single clip DIMM socket 1. Press the retaining clip outward ... of the DIMM simultaneously until the retaining 3 clip snaps back into a socket in any further to the user guide for qualified vendor lists of the memory modules. Apply force to both of the DIMM. Locked Retaining Clip Always insert the DIMM into the socket. The DIMM might get damaged when it...
ASUS P9D-E/4L 2-15 Hold the DIMM by pressing the DIMM notch retaining clip outward. 2. Remove the DIMM from a single clip DIMM socket 1. Press the retaining clip outward ... of the DIMM simultaneously until the retaining 3 clip snaps back into a socket in any further to the user guide for qualified vendor lists of the memory modules. Apply force to both of the DIMM. Locked Retaining Clip Always insert the DIMM into the socket. The DIMM might get damaged when it...
User Guide
Page 46
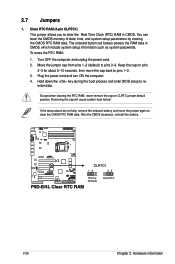
... pins 1-2. 3. enter data. Move the jumper cap from pins 1-2 (default) to re- Removing the cap will cause system boot failure! You can clear the CMOS memory of date, time, and system setup parameters by erasing the CMOS RTC RAM data. Hold down the key during the boot process and enter BIOS...
... pins 1-2. 3. enter data. Move the jumper cap from pins 1-2 (default) to re- Removing the cap will cause system boot failure! You can clear the CMOS memory of date, time, and system setup parameters by erasing the CMOS RTC RAM data. Hold down the key during the boot process and enter BIOS...

User Guide
Page 82
... [IDE]. Aptio Setup Utility - VT-d Enable NB Card BDAT ACPI Table Support VGA Priority [Enabled] [Disabled] [Disabled] [Offboard] Memory Configuration VT-d [Enabled] This allows you enable or disable the VT-d function on MCH. Compatible Mode [Disabled] This item only appears ... NB CRID [Disabled] This allows you enable or disable the support for the BDAT ACPI table. Configuration options: [Onboard] [Offboard] ASUS P9D-E/4L 4-17 Advanced System Agent Bridge Name System Agent RC Version VT-d Capability Haswell 1.0.0.0 Supported Check to enable or disable the Compatible mode....
... [IDE]. Aptio Setup Utility - VT-d Enable NB Card BDAT ACPI Table Support VGA Priority [Enabled] [Disabled] [Disabled] [Offboard] Memory Configuration VT-d [Enabled] This allows you enable or disable the VT-d function on MCH. Compatible Mode [Disabled] This item only appears ... NB CRID [Disabled] This allows you enable or disable the support for the BDAT ACPI table. Configuration options: [Onboard] [Offboard] ASUS P9D-E/4L 4-17 Advanced System Agent Bridge Name System Agent RC Version VT-d Capability Haswell 1.0.0.0 Supported Check to enable or disable the Compatible mode....

User Guide
Page 83
...Configuration options: [Enabled] [Disabled] GDXC Support [Disabled] This allows you to enable or disable the Memory Scrambler support. Advanced Memory Information Memory RC Version Memory Frequency Usage Memory DIMM_A1 DIMM_A2 DIMM_A3 DIMM_A4 CAS Latency (tCL) Minimum delay time CAS to RAS (tRCDmin) Row Precharge... (tRPmin) Active to enable or disable the GDXC feature. Configuration options: [Enabled] [Disabled] Memory Scrambler [Enabled] This allows you to Precharge (tRASmin) 1.0.0.0 1067 MHz 1024 MB (DDR3) Not Present 1024 MB (DDR3) Not Present ...
...Configuration options: [Enabled] [Disabled] GDXC Support [Disabled] This allows you to enable or disable the Memory Scrambler support. Advanced Memory Information Memory RC Version Memory Frequency Usage Memory DIMM_A1 DIMM_A2 DIMM_A3 DIMM_A4 CAS Latency (tCL) Minimum delay time CAS to RAS (tRCDmin) Row Precharge... (tRPmin) Active to enable or disable the GDXC feature. Configuration options: [Enabled] [Disabled] Memory Scrambler [Enabled] This allows you to Precharge (tRASmin) 1.0.0.0 1067 MHz 1024 MB (DDR3) Not Present 1024 MB (DDR3) Not Present ...

User Guide
Page 95
Copyright (C) 2013 American Megatrends, Inc. Advanced Intel CPU RC Version Memory RC Version Intel SA RC Version Intel PCH RC Version 1.0.0.0 1.0.0.0 1.0.0.0 1.0.0.0 4-30 Chapter 4: BIOS setup Copyright (C) 2013 American Megatrends, Inc. Configuration options: [Disable] [Enable] 4.4.18 Intel ...
Copyright (C) 2013 American Megatrends, Inc. Advanced Intel CPU RC Version Memory RC Version Intel SA RC Version Intel PCH RC Version 1.0.0.0 1.0.0.0 1.0.0.0 1.0.0.0 4-30 Chapter 4: BIOS setup Copyright (C) 2013 American Megatrends, Inc. Configuration options: [Disable] [Enable] 4.4.18 Intel ...