P8Z77-V PREMIUM User's Manual
Page 16
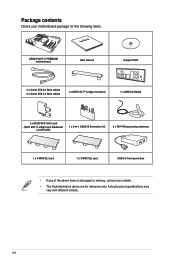
... may vary with different models. xvi Package contents Check your retailer. • The illustrated items above are for the following items. User Manual ASUS P8Z77-V PREMIUM motherboard User manual Support DVD 4 x Serial ATA 6.0 Gb/s cables 2 x Serial ATA 3.0 Gb/s cables 1 x ASUS SLI™ bridge connector 1 x ASUS Q-Shield 1 x ASUS Wi-Fi GO! card (Wi-Fi 802.11 a/b/g/n and Bluetooth v4.0/3.0+HS) 1 x 2-in...
... may vary with different models. xvi Package contents Check your retailer. • The illustrated items above are for the following items. User Manual ASUS P8Z77-V PREMIUM motherboard User manual Support DVD 4 x Serial ATA 6.0 Gb/s cables 2 x Serial ATA 3.0 Gb/s cables 1 x ASUS SLI™ bridge connector 1 x ASUS Q-Shield 1 x ASUS Wi-Fi GO! card (Wi-Fi 802.11 a/b/g/n and Bluetooth v4.0/3.0+HS) 1 x 2-in...
P8Z77-V PREMIUM User's Manual
Page 20
... (TurboV Processing Unit) offers precise voltage control and advanced monitoring mechanisms through the Auto Tuning and TurboV functions. Auto Tuning provides a user-friendly solution to automatically optimize the system for fast, yet stable clock speeds, while TurboV enables unlimited freedom to a more efficient computing...and ratios for selected applications, even when the system is in the TPU to manually adjust the voltage levels, offering easier power control and better power-saving solutions via the ASUS AI Suite II utility. This means less time waiting for your web applications in...
... (TurboV Processing Unit) offers precise voltage control and advanced monitoring mechanisms through the Auto Tuning and TurboV functions. Auto Tuning provides a user-friendly solution to automatically optimize the system for fast, yet stable clock speeds, while TurboV enables unlimited freedom to a more efficient computing...and ratios for selected applications, even when the system is in the TPU to manually adjust the voltage levels, offering easier power control and better power-saving solutions via the ASUS AI Suite II utility. This means less time waiting for your web applications in...
P8Z77-V PREMIUM User's Manual
Page 45
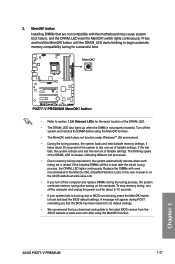
...restored to its default settings. • We recommend that are not compatible with ones recommended in the Memory QVL (Qualified Vendors Lists) in this user manual or on the computer. switch does not function under Windows™ OS environment. • During the tuning process, the system loads and tests failsafe... starts blinking to test one set of the DRAM_LED. • The DRAM_LED also lights up due to the latest BIOS version from the ASUS website at www.asus.com. • If you download and update to BIOS overclocking, press the MemOK! ASUS P8Z77-V PREMIUM 1-27 Chapter 1
...restored to its default settings. • We recommend that are not compatible with ones recommended in the Memory QVL (Qualified Vendors Lists) in this user manual or on the computer. switch does not function under Windows™ OS environment. • During the tuning process, the system loads and tests failsafe... starts blinking to test one set of the DRAM_LED. • The DRAM_LED also lights up due to the latest BIOS version from the ASUS website at www.asus.com. • If you download and update to BIOS overclocking, press the MemOK! ASUS P8Z77-V PREMIUM 1-27 Chapter 1
P8Z77-V PREMIUM User's Manual
Page 87
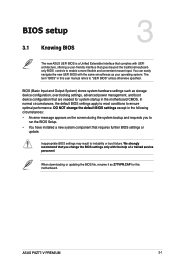
... "BIOS" in this motherboard. DO NOT change the default BIOS settings except in the motherboard CMOS. Chapter 3 ASUS P8Z77-V PREMIUM 3-1 Inappropriate BIOS settings may result to ensure optimal performance. In normal circumstances, the default BIOS settings apply to most... overclocking settings, advanced power management, and boot device configuration that are needed for this user manual refers to enable a more flexible and convenient mouse input. BIOS setup 3.1 Knowing BIOS 3 The new ASUS UEFI BIOS is a Unified Extensible Interface that complies with the help of a trained ...
... "BIOS" in this motherboard. DO NOT change the default BIOS settings except in the motherboard CMOS. Chapter 3 ASUS P8Z77-V PREMIUM 3-1 Inappropriate BIOS settings may result to ensure optimal performance. In normal circumstances, the default BIOS settings apply to most... overclocking settings, advanced power management, and boot device configuration that are needed for this user manual refers to enable a more flexible and convenient mouse input. BIOS setup 3.1 Knowing BIOS 3 The new ASUS UEFI BIOS is a Unified Extensible Interface that complies with the help of a trained ...
P8Z77-V PREMIUM User's Manual
Page 95
...you to select the CPU overclocking options to achieve the desired CPU internal frequency. Use the and keys to 300.0MHz. Chapter 3 ASUS P8Z77-V PREMIUM 3-9 ASUS MultiCore Enhancement [Enabled] [Enabled] Default set to [Enabled] for every core-activation condition [Disabled] Allows you to set the ...appears: Ratio Synchronizing Control [Enabled] [Enabled] Allows you to set an individual Turbo Ratio for maximum performance under XMP/Manual/ User-defined memory frequency mode. [Disabled] Allows you to set the Ai Overclocking Tuner item to [X.M.P.] and allows you ...
...you to select the CPU overclocking options to achieve the desired CPU internal frequency. Use the and keys to 300.0MHz. Chapter 3 ASUS P8Z77-V PREMIUM 3-9 ASUS MultiCore Enhancement [Enabled] [Enabled] Default set to [Enabled] for every core-activation condition [Disabled] Allows you to set the ...appears: Ratio Synchronizing Control [Enabled] [Enabled] Allows you to set an individual Turbo Ratio for maximum performance under XMP/Manual/ User-defined memory frequency mode. [Disabled] Allows you to set the Ai Overclocking Tuner item to [X.M.P.] and allows you ...
P8Z77-V PREMIUM User's Manual
Page 134
Restart your motherboard user manual for details. • Ensure to connect all SATA hard disk drives after updating BIOS. • Ensure to load the BIOS default settings to ensure system ...
Restart your motherboard user manual for details. • Ensure to connect all SATA hard disk drives after updating BIOS. • Ensure to load the BIOS default settings to ensure system ...
P8Z77-V PREMIUM User's Manual
Page 135
... menu if Autorun is NOT enabled in your computer, browse the contents of supplementary user manuals. The Drivers menu shows the available device drivers if the system detects installed devices. The Manual menu contains the list of the support DVD to your computer. Click each menu ... disk. Click an icon to display DVD/ motherboard information Click an item to change at www.asus.com for reference only. ASUS P8Z77-V PREMIUM 4-1 Double-click the ASSETUP.EXE to display the ASUS contact information. Click an item to open the folder of the support DVD are subject to install...
... menu if Autorun is NOT enabled in your computer, browse the contents of supplementary user manuals. The Drivers menu shows the available device drivers if the system detects installed devices. The Manual menu contains the list of the support DVD to your computer. Click each menu ... disk. Click an icon to display DVD/ motherboard information Click an item to change at www.asus.com for reference only. ASUS P8Z77-V PREMIUM 4-1 Double-click the ASSETUP.EXE to display the ASUS contact information. Click an item to open the folder of the support DVD are subject to install...
P8Z77-V PREMIUM User's Manual
Page 137
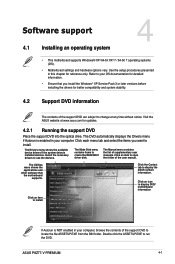
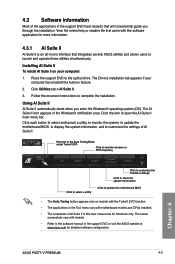
... installed. • The screeshots of AI Suite II in this user manual are for more information. 4.3.1 AI Suite II AI Suite II is an all-in-one interface that integrates several ASUS utilities and allows users to update the motherboard BIOS • The Auto Tuning button appears...to customize the settings of AI Suite II. Using AI Suite II AI Suite II automatically starts when you through the installation. Chapter 4 ASUS P8Z77-V PREMIUM 4-3 The Drivers installation tab appears if your computer: 1. 4.3 Software information Most of the applications in the support DVD have wizards that...
... installed. • The screeshots of AI Suite II in this user manual are for more information. 4.3.1 AI Suite II AI Suite II is an all-in-one interface that integrates several ASUS utilities and allows users to update the motherboard BIOS • The Auto Tuning button appears...to customize the settings of AI Suite II. Using AI Suite II AI Suite II automatically starts when you through the installation. Chapter 4 ASUS P8Z77-V PREMIUM 4-3 The Drivers installation tab appears if your computer: 1. 4.3 Software information Most of the applications in the support DVD have wizards that...
P8Z77-V PREMIUM User's Manual
Page 140
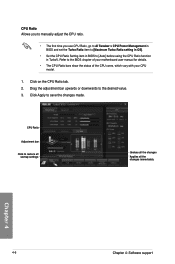
... Undoes all the changes Applies all the changes immediately Chapter 4 4-6 Chapter 4: Software support CPU Ratio Adjustment bar Click to the BIOS chapter of your motherboard user manual for details. • The CPU Ratio bars show the status of the CPU cores, which vary with your CPU model. 1. Click on the CPU Ratio... tab. 2. CPU Ratio Allows you to manually adjust the CPU ratio. • The first time you use CPU Ratio, go to AI Tweaker > CPU Power Management in BIOS and set the Turbo...
... Undoes all the changes Applies all the changes immediately Chapter 4 4-6 Chapter 4: Software support CPU Ratio Adjustment bar Click to the BIOS chapter of your motherboard user manual for details. • The CPU Ratio bars show the status of the CPU cores, which vary with your CPU model. 1. Click on the CPU Ratio... tab. 2. CPU Ratio Allows you to manually adjust the CPU ratio. • The first time you use CPU Ratio, go to AI Tweaker > CPU Power Management in BIOS and set the Turbo...
P8Z77-V PREMIUM User's Manual
Page 167
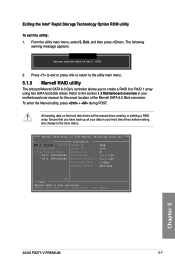
...: Return Chapter 5 ASUS P8Z77-V PREMIUM 5-7 Press to exit or press to return to the utility main menu. 5.1.5 Marvell RAID utility The onboard Marvell SATA 6.0 Gb/s controller allows you have back up all your data in your hard disk drives before making any change to the section 1.2 Motherboard overview in your motherboard user manual for the...
...: Return Chapter 5 ASUS P8Z77-V PREMIUM 5-7 Press to exit or press to return to the utility main menu. 5.1.5 Marvell RAID utility The onboard Marvell SATA 6.0 Gb/s controller allows you have back up all your data in your hard disk drives before making any change to the section 1.2 Motherboard overview in your motherboard user manual for the...
P8Z77-V PREMIUM User's Manual
Page 176
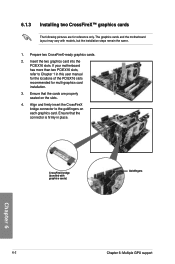
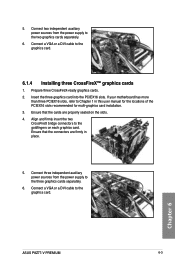
... and firmly insert the CrossFireX bridge connector to Chapter 1 in place. Prepare two CrossFireX-ready graphics cards. 2. Ensure that the connector is firmly in this user manual for the locations of the PCIEX16 slots recommended for reference only. If your motherboard has more than two PCIEX16 slots, refer to the goldfingers on...
... and firmly insert the CrossFireX bridge connector to Chapter 1 in place. Prepare two CrossFireX-ready graphics cards. 2. Ensure that the connector is firmly in this user manual for the locations of the PCIEX16 slots recommended for reference only. If your motherboard has more than two PCIEX16 slots, refer to the goldfingers on...
P8Z77-V PREMIUM User's Manual
Page 177
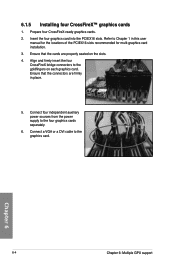
...graphics cards. 2. Ensure that the connectors are properly seated on each graphics card. Ensure that the cards are firmly in this user manual for the locations of the PCIEX16 slots recommended for multi-graphics card installation. 3. Connect a VGA or a DVI cable to ...graphics cards separately. 6. If your motherboard has more than three PCIEX16 slots, refer to the two graphics cards separately. 6. Chapter 6 ASUS P8Z77-V PREMIUM 6-3 Insert the three graphics card into the PCIEX16 slots. 5. Connect two independent auxiliary power sources from the power supply to the ...
...graphics cards. 2. Ensure that the connectors are properly seated on each graphics card. Ensure that the cards are firmly in this user manual for the locations of the PCIEX16 slots recommended for multi-graphics card installation. 3. Connect a VGA or a DVI cable to ...graphics cards separately. 6. If your motherboard has more than three PCIEX16 slots, refer to the two graphics cards separately. 6. Chapter 6 ASUS P8Z77-V PREMIUM 6-3 Insert the three graphics card into the PCIEX16 slots. 5. Connect two independent auxiliary power sources from the power supply to the ...
P8Z77-V PREMIUM User's Manual
Page 178
... goldfingers on the slots. 4. Align and firmly insert the four CrossFireX bridge connectors to Chapter 1 in place. 5. Ensure that the cards are firmly in this user manual for the locations of the PCIEX16 slots recommended for multi-graphics card installation. 3.
... goldfingers on the slots. 4. Align and firmly insert the four CrossFireX bridge connectors to Chapter 1 in place. 5. Ensure that the cards are firmly in this user manual for the locations of the PCIEX16 slots recommended for multi-graphics card installation. 3.
P8Z77-V PREMIUM User's Manual
Page 181
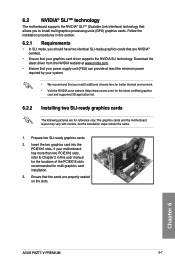
If your system. • We recommend that allows you to Chapter 2 in this user manual for the locations of the PCIEX16 slots recommended for reference only. Follow the installation procedures in this section. 6.2.1 Requirements • In...graphics card installation. 3. Insert the two graphics card into the PCIEX16 slots. Ensure that your graphics card driver supports the NVIDIA SLI technology. Chapter 6 ASUS P8Z77-V PREMIUM 6-7 The graphics cards and the motherboard layout may vary with models, but the installation steps remain the same. 1. Prepare two SLI-ready graphics cards....
If your system. • We recommend that allows you to Chapter 2 in this user manual for the locations of the PCIEX16 slots recommended for reference only. Follow the installation procedures in this section. 6.2.1 Requirements • In...graphics card installation. 3. Insert the two graphics card into the PCIEX16 slots. Ensure that your graphics card driver supports the NVIDIA SLI technology. Chapter 6 ASUS P8Z77-V PREMIUM 6-7 The graphics cards and the motherboard layout may vary with models, but the installation steps remain the same. 1. Prepare two SLI-ready graphics cards....
P8Z77-V PREMIUM User's Manual
Page 182
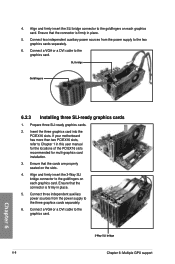
... 6 If your motherboard has more than two PCIEX16 slots, refer to the goldfingers on each graphics card. Ensure that the connector is firmly in this user manual for the locations of the PCIEX16 slots recommended for multi-graphics card installation. 3. Ensure that the connector is firmly in place. 5. Align and firmly insert...
... 6 If your motherboard has more than two PCIEX16 slots, refer to the goldfingers on each graphics card. Ensure that the connector is firmly in this user manual for the locations of the PCIEX16 slots recommended for multi-graphics card installation. 3. Ensure that the connector is firmly in place. 5. Align and firmly insert...
P8Z77-V PREMIUM User's Manual
Page 183
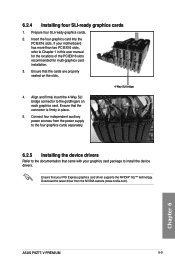
... and firmly insert the 4-Way SLI bridge connector to the documentation that the connector is firmly in this user manual for the locations of the PCIEX16 slots recommended for multi-graphics card installation. 3. Chapter 6 ASUS P8Z77-V PREMIUM 6-9 Download the latest driver from the power supply to the four graphics cards separately. 6.2.5 Installing the device drivers...
... and firmly insert the 4-Way SLI bridge connector to the documentation that the connector is firmly in this user manual for the locations of the PCIEX16 slots recommended for multi-graphics card installation. 3. Chapter 6 ASUS P8Z77-V PREMIUM 6-9 Download the latest driver from the power supply to the four graphics cards separately. 6.2.5 Installing the device drivers...

