User Manual
Page 5
...ASUS FAN Xpert 4-13 4.3.7 ASUS Probe II 4-14 4.3.8 Ai Charger 4-15 4.3.9 Audio configurations 4-16 4.4 RAID configurations 4-17 4.4.1 RAID definitions 4-17 4.4.2 Installing Serial ATA hard disks 4-18 4.4.3 Setting the RAID item in BIOS 4-18 4.4.4 Intel® Rapid Storage Technology Option ROM utility 4-18 4.5 Creating a RAID driver disk 4-24 4.5.1 Creating a RAID driver... 5-1 5.1.3 Installing two CrossFireX™ graphics cards 5-2 5.1.4 Installing the device drivers 5-3 5.1.5 Enabling the ATI® CrossFireX™ technology 5-3 5.2 NVIDIA® SLI™ technology...
...ASUS FAN Xpert 4-13 4.3.7 ASUS Probe II 4-14 4.3.8 Ai Charger 4-15 4.3.9 Audio configurations 4-16 4.4 RAID configurations 4-17 4.4.1 RAID definitions 4-17 4.4.2 Installing Serial ATA hard disks 4-18 4.4.3 Setting the RAID item in BIOS 4-18 4.4.4 Intel® Rapid Storage Technology Option ROM utility 4-18 4.5 Creating a RAID driver disk 4-24 4.5.1 Creating a RAID driver... 5-1 5.1.3 Installing two CrossFireX™ graphics cards 5-2 5.1.4 Installing the device drivers 5-3 5.1.5 Enabling the ATI® CrossFireX™ technology 5-3 5.2 NVIDIA® SLI™ technology...

User Manual
Page 12
... PnP, DMI 2.0, WfM 2.0, SM BIOS 2.5, ACPI 2.0a, Multi-language BIOS, ASUS EZ Flash 2, ASUS CrashFree BIOS 3, F12 PrintScreen Function WfM 2.0, DMI 2.0, WOL by PME, WOR by PME, PXE Drivers ASUS Utilities ASUS Update Anti-virus software (OEM version) ATX form factor: 12 in . (30...-step CPU & PLL voltage control SFS (Stepless Frequency Selection) - vDRAM Bus: 160-step memory voltage control - P8Z68-V/GEN3 specifications summary ASUS exclusive overclocking features Back panel I/O ports Internal I/O connectors BIOS features Manageability Support DVD contents Form factor Precision Tweaker 2 -
... PnP, DMI 2.0, WfM 2.0, SM BIOS 2.5, ACPI 2.0a, Multi-language BIOS, ASUS EZ Flash 2, ASUS CrashFree BIOS 3, F12 PrintScreen Function WfM 2.0, DMI 2.0, WOL by PME, WOR by PME, PXE Drivers ASUS Utilities ASUS Update Anti-virus software (OEM version) ATX form factor: 12 in . (30...-step CPU & PLL voltage control SFS (Stepless Frequency Selection) - vDRAM Bus: 160-step memory voltage control - P8Z68-V/GEN3 specifications summary ASUS exclusive overclocking features Back panel I/O ports Internal I/O connectors BIOS features Manageability Support DVD contents Form factor Precision Tweaker 2 -
User Manual
Page 60
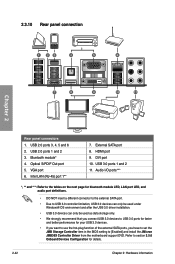
... you want to use the hot-plug function of the external SATA ports, you connect USB 3.0 devices to [Enabled] and install the JMicron JMB36X Controller Driver from the motherboard support DVD. HDMI port 9. Optical S/PDIF Out port 5. USB 3.0 ports 1 and 2 11. Intel LAN (RJ-45) port 1** 7. Audio I/O ports*** ... • Due to USB 3.0 controller limitation, USB 3.0 devices can only be used under Windows® OS environment and after the USB 3.0 driver installation. • USB 3.0 devices can only be used as data storage only. • We strongly recommend that you have to set the JMB...
... you want to use the hot-plug function of the external SATA ports, you connect USB 3.0 devices to [Enabled] and install the JMicron JMB36X Controller Driver from the motherboard support DVD. HDMI port 9. Optical S/PDIF Out port 5. USB 3.0 ports 1 and 2 11. Intel LAN (RJ-45) port 1** 7. Audio I/O ports*** ... • Due to USB 3.0 controller limitation, USB 3.0 devices can only be used under Windows® OS environment and after the USB 3.0 driver installation. • USB 3.0 devices can only be used as data storage only. • We strongly recommend that you have to set the JMB...
User Manual
Page 61
...the system to adjust the monitor resolution from the Windows® Display Settings menu. • Due to the Intel® driver issue, some resolution options that your monitor does not support. CPU: Intel Pentium 2.8GHz DIMM: DDR3-1066 2GB Playback software...You can connect two monitors to any two of higher speed and bandwidth with the higher-version DVD player and drivers will automatically select the the add-on monitor overscan/underscan problem • Playback of Blu-Ray Discs The speed... original setting or restart the system and press F8 to enter Safe Mode. ASUS P8Z68-V/GEN3 2-43
...the system to adjust the monitor resolution from the Windows® Display Settings menu. • Due to the Intel® driver issue, some resolution options that your monitor does not support. CPU: Intel Pentium 2.8GHz DIMM: DDR3-1066 2GB Playback software...You can connect two monitors to any two of higher speed and bandwidth with the higher-version DVD player and drivers will automatically select the the add-on monitor overscan/underscan problem • Playback of Blu-Ray Discs The speed... original setting or restart the system and press F8 to enter Safe Mode. ASUS P8Z68-V/GEN3 2-43

User Manual
Page 62
Click Display > General Settings and select a Resolution. Move the Horizontal Scaling and Vertical Scaling sliders and then click Apply. 2-44 Chapter 2: Hardware information Chapter 2 **Troubleshooting on monitor overscan / underscan problem 1. Install Intel Graphics Accelerator Driver from the motherboard support DVD. 2. Click Apply. 4. Or you can click Display > General Settings > Scaling > Customize Aspect Ratio. From the Windows® notification area, double-click the Intel(R) Graphics Media Accelerator Driver icon and click Graphics Properties. 3.
Click Display > General Settings and select a Resolution. Move the Horizontal Scaling and Vertical Scaling sliders and then click Apply. 2-44 Chapter 2: Hardware information Chapter 2 **Troubleshooting on monitor overscan / underscan problem 1. Install Intel Graphics Accelerator Driver from the motherboard support DVD. 2. Click Apply. 4. Or you can click Display > General Settings > Scaling > Customize Aspect Ratio. From the Windows® notification area, double-click the Intel(R) Graphics Media Accelerator Driver icon and click Graphics Properties. 3.
User Manual
Page 84
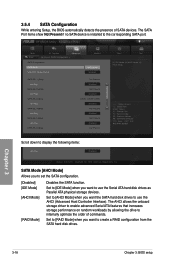
... SATA 6G_1 (Gray) Not Present Hot Plug Disabled SATA 6G_2 (Gray) Not Present Hot Plug Disabled SATA 3G_3 (Blue) ASUS CB-521 ATAPI Hot Plug Disabled SATA 3G_4 (Blue) Not Present Hot Plug Disabled SATA 3G_5 (Blue) Not Present Hot ...AHCI Mode S.M.A.R.T. 3.5.4 SATA Configuration While entering Setup, the BIOS automatically detects the presence of commands. The AHCI allows the onboard storage driver to enable advanced Serial ATA features that increases storage performance on random workloads by allowing the drive to set the SATA configuration. [...
... SATA 6G_1 (Gray) Not Present Hot Plug Disabled SATA 6G_2 (Gray) Not Present Hot Plug Disabled SATA 3G_3 (Blue) ASUS CB-521 ATAPI Hot Plug Disabled SATA 3G_4 (Blue) Not Present Hot Plug Disabled SATA 3G_5 (Blue) Not Present Hot ...AHCI Mode S.M.A.R.T. 3.5.4 SATA Configuration While entering Setup, the BIOS automatically detects the presence of commands. The AHCI allows the onboard storage driver to enable advanced Serial ATA features that increases storage performance on random workloads by allowing the drive to set the SATA configuration. [...
User Manual
Page 88
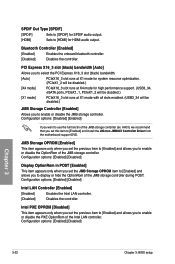
... you set this item to enable or disable the JMB storage controller. AHCI), we recommend that you to [Enabled] and install the JMicron JMB36X Controller Driver from the motherboard support DVD. Configuration options: [Enabled] [Disabled] Intel LAN Controller [Enabled] [Enabled] Enables the Intel LAN controller. [Disabled] Disables the controller. JMB Storage...
... you set this item to enable or disable the JMB storage controller. AHCI), we recommend that you to [Enabled] and install the JMicron JMB36X Controller Driver from the motherboard support DVD. Configuration options: [Enabled] [Disabled] Intel LAN Controller [Enabled] [Enabled] Enables the Intel LAN controller. [Disabled] Disables the controller. JMB Storage...
User Manual
Page 107
... install the Windows® XP Service Pack 3 or later versions before installing the drivers for reference only. Visit the ASUS website at any time without notice. Click the Contact tab to run the DVD. Click an icon to install. ASUS P8Z68-V/GEN3 4-1 Always install the latest OS version and corresponding updates to maximize the features...
... install the Windows® XP Service Pack 3 or later versions before installing the drivers for reference only. Visit the ASUS website at any time without notice. Click the Contact tab to run the DVD. Click an icon to install. ASUS P8Z68-V/GEN3 4-1 Always install the latest OS version and corresponding updates to maximize the features...

User Manual
Page 109
Using AI Suite II AI Suite II automatically starts when you through the installation. Click the icon to complete installation. ASUS P8Z68-V/GEN3 4-3 Installing AI Suite II To install AI Suite II on models with the TurboV EVO function. • The applications in the Tool ...Software information Most of the applications in the support DVD have wizards that will conveniently guide you enter the Windows® operating system (OS). The Drivers installation tab appears if your computer 1. Follow the onscreen instructions to open the AI Suite II main menu bar. Click each button to select and...
Using AI Suite II AI Suite II automatically starts when you through the installation. Click the icon to complete installation. ASUS P8Z68-V/GEN3 4-3 Installing AI Suite II To install AI Suite II on models with the TurboV EVO function. • The applications in the Tool ...Software information Most of the applications in the support DVD have wizards that will conveniently guide you enter the Windows® operating system (OS). The Drivers installation tab appears if your computer 1. Follow the onscreen instructions to open the AI Suite II main menu bar. Click each button to select and...

User Manual
Page 122
...support, and interrupt capability. Follow the installation wizard to the software manual in the support DVD or visit the ASUS website at www.asus.com for Windows XP Configuration options Control settings window Information button Exit button Minimize button Chapter 4 Information button Refer... to install the Realtek® Audio Driver from the support DVD that came with the motherboard package. Realtek HD Audio Manager ...
...support, and interrupt capability. Follow the installation wizard to the software manual in the support DVD or visit the ASUS website at www.asus.com for Windows XP Configuration options Control settings window Information button Exit button Minimize button Chapter 4 Information button Refer... to install the Realtek® Audio Driver from the support DVD that came with the motherboard package. Realtek HD Audio Manager ...
User Manual
Page 123
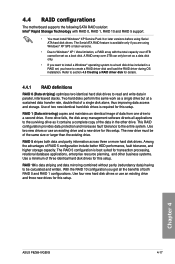
...identical hard disk drives to be calculated and written. RAID 10 is best suited for this setup. Refer to section 4.5 Creating a RAID driver disk for this setup. Two hard disks perform the same work as a boot disk. RAID 1 (Data mirroring) copies and maintains an ... RAID 1, RAID 10 and RAID 5 support. • You must be set , you have to create a RAID driver disk and load the RAID driver during OS installation. Chapter 4 ASUS P8Z68-V/GEN3 4-17 If one drive to the entire system. This RAID configuration provides data protection and increases fault tolerance to a second...
...identical hard disk drives to be calculated and written. RAID 10 is best suited for this setup. Refer to section 4.5 Creating a RAID driver disk for this setup. Two hard disks perform the same work as a boot disk. RAID 1 (Data mirroring) copies and maintains an ... RAID 1, RAID 10 and RAID 5 support. • You must be set , you have to create a RAID driver disk and load the RAID driver during OS installation. Chapter 4 ASUS P8Z68-V/GEN3 4-17 If one drive to the entire system. This RAID configuration provides data protection and increases fault tolerance to a second...

User Manual
Page 128
Place the support DVD to launch Smart Response Technology settings. The Drivers installation tab appears if your storage system. Click Acclerate to the optical drive. Intel® Smart Response Technology Intel® Smart ...• Before applying Intel® Smart Response Technology, set the SATA Mode BIOS item to use Smart Response Technology: 1. Click the Drivers tab, then click Intel Rapid Storage Technology Driver software. 3. d. Refer to accelerate your computer has enabled the Autorun feature. 2. To use to section 3.5.4 SATA Configuration for frequently ...
Place the support DVD to launch Smart Response Technology settings. The Drivers installation tab appears if your storage system. Click Acclerate to the optical drive. Intel® Smart Response Technology Intel® Smart ...• Before applying Intel® Smart Response Technology, set the SATA Mode BIOS item to use Smart Response Technology: 1. Click the Drivers tab, then click Intel Rapid Storage Technology Driver software. 3. d. Refer to accelerate your computer has enabled the Autorun feature. 2. To use to section 3.5.4 SATA Configuration for frequently ...

User Manual
Page 129
....6GB) and one HDD for normal storage. • Be sure to enable Intel® Smart Response Technology. Removing or replacing the SSD - 3. Chapter 4 ASUS P8Z68-V/GEN3 4-23 Updating IRST 10.5 driver - A single SSD can still be assigned to one HDD as a set to disable the acceleration function of Intel® Smart Response Technology under...
....6GB) and one HDD for normal storage. • Be sure to enable Intel® Smart Response Technology. Removing or replacing the SSD - 3. Chapter 4 ASUS P8Z68-V/GEN3 4-23 Updating IRST 10.5 driver - A single SSD can still be assigned to one HDD as a set to disable the acceleration function of Intel® Smart Response Technology under...
User Manual
Page 130
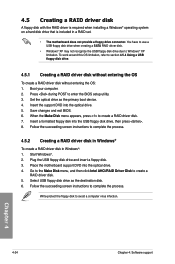
... to Windows® XP limitation. Chapter 4 4-24 Chapter 4: Software support You have to use a USB floppy disk drive when creating a SATA RAID driver disk. • Windows® XP may not recognize the USB floppy disk drive due to avoid a computer virus infection. Insert the support DVD into... disk drive as the primary boot device. 4. To work around this OS limitation, refer to complete the process. Press during POST to create a RAID driver disk. 7. When the Make Disk menu appears, press to enter the BIOS setup utility. 3. Set the optical drive as the destination disk. 6. Insert...
... to Windows® XP limitation. Chapter 4 4-24 Chapter 4: Software support You have to use a USB floppy disk drive when creating a SATA RAID driver disk. • Windows® XP may not recognize the USB floppy disk drive due to avoid a computer virus infection. Insert the support DVD into... disk drive as the primary boot device. 4. To work around this OS limitation, refer to complete the process. Press during POST to create a RAID driver disk. 7. When the Make Disk menu appears, press to enter the BIOS setup utility. 3. Set the optical drive as the destination disk. 6. Insert...
User Manual
Page 131
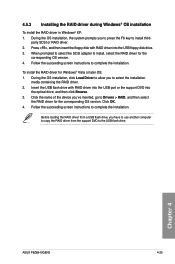
...ASUS P8Z68-V/GEN3 4-25 party SCSI or RAID driver. 2. To install the RAID driver for the corresponding OS version. When prompted to select the SCSI adapter to complete the installation. Follow the succeeding screen instructions to install, select the RAID driver for the corresponding OS version. 4. Before loading the RAID driver...into the USB floppy disk drive. 3. 4.5.3 Installing the RAID driver during Windows® OS installation To install the RAID driver in Windows® XP: 1. During the OS installation, click Load Driver to allow you to press the F6 key to install third...
...ASUS P8Z68-V/GEN3 4-25 party SCSI or RAID driver. 2. To install the RAID driver for the corresponding OS version. When prompted to select the SCSI adapter to complete the installation. Follow the succeeding screen instructions to install, select the RAID driver for the corresponding OS version. 4. Before loading the RAID driver...into the USB floppy disk drive. 3. 4.5.3 Installing the RAID driver during Windows® OS installation To install the RAID driver in Windows® XP: 1. During the OS installation, click Load Driver to allow you to press the F6 key to install third...
User Manual
Page 132
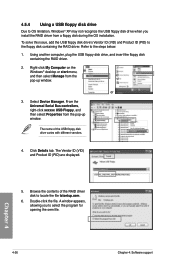
...Click Details tab. Chapter 4 4-26 Chapter 4: Software support Using another computer, plug the USB floppy disk drive, and insert the floppy disk containing the RAID driver. 2. The Vendor ID (VID) and Product ID (PID) are displayed. 5. Double-click the file. To solve this issue, add the USB floppy ...right-click xxxxxx USB Floppy, and then select Properties from the pop-up window. or 3. A window appears, allowing you install the RAID driver from a floppy disk during the OS installation. Right-click My Computer on the Windows® desktop or start menu, and then select Manage ...
...Click Details tab. Chapter 4 4-26 Chapter 4: Software support Using another computer, plug the USB floppy disk drive, and insert the floppy disk containing the RAID driver. 2. The Vendor ID (VID) and Product ID (PID) are displayed. 5. Double-click the file. To solve this issue, add the USB floppy ...right-click xxxxxx USB Floppy, and then select Properties from the pop-up window. or 3. A window appears, allowing you install the RAID driver from a floppy disk during the OS installation. Right-click My Computer on the Windows® desktop or start menu, and then select Manage ...

User Manual
Page 135
ASUS P8Z68-V/GEN3 5-1 Close all existing graphics card drivers before installing ATI CrossFireX graphics cards to your graphics card driver supports the ATI CrossFireX technology. For Windows Vista, select Uninstall. 5. To uninstall existing graphics card drivers: 1. Turn off your current graphics card driver/s. 4. Download the latest driver from the AMD website (www.amd.com). • Ensure that your power...
ASUS P8Z68-V/GEN3 5-1 Close all existing graphics card drivers before installing ATI CrossFireX graphics cards to your graphics card driver supports the ATI CrossFireX technology. For Windows Vista, select Uninstall. 5. To uninstall existing graphics card drivers: 1. Turn off your current graphics card driver/s. 4. Download the latest driver from the AMD website (www.amd.com). • Ensure that your power...
User Manual
Page 137
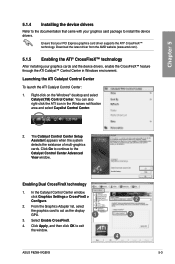
... window. 2 3 4 ASUS P8Z68-V/GEN3 5-3 Click Apply, and then click OK to act as the display GPU. 1 3. Select Enable CrossFireX. 4. You can also right-click the ATI icon in Windows environment. Click Go to continue to install the device drivers. The Catalyst Control Center Setup...and select Cayalist Control Center. 2. In the Catalyst Control Center window, click Graphics Settings > CrossFireX > Configure. 2. Download the latest driver from the AMD website (www.amd.com). 5.1.5 Enabling the ATI® CrossFireX™ technology After installing your graphics card package to...
... window. 2 3 4 ASUS P8Z68-V/GEN3 5-3 Click Apply, and then click OK to act as the display GPU. 1 3. Select Enable CrossFireX. 4. You can also right-click the ATI icon in Windows environment. Click Go to continue to install the device drivers. The Catalyst Control Center Setup...and select Cayalist Control Center. 2. In the Catalyst Control Center window, click Graphics Settings > CrossFireX > Configure. 2. Download the latest driver from the AMD website (www.amd.com). 5.1.5 Enabling the ATI® CrossFireX™ technology After installing your graphics card package to...

User Manual
Page 138
...system. The graphics cards and the motherboard layout may vary with models, but the installation steps remain the same. 1. If your graphics card driver supports the NVIDIA SLI technology. See Chapter 2 for details. • We recommend that your motherboard has more than two PCIEX16 slots, refer...should have two identical SLI-ready graphics cards that are properly seated on the slots. 5-4 Chapter 5: Multiple GPU technology support Download the latest driver from the NVIDIA website (www.nvidia.com). • Ensure that the cards are NVIDIA® certified. • Ensure that you to ...
...system. The graphics cards and the motherboard layout may vary with models, but the installation steps remain the same. 1. If your graphics card driver supports the NVIDIA SLI technology. See Chapter 2 for details. • We recommend that your motherboard has more than two PCIEX16 slots, refer...should have two identical SLI-ready graphics cards that are properly seated on the slots. 5-4 Chapter 5: Multiple GPU technology support Download the latest driver from the NVIDIA website (www.nvidia.com). • Ensure that the cards are NVIDIA® certified. • Ensure that you to ...

User Manual
Page 139
...; technology After installing your graphics cards and the device drivers, enable the SLI feature in place. 5. Launching the NVIDIA Control Panel You can launch the NVIDIA Control Panel by the following two methods. The NVIDIA Control Panel window appears (See Step B5). ASUS P8Z68-V/GEN3 5-5 Connect a VGA or a DVI cable to the two graphics...
...; technology After installing your graphics cards and the device drivers, enable the SLI feature in place. 5. Launching the NVIDIA Control Panel You can launch the NVIDIA Control Panel by the following two methods. The NVIDIA Control Panel window appears (See Step B5). ASUS P8Z68-V/GEN3 5-5 Connect a VGA or a DVI cable to the two graphics...


