
User Manual
Page 38
... OFF the computer and unplug the power cord. 2. For system failure due to enable C.P.R. Shut down the key during the boot process and enter BIOS setup to clear the Real Time Clock (RTC) RAM in CMOS, which include system setup information such as system passwords. After the CMOS clearance, reinstall... clearing the RTC RAM, never remove the cap on pins 2-3 for about 5-10 seconds, then move the jumper again to pins 2-3. You can automatically reset parameter settings to default values. • Due to the chipset behavior, AC power off and on the power supply or unplug and plug the power...
... OFF the computer and unplug the power cord. 2. For system failure due to enable C.P.R. Shut down the key during the boot process and enter BIOS setup to clear the Real Time Clock (RTC) RAM in CMOS, which include system setup information such as system passwords. After the CMOS clearance, reinstall... clearing the RTC RAM, never remove the cap on pins 2-3 for about 5-10 seconds, then move the jumper again to pins 2-3. You can automatically reset parameter settings to default values. • Due to the chipset behavior, AC power off and on the power supply or unplug and plug the power...

User Manual
Page 47
...activity LED (2-pin IDE_LED) This 2-pin connector is for the system power LED. Pressing the power button turns the system on the BIOS settings. ASUS P8Z68-V/GEN3 2-29 The system power LED lights up or flashes when data is read from or written to hear system beeps and warnings. •...-off the system power. Pressing the power switch for more than four seconds while the system is ON turns the system OFF. • Reset button (2-pin RESET) This 2-pin connector is for the system power button. 9. System panel connector (20-8 pin PANEL) This connector supports several chassis-mounted ...
...activity LED (2-pin IDE_LED) This 2-pin connector is for the system power LED. Pressing the power button turns the system on the BIOS settings. ASUS P8Z68-V/GEN3 2-29 The system power LED lights up or flashes when data is read from or written to hear system beeps and warnings. •...-off the system power. Pressing the power switch for more than four seconds while the system is ON turns the system OFF. • Reset button (2-pin RESET) This 2-pin connector is for the system power button. 9. System panel connector (20-8 pin PANEL) This connector supports several chassis-mounted ...
User Manual
Page 67
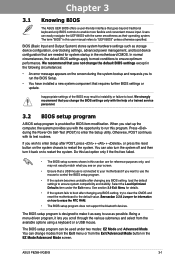
...: EZ Mode and Advanced Mode. The BIOS setup program can change the BIOS settings only with the opportunity to ensure system compatibility and stability. Chapter 3 ASUS P8Z68-V/GEN3 3-1 Inappropriate settings of a trained service personnel. 3.2 BIOS setup program A BIOS setup program is provided for information on ...See section 3.9 Exit Menu for details. • If the system fails to boot after changing any BIOS setting, try to clear the CMOS and reset the motherboard to the default value. �S�e�e��s�e��c�ti�o&#...
...: EZ Mode and Advanced Mode. The BIOS setup program can change the BIOS settings only with the opportunity to ensure system compatibility and stability. Chapter 3 ASUS P8Z68-V/GEN3 3-1 Inappropriate settings of a trained service personnel. 3.2 BIOS setup program A BIOS setup program is provided for information on ...See section 3.9 Exit Menu for details. • If the system fails to boot after changing any BIOS setting, try to clear the CMOS and reset the motherboard to the default value. �S�e�e��s�e��c�ti�o&#...

User Manual
Page 68
...ASUS Optimal mode Selects the boot device priority • The boot device options vary depending on the devices you to select the display language, system performance mode and boot device priority. To access the Advanced Mode, click Exit/Advanced Mode, then select Advanced Mode. EZ Mode Monday [9/13/2010] P8Z68-V/GEN3 BIOS... the BIOS setup program without saving the changes, saves the changes and resets the system, or enters the Advanced Mode EFI BIOS Utility - The EZ Mode provides you an overview of the BIOS setup program Clicks to the system. 3-2 Chapter 3: BIOS setup ...
...ASUS Optimal mode Selects the boot device priority • The boot device options vary depending on the devices you to select the display language, system performance mode and boot device priority. To access the Advanced Mode, click Exit/Advanced Mode, then select Advanced Mode. EZ Mode Monday [9/13/2010] P8Z68-V/GEN3 BIOS... the BIOS setup program without saving the changes, saves the changes and resets the system, or enters the Advanced Mode EFI BIOS Utility - The EZ Mode provides you an overview of the BIOS setup program Clicks to the system. 3-2 Chapter 3: BIOS setup ...

User Manual
Page 96
...;��p�r�o�f�i�le� number that saved your BIOS settings, press , and then select Yes. • DO NOT shut down or reset the system while updating the BIOS to prevent the system boot failure! • We recommend that you to .... Advanced Mode Exit Main Back Ai Tweaker Tool\ ASUS O.C. Load from Profile Monitor Not Installed Not Installed Not Installed Not Installed Not Installed Not Installed Not Installed Not Installed 1 1 Boot Tool Save BIOS settings to the BIOS Flash, and create a profile. Profile This item allows...
...;��p�r�o�f�i�le� number that saved your BIOS settings, press , and then select Yes. • DO NOT shut down or reset the system while updating the BIOS to prevent the system boot failure! • We recommend that you to .... Advanced Mode Exit Main Back Ai Tweaker Tool\ ASUS O.C. Load from Profile Monitor Not Installed Not Installed Not Installed Not Installed Not Installed Not Installed Not Installed Not Installed 1 1 Boot Tool Save BIOS settings to the BIOS Flash, and create a profile. Profile This item allows...

User Manual
Page 97
... Optimized Defaults This option allows you to load the default values for the BIOS items, and save changes and exit. Exit Load Optimized Defaults Save Changes & Reset Discard Changes & Exit ASUS EZ Mode Launch EFI Shell from filesystem device This option allows you to...Shell application (shellx64.efi) from the Exit menu to ensure the values you press , a confirmation window appears. Chapter 3 ASUS P8Z68-V/GEN3 3-31 Save Changes & Reset Once you are finished making your changes. �W�h��e�n�y�o�u� select this option from one...
... Optimized Defaults This option allows you to load the default values for the BIOS items, and save changes and exit. Exit Load Optimized Defaults Save Changes & Reset Discard Changes & Exit ASUS EZ Mode Launch EFI Shell from filesystem device This option allows you to...Shell application (shellx64.efi) from the Exit menu to ensure the values you press , a confirmation window appears. Chapter 3 ASUS P8Z68-V/GEN3 3-31 Save Changes & Reset Once you are finished making your changes. �W�h��e�n�y�o�u� select this option from one...

User Manual
Page 102
... and save it fails or gets corrupted during the updating process. When found, the utility reads the BIOS file and enters ASUS EZ Flash 2 utility automatically. 4. DO NOT shut down or reset the system while updating the BIOS to load default BIOS values. The BIOS file in the motherboard support DVD may be older than the...
... and save it fails or gets corrupted during the updating process. When found, the utility reads the BIOS file and enters ASUS EZ Flash 2 utility automatically. 4. DO NOT shut down or reset the system while updating the BIOS to load default BIOS values. The BIOS file in the motherboard support DVD may be older than the...

User Manual
Page 105
... BIOS file and press . ASUS P8Z68-V/GEN3 3-39 Updating the BIOS file To update the BIOS file using BIOS Updater 1. At the FreeDOS prompt, type bupdater /pc /g and press . Press to switch between screen fields and use the keys to exit BIOS Updater. See Chaper 3 of your computer. DO NOT shut down or reset the system while updating the BIOS...
... BIOS file and press . ASUS P8Z68-V/GEN3 3-39 Updating the BIOS file To update the BIOS file using BIOS Updater 1. At the FreeDOS prompt, type bupdater /pc /g and press . Press to switch between screen fields and use the keys to exit BIOS Updater. See Chaper 3 of your computer. DO NOT shut down or reset the system while updating the BIOS...
User Manual
Page 124
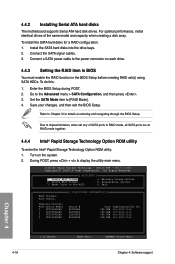
Enter the BIOS Setup during POST. 2. All Rights Reserved. [ MAIN MENU ] 1. ...the power connector on each drive. 4.4.3 Setting the RAID item in BIOS You must enable the RAID function in the BIOS Setup before creating RAID set any of the same model and capacity ...drive bays. 2. Connect the SATA signal cables. 3. Save your changes, and then exit the BIOS Setup. Due to RAID mode, all SATA ports run at RAID mode together. 4.4.4 Intel®...entering and navigating through the BIOS Setup. Intel(R) Rapid Storage Technology - v10.5.1.1070 Copyright(C) 2003-10 Intel Corporation. Create RAID...
Enter the BIOS Setup during POST. 2. All Rights Reserved. [ MAIN MENU ] 1. ...the power connector on each drive. 4.4.3 Setting the RAID item in BIOS You must enable the RAID function in the BIOS Setup before creating RAID set any of the same model and capacity ...drive bays. 2. Connect the SATA signal cables. 3. Save your changes, and then exit the BIOS Setup. Due to RAID mode, all SATA ports run at RAID mode together. 4.4.4 Intel®...entering and navigating through the BIOS Setup. Intel(R) Rapid Storage Technology - v10.5.1.1070 Copyright(C) 2003-10 Intel Corporation. Create RAID...


